
JPEG is one of the most common digital file formats for web use. However, other formats have been developed, offering better features that work well online, one of which is WebP. While Adobe took a while to add the WebP format to the program, you can now (Photoshop 23.2 and newer versions) convert JPG to WebP in Photoshop.
There are many differences between these two file types, and you can choose either format to use on your website or for other online graphics. However, it’s worth noting the differences before deciding which format you will use.
I will first explain the simple way to save an image as a WebP file using Photoshop before getting into the finer details of these two digital file types.
How To Save An Image As WebP In Photoshop
Follow these three simple steps to take a JPG (or any other image format compatible with Photoshop) and save it as a WebP file.
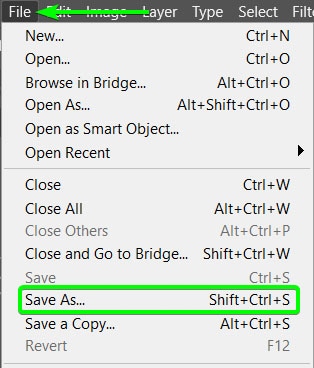
Step 1: Go To File > Save As
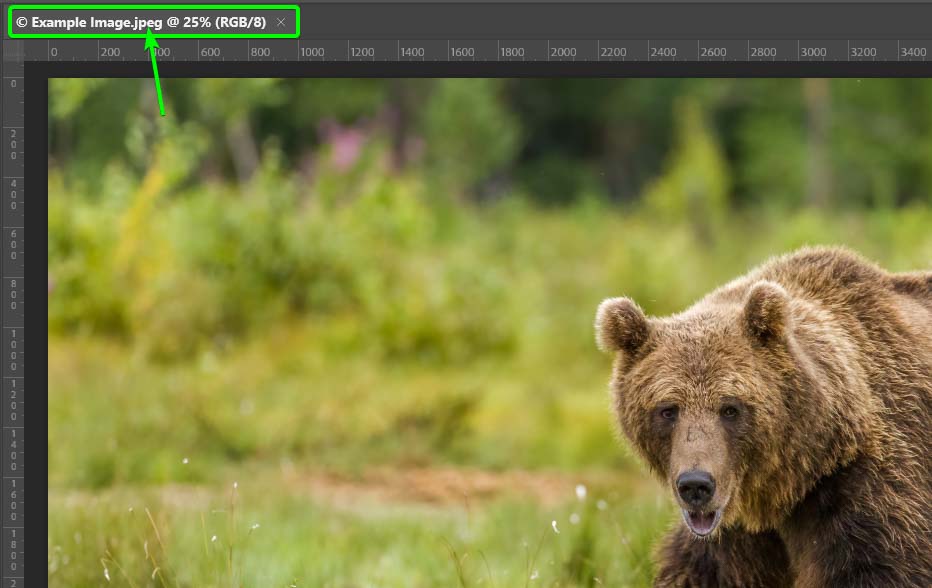
Once your file is open in Photoshop, you can quickly check the file format by looking at the file extension in the document tab. Look at the tab above your image to see the file extension. The image in my example is a JPEG.
Once you have added your edits to the image and are ready to save the file to upload to the web, go to File > Save As. You can also use the shortcut Shift + Control + S (Win) or Shift + Command + S (Mac).
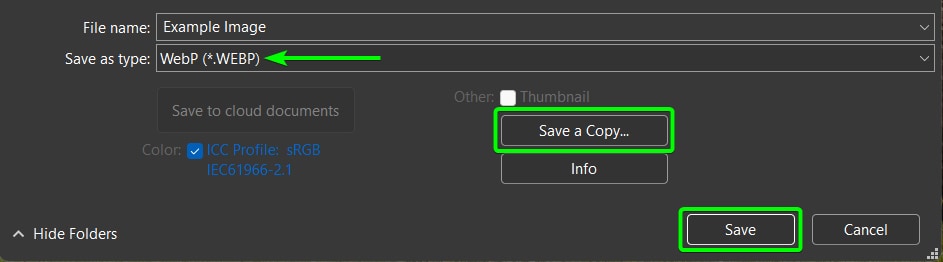
Step 2: Choose The WebP Format Option And Click Save
At the bottom of the Save As window, open the Save as Type drop-down menu and locate the WebP (*.WEBP) format.

Once you have selected the format, click on Save, or if you want to save a copy of your work, so you don’t affect your current document, click Save a Copy.
Step 3: Select The Appropriate Settings And Click OK
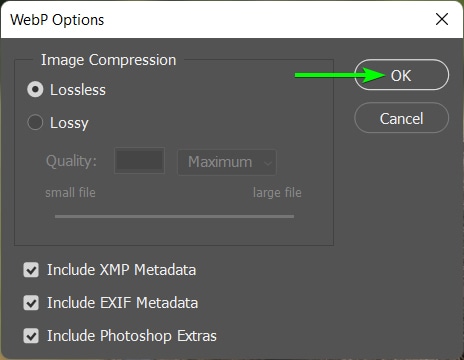
Once you click on Save, a new dialog box opens with the WebP format settings.
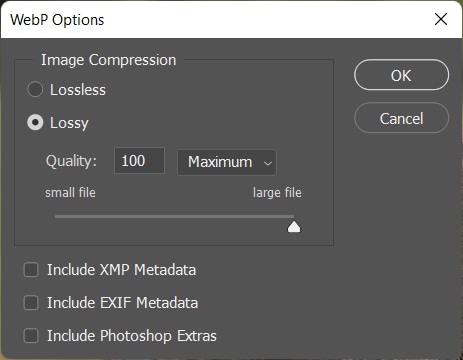
Adjust the setting as you need them. Here is what the various settings do:
Lossless vs. Lossy: A lossless file retains all the information in the file when compressed and exported from a program like Photoshop. A lossless file is larger than a lossy file.
A lossy compression deletes certain information from the file, which is usually non-essential information. Lossy compression reduces the quality of an image but keeps the file size low.
Quality Slider: The quality slider allows you to determine how high you want to keep the quality when using lossy compression. However, increasing the quality also increases the file size, so you must balance the two depending on where you will use the file.
Then you can check each option to include the XMP metadata, which contains descriptions about the image, such as author, caption, etc. You can also choose to include the EXIF metadata, which contains the copyright and camera information. Lastly, you can include Photoshop Extras.
Once you have chosen the settings, you can click OK.
Locate your saved file in the folder you saved it, and you’ll see the file extension. Without editing this image and saving it with lossless compression, you can see the difference in size between the WebP file, the JPEG (lossy compression), and the PNG (lossless compression).

How To Save An Image As WebP For Photoshop 23.1 And Below
If you use a Photoshop version older than 23.2, you won’t find the WebP format in the Save As window, and you can’t open WebP files. According to Adobe, in this case, you need to download the WebPShop plug-in to open, edit, and save in the WebP format.
To download the plug-in, use the following direct download links.
For Windows(x64):
https://github.com/webmproject/WebPShop/releases/download/v0.3.3/WebPShop_0_3_3_Win_x64.8bi
For macOS:
https://github.com/webmproject/WebPShop/releases/download/v0.3.3/WebPShop_0_3_3_Mac_Universal.zip
You can install the plug-in to the following menu paths before opening Photoshop.
- Windows: \Program Files\Common Files\Adobe\Plug-Ins\CC
- macOS: /Library/Application Support/Adobe/Plug-Ins/CC
JPG Vs. WebP Files Explained
Suppose you are considering converting your images to WebP before uploading them to the web. To determine which format suits you, you should understand the differences between the WebP and a JPG file.
JPG is a lossy compressed file that deletes non-essential information from the file to create a smaller file size. The quality is lower than lossless compressed files.
WebP is an open-source, raster file format developed by Google to help improve loading times across the web. You can set a WebP file to lossy or lossless compression.
While WebP files can be up to 26% smaller than PNGs and 25-34% smaller than JPEGs with the same quality index, the WebP file may be lower quality. WebP files also have a size limit of 16.383 x 16.383 pixels.
The WebP file was designed specifically for the internet to create faster load times on websites, which has numerous benefits, such as higher SEO rankings, improved user experience, and increased website traffic. This file type is primarily used for reducing image size and supporting online animations, as the file type is significantly smaller than the common GIF format.
Pros Of WebP Files
- WebP files are compatible with most web browsers, such as Safari, Microsoft Edge, Opera Browser, Google Chrome, and Mozilla Firefox.
- Webpages that load faster increase the website’s search engine ranking and retain users due to the improved user experience.
- The compressed file size of WebP files frees up space on websites, allowing for more storage space.
Cons Of WebP Files
- Not all web browsers support WebP files, especially older ones.
- WebP images are only useful online and don’t serve much of a purpose offline.
- Limited file size of 16.383 x 16.383 pixels.
- Any type of compression, even a small amount, reduces the photo’s quality which won’t work for professional photographers who need to upload high-quality images to their websites.


