fbpx

How To Resize Pixel Art In Photoshop (Without Losing Quality)


Creating pixel art is not just about nostalgia and classic video games. Nowadays, pixel art has made a comeback, and it looks like it’s here to stay. However, the problem with making pixel art is having to make the pixel art on such a small canvas and exporting a blurry image later. If this is an issue for you, here’s how to resize your pixel art without losing quality. 

To resize pixel art in Photoshop, go to Image > Image Size. With the width and height value linked, type in your desired dimensions for your artwork and set the resolution to 72. Finally, check the Resample option and set it to Nearest Neighbor (Hard Edges) and click OK to resize the pixel art.

I’ll explain this process more in-depth below, along with an alternative resize method you can do upon exporting. That way you can make sure you never have to deal with poor-quality pixel art again!

The Problem With Small Pixel Art

When you create pixel art, there are a few reasons why you have to resize your pixel art without losing quality. Here’s what your pixel art may look like in Photoshop using a 50 x 50 sized canvas

You may ask, “Why do I need to resize this? It looks fine to me.” 

In Photoshop, sure, it looks fine. Here’s what it looks like when you export it without resizing it:

Now you may think, “It’s small, but it still looks great. What’s the problem?”

Here’s what it looks like when zoomed in:

If you’re making pixel art for a client, they will not be happy with this. If you’re making pixel art for a game, this will look blurry. 

This is why it’s so crucial for you to resize and export your pixel art correctly. 

Preparation For Perfect Pixel Art 

Before exporting your pixel art, there are a few things to set up to ensure that the sharpness of your pixel art is retained.  

Set Your Resolution To 72

When resizing pixel art, you want to ensure your resolution is an even number. You don’t want to make the mistake of resizing a resolution with an odd number and end up with extra pixels all over your art. 

72 is a standard resolution and the baseline resolution for pixel art. 

Make Sure Your Background Is Transparent 

This one may be obvious, but it’s easy to forget to select it. Make sure before you make your canvas that you choose Transparent under Background Contents. This ensures you don’t export your pixel art with a white background.

Set The Image Interpolation To Nearest Neighbor 

This one’s an important one. Image interpolation is used in Photoshop to smooth out pixels in an image so that even when you zoom in, your image feels smooth with no jagged edges. 

With Pixel Art, the jagged edges are part of the point. To stop the pixels from smoothing out, go to Edit > Preferences > General

In the Options Window that pops up, find Image Interpolation and select Nearest Neighbor (Preserve Hard Edges). Now, no matter how large you scale your image when you export, the edges of your pixel art remain crisp and not blurry. 

How To Resize Pixel Art In Photoshop

Now that you’ve made all the necessary preparations, it’s time to guide you step by step through the process. 

Option 1: Resizing Your Pixel Art Before Exporting 

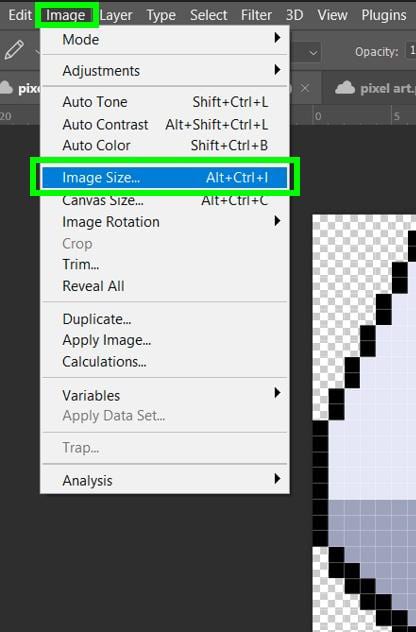
Step 1: Open The Image Size Window 

To change the size of your finished image, go to Image > Image Size. You can also use the shortcut Alt + Control + I (Win) or Option + Command + I (Mac).
Step 2: Resize Your Image To The Size You Require 

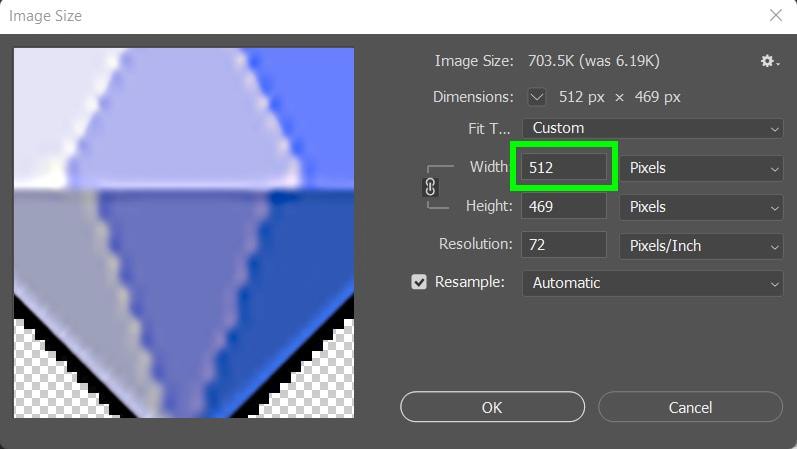
When the Image Size window pops up, you should first confirm that your Width and your Height are linked together, so if you change the size of one measurement, it adjusts the other measurement automatically.

To ensure your Width and Height are linked together, look for the Link Icon between the two. If it’s not there, click inside the area to connect them. 
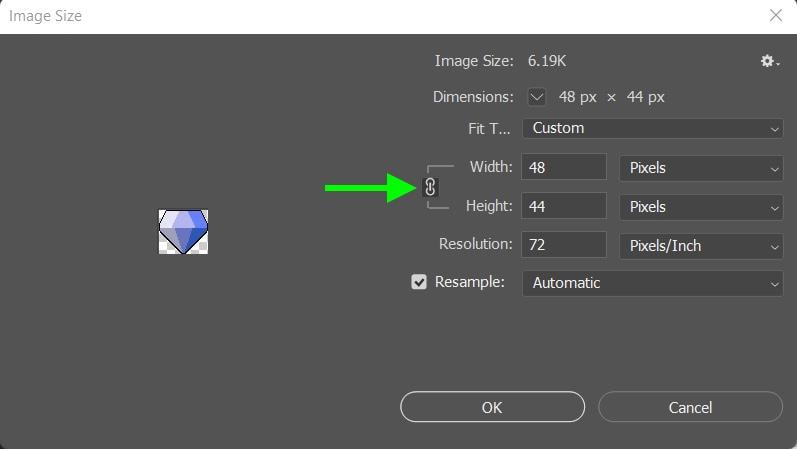
Now that your Width and Height are linked together, you can change the Width to your desired size, and your Height snaps to the exact size it needs to be to retain the perfect aspect ratio

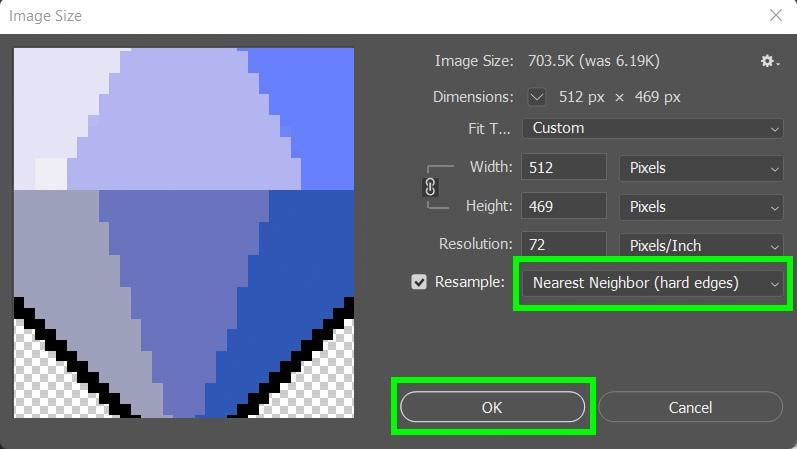
Once you input your dimensions, you’ll notice how blurry your pixel art looks in the Preview Window. To fix this, under Resample, choose Nearest Neighbor (Hard Edges) to make your pixel art sharp again. 

When you’re done, click OK

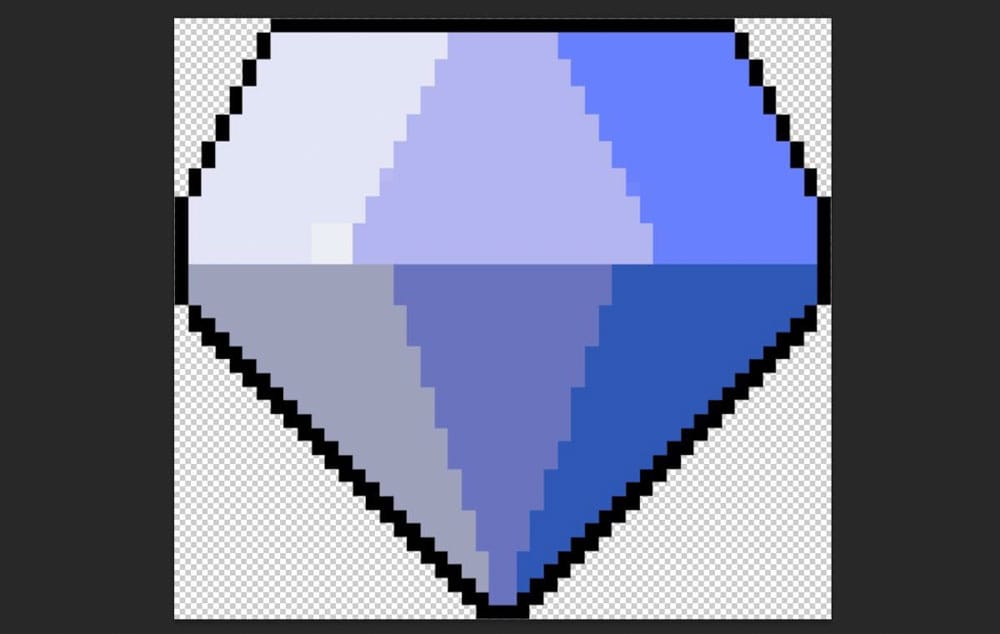
Once you click on OK, you’ll first notice that your pixel art is now huge! This is a good thing. It means that your pixel art is officially resized. 

To see your entire image quickly, press Control + 0 (Win) or Command + 0 (Mac) to zoom out and view your entire canvas. 
Step 3: Export To PNG 

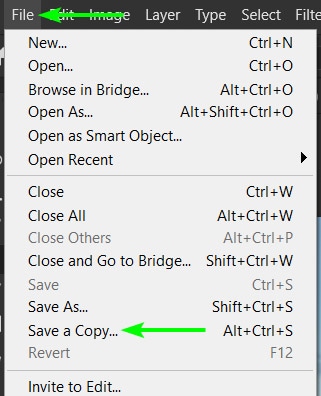
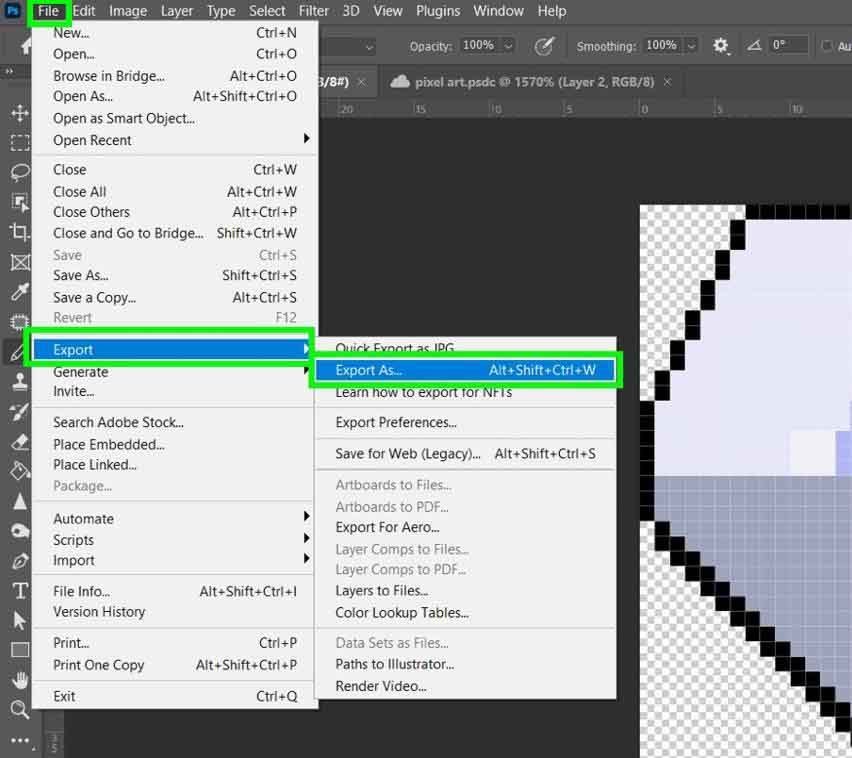
Now that your pixel art is resized and ready to export, go to File > Export > Export As to open up the Export As Window

The first thing you may notice from here is that the background of your pixel art is a plain white background. Even after setting your background to Transparent earlier on, your background is still white and not a transparent one. 

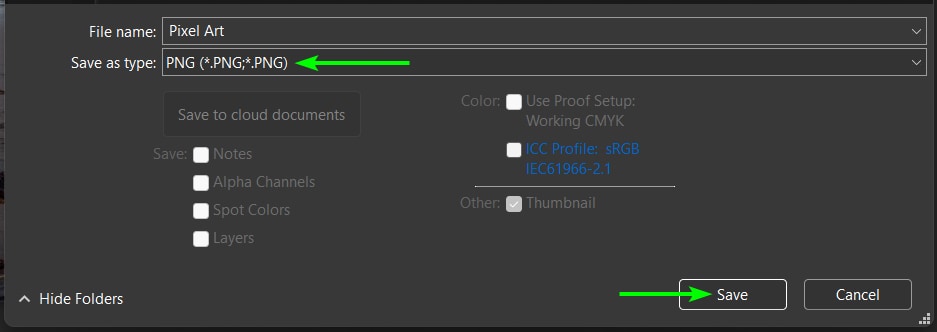
You didn’t mess up. Photoshop guessed that you wanted to export your image as a JPG. To get rid of the white background, change the Format from JPG to PNG. PNG format retains the image’s transparency, removing the white background for good. 

You’ll see a black and white checkerboard pattern behind your pixel art to confirm this. 

Step 4: Set Resample To Nearest Neighbor 

One last thing before you export. Make sure that under the Resample Drop Down Menu, Nearest Neighbor is chosen. You chose this option earlier in the process, but it’s never a bad idea to double-check this. 

Finally, click the Export Button to download your pixel art to your computer. 

With your pixel art downloaded to your hard drive, you can open the file and zoom in. The edges of your pixel art remain sharp no matter how much you zoom in. 

Option 2: Resizing Your Pixel Art When Exporting

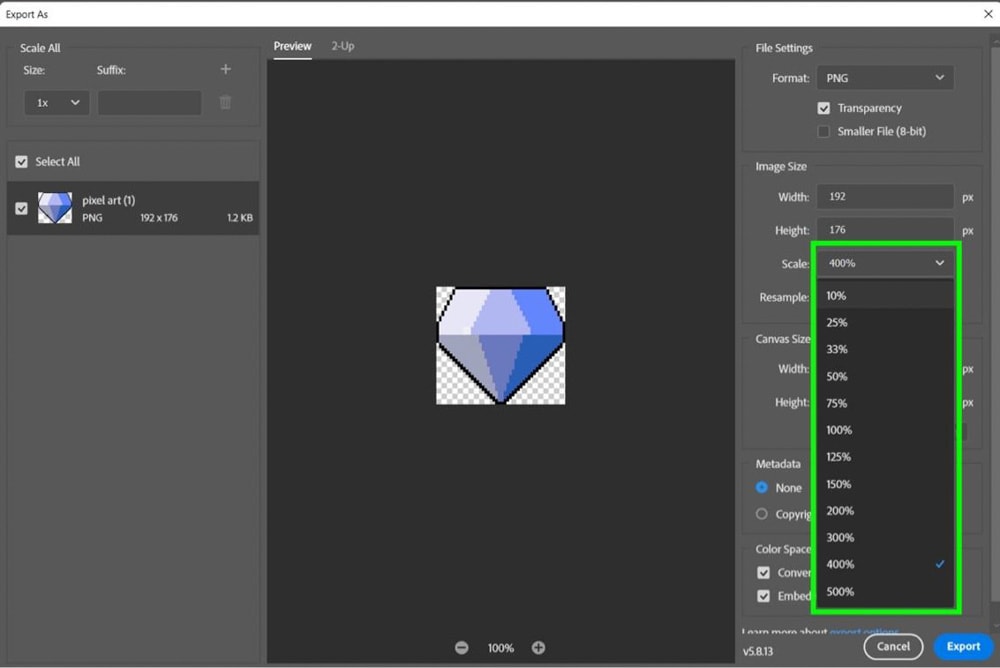
The second way you can resize your pixel art without losing quality is to resize it by a percentage as you export it. This is best used when you need your pixel art to be bigger but don’t have exact dimensions. 

To start this process, go to File > Export > Export as. The Export As Window pops up.
In the Export As Window, ensure that PNG is selected as the Format and that Nearest Neighbor is selected under the Resample Drop Down Menu.
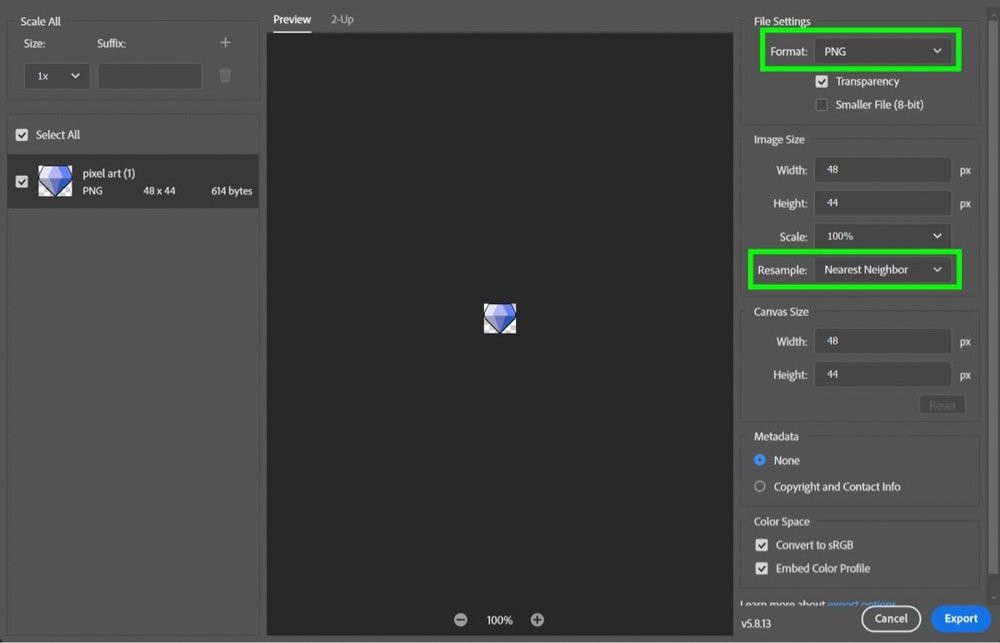
Once you have all your options in order, open up the Scale Drop Down Menu and choose the percentage you wish to resize your pixel art. 

When you’re ready, click Export to send your image to your computer’s hard drive. 

You can now locate the file on your computer. Open your file and zoom in to ensure that your pixel art is sharp without blurring. 
Happy Editing!

Article By

Brendan Williams

Hey, I'm Brendan! I'm a professional photographer and photo retoucher who has spent the majority of his career shooting or retouching outdoor lifestyle and social media campaigns for brands like G-Adventures, xoxo Bella, P&G, Fitbit, Chevy, Tourism California, and more. You can view my photography portfolio here.

These days I primarily focus my efforts on this site, creating guides and tutorials that I wish I had earlier in my career. Each week I publish new tutorials on Photography, Photoshop, Lightroom, and Canva to help you unlock new skills and bring your creativity to new levels! Everything you learn here is backed by real experience, so you can finally skip the fluff and focus only on what matters.

0 0 votes
Article Rating
Subscribe
Notify of
guest
0 Comments
Inline Feedbacks
View all comments

Continue Reading:

How To Whiten Teeth In Photoshop (2 Easy Ways)

Discover two surprisingly easy ways to whiten teeth in Photoshop with the help of a few beginner-friendly sliders.

How To Use Gradient Maps In Photoshop

Learn the ins and outs of how to use gradient maps in Photoshop to color grade your photos and transform your images for the better.

How To Make A Silhouette In Photoshop (2 Best Ways)

Here are two easy ways to make a silhouette in Photoshop. The first method creates a silhouette graphic, while the second in more realistic.

Adobe Lightroom System Requirements For Mac & PC

Here's a breakdown of the system requirements for Adobe Lightroom Classic and Lightroom CC to make sure it will run smoothly on your computer.

How To Add A Watermark In Lightroom Classic & CC

Learn how to add a text or graphic watermark to a photo in Lightroom Classic and Lightroom CC to protect your photos from theft.

How To Use Dehaze In Lightroom

Learn how to use dehaze in Lightroom along with five different ways you can use the dehaze tool to improve your images in Lightroom.

35+ Best Fonts For Logos In Canva

Here's a list of the best fonts for logos in Canva to help give you inspiration in your next logo design!

How To Create Curved Text In Canva

Learn how to quickly create curved text in Canva desktop and mobile with just a few clicks to spruce up any design!

35 Best Fonts For Teachers In Canva

Discover the best fonts for teachers in Canva to help with your next worksheet or presentation for your class!

The 9 Best SD Cards For Sony

Discover the best SD cards for Sony to find the most reliable and best valued memory cards for your photo and video needs.

The Best Canon Lens For Low Light (10 Top Picks)

Get a complete view of the best Canon lenses for low light photography and video along with tips to make the right buying decision.

Affinity Photo VS Photoshop – Which Should You Choose?

Let's take a deep look at the similarities and differences between Affinity Photo and Photoshop to see which program you should pick.