
You may use Photoshop for a while before coming across any messages about your scratch disk. The scratch disk is an essential element of Photoshop, as this is the disk where Photoshop keeps temporary image information, and Photoshop will not work without space in the scratch disk.
You can set up the scratch disk where you want to store the information and even add multiple scratch disks. Doing this lightens the memory load on your computer and helps you save space on your drive to ensure Photoshop runs smoothly.
What Is A Scratch Disk?
A scratch disk is a disk within your computer files (or an external drive) that Photoshop uses to store temporary files. It can hold various file types and mainly consists of documents and history states that don’t fit in your computer’s RAM while working in Photoshop.
If your scratch disk is full, you’ll get an error message when trying to run Photoshop. Therefore, it’s good to understand what a scratch disk is and where you can locate and change your scratch disk preferences.
How To Change Your Scratch Disk In Photoshop
If your computer is low on disk space, your scratch disk will seem full to Photoshop, and the program won’t run properly. It may halt your work with a warning message mid-edit, or maybe the program will refuse to start at all. Either way, a full scratch disk message is frustrating and disrupts your work.
You can change the scratch disk Photoshop uses to a different disk in your files or even to an external drive. Remember that if you move Photoshop’s scratch disk to an external drive, you must always have the drive plugged into your computer while working in Photoshop.
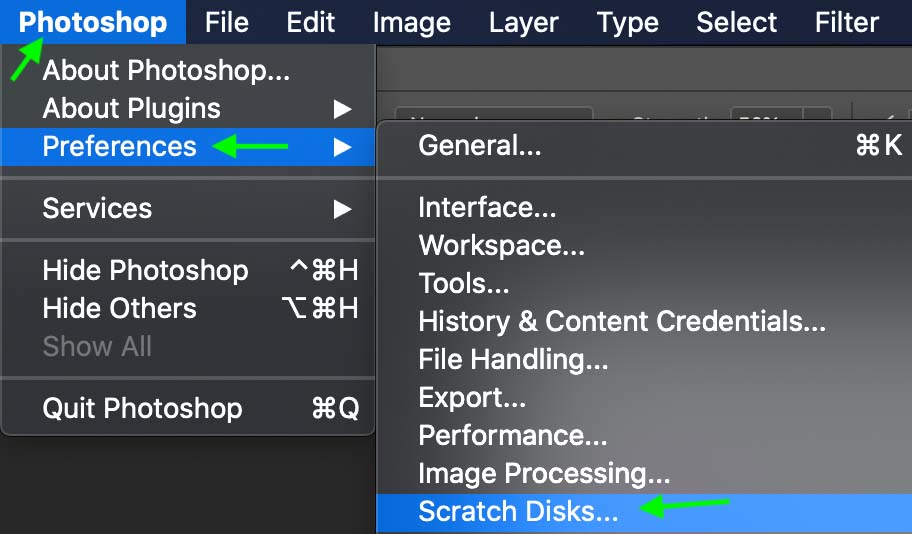
To access your scratch disk settings in Photoshop, head to Edit > Preferences > Scratch Disks (Win) or Photoshop > Preferences > Scratch Disks (Mac).
Ensure you’re on the scratch disks tab from the options along the left. Here you’ll see information about the current scratch disk Photoshop uses, such as the drive name and the available storage.
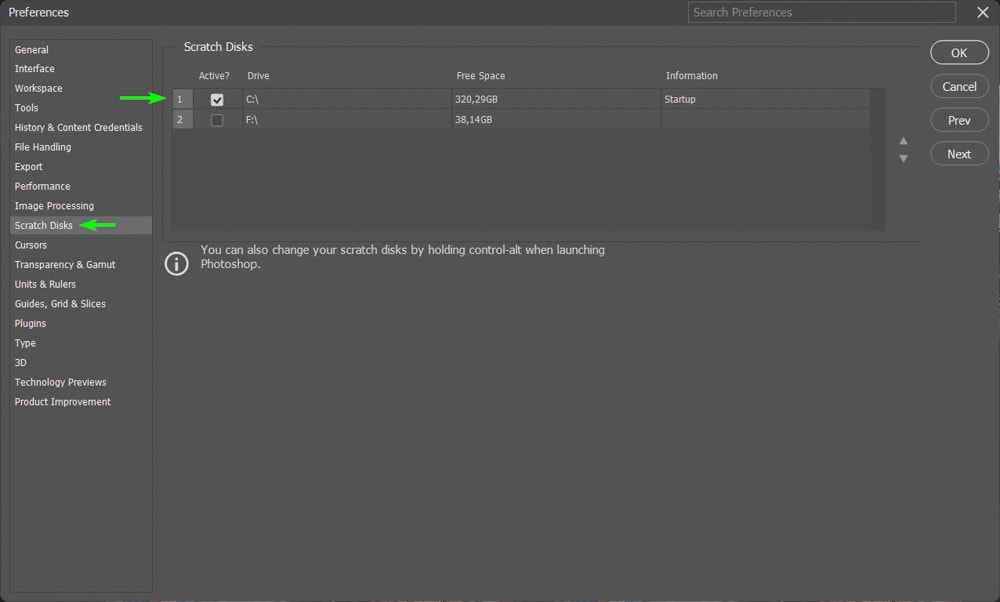
All available scratch disk options are shown as a list under scratch disks, so you’ll need to make sure you’ve made all drives and disks you’d like to use available. For external drives, you’ll need to have them plugged into your computer.
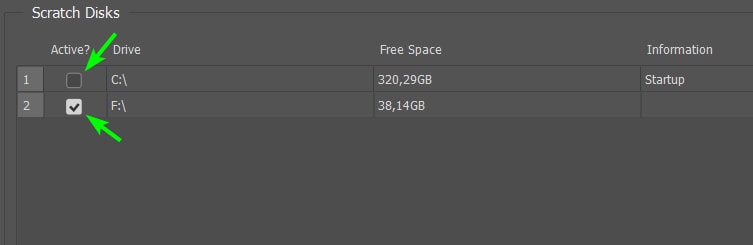
To switch to a different scratch disk, click the checkbox under Active for the disk you’d like to use. Then uncheck the Active box for the original scratch disk. Photoshop will then start using the new scratch disk that is marked as Active.
How To Add A Scratch Disk To Photoshop
If Photoshop tells you your scratch disk is full, you can always add another scratch disk to help lighten the load. This gives Photoshop extra room to store files and allows you to keep working without the error message.
To add a scratch disk to Photoshop, first, make sure you’ve plugged in any external drives you’d like to use as a scratch disk. Then, head to Edit > Preferences > Scratch Disks (Win) or Photoshop > Preferences > Scratch Disks (Mac).
In the scratch disk list, click the Active checkbox for all the scratch disks you’d like to use. Keep in mind only available scratch disks will be shown. When more than one disk is marked as Active, then Photoshop uses memory from both drives to run the program.

How To Empty Your Scratch Disks
Scratch disks can become full of temporary files, which are unnecessary on a completed project. There are a few ways to clear out this cache and reduce the number of temporary files saved on a scratch disk. If you are experiencing the “scratch disks are full error,” one solution is to empty your scratch disks to solve the problem.
The easiest way is to close any documents you’re no longer working on. You can do this from Photoshop by clicking X on any tab.

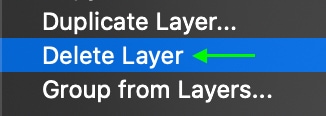
Another way is to delete any duplicate or unnecessary layers. In the Layers panel, you can right-click or Control + click a layer and select Delete Layer to get rid of it.

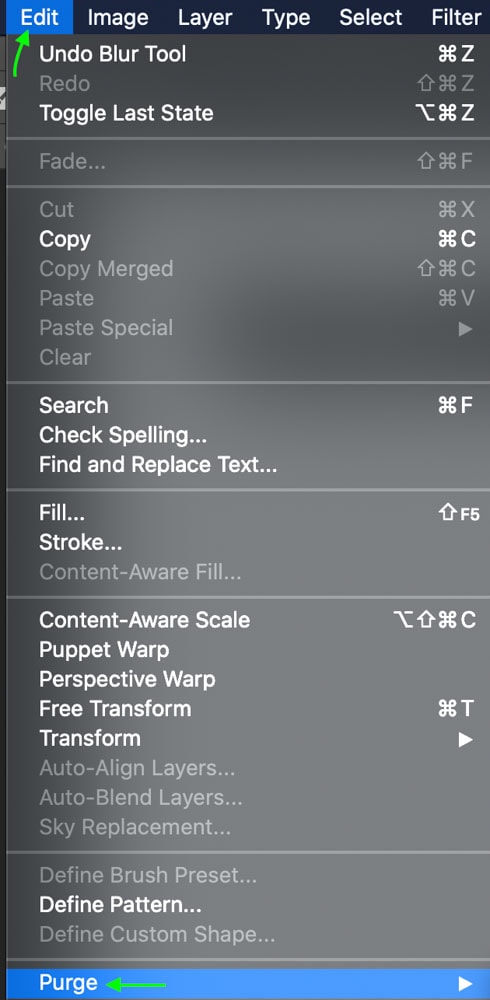
Finally, you can purge any cached files by heading to Edit > Purge.
Your options are to purge the Clipboard, the Histories, or All (if there is nothing currently on the Clipboard, the option will be grayed out). It is best to select All to get the most space out of the process. You can also clear the Video Cache if available.
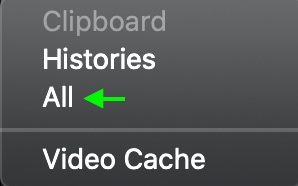
This will clear everything added to the clipboard and all history states (these, in particular, can take up quite a lot of room).
Periodically running through these steps to ensure you’re optimizing the space on your scratch disk is a great way to ensure Photoshop continues running smoothly. If Photoshop is still running slow and giving you errors after your scratch disk has been changed, consult my guide to speeding up Photoshop to fix any additional issues.


