
A little-known tool hiding within Lightroom’s adjustments can work wonders for the quality of your images. The Super Resolution in Lightroom is a tool that allows you to increase the size of pictures without compromising resolution – in fact, the tool increases the resolution along with the size!
The tool works like magic and can be applied with just a few clicks. Here’s everything you need to know about using Super Resolution.
What Is Super Resolution In Lightroom?
In short, Super Resolution is a tool that increases the dimensions and resolution of an image. Super Resolution works by doubling your image’s vertical and horizontal pixels, creating 4x more pixels than before.
Lightroom then intelligently fills in those new pixels based on a complex algorithm and thousands of sample images that have been used to “train” the program.
While enlarging an image would generally result in lower quality and blurred details, you won’t have to worry about this with Super Resolution. This means that Super Resolution can perform a variety of useful functions.
You can improve old photos taken with low-resolution cameras, get the best quality for printing and zooming purposes, and even increase the resolution of smartphone photography.
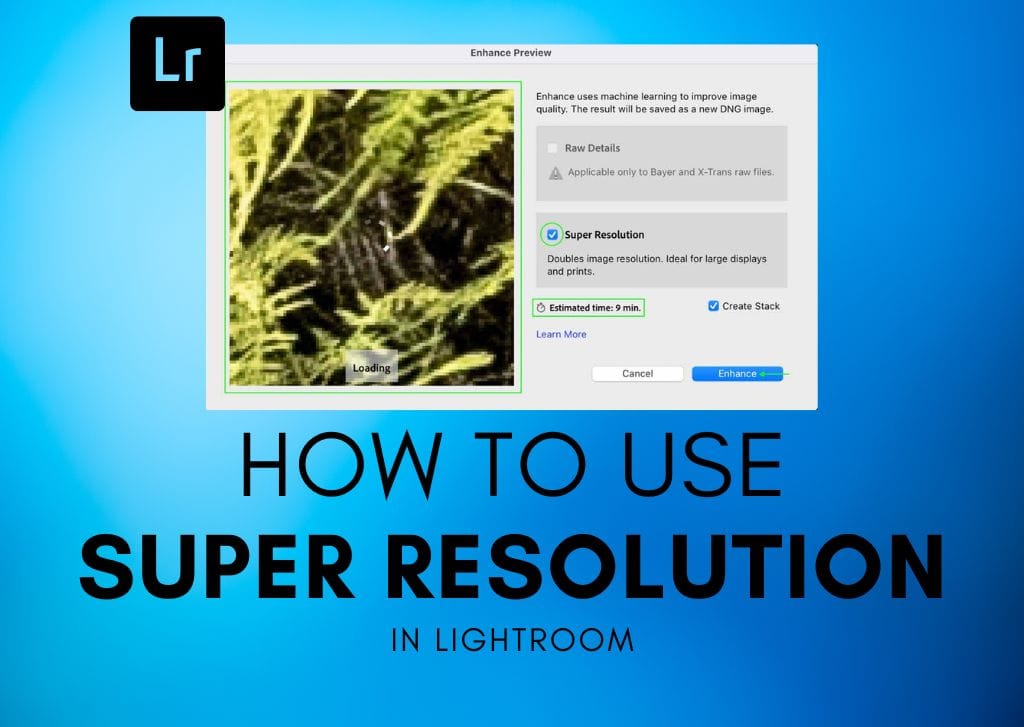
How To Use Super Resolution In Lightroom Classic
Accessing the Super Resolution feature within Lightroom’s Enhance settings is easy. First, make sure you’re in the Develop module.

Select the photo you’d like to enhance from the film strip, then head to Photo > Enhance.

You can also right-click or Control + click any image in the film strip and select Enhance from the options.


From here, the Enhance Preview window will open. You’ll see the image sample loading in the Preview box. The Super Resolution check box should automatically be checked, but check it if it isn’t. Below this, you’ll see the estimated amount of time Lightroom will take to enhance your image. As you can see, my image will take nine minutes, but the time varies according to the photo.

Click Enhance, and the image will begin processing – in the top left, you’ll see the progress bar above the Navigator tab.

Remember that your program may run slowly while the image is processing. Once it finishes, you’ll see the enhanced image appear.

It may not look drastically different from the original, but you’ll see the difference in pixels when you zoom in close to the enhanced image and compare the same zoomed area to the original.


The enhanced image is much clearer and sharper, and the increase in pixels can be seen compared to the original. It may even look grainy – but zoomed out, the quality is clear.
The enhanced image will not erase or replace the original image; instead, the two will now appear grouped in the film strip, and you can click the icon to view them separately in the film strip.


Accessing Super Resolution In Lightroom CC
Lightroom CC also has the Super Resolution tool, and you can access it pretty much the same way as in Lightroom Classic, though the user interface is a bit different between the two programs.
You can find Super Resolution in Lightroom CC by selecting an image and heading to Photo > Enhance.

You can also right-click or Control + click any image in your library and select Enhance.
From there, follow the same steps as above to enhance the image – make sure the Super Resolution check box is checked and click Enhance, then wait until the process is complete.
You’ll see the progress bar at the top of the screen, and the enhanced image will appear as a new image rather than replacing the original.
When Should You Use Super Resolution In Lightroom
Take advantage of the Super Resolution tool when you’d like to increase an image’s size or resolution for cropping, printing, or improving the overall quality.
For instance, Super Resolution is the perfect tool to use if you’ve taken a photo with an older digital camera model that looks great on a screen, but when printed, the quality is drastically reduced. This is because printing requires a much larger amount of pixels to display the image adequately. Super Resolution will quadruple the total pixel count, thus making the image much better for printing.
The same applies if you’d like to crop a photo into a smaller area. Cropping an image can reduce the quality as you increase the size of a smaller picture area.


The edges in the cropped version are a bit dull, and the image isn’t as clear as it needs to be. However, once you apply Super Resolution to the original image, the details become clearer and sharper.

As mentioned, you can use Super Resolution with images from digital cameras and smartphones. Of course, the results will differ slightly, and it is always best to use a RAW image that hasn’t yet been processed anywhere else, like Photoshop.
However, the tool will still work quite well with processed images, like JPEGs or pictures taken with a smartphone. In fact, using Super Resolution is a great way to take your smartphone pictures from good quality to excellent quality.
For instance, when I zoom into an image taken on an iPhone, I can see that the details become quite blurry – to the point where it almost looks like the photo could be a painting!

When Super Resolution is applied, the details become sharper, and the image looks more crisp and clear overall.

Again, because this is a smartphone photo rather than a raw photo, there isn’t as much image information to work with, so the quality is still not at great as what you’d get shooting in raw with a DSLR. However, zoom out, and you can see the image’s quality – not bad for shooting with a phone!

When To Avoid Using Super Resolution
As I’ve mentioned, Super Resolution is helpful if you need to print, crop, or improve the quality of an image. However, the Super Resolution tool will make a secondary version of a photo that has a much larger file size than the original. Too many of these can take up a lot of space on your drive and even slow down Lightroom, so it’s best to only use Super Resolution if a photo really needs it.
Because most DSLRs released in recent years now have a very high megapixel count, you likely won’t need to use Super Resolution if the image was taken on a newer model DSLR. It also won’t be necessary if you only plan to display the image digitally. Most pictures (especially if they were shot in RAW) have high enough quality that you would hardly notice the difference if you used Super Resolution.
So, while many of your images may not need the extra pixels, there are certainly cases in which you would! Luckily, Super Resolution is always at your disposal if you need to enhance the quality and size of an image – and it only takes the click of a button.


