
Adobe Lightroom is one of the most popular photo editing programs on the market, but what exactly is it capable of? Especially if you’re new to photo editing, you may overlook some of the helpful things this program can do for you. From image organization, exposure correction, color adjustments, watermarking, and more, Lightroom offers many tools. Let’s break down some of the most helpful ones available in the program.
In Lightroom, you can organize and catalog photos, correct exposure and white balance, improve colors, add watermarks, create slideshows, and more. Lightroom offers photographers a faster way to enhance their photos, whether they’re working with single images or thousands at once.
To get things started, let’s go through 10 common things that Lightroom is used for. Later in the post, you’ll discover some cool things you can do in the program, along with a handful of trendy editing styles!
What Is Lightroom Used For?
1. Exposure Correction
The most common thing Lightroom is used for is exposure (aka image brightness) correction. When you’re taking a photo, you’re constantly battling the lighting conditions against your camera settings. In some cases, you will end up with a photo that looks too bright or too dark.
Without Lightroom, you’re out of luck with limited options to fix this problem, especially if you’re shooting RAW files.
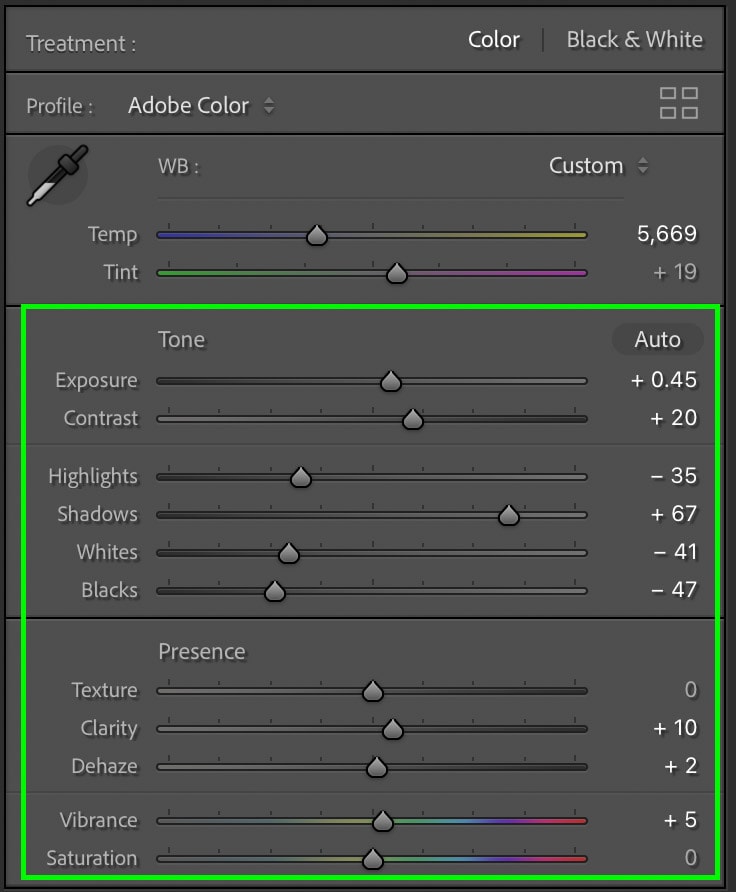
That’s why so many photographers use Lightroom to fix the brightness of their photos and balance things out. With the help of the exposure, contrast, highlights, shadows, whites, and blacks sliders, everything can be fixed in seconds.

Even if you choose not to make any other editing adjustments, these few sliders alone make a big difference in your images.
2. White Balance Adjustments
When you take a photo, your camera will typically choose a white balance for you automatically. Your camera will figure out what white balance setting is best to accurately display your colors based on the lighting conditions.
The caveat to this is that sometimes it doesn’t quite look perfect. For example, a photo taken outside may look a little too blue, while an indoor photo may look too yellow.
Beyond that, many photographers want to enhance the colors in their photos to make a sunset appear more vibrant than it really was. Once again, the white balance can help achieve that.

In Lightroom, changing the white balance is easy with two sliders inside the Basic panel. By moving the Temperature and Tint sliders, you can make your colors appear more true-to-real-life or simply stylize your photos. This adjustment is another common thing every photographer uses Lightroom for.
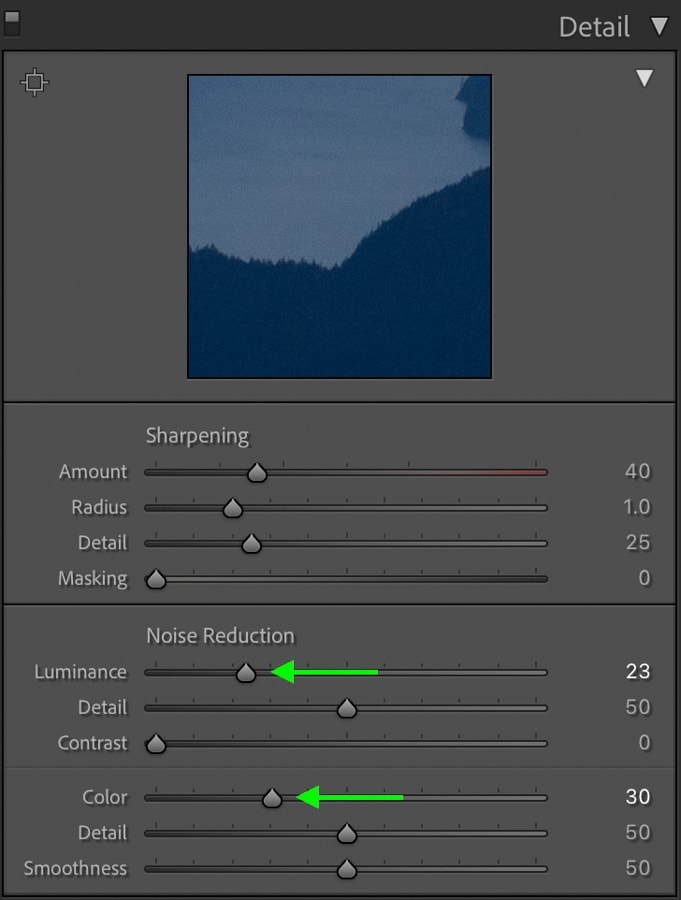
3. Image Sharpening & Noise Reduction
To ensure all the details in your photos look clear and crisp, sharpening is a big part of the photo editing process. In Lightroom, there are various helpful tools to both sharpen and reduce noise in a photo. All of this can be found inside the Detail Panel.
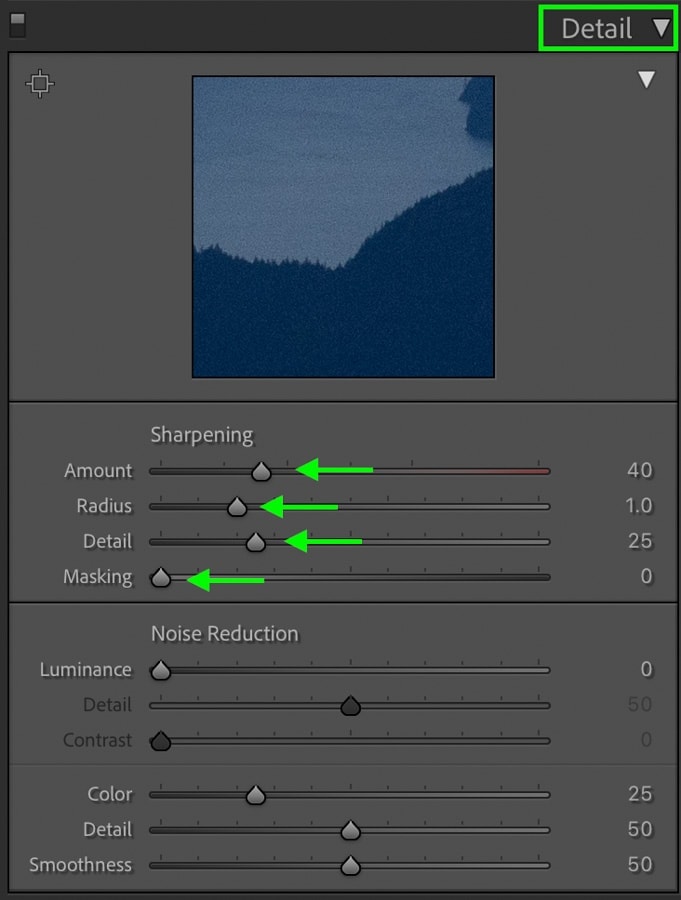
In a nutshell, sharpening your images adds contrast to the edges in your photo. This contrast makes objects appear to stand out more in the image and gives the overall photo a more crisp appearance.
With other photo editing programs sharpening adjustments are applied equally to the whole photo without much refinement. With Lightroom, you have many options to refine these adjustments. For example, the Radius slider alters how broadly the edge contrast (sharpening) is visible, and the Masking slider controls which edges have sharpening applied.
Beyond sharpening, you can also reduce noise from a photo in Lightroom to improve the overall quality. With the Luminance and Color Noise reduction sliders, it’s easy to reduce the grain in an image shot with a high ISO.
Even with the best exposure and color edit applied to a photo, poor sharpening or excess noise takes away from it. Luckily Lightroom makes it easy to solve this issue.
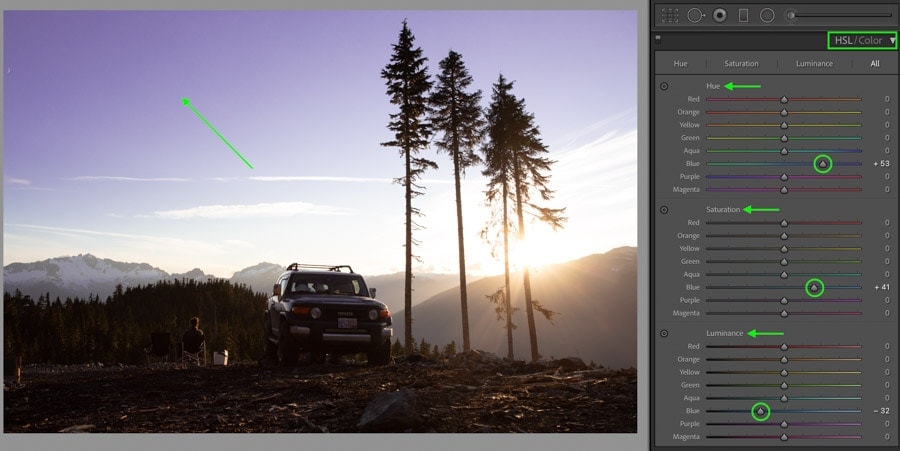
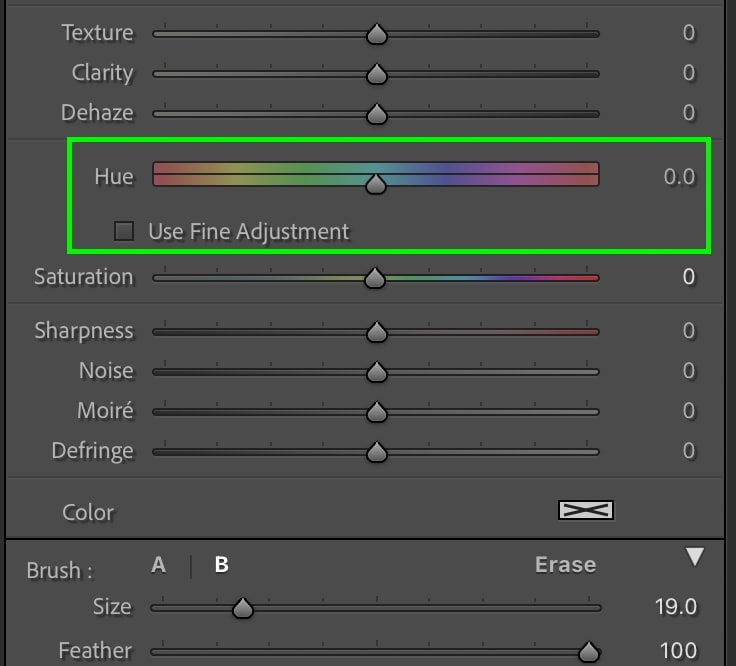
4. Color Correction
In Lightroom, you can choose between a variety of helpful color adjustments. Whether you want to change colors, add hues, or adjust the saturation, it’s easy to do so.
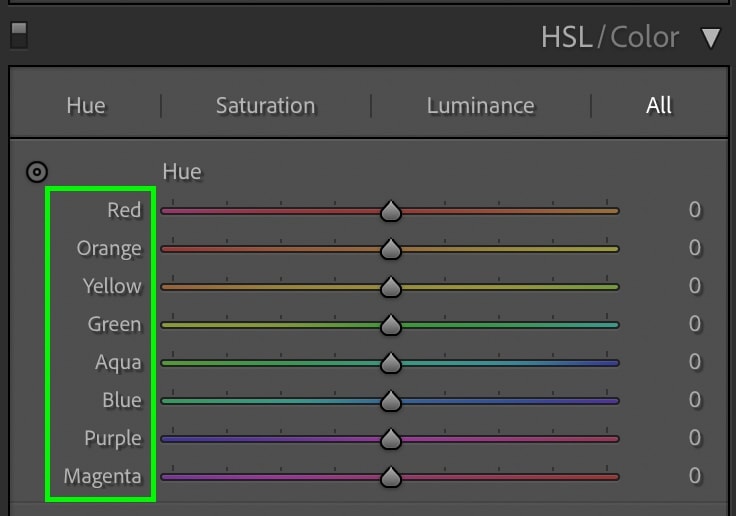
There are two main color adjustments in Lightroom called the HSL and the Color Grading tools. Let’s first discuss HSL.
The HSL adjustment stands for Hue, Saturation, and Luminance. As the name suggests, you can change the look of your colors with these three different settings, each broken down into a variety of color channels.
For example, if you wanted to change the hue and saturation of the sky, adjusting the blue channel will do just that. Every color in your photo will have a dedicated color channel. Depending on which hues are in your image, some channels will have more effect than others.

The second main color adjustment in Lightroom is known as Color Grading. This tool adds a specific color hue to either the midtones, highlights, or shadows exposure range. By choosing any color on the provided color wheels, it’s easy to add quick color improvements to your images.
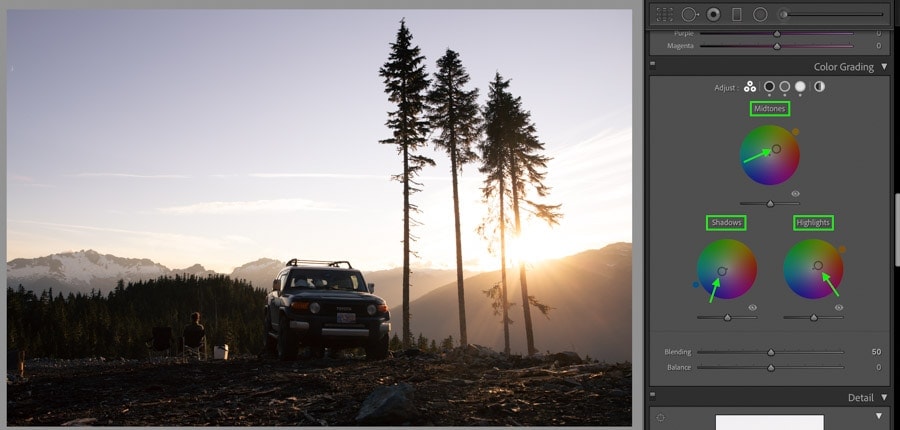
Although there are other tools for color correction such as Calibration, Saturation, Vibrance, and the Tone Curve, the HSL, and Color Grading are the two most popular. With just a small glimpse of the uses these tools offer, it’s easy to see how you can use them to enhance photos in Lightroom!
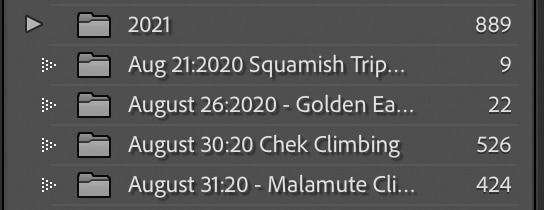
5. File Management & Organization
Unless you have a knack for keeping things perfectly organized, you likely loathe the thought of sorting through your thousands of images. Rather than having to sort through all of your photos in your computer documents, you can manage files in Lightroom with folders, catalogs, and a variety of culling methods.
The first way Lightroom organizes files is with Lightroom Catalogs. The best way to think of these is like a physical photo album. You can create a new catalog for different themes or events to only see those photos while you work. To give you an example, you could have a Lightroom catalog for your recent vacation, then another for your recent client work.

When you’re working inside a particular catalog, you will only see the images you imported to that specific one. Vacation photos won’t be accessible in your client catalog and vice versa. Just like a real-life photo album!
Now inside of each catalog are folders and sorting options such as flags and ratings. Like on your computer, you can sort all your images by parent and child folders. You can either copy the same folder structure as your computer or create a totally new one inside of Lightroom.
Best of all, when you move a photo in Lightroom, you have the option to move the actual file on your computer as well.
With photos sorted into their respective folders, you can pick out your favorites using flags, star ratings, and color labels. With these three options, it’s easy to separate the good photos from the bad. You can even flag photos for deletion later on if need be.
Lightroom can be used for a ton of file management tasks that are cumbersome to do without. Besides actual photo editing, file management is a huge bonus of the program.
6. Image Watermarking
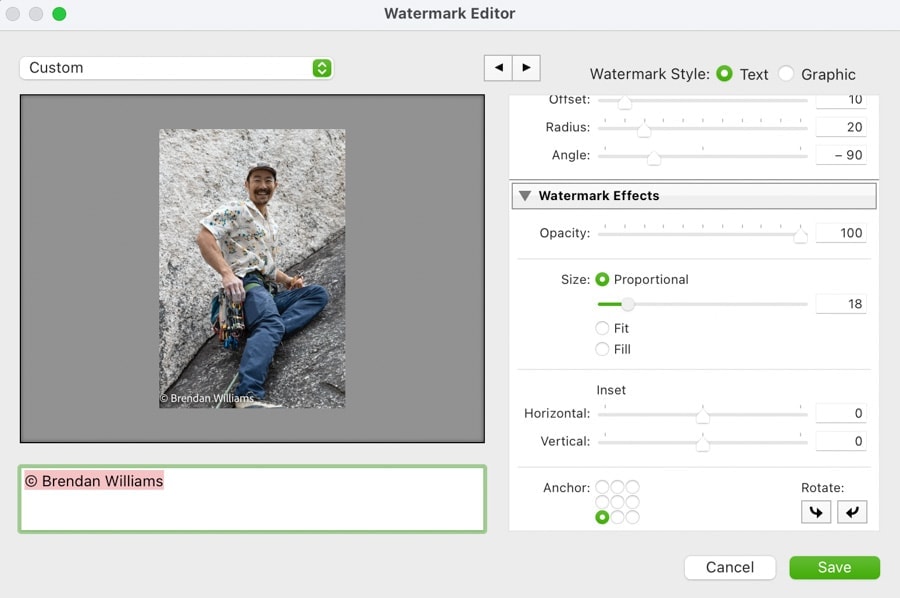
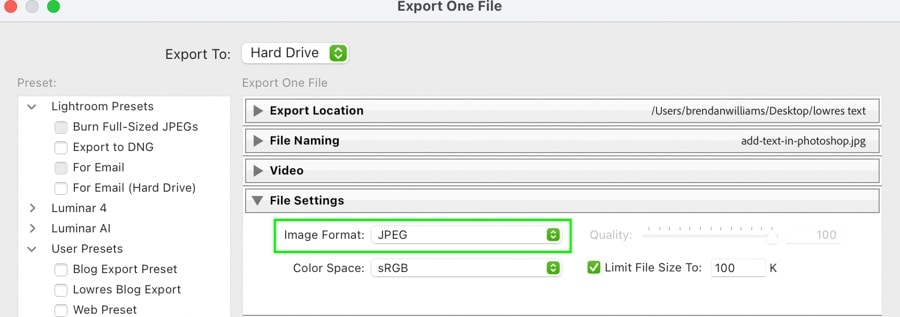
When you upload your images online, you run the risk of having them used without your permission. That’s why many photographers opt to add a watermark to their photos whenever they upload. In Lightroom, you can export your images with a watermark, so you don’t have to do any manual work in Photoshop or Canva, for example.
Now, how easy is it to add a watermark in Lightroom you ask? Well, let’s take a look.
All you need to do is go to File > Export, then check off the watermark option from the export window. Here you can choose between all of your preset watermarks.
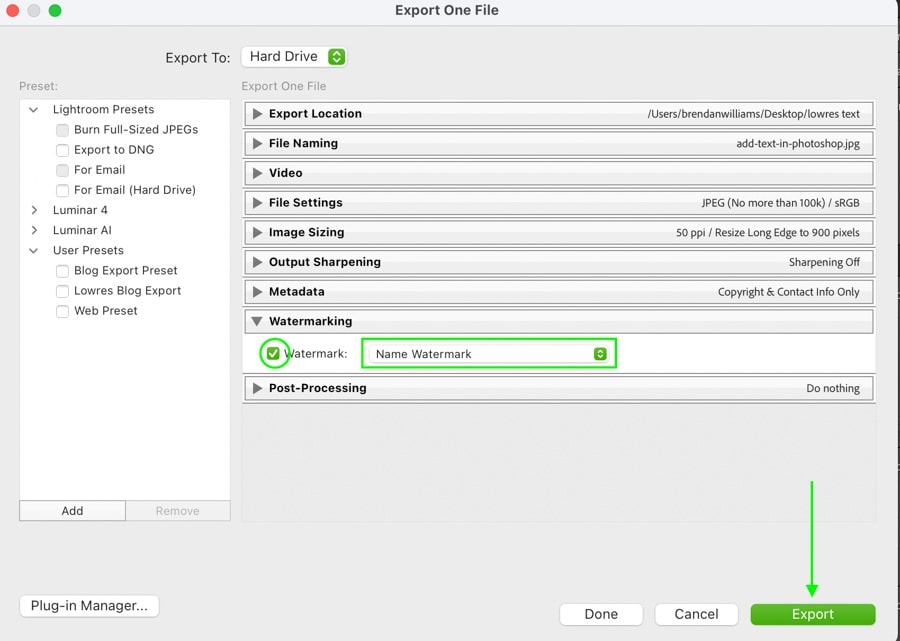
With your watermark applied, just press Export, and the watermark will be added to all images from that export. Whether you’re exporting one photo or one hundred, the watermark would still be applied.

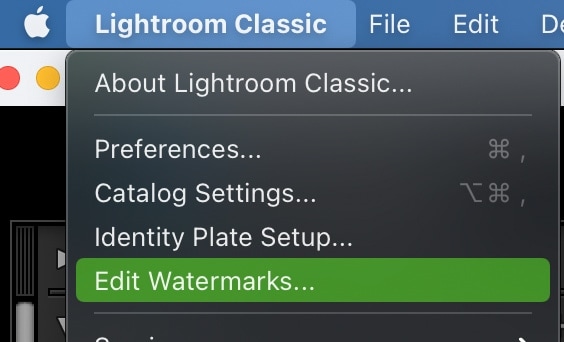
You can create basic text watermarks like shown above or upload a custom PNG logo to use. By going to Lightroom Classic > Edit Watermarks, you’ll be able to customize everything to suit your style.
The simplicity of watermarking photos in Lightroom offers photographers yet another reason to use the program.
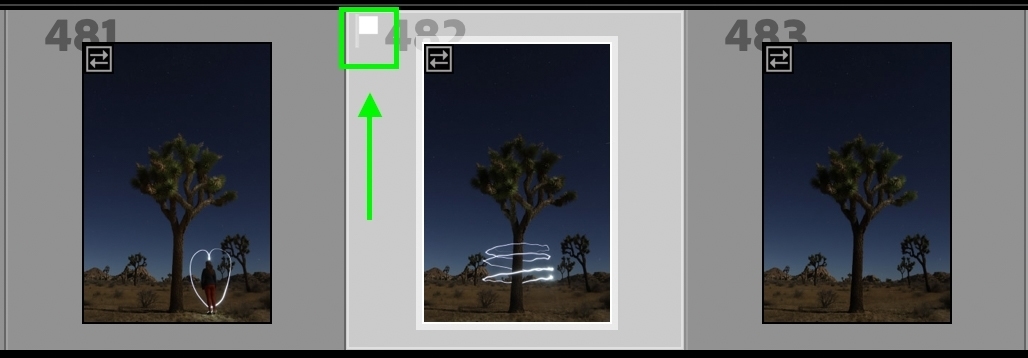
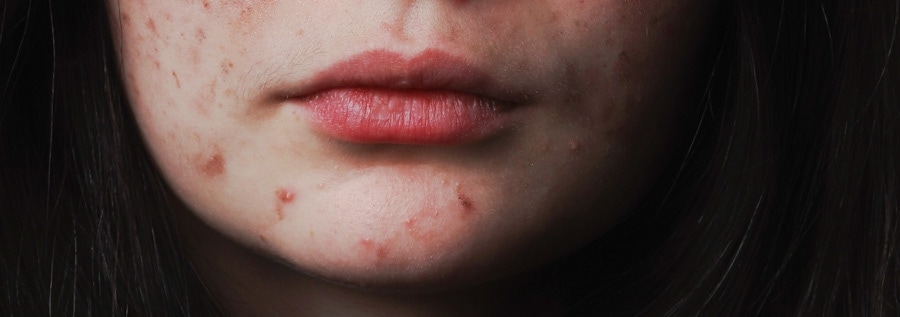
7. Object Removal
Lightroom can be used for basic object removal with the help of the Spot Removal Tool.
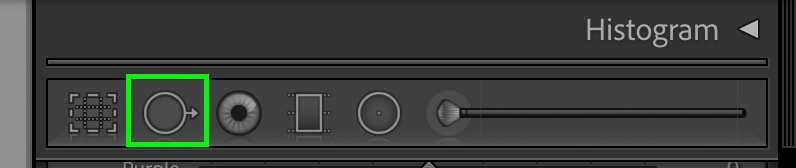
This tool has two main settings known as Clone and Heal.
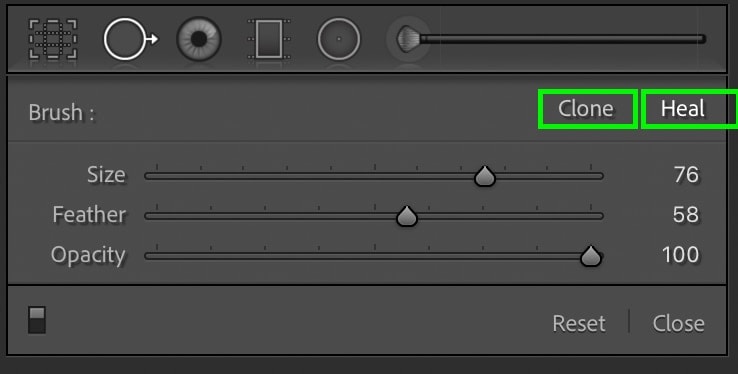
The clone option takes an exact sample of one section of your photo and replaces it with another. For example, if you have something in the sky you want to remove, the clone setting will sample a different blue color to cover the unwanted area.
Meanwhile, the heal option helps blend a particular sample into your photo. That way, anything you try to remove has a clean and well-blended result. For skin retouching in particular, this option is extremely helpful.
Here’s an example of the Spot Removal Tool at work:
To use the Spot Removal Tool, just click and drag over the area you want to remove. Lightroom will automatically find another part of your photo to replace it and instantly remove objects from the image.
If the sample isn’t perfect, you can manually pick a sample by clicking and dragging on the sampled area.
Although this tool isn’t as capable as the ones found in Photoshop, it does a great job for most object removal needs. It adds a nice bonus to all of the editing tools found in Lightroom.
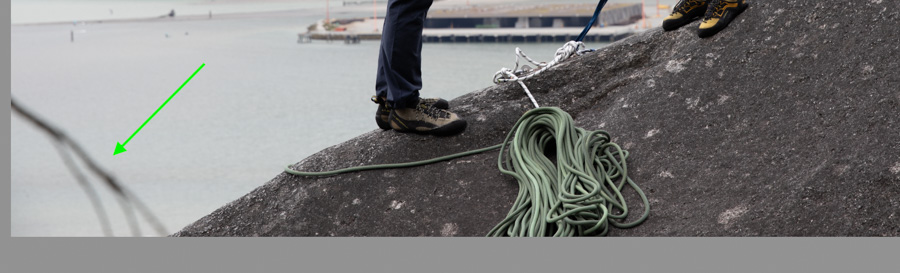
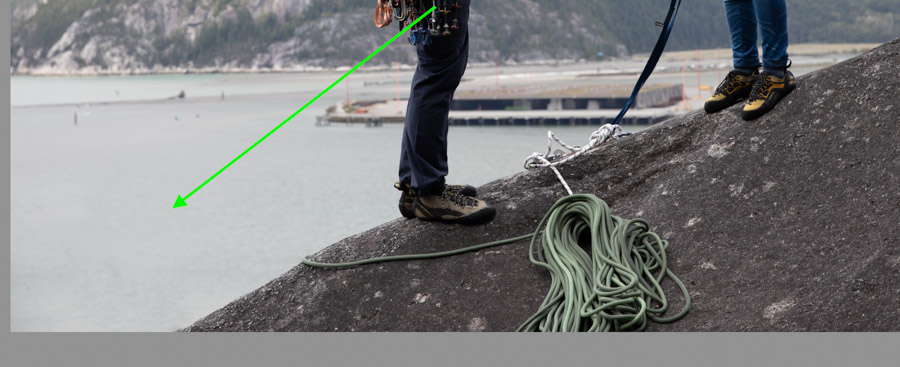
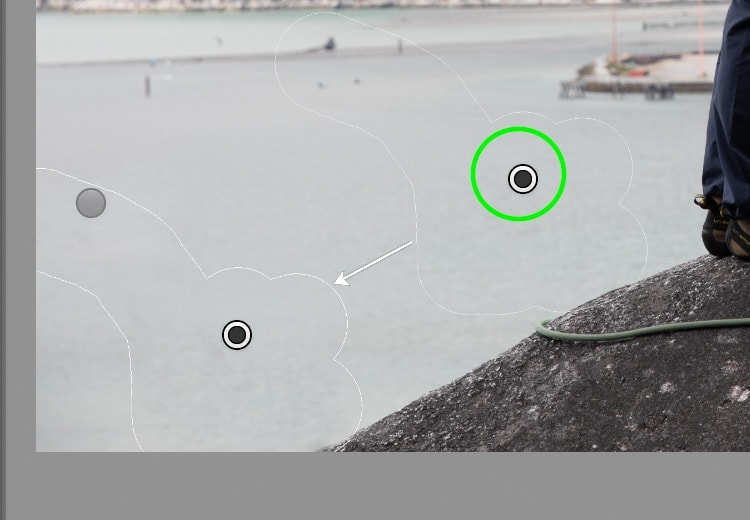
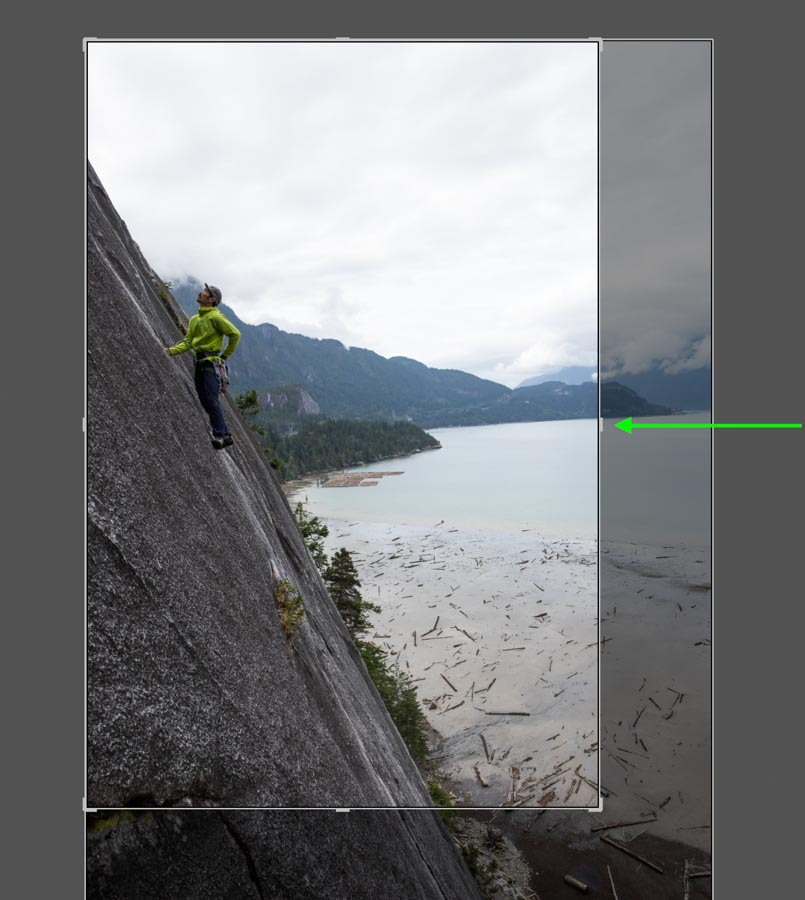
8. Cropping & Straightening
There are many ways to crop and straighten your photo, but Lightroom offers a straightforward process. By selecting the Crop Tool, you can manually click and drag on your image to change the crop and improve your composition.
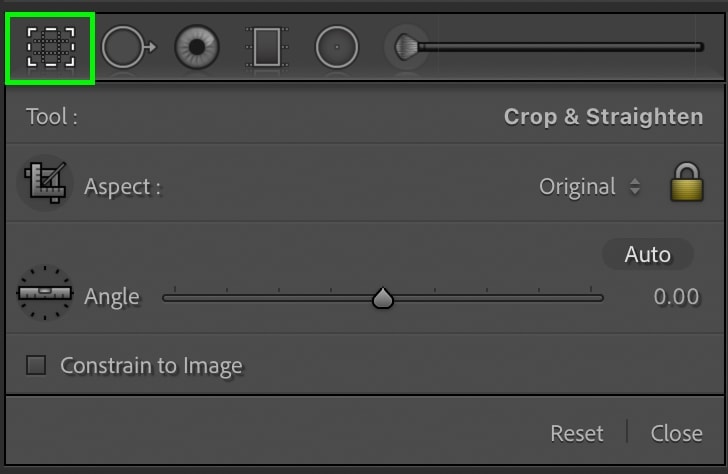
If you have a crooked horizon, it can quickly be fixed with the Angle Slider or the Straightening Tool. Better yet, you can fix it with one click via the auto straighten button.
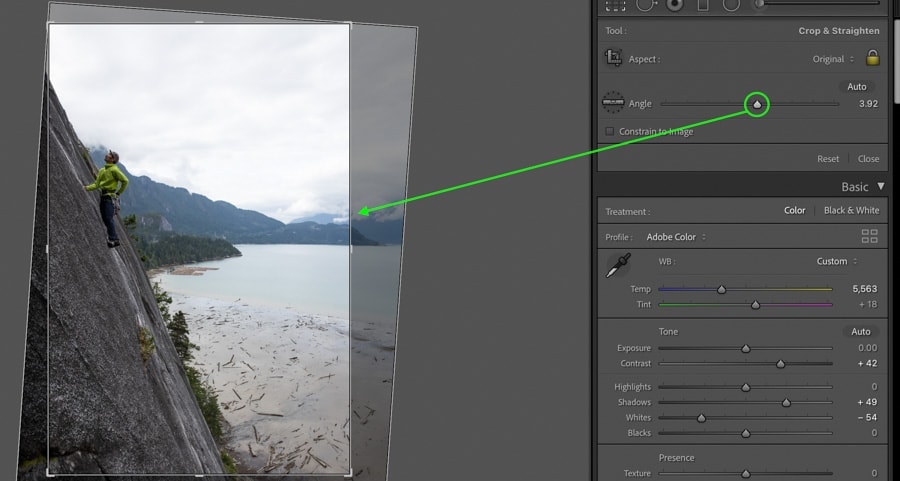
I dive into all the details of these two tools in this post on cropping and straightening in Lightroom!
9. Converting RAW into JPEG
Some editing programs cannot work with RAW files and require you to convert them before import. In other cases, they will convert your RAW file into a TIFF like what’s done in Photoshop.
Lightroom can directly import your RAW files and allow you to edit them without converting them into a different file type. Then when it comes time to export, choosing the JPEG option is as easy as pressing a button.
Even if you didn’t edit a photo and just wanted to convert it to JPEG, you could import the file into Lightroom, then go to File > Export and set the file type to JPEG.
Click Export, and now you’ve just converted a RAW file into JPEG in no time. You could do the same thing with larger batches of images by selecting multiple photos and following the same process.
The simplicity of file management and exporting in Lightroom is another valuable thing you can do in the program.
10. Batch Photo Editing
The final thing Lightroom is commonly used for is batch photo editing. As the name suggests, you can edit large quantities of photos at once with the Sync option in Lightroom.
Let’s say you have several images that all require similar adjustments. Starting with one image, you can make the adjustments that you want to apply to every image in your batch.
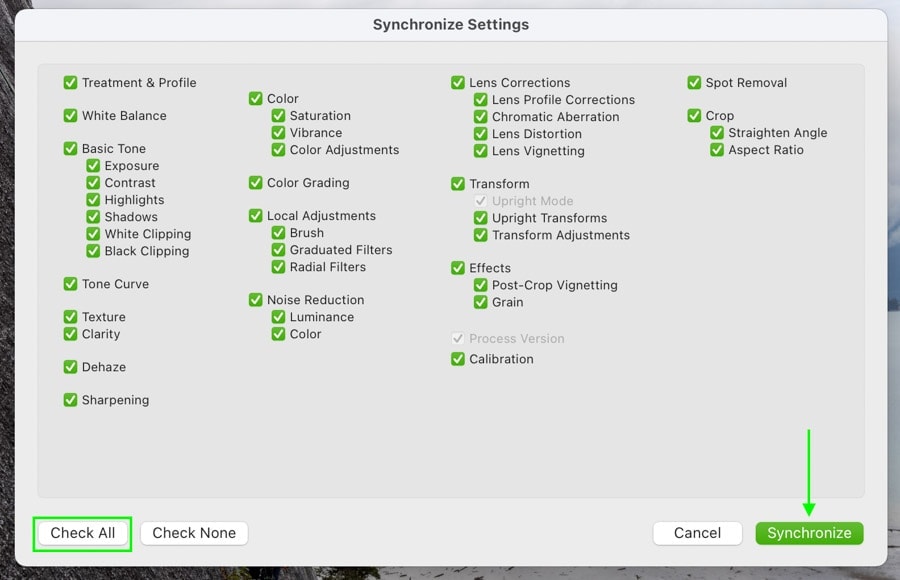
Once the adjustments are set, you can select the other images to apply the same adjustments onto. With all your images selected, just press “Sync” and choose which settings you want to sync between all the photos.

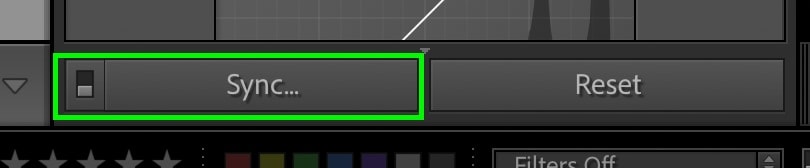
Once applied, all the settings from your first edit will be added to the other selected photos. This way, you’ve quickly edited everything without having to go through the same adjustments manually for every photo.
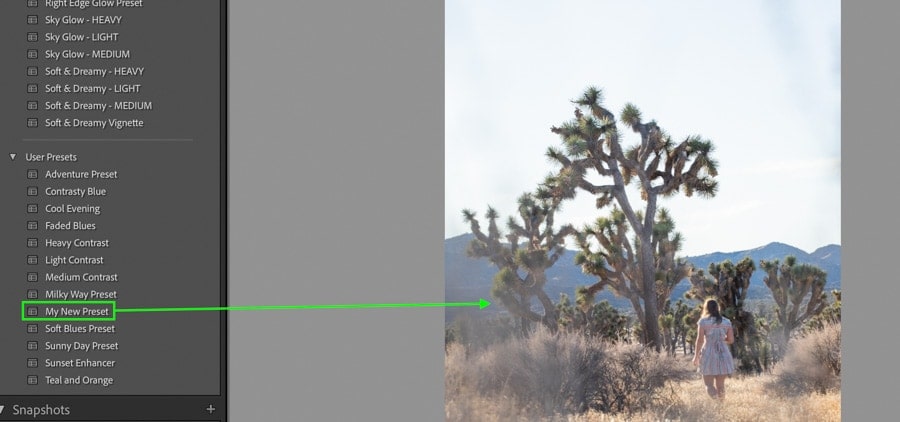
Another way you can do this is with Lightroom Presets. By saving the settings you made into a preset, you can apply those settings to other photos with a single click. This achieves the same result as before, except it can be used between multiple lightroom folders and catalogs. Syncing settings only work for images inside of the same folders.
Now you know 10 common things that Lightroom is used for, but let’s make things a little more exciting. Below shares some cool tricks and features of the program that are worth noting.
10 Cool Things You Can Do In Lightroom
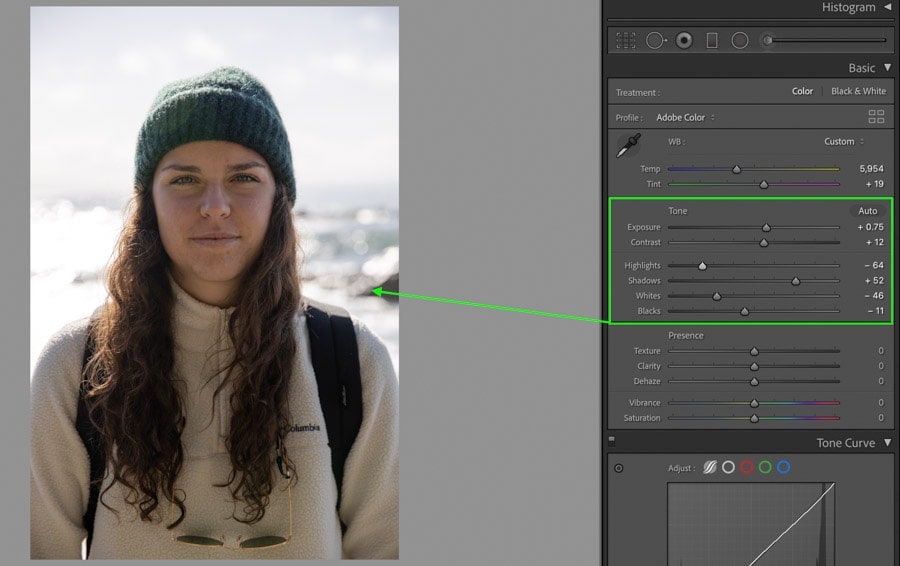
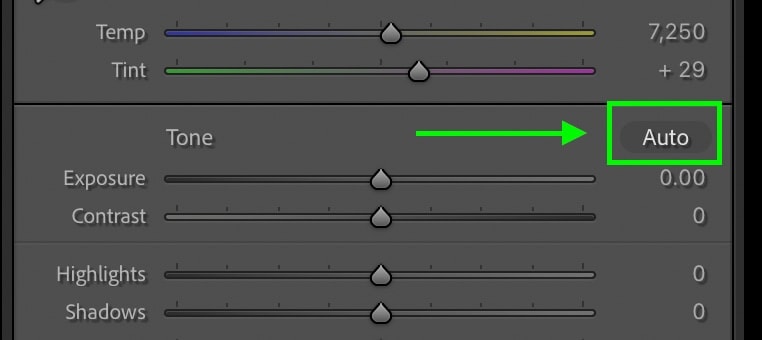
1. Automatically Correct Image Exposure
To get your edit started, automatic exposure correction works wonders. Rather than going through all the sliders manually, Lightroom does a pretty good job of brightening your photo with one click.
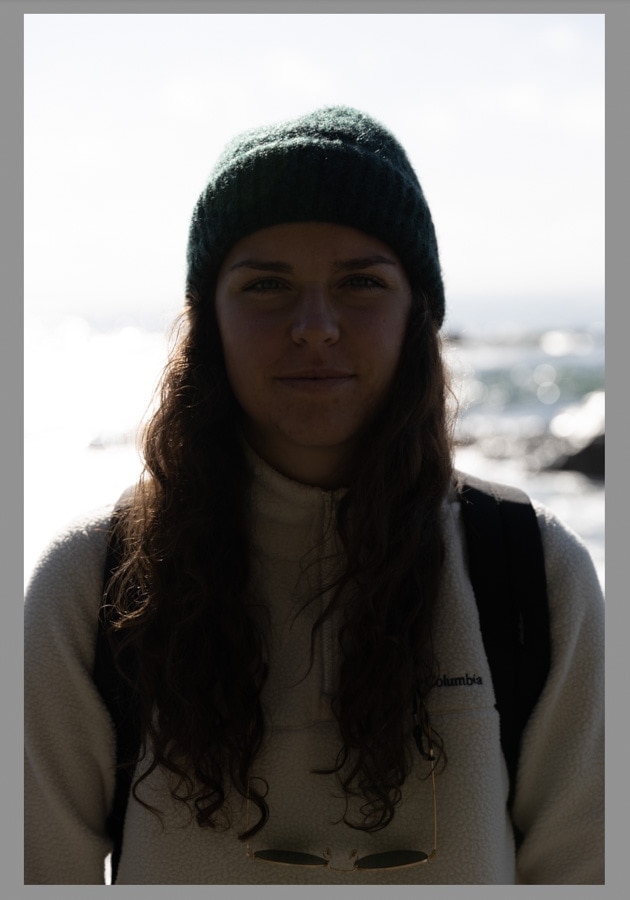
For example, this image is relatively dark and clearly needs to be brightened.
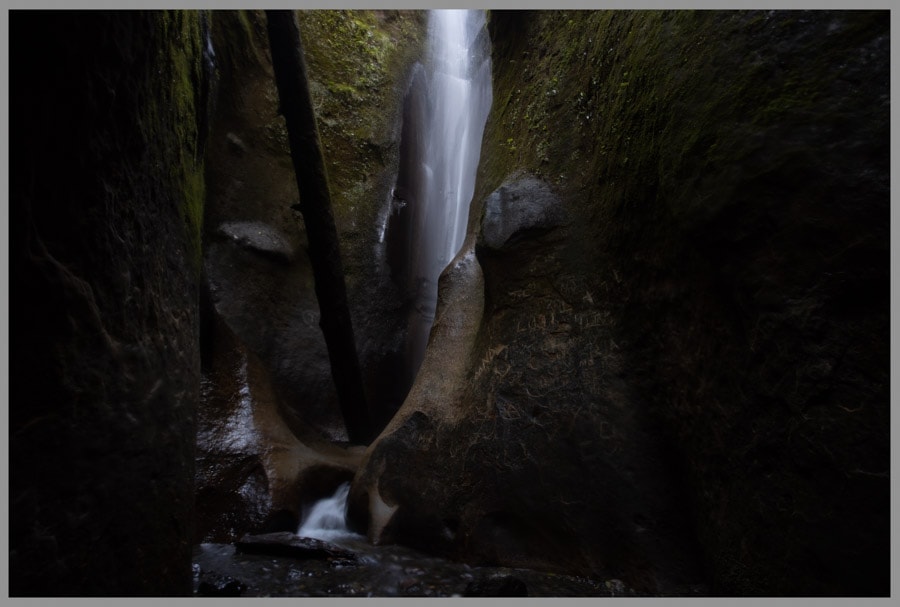
Inside of the Basic Panel above the exposure slider is a button that says “Auto.” Clicking on this button, Lightroom will automatically figure out the best settings to get a balanced exposure.
Now the photo is corrected and has a much better exposure than before.
With that said, this setting isn’t always perfect. The advantage, however, is that it gets the bulk of the work done, so all you need to do is refine it. Rather than going through all of the exposure sliders, you may only need to adjust the shadows and contrast. These little automatic adjustments in Lightroom are perfect for helping save time.
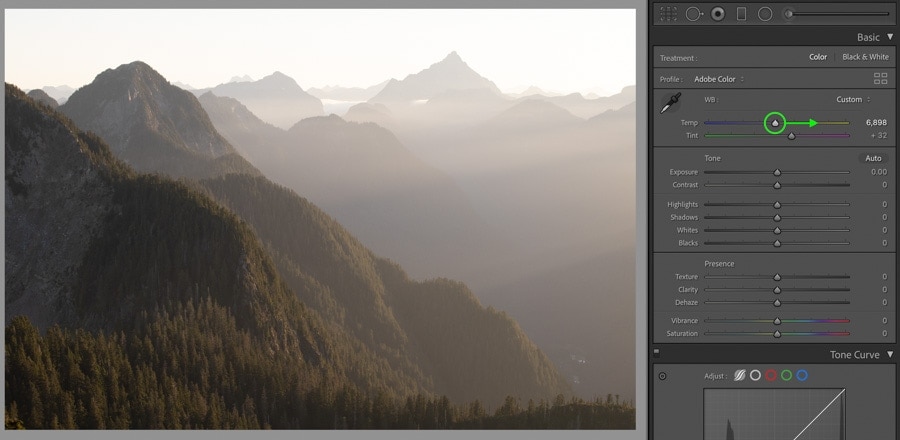
2. One-Click White Balance Correction
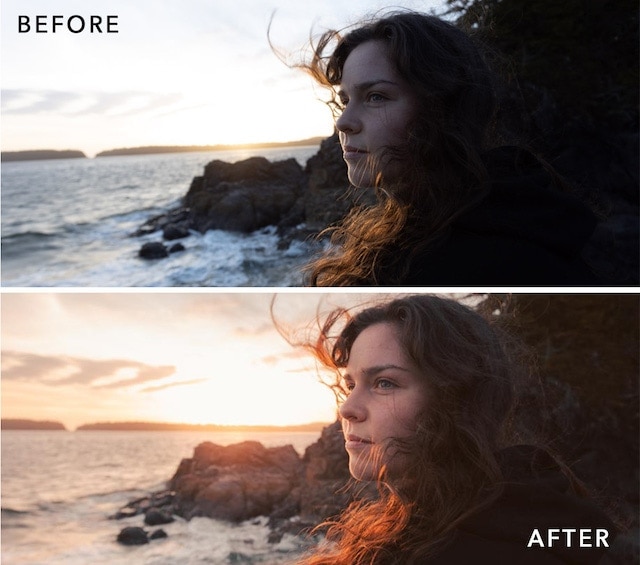
Speaking of saving time, one-click white balance corrections do just that. Let’s take this photo of a hotel room; it’s extremely yellow and needs a different white balance setting.
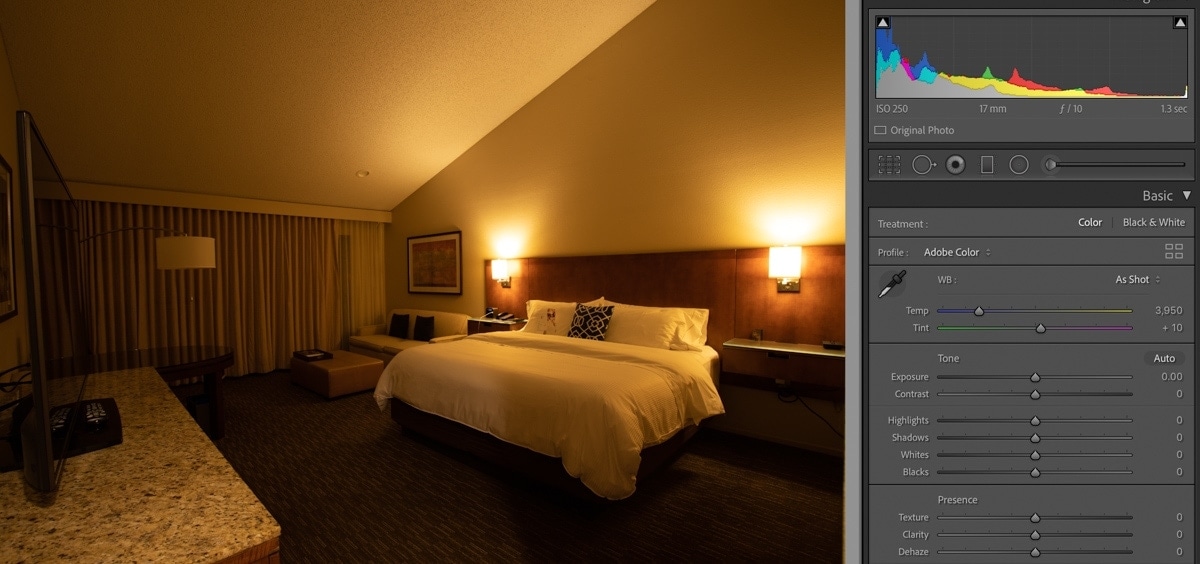
Before, you would have to manually adjust the Temperature and Tint sliders until your colors started to look correct. In Lightroom, click on the eyedropper beside the white balance sliders, then click to sample a white area in the photo.
In this case, I’ll click on the white bedsheets to base the white balance on.
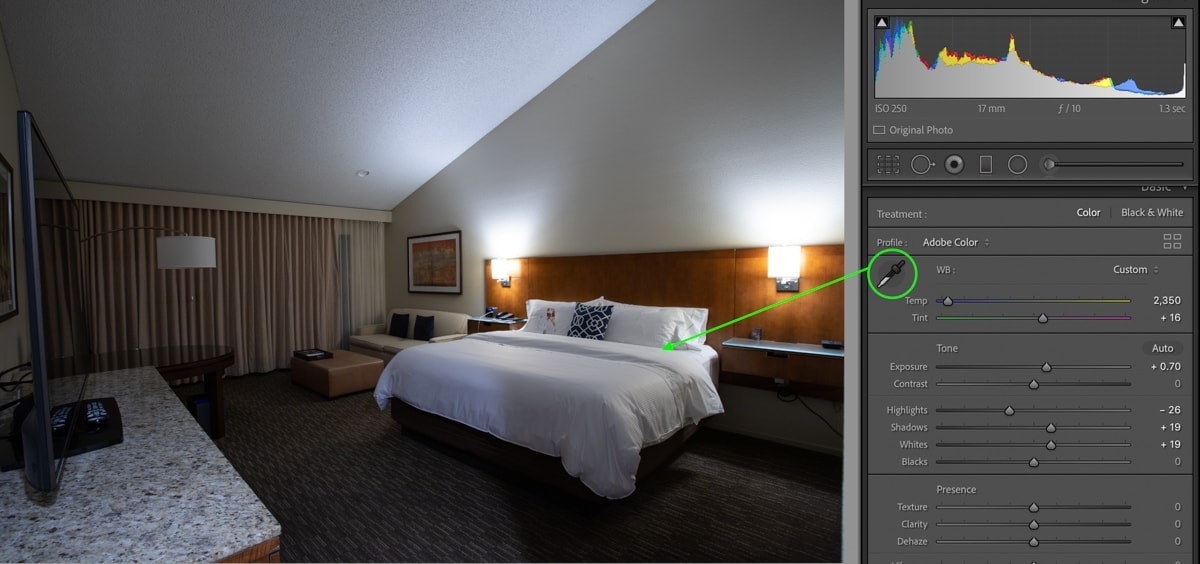
Now the white balance has been perfectly corrected to make the colors look far more accurate in the image. This awesome feature in Lightroom is something you will find a use for in every edit you work on. It works especially well for correcting yellow photos but is also handy for more subtle white balance adjustments.
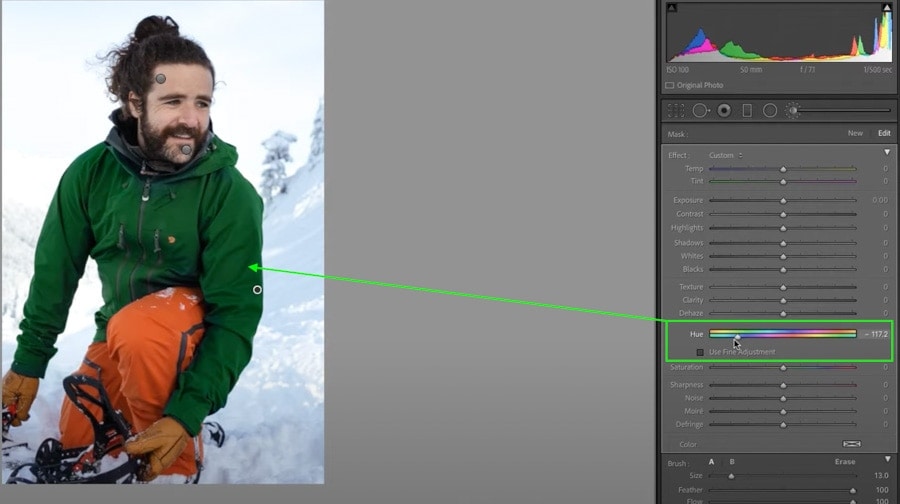
3. Change Colors
Lightroom is a surprisingly powerful tool for changing colors. With recent updates to the program, it contends with the capabilities found inside of Photoshop. Let’s break down the two different options you have for the job.
The most basic option is the HSL adjustment. As you learned earlier in this post, this option allows you to change the Hue, Saturation, or Luminance of different colors. Broken down into 8 different color channels, it’s easy to target any color you wish.
The limitation to the HSL adjustment is that it changes the colors globally. If you only wanted to change the color of a blue jacket, you’ll also change the color of the blue sky or the blue tones found in the shadows. Luckily there’s a different way to change colors in more targeted ways.
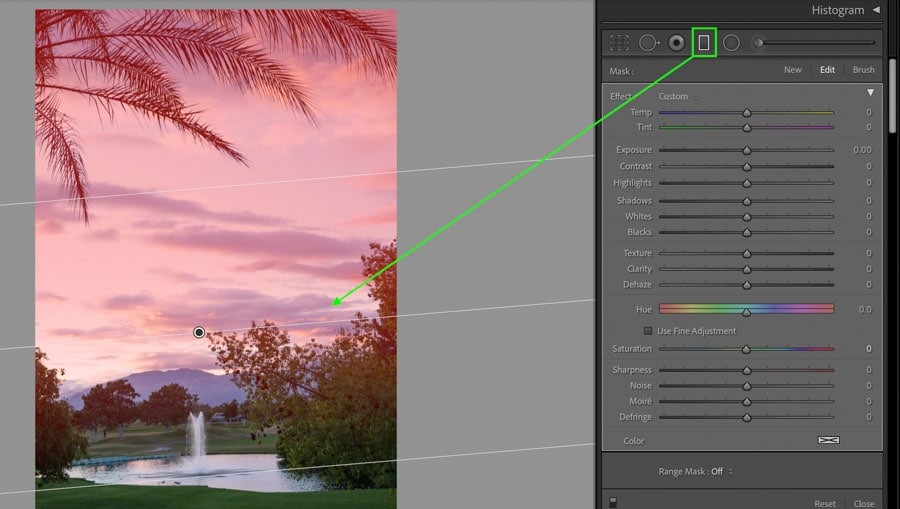
Using the adjustment brush in Lightroom, you can create a mask to tell Lightroom exactly where you want the adjustment to take place.
After creating your mask, there is a hue slider found within the adjustment panel. Here you can change the hue of your selected area. Since the jacket is selected, only that color will change without affecting the surrounding areas.

You may want to change colors in Lightroom for creative reasons or just to fix some sort of discoloration. Whatever the reason, Lightroom offers a couple of effective ways to do so.
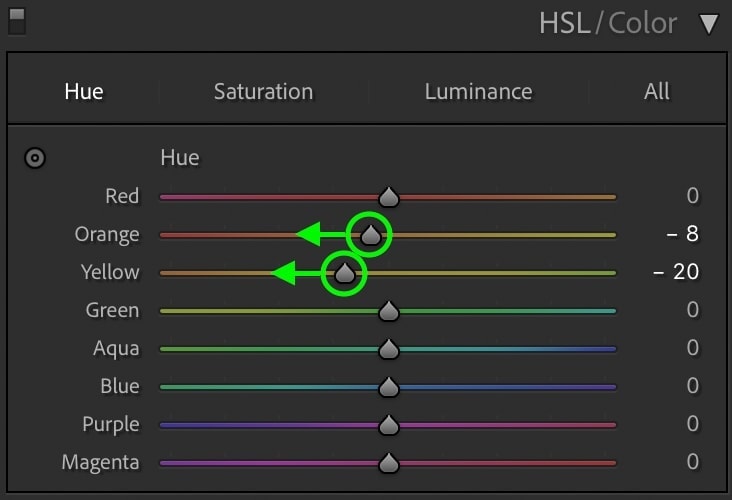
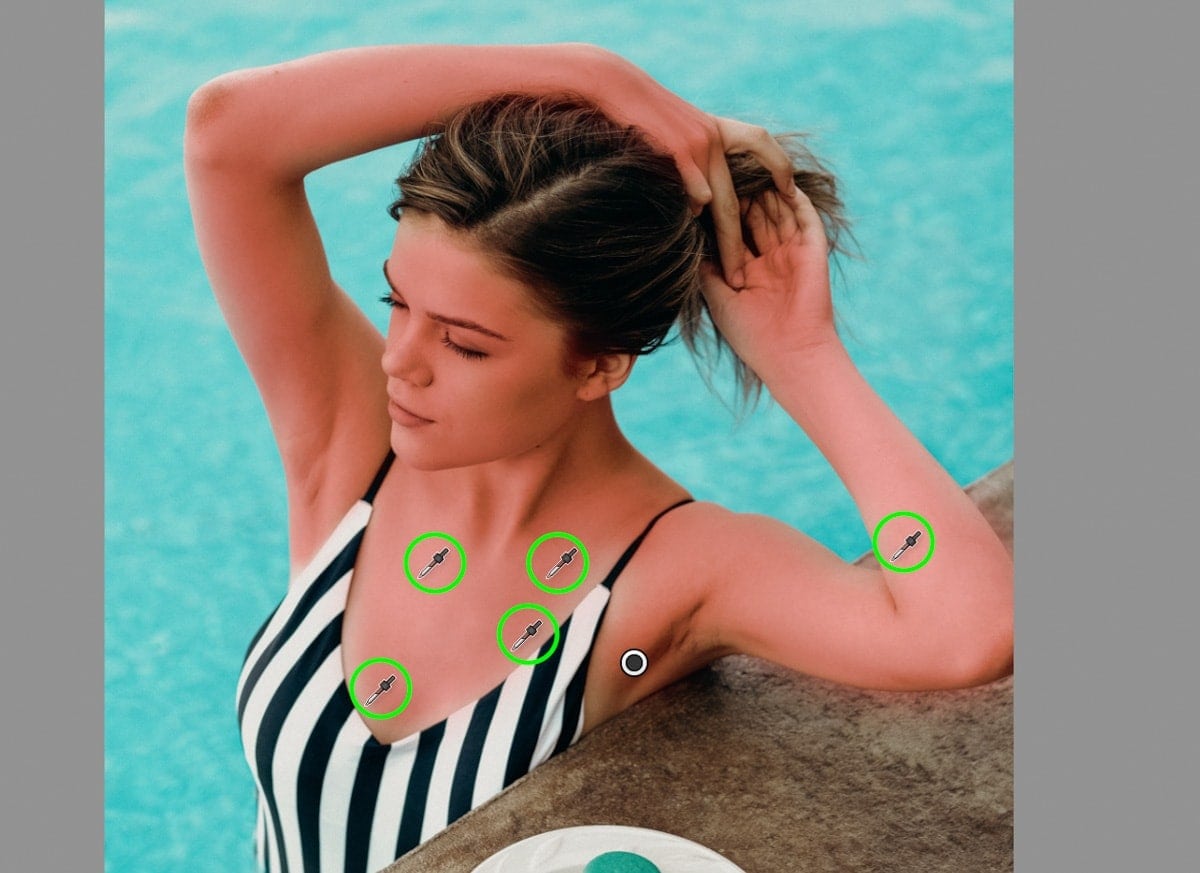
4. Make Yourself More Tanned
Another cool thing you can do with Lightroom is to get your tan on without actually seeing the sun. If you’re like me, who lives somewhere that it rains most of the year, the chances of getting a tan are slim. Luckily Lightroom can help you fulfill your dreams of golden skin color.
There are two different ways to accomplish this. The easiest way is by selecting the yellow or orange hue adjustment in the HSL panel and shifting it towards a deeper orange/red color.
If this method doesn’t quite achieve the result you want, the second option is to use a Luminance Mask to selectively add color to your skin tones. I highlight all the details in the video above.
5. Enhance The Sky
One of the easiest ways to enhance a photo in Lightroom is to make the sky pop more in your photo. With the help of a gradient filter and some contrast, you can do just that.
First, start by creating a gradient mask to cover your entire sky. The further you stretch the gradient, the softer it will blend into the photo. You can learn more details about this tool here.
With the gradient in place, bring down the exposure slider slightly to darken the overall sky.

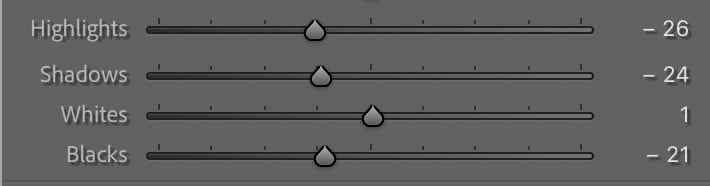
Then adjust the highlights, shadows, whites, and blacks sliders to improve the contrast.
Lastly, move the dehaze slider to the right to deepen the contrast in the sky and make it appear more dramatic than before.
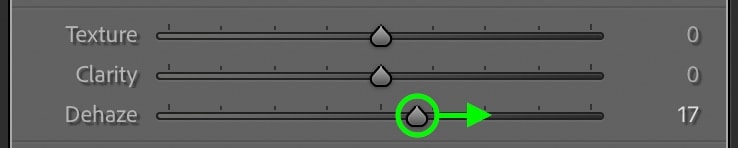
With just a few sliders and the gradient filter, you can quickly enhance your sky in Lightroom. This is one of the easiest things you can do to improve the look of your photos and is a really cool thing to try in Lightroom.


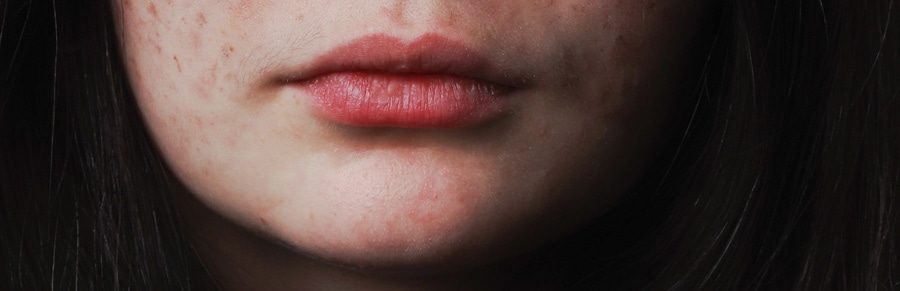
6. Remove Blemishes
Lightroom can be used for quick blemish removal and skin retouching. With the help of the Spot Removal Tool, all it takes is one click, and Lightroom will automatically cover up unwanted imperfections.
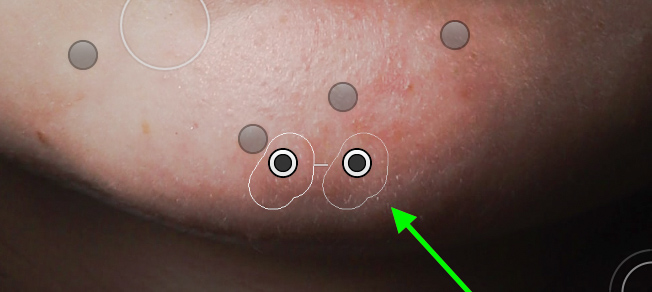
To do this, access the Spot Removal Tool or press Q on your keyboard.
Then set the brush type to “Heal.” When working with skin, this setting will help blend in your clone adjustments more realistically.

Now click over the blemishes you want to remove. If there is a larger area you need to select, click and drag to paint a larger spot removal area. Lightroom will automatically find a similar area in your photo to cover up the blemishes.
After going through and making a series of spot removal adjustments, you can touch up any blemish in a matter of minutes. It’s pretty awesome how quickly Lightroom can do this, don’t you think?
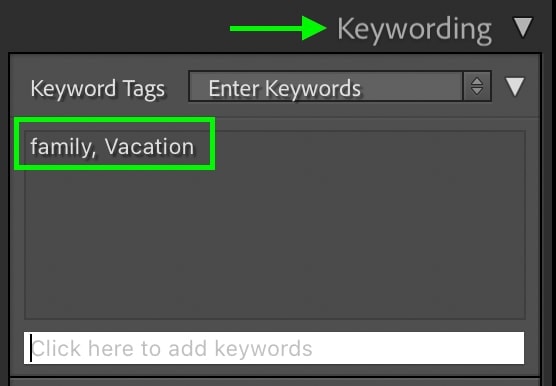
7. Sort Images By Keywords
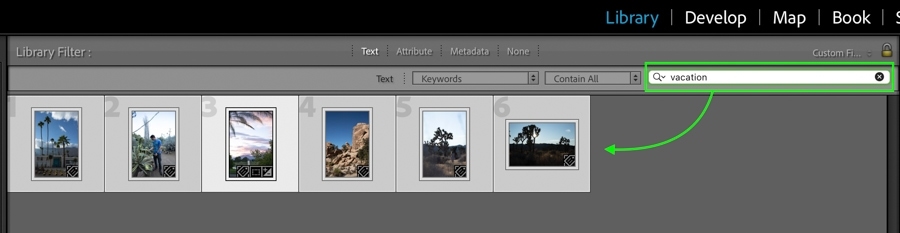
Inside of every Lightroom catalog you have, there are likely hundreds, even thousands of photos. If you need to find one particular image, or more specifically, a theme of images, it might be hard to know where to begin. A great thing you can do in Lightroom is add keywords to your images, so it’s easy to find them later on.
To add a keyword to a photo, select your image(s) and access the Library Module.

On the right side, open the panel that reads “Keywording.” Here you can begin to type in all the related keywords for your selected photos. If these were all vacation photos, you might keyword the images with “Vacation, Personal, Mexico, Family.”
Once the keywords are added to a photo, you can search for those keywords to find them within your catalog. In the Library Filter settings, click “Text,” then set the text type to “Keywords.”

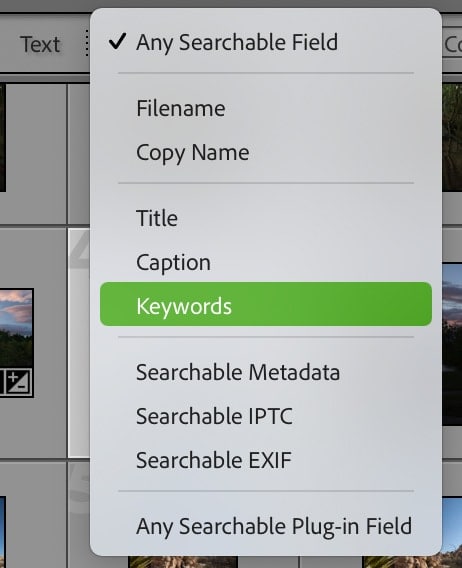
Typing in your specific keywords into the search bar, any photo matching that keyword will appear. There truly isn’t a faster way to locate your images than with this simple technique!
8. Apply Lightroom Presets
If you aren’t familiar with Lightroom Presets, they are a set series of editing adjustments that can be later applied to other photos. If you have a particular editing style you love, creating a preset for it is a great way to achieve that look in less time.
You can get a variety of Lightroom presets online or create your own. Regardless of where you get them, presets are an amazing part of Lightroom that streamlines your workflow.
If you decide to purchase Lightroom presets online, check out this post to install them.
But let’s dive into how to actually make a preset for yourself (because it’s free!)
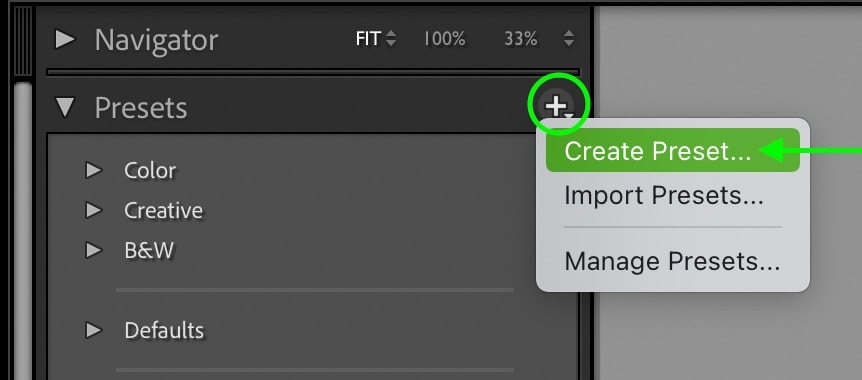
First, you’ll need to make whatever adjustments to your photo you want to save as a preset. Once everything is applied, click on the + icon beside the Preset panel and choose “Create Preset.”
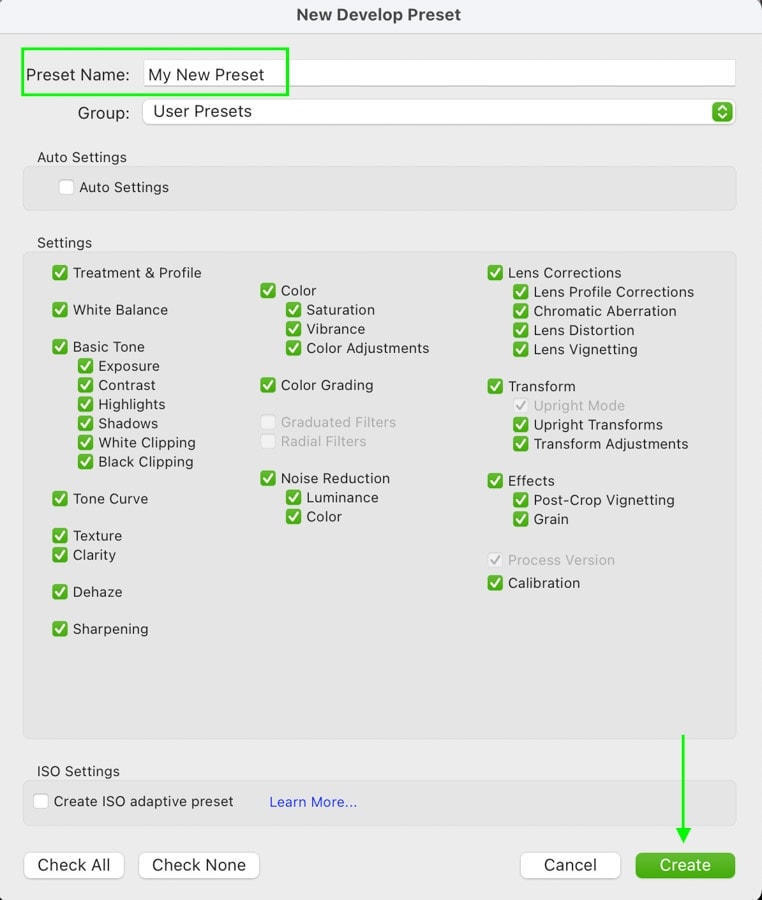
A new window will appear with the different adjustments you can include in your preset. If you want every adjustment to be saved, click “Check All.” Add a name for your preset then click Create.
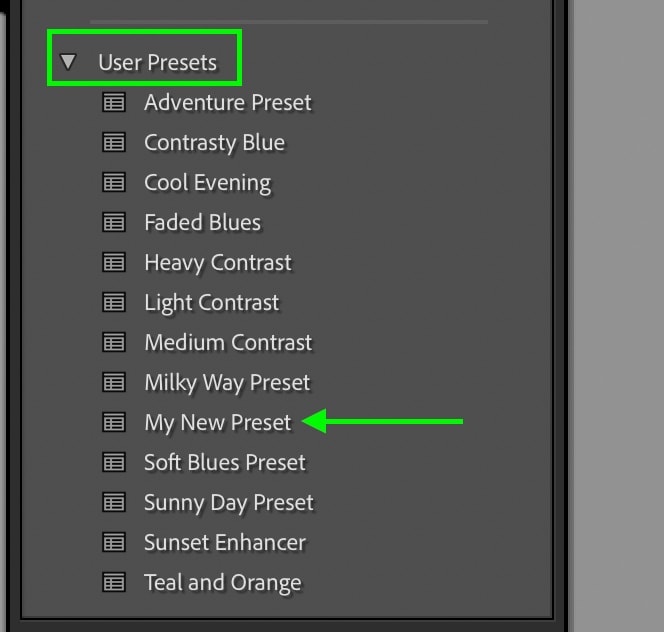
A new preset will be saved that can be accessed inside of the Preset panel. Selecting a new photo, opening the Preset panel, then clicking on the preset you just created, that same look will be applied to your new photo.
Presets are an awesome feature in Lightroom that helps improve your workflow and help you create better editing styles.
With that said, you may want to know the secrets to make your photos look epic without needing presets. Luckily I provide all the answers to this in my Lightroom Course.
9. Create Slideshows
After editing all your photos, you’re probably ready to show them off. If you have a presentation you’re about to do or just want a better way to show everything off to friends and family; slideshows are a great option. In Lightroom, you can create custom slideshows without ever leaving the program.
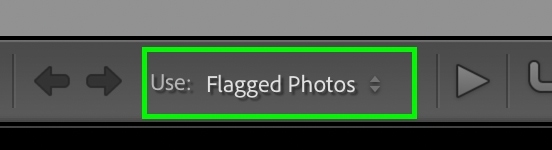
To create a slideshow in Lightroom, click on the Slideshow module.

The images available for the slideshow will be the ones inside of your currently selected image folder. If you only want to add a few of these images to your slideshow, using ratings or flags is an easy way to filter them. After adding flags (P) to select photos, set the “Use” option to “Flagged Images” in the toolbar.
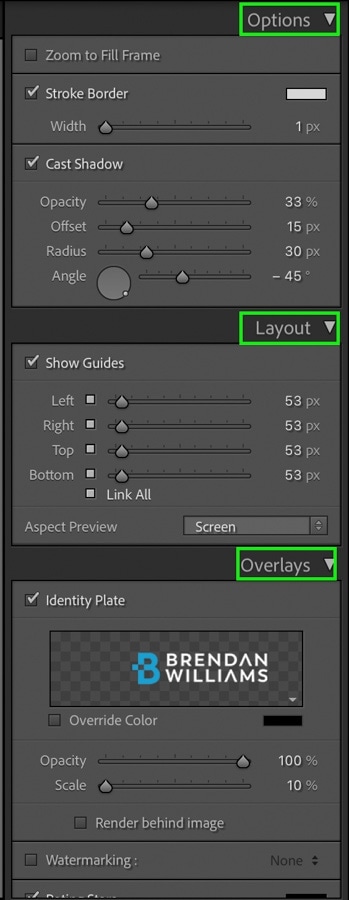
To customize the look of your slideshow, go through the Options, Layout, and Overlay panels on the right.
With everything set, click “Export Video” to save your slideshow as a shareable MP4 file from Lightroom.
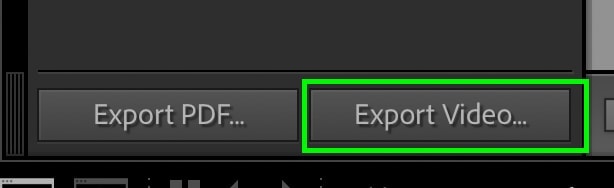
Now you can easily view your images in a video without having to use any external software. Especially if you love sharing your photos with friends and family, this is a really awesome thing you can do with Lightroom.
10. Merge Panoramas Automatically
If you have ever tried to merge a panorama manually, you know how much of a pain it is. An awesome part of Lightroom is the automatic panorama merge options inside the program. It works extremely well 9.5 times out of 10 for both horizontal and vertical panoramas.
To merge panoramas, first select the series of photos included in the panorama by holding Command/Control and clicking between each image.

Then right-click on the highlighted photos and choose Photo Merge > Panorama.
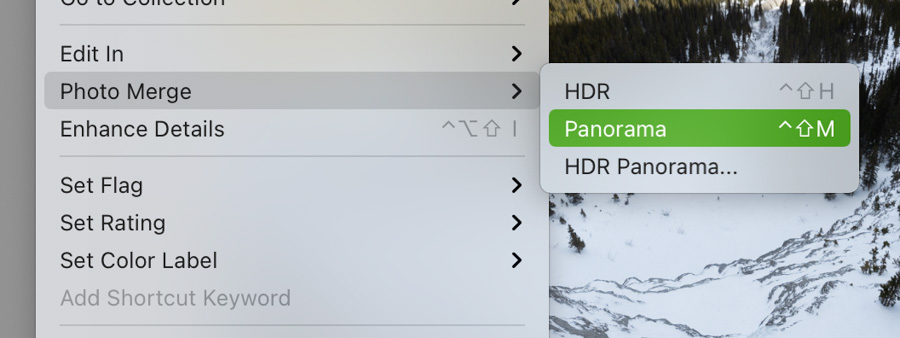
A new window will appear with a variety of options for your Panoramas settings. Try clicking between the different settings to see which option works best. Once complete, click Merge.
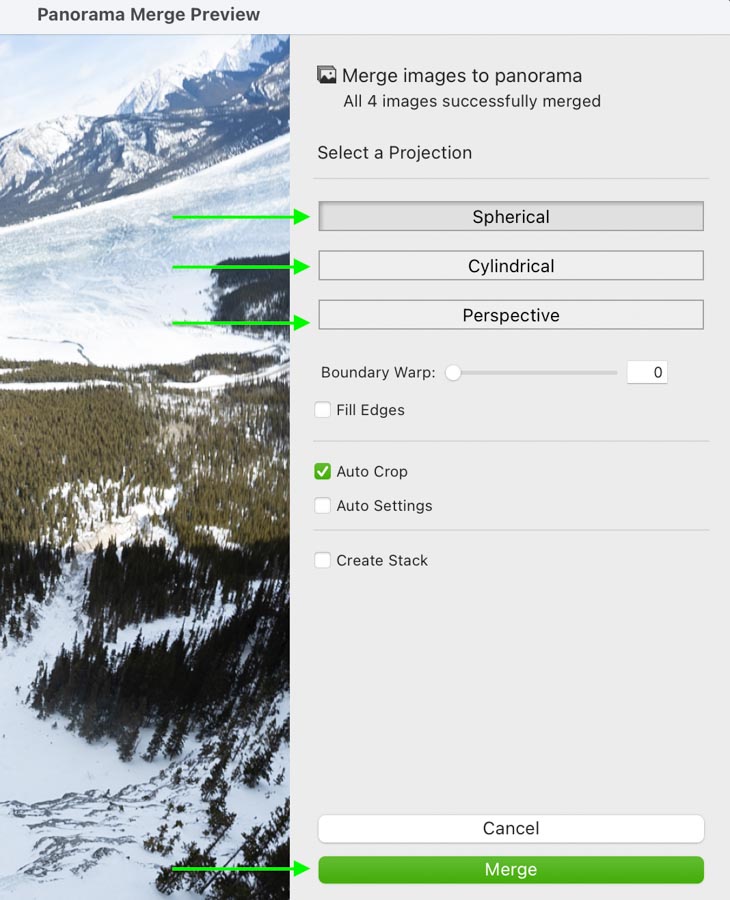
Lightroom will automatically merge your images to create a single panorama located beside the initial photos. This feature is a massive time saver compared to doing it manually and does an excellent job. This is one of my favorite things to use inside of Lightroom!

10 Awesome Types Of Editing To Try In Lightroom
So far, you’ve learned 20 different things you can do in Lightroom based on adjustments and program features. Let’s now dive into 10 types of photo editing you can do to make your photos look more professional. The tutorials below cover how to create these looks in either Lightroom or Lightroom Mobile.
1. Dark & Moody
The dark and moody look is great for gloomy days or photos in the forest. With high contrast and darker exposures, this look will make your photos have a moody eerie feel to them!
2. Black Tones Look
The black tones editing style is commonly used for a high-class look in your images. By desaturating and darkening the dominant colors in your photo, your image takes on a sleek minimalist look.
3. Soft Muted Colors
Rather than going overboard with saturation, muted colors look great with portraits and travel photos. This look makes colors appear more pastel and give the image a more aesthetic feel.
4. The Dreamy Editing Style
The dreamy editing style can be used in a section of your photo or across the entire thing. It works well for all genres, including landscapes, milky way, and portrait photography. This look is created with a specific set of steps in Lightroom outlined in the video above.
To achieve this look in less time, check out this soft and dreamy preset pack.
5. Soft Brown Tones
Brown tones are a crazy popular look in the photo world right now. From Instagram to Pinterest, you’re bound to find this look across a variety of genres. These tones tend to stump a lot of photographers since there isn’t any brown adjustment in Lightroom. Instead, you need to mix a few different colors to achieve this type of look.
6. Orange & Teal Editing
The classic color palette of orange and teal adds a colorful and stylized look to any photo. This is achieved with a few basic color adjustments to enhance the teals and oranges in your photo. Even if they aren’t in the image naturally, it’s simple to add these tones into your images with the help of Lightroom!
7. The Film Look
If you love the film look but don’t actually have a film camera, you can replicate it in Lightroom. This type of photo editing favors less contrast and washed-out tones to match the look of real film. Best of all, you can add film grain to your photos for a more convincing look.
8. Bright & White
Popular on Pinterest and amongst food and family photographers, the bright and white look makes any image feel carefree and light. With the help of the exposure sliders and some targeted luminance adjustment, the bright and white editing style can be achieved in no time.
9. The Urban Look
Especially for city photographers, the urban look provides a gritty feel to your photos. This style is an awesome option to make your images stand out with muted colors, high contrast, and more grey tones.
10. Warm Summer Tones
Who doesn’t love a nice beach vibe? With the warm summer tones editing style, you can make it feel like summer, no matter the season. This editing style favors low contrast and warm tones to give your images a summer aesthetic. It works especially well for portrait photos but can be used for any genre!
Want To Master Lightroom? Here’s How:
Now that you know how many things you can do in Lightroom, all that’s left is to practice. The problem is learning Lightroom can be overwhelming, especially when it comes to how to edit your photos the way you want them to look.
Well, that’s exactly what you’ll learn in my Lightroom course called Photo Editing Unlocked.
Whether you’re a complete beginner or an advanced Lightroom user, this course will help you unlock the secrets of more professional edits.
This is done with a learning strategy I like to call the 5 Editing Style Pillars. By mastering each of these editing styles, you can take pieces of each to create your very own editing style.
Photo Editing Unlocked offers a direct step-by-step learning model to make your images stand out from the crowd. Better yet, you’ll even learn how you can replicate any editing style you see online.
To get more details and get lifetime access to this Lightroom Course, click below!
Enroll In Photo Editing Unlocked Today!
Happy Editing!
Brendan 🙂


