

If you’re dealing with a photo that has flat contrast, this can throw a wrench in the editing process. Luckily, you can learn how to dehaze in Photoshop via Camera Raw to improve the clarity of your images.
Dehaze boosts the contrast and detail in a specific tonal range of the image. This will help enhance details through fog or haze in your picture and make a big difference in the final edit. So, let’s learn how to dehaze an image in Camera Raw.


How To Dehaze An Image Using Camera Raw
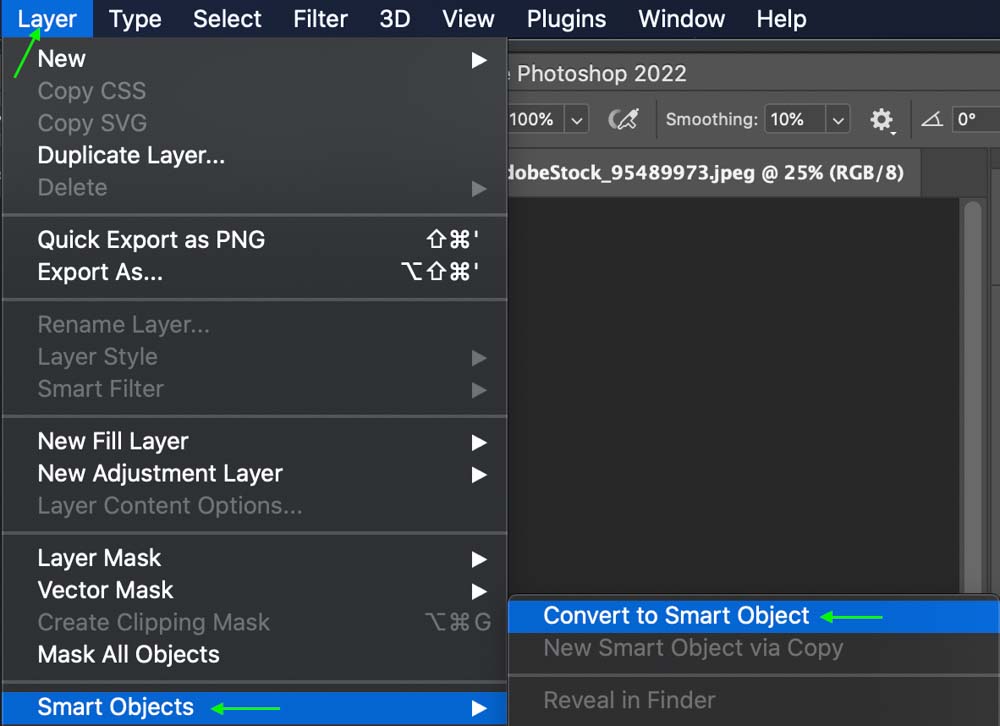
Step 1: Go To Layer > Smart Objects > Convert To Smart Object
Open your image in Photoshop. If your image is a raw file, Camera Raw will open automatically. In this case, skip to Step 3. Otherwise, you should first convert the image into a smart object to easily edit it further at a later stage. Once your file is open in Photoshop, head to Layer > Smart Objects > Convert to Smart Object.
Step 2: Open Camera Raw By Going To Filter > Camera Raw Filter
Now that your image layer is converted to a Smart Object, you can open Camera Raw by heading to Filter > Camera Raw Filter. The Camera Raw workspace will open.

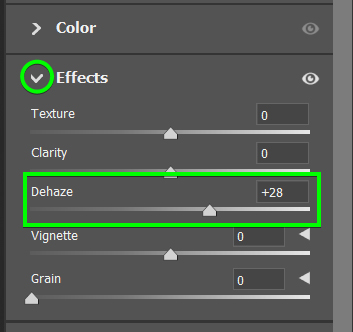
Step 3: Adjust The Dehaze Slider In The Effects Tab
Open the Effects tab to find the Dehaze slider. To increase the Dehaze Effect, simply drag the toggle to the right. Your image will change as you move it.
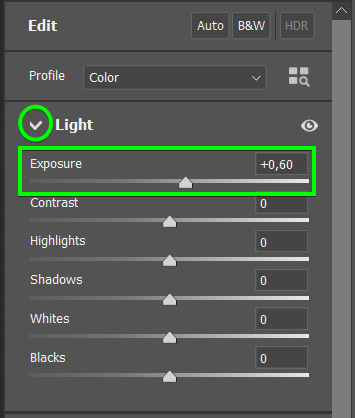
Step 4: Adjust The Exposure Slider In The Light Panel (Optional)
Head to the Light tab. You can ensure the image still looks appealing by increasing the exposure slider slightly. You don’t want the effect to wash out the image too much – just increase it by a few points. This will prevent the dehaze effect from overly contrasting the image and losing some detail.
Step 5: Click OK To Apply The Changes
Once satisfied with the effects, you can click OK to apply your changes to the image.

Your image will match the adjustments you’ve chosen, and when compared with the original, you’ll notice a much sharper, clearer image.
How To Open Raw Images As Smart Objects In Camera Raw
If your image is a raw file and it automatically opens in Camera Raw, you can still save your changes as a smart object when exiting Camera Raw by holding the Shift key while clicking the open button. Upon pressing Shift, the button will read Open Object.

This will open your image layer as a smart object, which allows you to change the Camera Raw adjustments at any time without them being permanently written into the file. In the layer thumbnail, you’ll see the Smart Object icon in the bottom right corner.


