

Camera Raw is a simple yet powerful plugin in Photoshop that proves useful to just about everyone, but why exactly should you use it? There are already so many tools within the Photoshop workspace that can achieve just about any adjustments you could need. So why bother with Camera Raw?
Adobe Camera Raw is a powerful and intuitive built-in Photoshop plugin that allows you to apply quick edits to any RAW file or layer in the program. Camera Raw allows you to make quick and professional editing adjustments to your photos non-destructively to enhance exposure, colors, and more.
Even if you are a complete beginner in Photoshop, Camera Raw is an extremely simple tool to use. Since it’s so useful to all levels of Photoshop users, there are a ton of reasons why you would want to use it in your workflow. Let’s get into a few of those reasons here!
What Is Camera Raw?
Camera Raw is a plug-in Adobe software that’s included with Photoshop in the Creative Cloud suite. It’s useful for applying general editing adjustments to all kinds of files but opens automatically when you open a raw file in Photoshop. You can also open Camera Raw with jpegs, but I’ll explain that later on.
On the surface, it may seem that you need to choose Camera Raw OR Photoshop for your photo editing, but luckily that’s not the case. Camera Raw can be applied directly to a layer or used as a smart filter beneath any smart object. Since it’s not layer-based, editing a photo in Camera Raw is much simpler than in Photoshop. By dragging around a few sliders, you can quickly enhance your images; no layer masks or endless layer stacks required!
Being that it’s both useful for fast image enhancements and highly user-friendly, it’s a great tool to include in your editing workflow.
Why Use Camera Raw In Photoshop?
1. Exposure And Color Adjustments Are Made Easy Without Layers
In Photoshop, it can be difficult to make simple adjustments to your photo. It is often unnecessary to have so many steps in basic edit when you could easily open Camera Raw and make your edits there. This is because, in Camera Raw, you’re not working with any layers. Instead, you have sliders to adjust.
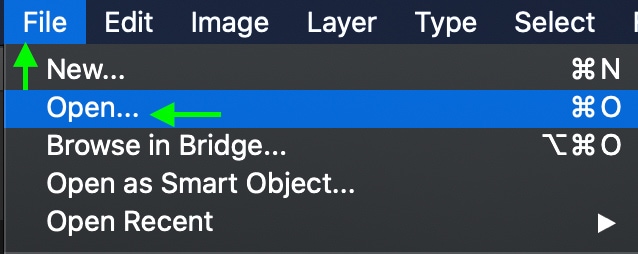
As I’ve mentioned, Camera Raw opens on its own when you open a raw file in Photoshop. You can open your RAW file by heading to File > Open and select the files you’d like to work with.
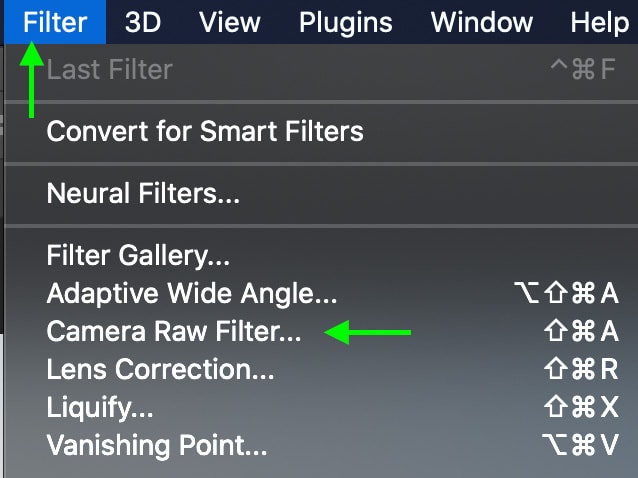
However, you can use Camera Raw with files that aren’t raw, such as TIFF or JPEG files. To do this, go to Filter > Camera Raw Filter to open your selected existing layer in Camera Raw. You can also use Shift + Command + A on a Mac or Shift + Control + A on a PC.
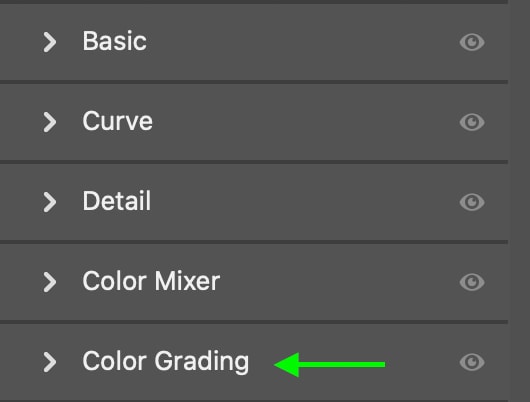
To begin editing an image with Camera Raw, make sure the Edit icon (at the top of the left toolbar) is selected.

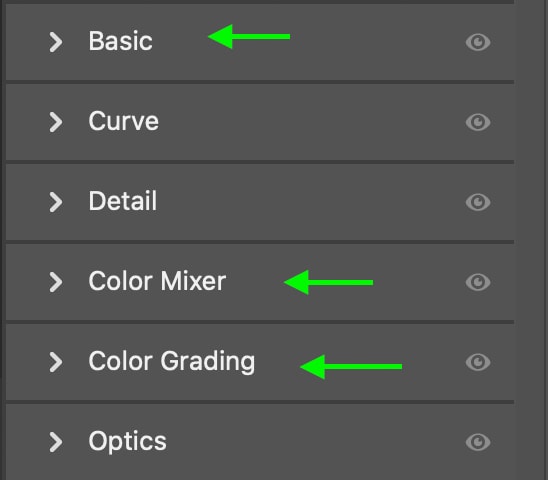
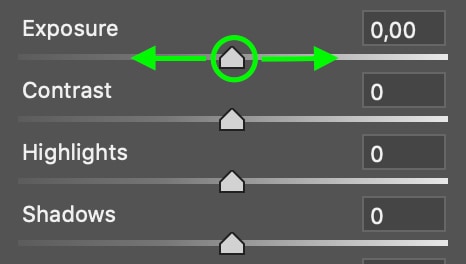
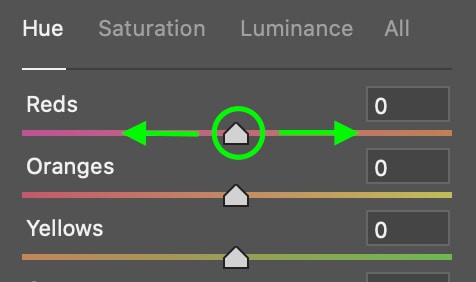
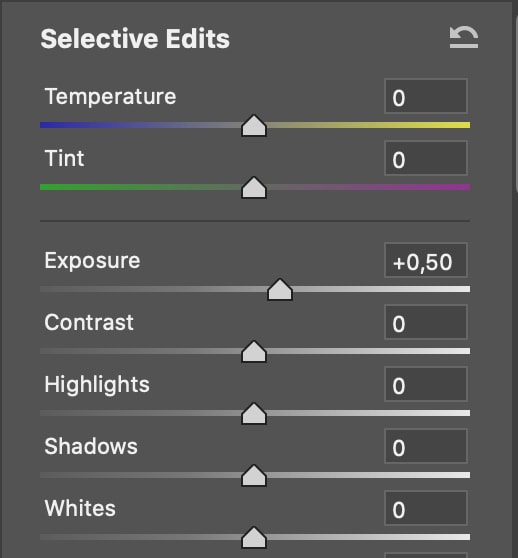
Here you will see different options to edit your photo with. For example, edits to the photo’s exposure can be made within the Basic panel, while you can make color adjustments in the Color Mixer or Color Grading sections. You can also make temperature adjustments in the Basic panel. If you are familiar with editing in Lightroom, this is almost exactly the same.
You’ll notice the tools are pretty intuitive to use in Camera Raw. For example, you can slide the bar up or down to increase or decrease exposure or change the HSL of different colors.
As I mentioned, this layout is reminiscent of working in Lightroom, so if you spend a lot of time in Lightroom, you’ll likely have no trouble at all working in Camera Raw.
2. Easier Batch Editing
It is technically possible to batch edit in Photoshop, but there are many steps, and it’s needlessly complicated. Batch editing in Camera Raw, however, is much easier and more streamlined.
To apply edits to multiple photos at once, open your files to edit by going to File > Open and selecting any RAW images you’d like. You can select multiple by holding down Command on a Mac or Control on a PC while selecting your photos.
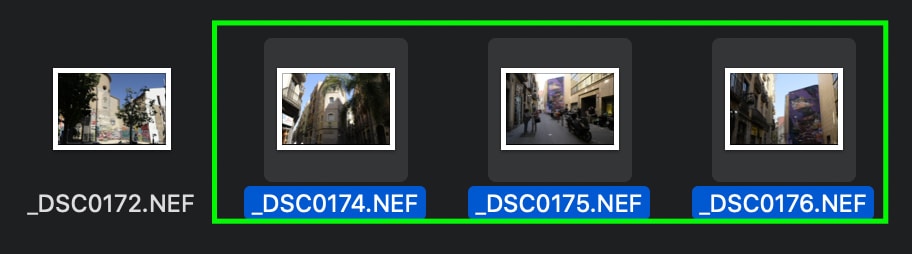
In the Camera Raw window that comes up, select all the photos you’d like to edit by holding down Command on a Mac or Control on a PC and clicking the images. A gray outline around the photos indicates they’re selected.
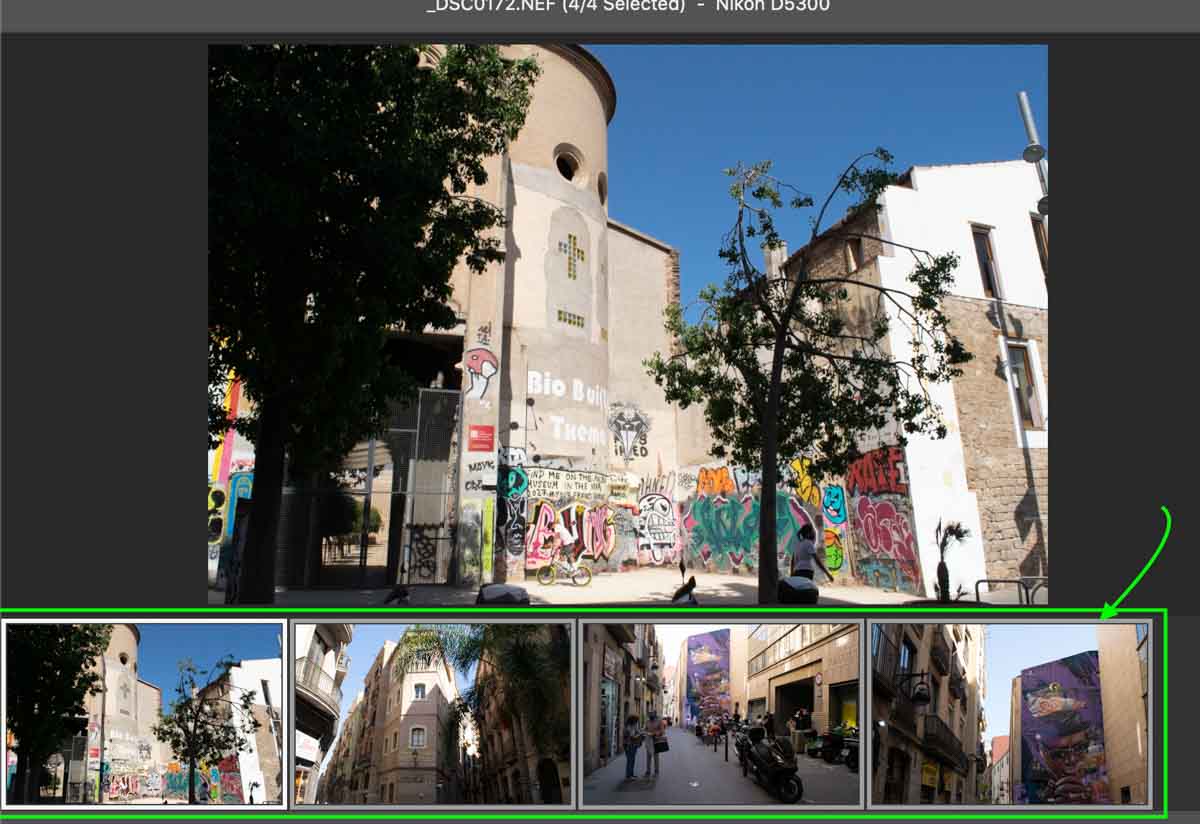
From there, any edits you make to the main photo you’re working on will automatically apply to all other images you’ve selected. You can watch this happen in real-time, as the previews at the bottom will change according to the edits you make.
Before:
After:
Keep in mind, if you unselect the photos, any edits you make will only apply to the image you’re working on.
3. You Get Access To Tools Not Available Elsewhere In Photoshop
You’ll find that some of the adjustments you can make while working in Camera Raw aren’t available in other areas of Photoshop. For instance, while you can change the colors of specific elements in your photo in Photoshop, there is no Color Grading tool specifically. The same goes for other common adjustments like texture and clarity enhancements.
In Camera Raw, you get access to all of these tools not available in the main Photoshop workspace. Since you get a few more options than what’s found with regular adjustment layers, this proves to be another useful reason to use Camera Raw!
4. You Can Apply Presets
Camera Raw gives you the option to quickly apply XMP presets to as many photos as you’d like. To do this, click the Presets icon in the toolbar on the right.
Here you’ll see all your presets listed. Click the one you’d like to apply to your photo.
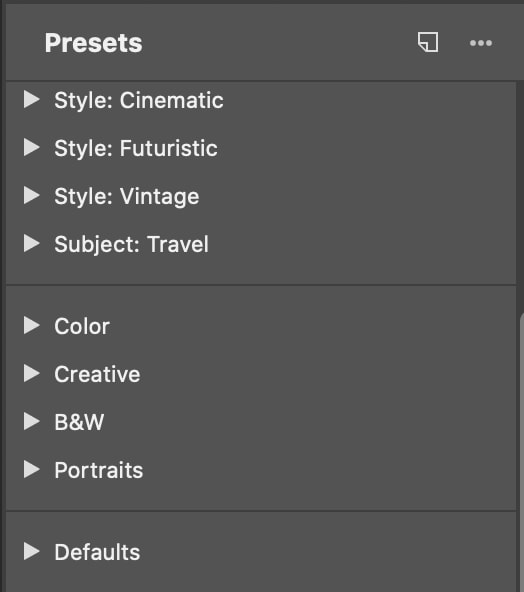
To apply a preset to multiple photos, select all the images you’d like to apply a preset to in the filmstrip. By clicking on a preset, you’ll then see the preset applied to all the selected images.
To remove a preset from your photo, simply click it a second time. After that, it should disappear from the image.
Like many of the features we’ve discussed so far, you can apply presets to photos while working in Photoshop, but it is much faster and less complicated to apply them in Camera Raw. It is also much easier to use Camera Raw if you’d like to apply presets to multiple photos at once.
5. Selective Adjustments Are More Beginner Friendly
While Photoshop allows you to do incredible things with images, working with its countless tools and features can be pretty confusing for many beginners. One of these confusing things being layer masks and adjustment layers.
It can be pretty overwhelming to understand working with layers for a beginner photographer, so using the selective adjustment tools available in Camera Raw is a much easier alternative. These tools include the adjustment brush, the graduated filter, and the radial filter.
If you’re familiar with Lightroom, you’ll notice these tools function pretty much the same way in both software and allow you to make basic selective edits. Things like spot exposure, color, sharpness, clarity, and saturation adjustments, for example.
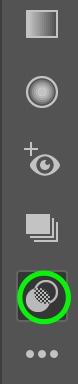
To use these tools, open up your photo in Camera Raw and head to the toolbar on the right. The adjustment brush tool allows you to make localized edits to a specific area of the picture that you paint on with the brush. To access this tool, click the brush icon.

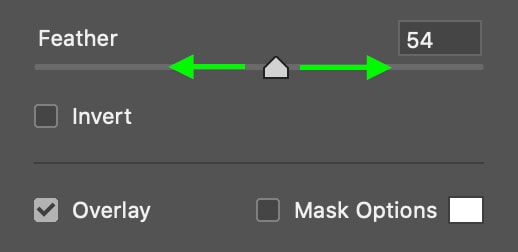
You can increase or decrease the size of the brush (represented by a circle when you hover over your image) using the Size bar. Click the arrow next to the Size setting to reveal drop-down options for the feathering, flow, and density of your brush.

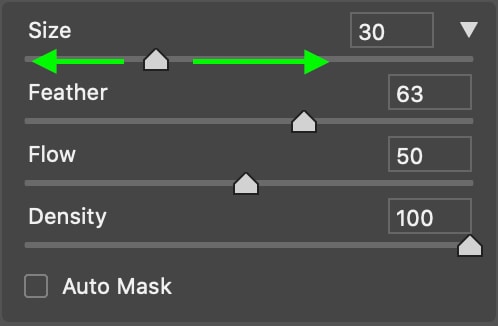
Below these settings, you’ll find all the adjustments that can be applied to your selected edits.
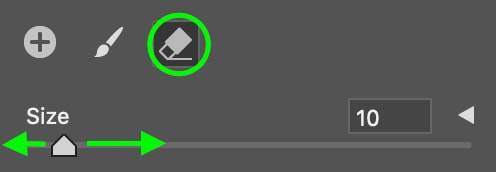
To erase your spot brush adjustments, select the eraser tool and change the size according to your needs.
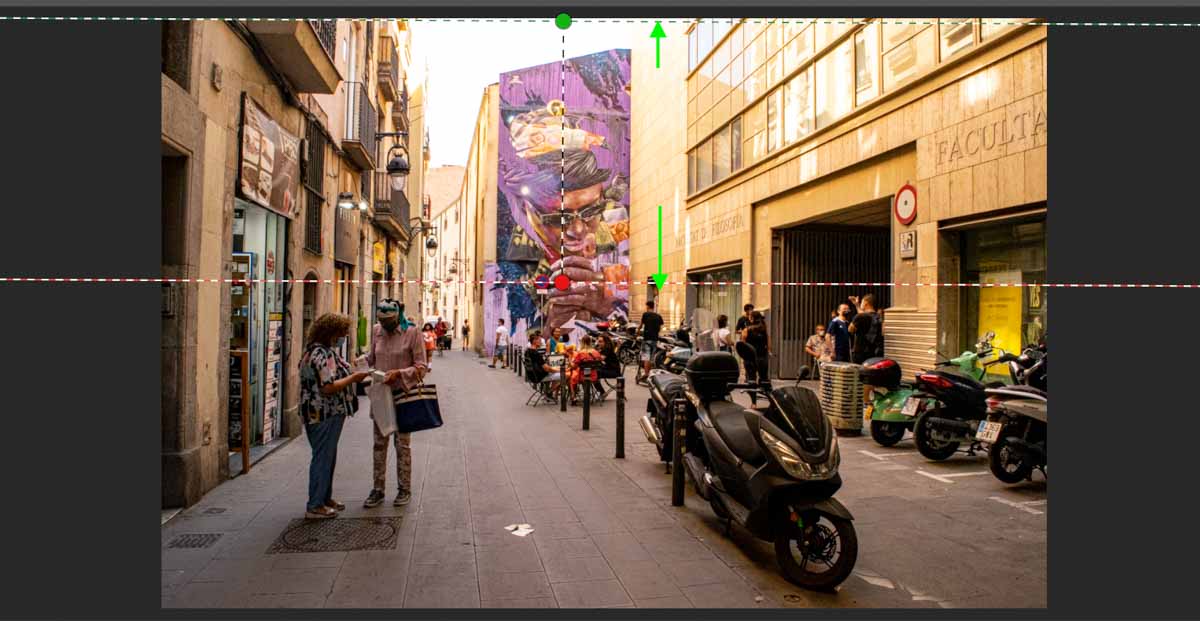
Next up, the graduated filter works by applying the edits in a gradient on your photo. To use it, click the icon and place the filter by clicking and dragging on your photo. You can increase or decrease the width and rotate the filter by clicking the red or green dashed lines.

You’ll find the adjustment options in the same area as the brush. Again, you can erase any part of the filter by clicking the eraser icon.

The radial filter works the same way as the previous two selective adjustments. Clicking the icon, click and drag the filter on your photo until it makes the radial shape you need, rotating and adjusting the size as you go.

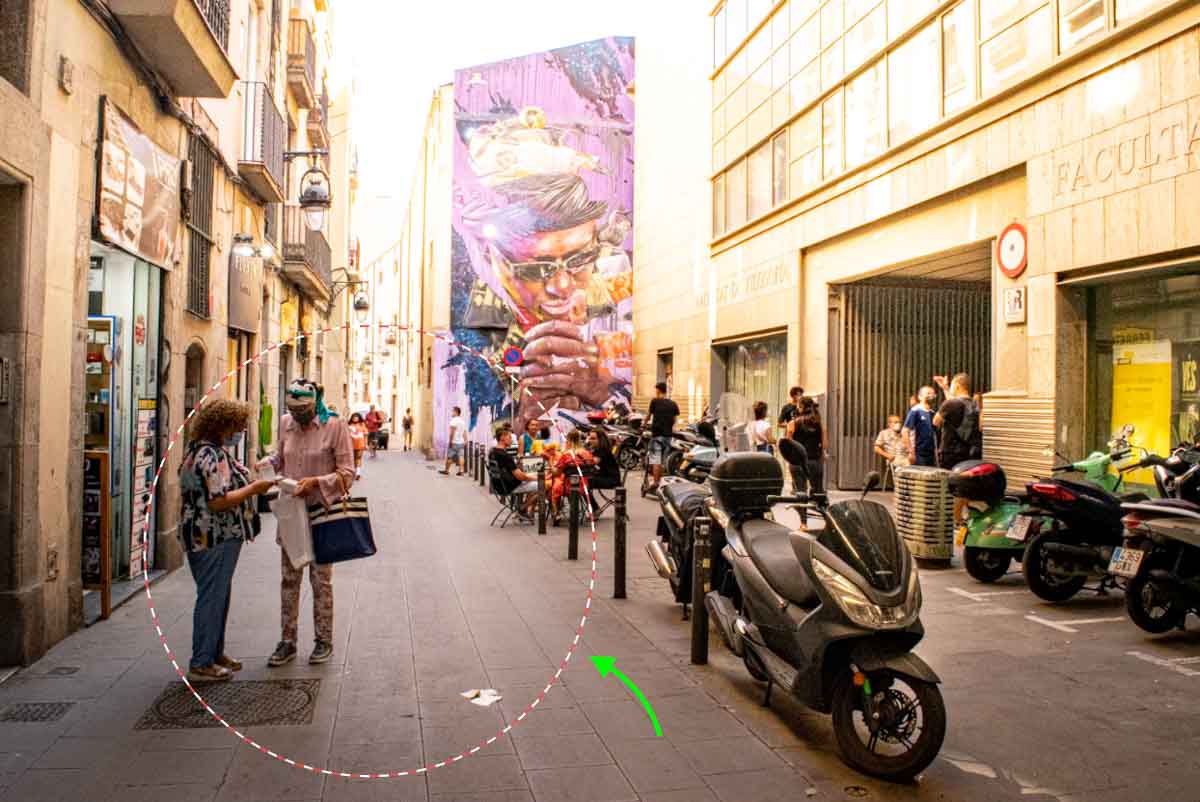
You can increase or decrease the feathering using the feather setting to allow for a more subtle look.
6. Allows For Basic Image Editing In Less Time
Photoshop is useful for many things, but because it is meant for advanced uses, it does tend to take more time to make basic edits to your photo.
Camera Raw has an interface that is super user-friendly and intuitive. All the basic adjustments you need are in the same place and labeled clearly, with simple functions. The ability to quickly batch-edit also speeds up the overall editing process quite a bit. All of this means making adjustments to your images with Camera Raw will be a breeze – as will undoing adjustments, which leads me to the next point.
7. Camera Raw Uses Non-Destructive Image Editing
Camera Raw makes it easy to erase or undo the edits you’ve made since it edits non-destructively.
And because you’re not working with multiple layers, it’s easier to figure out what needs to be undone or where you’ve made specific changes.
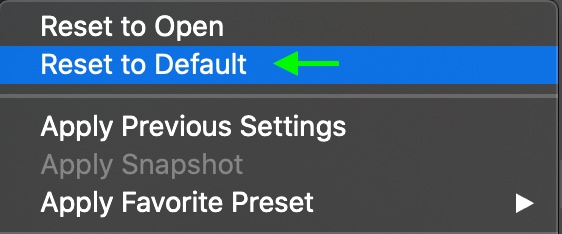
To undo all the edits you’ve made and reset your photo to its original settings, click the bottom icon on the right, which looks like an ellipsis.

Then select Reset to Default.
Otherwise, you can reset a specific step by double-clicking the slider, and it’ll pop back to its original settings. You can also use Command + Z on a Mac or Control + Z on a PC to undo the last edit you’ve made.
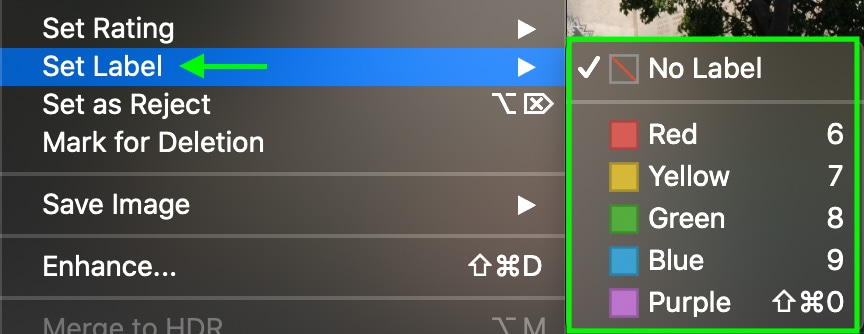
8. You Can Label And Flag Your Best Images
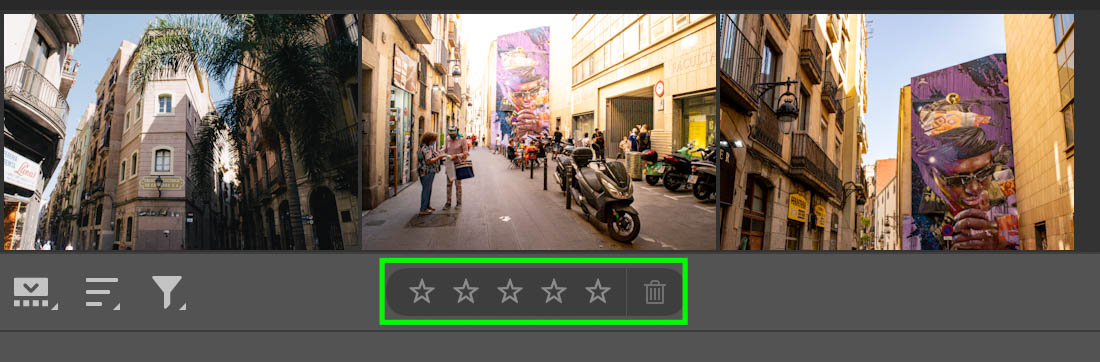
No matter what software you’re using to edit your pictures, one of the most important things you’ll need is a way to organize your photos. In Camera Raw, you can see all the images you’ve imported laid out in front of you at once. Here you can label your photos with colors or rate them to help you stay organized.
To rate or label your photos, you can do so by hovering over an image in the filmstrip and clicking the ellipsis icon.
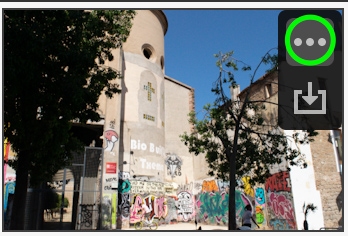
Here you can set the rating and color label.
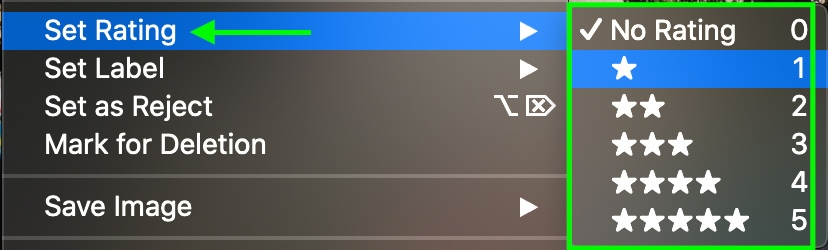
You can also set the rating at the bottom by clicking the stars.
Camera Raw VS Photoshop – Which To Use
As you can see, Camera Raw and Photoshop offer different features and a much different type of workflow. There are many situations where you might prefer to use one or the other (camera raw or the main photoshop workspace) to edit a photo. So let’s take a look at the pros and cons of each and explore in which situations they really shine.
Camera Raw Pros & Cons
Camera raw is great at basic, global edits (edits that affect the entire image). It is quick and easy to use with intuitive controls. You can play around with adjustments with the comforting knowledge the basic, raw file remains unchanged, and you can reset any adjustments as you please. However, you cannot perform more advanced edits like making selections or blending two images.
This means that Camera Raw shines as a development tool to make all the basic edits to exposure, tone, and clarity/sharpness that your photo may need before you make more specific edits. Using Camera Raw will get your picture to the right starting point before working with it in the main Photoshop workspace.
Advantages Of Camera Raw
- Very beginner-friendly.
- Can edit RAW files without coverting to TIFF.
- All adjustments are non-destructive and can be quickly reset.
- Offers adjustments not found in the main Photoshop workspace such as texture, clarity, or color grading.
- Can label and sort multiple images with star ratings or color labels.
- Offers selective adjustments without the potential confusion of layer masks.
Disadvantages Of Camera Raw
- You can’t make advanced adjustments like removing a background.
- Has limited spot removal tools.
- Doesn’t offer much use when working with text and graphics.
Photoshop Pros & Cons
Photoshop is better at complex adjustments like adding objects or blending images. It can be complicated to use and often requires a bit of self-teaching to feel comfortable. However, once you learn how to use it, you can create just about anything you can imagine.
Where Photoshop shines is when your photo has already been edited to some degree, and you want to make further improvements. Using techniques like the Orton effect, frequency separation, selective masking, and more, you have a more comprehensive range of possible editing options.
Advantages Of Photoshop
- Can both edit photos as well as create graphic designs.
- Allows for more control with layer masks.
- Your adjustments can stay more organized with the use of layers.
- There are plenty of exporting options, as well as has the ability to export transparent backgrounds.
- Offers nearly unlimited creative opportunity.
Disadvantages Of Photoshop
- Has a steep learning curve.
- It doesn’t work well for editing multiple photos at once.
- Adjustments are destructive if you don’t stay on top of creating new layers.
So, which should you use?
For the best workflow, taking advantage of both camera raw and the other tools Photoshop offers is the ultimate solution. You can use camera raw to make small adjustments to your photo, while Photoshop is used for the more intricate edits you need to make. Using the tools in conjunction ensures you get the most creative control in your editing.
The best way to think of Camera Raw and Photoshop is like a superhero and a sidekick. Photoshop is the superhero who does the bulk of the work, but its trusty sidekick, Camera Raw, makes sure everything goes to plan. Since Camera Raw offers many complimenting features to the main Photoshop workspace, it’s a great tool to use for all your image adjustment needs. For example, I always use Camera Raw to correct the initial look of my images, or I’ll use it to finalize the color grading of a photo manipulation. Now that you know some of the advantages of using this tool, it’s time for you to try it for yourself!
Happy Editing!
