
If you have any type of photo on your computer or mobile device, odds are, you’re probably looking at a JPEG file, but what exactly is a JPEG photo?
JPEG files are one of the most common and widely readable image files available. By using lossy compression, JPEG files help reduce the overall size of your image files, without sacrificing image quality. For uploading photos to the web or sharing pictures with others, JPEG is the best file type to use.
What Are Jpeg Photos?
![]()
JPEG comes from “Joint Photographic Experts Group”, which is also the name of the committee that created it.
JPEG is the most commonly used format in digital cameras. Furthermore, most images we see online today are JPEGs.
JPEGs are split into two subcategories: Exif (for digital cameras) and JFIF (for storing and transferring)
So what exactly is a jpeg? A Jpeg file format is a format for representing an image. Jpeg photos are smaller versions of the same image and they are typically used in web-based applications. However, JPEGs are not just a file format, but also a lossy compression method.
Lossy Compression is the process of retaining as much visual information as possible, without sacrificing the size of the file. This type of compression discards some original data, so there is some quality loss. In comparison, formats like TIFF, GIF, or PNG use lossless compression meaning there is no data loss, but higher file sizes.
A jpeg image is a digital file with a standardized “picture image” format. The final image discards high-frequency information and color aka everything that our eyes are bad at noticing. Jpeg allows you to use any color space imaginable – RGB, YCbCr, CIELAB, and so on.
The Process Of Jpeg File Compression
There are three stages of JPEG compression:
1. Chrominance Subsampling – separation of the luminance from the chrominance
2. Discrete Cosine Transform (DCT) & Quantization
3. Run-Length, Delta & Huffman Encoding
This process goes as follows: You take an RGB image and convert it into YCbCr to achieve a separation of the luminance from the chrominance. Then the image goes through downsampling, compressing the frequencies that are less visible to the eye – reducing the amount of color in the image. A loss in hue and saturation will be less visible to the human eye, therefore the downsampling is done only for the color component.
The next step is Discrete Cosine Transformation. This is at the core of how JPEG compression works. It represents image data as the sum of all the cosine waves. In JPEG, each image is split into 8×8 pixel groups (square of pixels) that all have their own cosine transformation.
The 64 modified elements are divided by a Quantization Coefficient and then rounded. In the end, they become integers. This is called quantization and it’s the lossy part of the whole process. Lastly, the image is encoded by using a combination of run-length and Huffman (entropy) coding.
Opening a JPEG file entails decoding it. When we are decoding a JPEG file, all these steps are reversed. You can open a JPEG with almost any program that you can imagine, even across all forms of computers, tablets, and smartphones.
Since JPEGs entail a lossy image compression, some information will ultimately end up being lost. The decoded image will be slightly different than the original RAW file from the camera. The sacrifice of losing a little bit of quality in order to get a smaller file size and increased speed is worth it, especially when the difference between the original and final image is often unnoticeable.
What Are The Advantages Of Jpeg Files?
1. JPEG’s Are An Effective Form Of Image Compression
Compressing a file in Jpeg can save on file space and increase download speed due to the smaller size. But not to worry, JPEGs compress an image while still maintaining the most essential visual characteristics of that photo. So even though you are getting a smaller file, everything will look exactly like it did in-camera after export.
2. Better File Readability
JPEG can be opened by most devices and software out there. Most editors, image viewers, browsers, and webpages can support JPEG files, which means that you don’t have to switch to a different format in order to open an image.
JPEGs are compatible with platforms like Microsoft Windows Photos, Apple Preview, Adobe Photoshop, Google Drive, Google Photos, and many more.
3. JPEG’s Retain Color Information Well
Unlike vector images, JPEGs can deliver a wide range of unique shades and tones. They use 8 bits of each color (RGB) and store 24 bits per pixel that can display up to 16 million unique colors.
When it comes to graphics, you would be better off using vector graphics. However, Jpeg image files are a much better way of representing photographs.
4. You Can Control The Compression Amount
A JPEGs quality setting levels are split into low, medium, and high. If the compression rate gets higher (lower quality rating), the images become more pixelated and colors begin to fall apart.
Therefore, a highly compressed JPEG file will noticeably have a much lower quality. There are situations where you might need a lower quality setting though such as for thumbnail images on a website. In most cases, leaving the compression amount to 100 (best quality) will get the job done.
Regardless of which compression you choose, JPEG files make it easy to manually control your compression amount. This type of control isn’t as simple with other image file types.
5. JPEG’s Can Be Shared Straight From Camera
When you’re taking photos on your digital camera or smartphone, JPEG files can be uploaded and shared right after they are taken. With other forms of image files in photography like the RAW file, you need to re-export the file through an editing software before you can share the photo. By capturing JPEG files, your photos are ready to go the moment they are taken!
Jpeg Vs. Jpg – What’s The Difference?
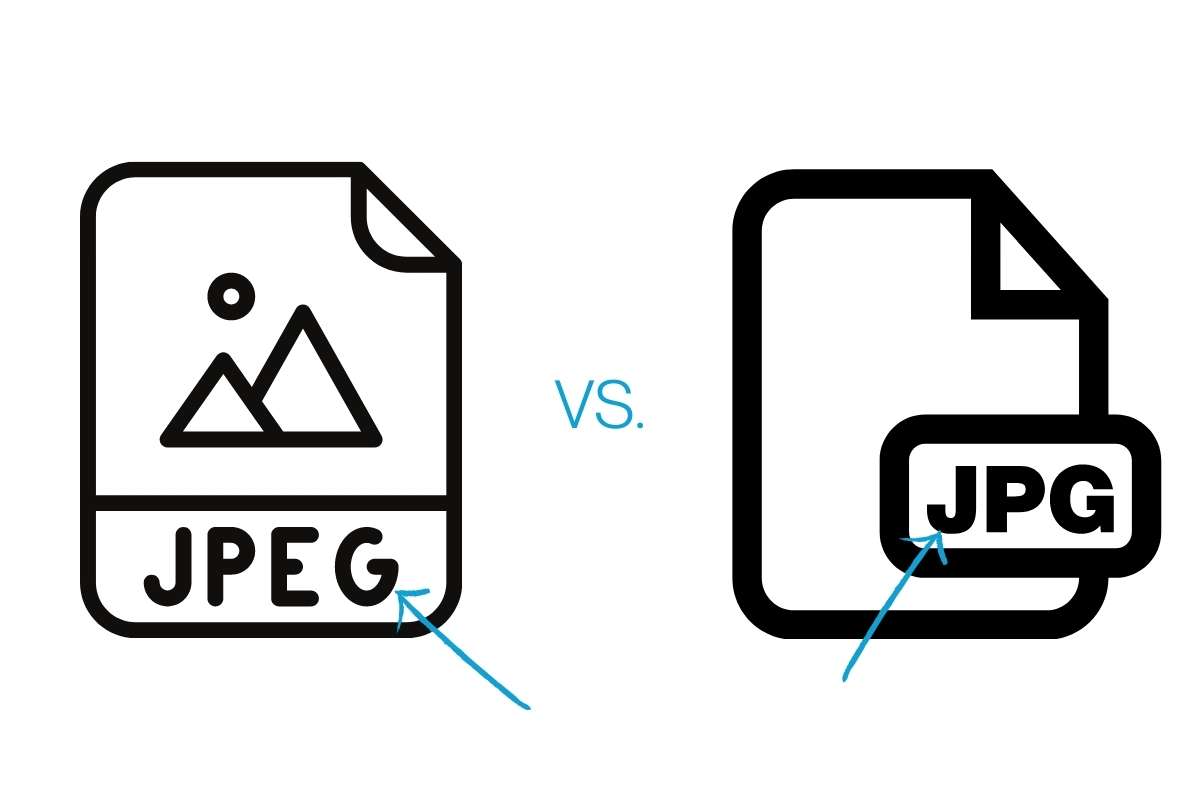
Both JPEG and JPG are the same type of file, each standing for “Joint Photographic Experts Group.” The file extension of JPG came from older windows computers that required a max 3 letter extension name. On modern computers, the JPEG file extension is more commonly seen but some people still refer to these files as JPG.
That’s one of the reasons why we still hear about JPGs and why people get confused when they stumble upon both of these names.
How Do I Convert An Image To Jpeg?
There are a lot of free options out there when it comes to converting an image to JPEG – online, as well as offline. Let’s go through a few of your options.
You can convert an image to a JPEG format by using most image-editing software available out there, like Photoshop or Gimp.
In Photoshop, you can convert an image to JPEG after editing a RAW photograph. A raw image is an uncompressed format that takes longer to read than JPEGs but holds more file information for editing. When doing drastic brightening or color adjustments, the JPEG format is not the most suitable one to use for that. Since there is less file information, the image begins to fall apart as it gets adjusted.
That’s why performing edits on RAW files and then exporting them as JPEGs is the best option when it comes to photo editing!
Using Computer Apps:
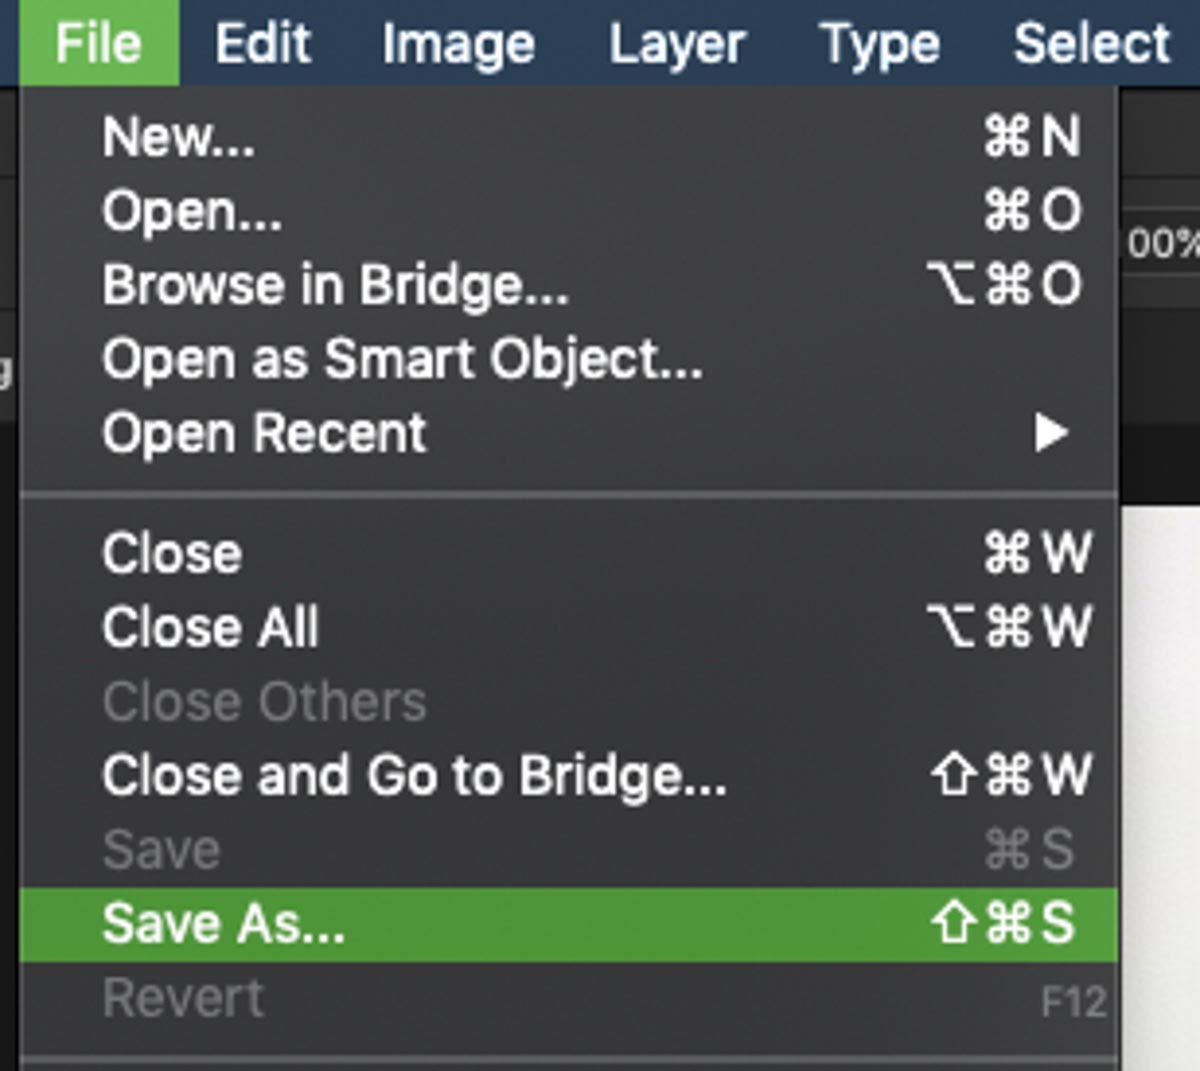
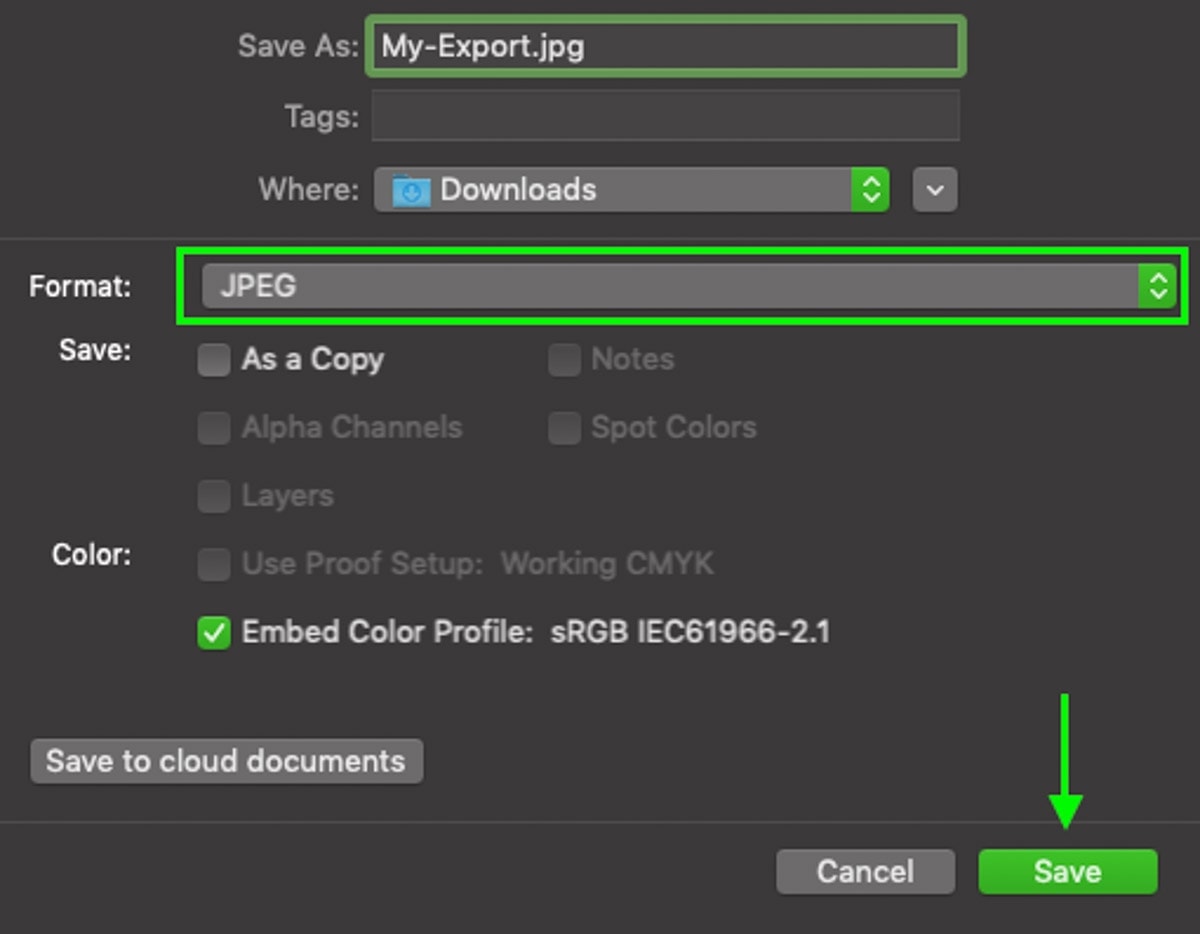
– How To Convert An Image To JPEG In Photoshop (Paid)
- Open and edit your RAW image in Photoshop as you wish.
- Go up to File > Save As.
- Change the image format to JPEG and click Save
– Converting An Image To JPEG in Windows Paint or Paint 3d (Free)
- Open your image in Paint.
- Go to the main menu and click File > Save As Type and select the JPEG file format
- Click Save
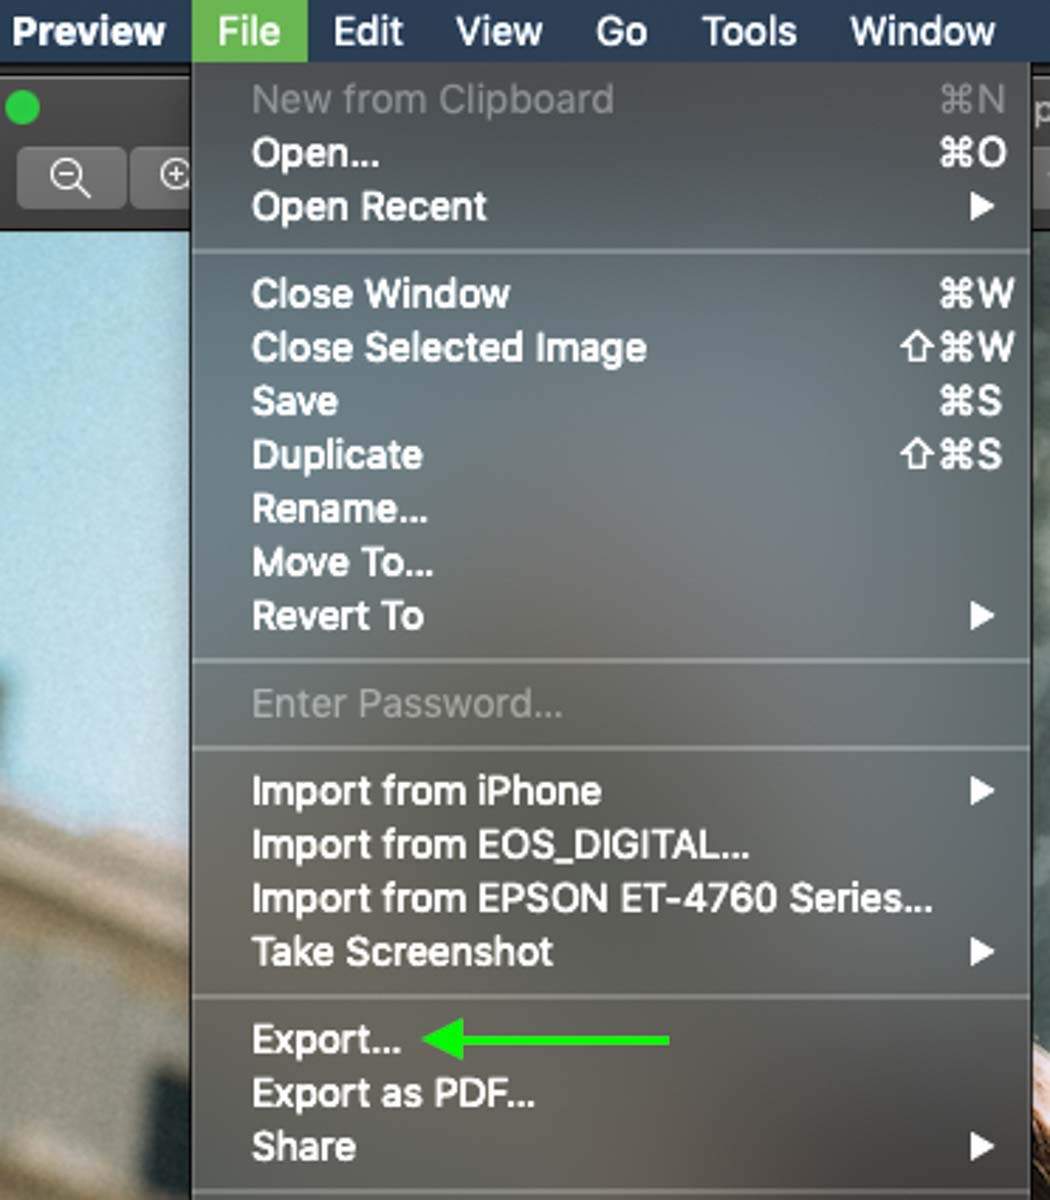
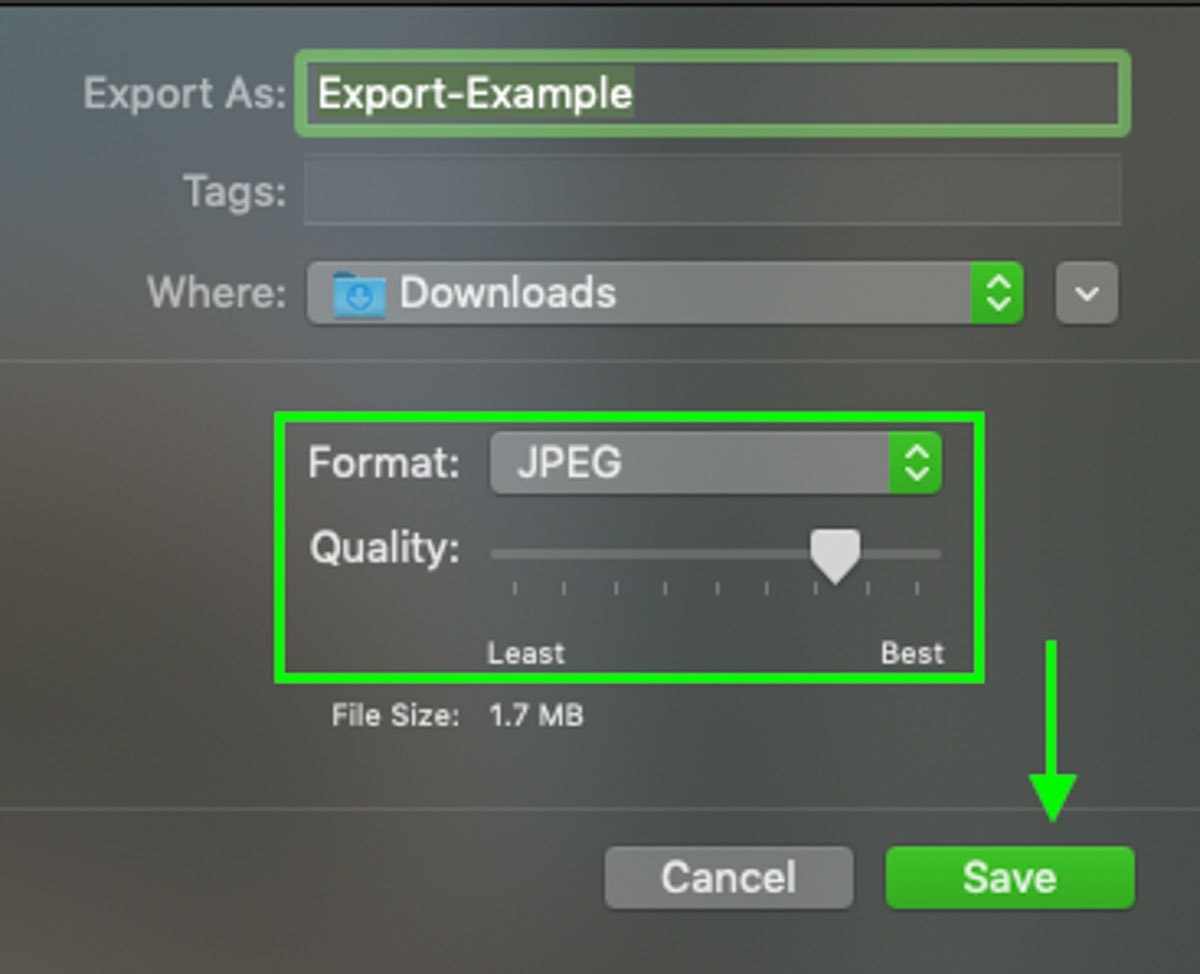
– Exporting As JPEG Using Preview on Mac (Free)
- Right-Click on your photo and select Open With > Preview.
- Go To File > Export.
- In the Format box select JPEG
- Click Save

Using Free Web-Based Apps:
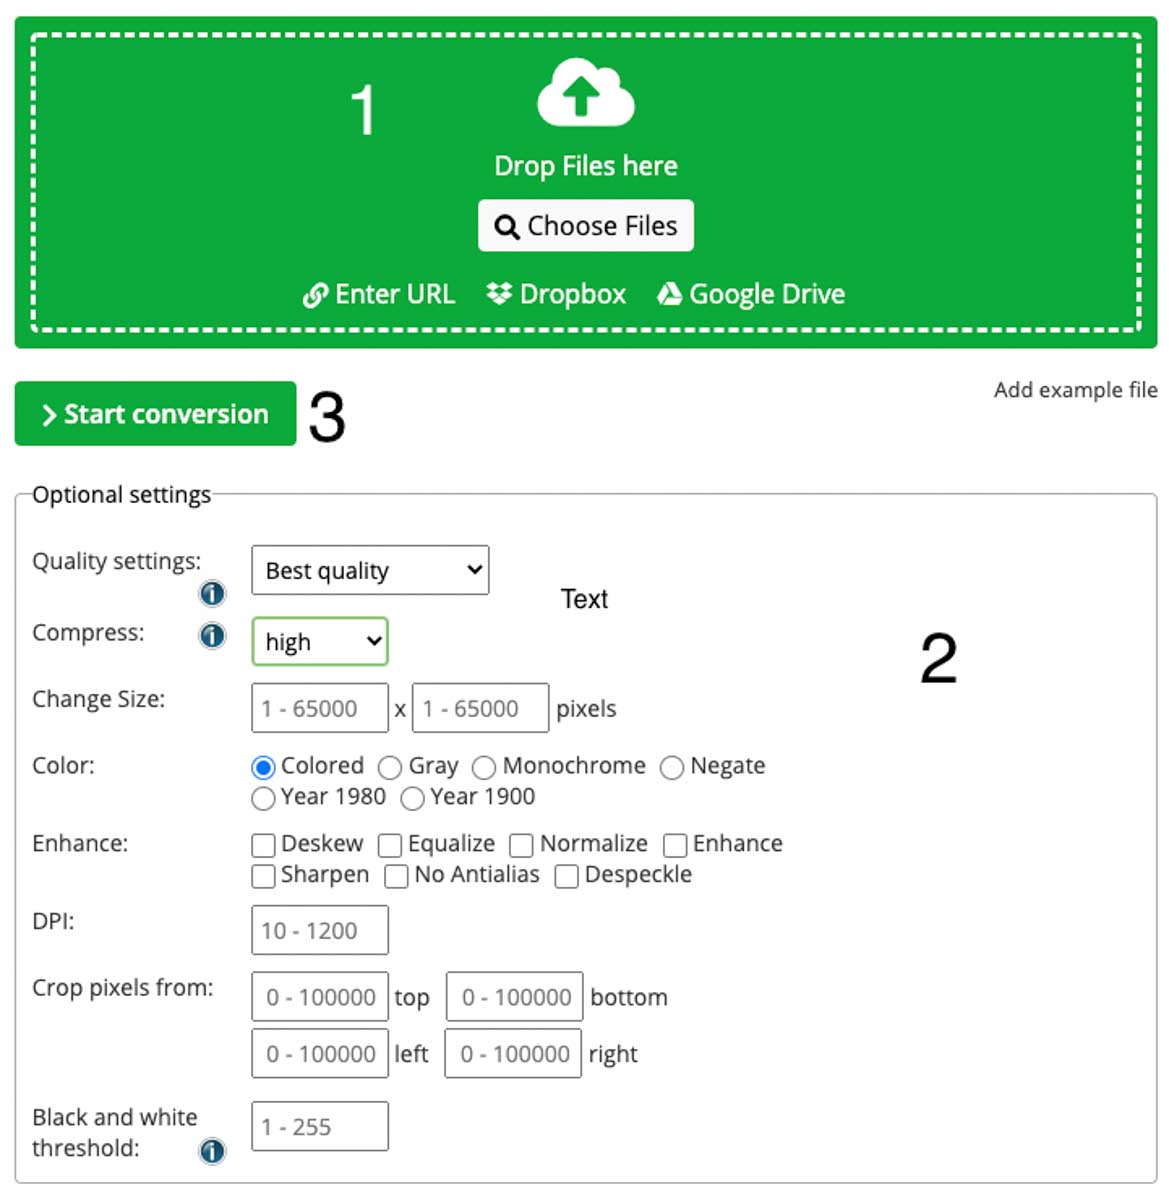
Image.online-convert.com
- Choose a File from your computer
- You can change various advanced settings like image quality, image size, DPI
- Click on Start conversion
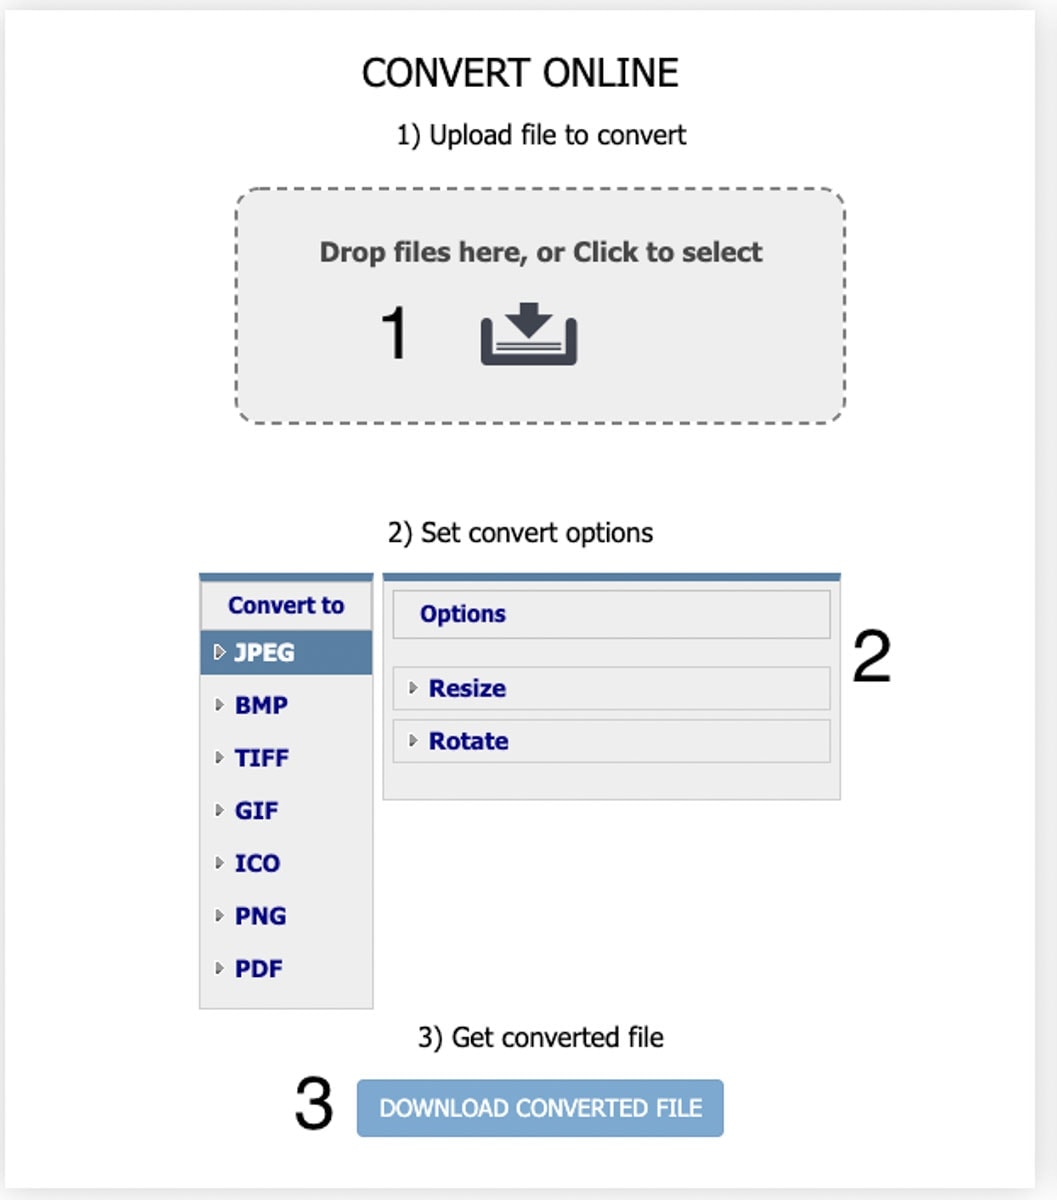
CoolUtils Online Image Converter
- Upload the file that you want to convert.
- Set convert options (in the Convert to section, choose JPEG)
- Click on Download converted file.
How Does a JPEG File Look Like?
The first thing that can tell you if an image is a JPEG or not is the filename extension. In most cases, it ends with .jpg or .jpeg.

But now let’s go beyond this detail and talk more about the image and the actual data.
JPEGs are raster images. That means that they’re made out of pixels – as opposed to vector images that are based on mathematical formulas. If you look very closely at a JPEG image, you will see that it’s actually made up of thousands of smaller colored squares, aka pixels.
JPEGs contain all of the graphic information inside the image – brightness levels, color, tone of the image, bitrates, resolution, and so on.
To understand how JPEG data looks like, we have to take a more in-depth look at the process of image compression. Values between 0 and 255 are used to represent a digital photograph. It makes more sense to use fewer bits to represent values that occur more often and more bits to represent values that occur less frequently. This is the process of reducing coding redundancy in JPEG compression! That means that the important information stays there because this color reduction is less obvious to the human eye since people have low acuity for color differences.
At the end of this chroma subsampling process, the color space transformation ends up being almost the same as the original. What does that mean specifically? The final image (output) is going to be a different image. When you access the image on the internet, you will notice it’s a whole lot smaller in size. But it will look very similar to the initial image. So much so, that you won’t be able to tell the difference.
However, you can also get to choose the quality of your final image. The quantization step may result in an image that looks almost identical to the original, but it can also result in a fuzzy one that seems to be comprised of several blocks. It all depends on the level of compression you choose to use. Higher compression means more artifacts.
At the end of the day, the only thing that really matters for you is that you see the .JPEG or .JPG file extension. Without having to do any technical sleuthing, you can identify which of your files are JPEGs simply by their extension!
– Brendan 🙂


