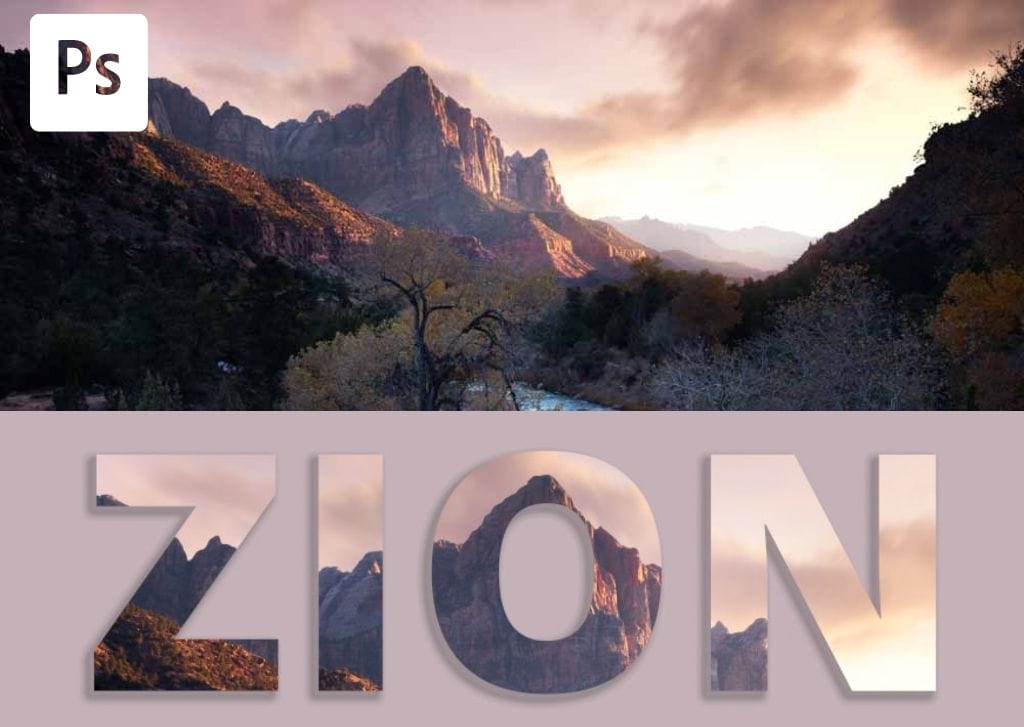
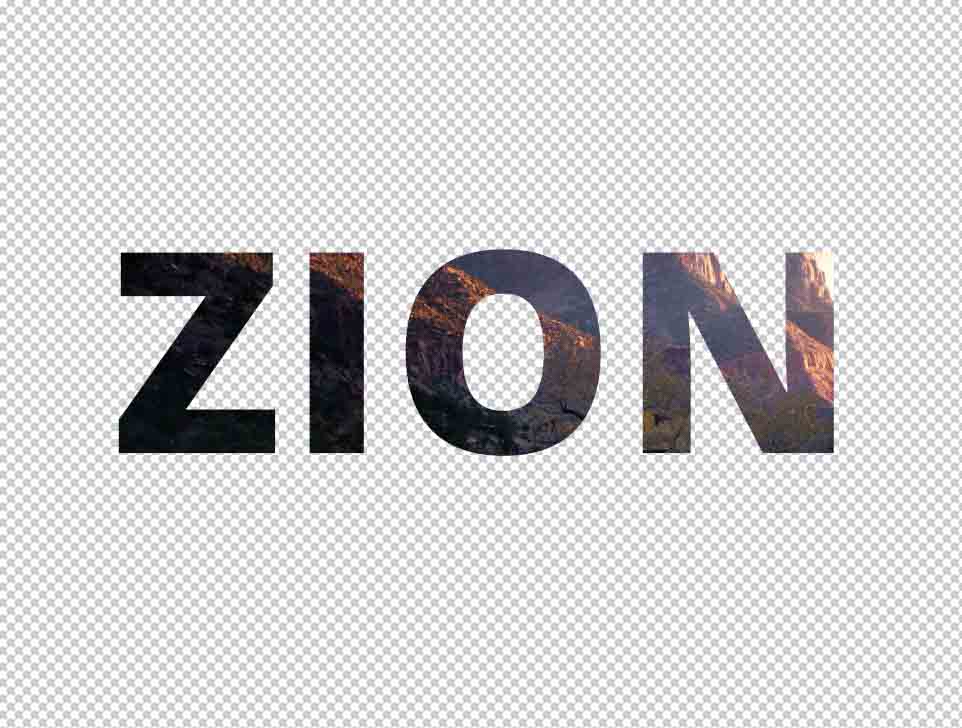
fbpx

How To Add Images Into Text In Photoshop (Step By Step)


One way to get creative with text in Photoshop is to fill the text with an image. This can give the text a unique look and theme, and it is easier to create than you’d expect! No selections or complicated tools are required.

Let’s see how it’s done.

How To Fill Text With Images In Photoshop

Step 1: Open Your Image

The first step is to open up the photo you’d like to use as the fill for your text. To do this, click the Open button in the Photoshop start screen or head to File > Open.

The Import Dialogue Box will appear, where you can select the image from your files and click Open. In the Layers Panel, you’ll see the image layer appear as Background.

You’ll want to unlock the background layer, as all layers must be unlocked to edit them. Click the lock icon to the right of the Image Layer in the Layers Panel.

The image layer will now appear as Layer 0 in the panel.

Step 2: Add Text Using The Type Tool

Now, you can add the text to your image using the Type Tool (T).

You can then click anywhere on the document to create a new text box and type in the word or words you’d like to fill with the image. I’ll use the word Zion, as I’m using a photo I took in Zion National Park.

You’ll see the text sitting over the image. Don’t worry, you can move and change the appearance of the text in the next step.

In the Layers Panel, you’ll see a new Text Layer sitting above the Image Layer.

Step 3: Adjust The Text Settings

For this effect to work best, you’ll need a bold font – the thicker your font, the more of the image will show through. To select a font, click the drop-down menu for the fonts in the Options Bar.

Select the font you’d like to use from the options in the list.

A few fonts that work well are Arial Black, Impact, and even the default Open Sans when the style is set to Bold or Extrabold. To make a font bold, click the font style drop-down menu and select either Bold or Extrabold.

You’ll also want to make the text big enough to fit over the area of the image you want to fill the text. To increase the size, click the drop-down next to size, select a point size, or type a value into the box.

Don’t worry about placing the text perfectly over the image; you can do this after you’ve applied the clipping mask in the next step.

Step 4: Add A Clipping Mask

Now that the text is placed correctly over the image, you can apply a clipping mask between the image and the text.

To do this, you’ll want to ensure you’ve unlocked any of the layers currently locked in the layers panel by clicking the lock icon to the right of the layer. If you haven’t done this yet, you can do it now.

Now, drag the text layer below the image layer.
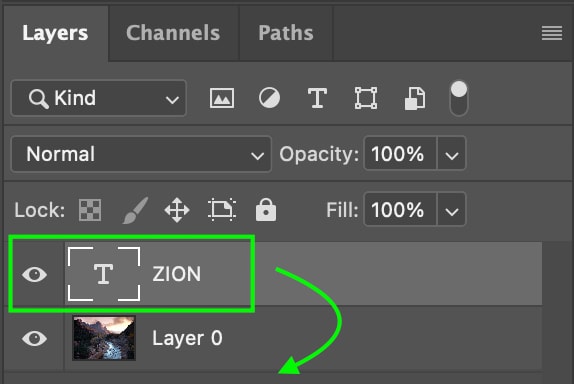
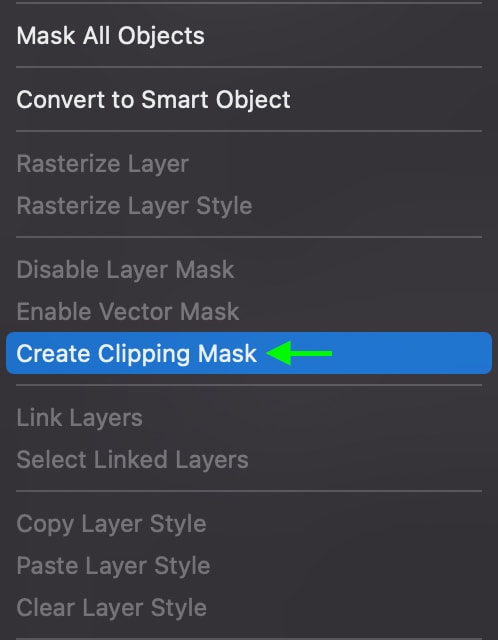
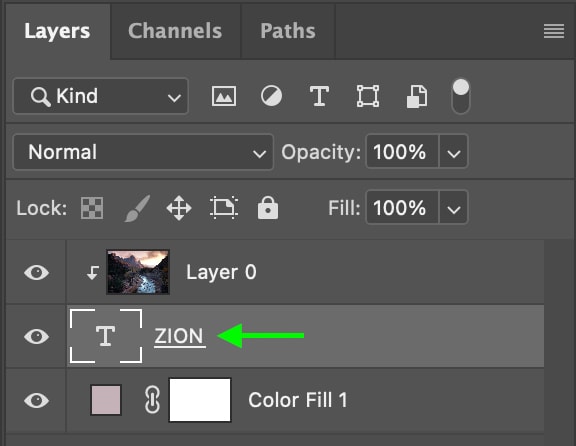
You’ll only see the image – it will look like the text has disappeared.

Then, Right-click or Control + click the image layer and scroll until you can see and select Create Clipping Mask.

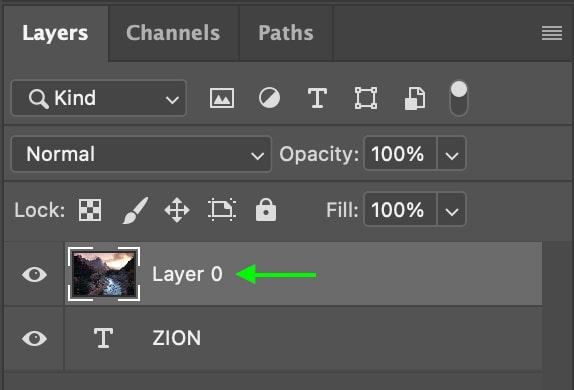
The image will be “clipped” to fill the text layer.

In the Layers Panel, you’ll see a small arrow pointing from the Image Layer to the Text Layer, representing the clipping mask.
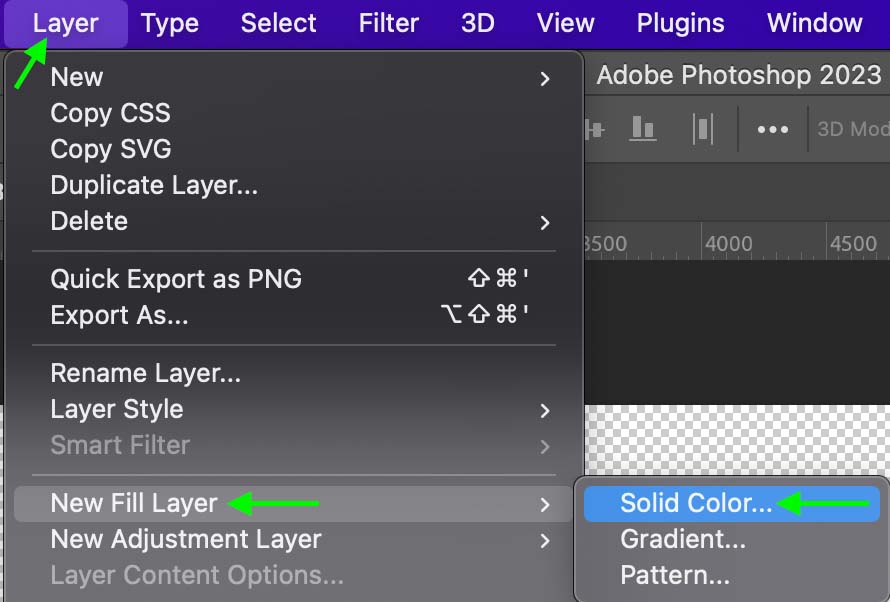
Step 5: Change The Background

As of this point in your project, the background will be transparent. You can change this so that you have a colored background rather than a transparent one by adding a new fill layer and placing it behind the text and image layers. However, if you want a transparent background, stop here and export your project as a PNG.

To do this, head to Layer > New Fill Layer > Solid Color.

In the New Layer window that comes up, you can name your layer if you’d like and click OK.

You’ll then see the Color Picker window appear. Click the color you’d like to fill the layer with.

You’ll see the fill layer currently covers the project’s text and image. This is because the layer currently sits at the top of the Layers Panel. To place the layer behind the image and text, click and drag it to the bottom of the stack.

Now, the text with the clipped image will appear in front of the fill layer, the solid color making up the background.

You can change the color at any time by double-clicking the icon In the Layers Panel and selecting a new color from the color picker window.

The color of the background will change to the new color you choose.

Step 6: Add A Drop Shadow

Finally, you can add a drop shadow to the text as a finishing touch. Drop shadows sit just off the text itself and will help the text stand out against whatever background you choose. It also helps give an extra sense of realism and style to the project.

To add a drop shadow, head to the Layers Panel and double-click the Text Layer.

The Layer Styles window will appear with a variety of settings. On the left, click the Drop Shadows box near the bottom of the list.

You’ll see various settings that will adjust the drop shadow in different ways. The main settings you’ll want to focus on are the Opacity, the Distance from the text, the Size, which will soften the shadow, the Angle, and the Spread.

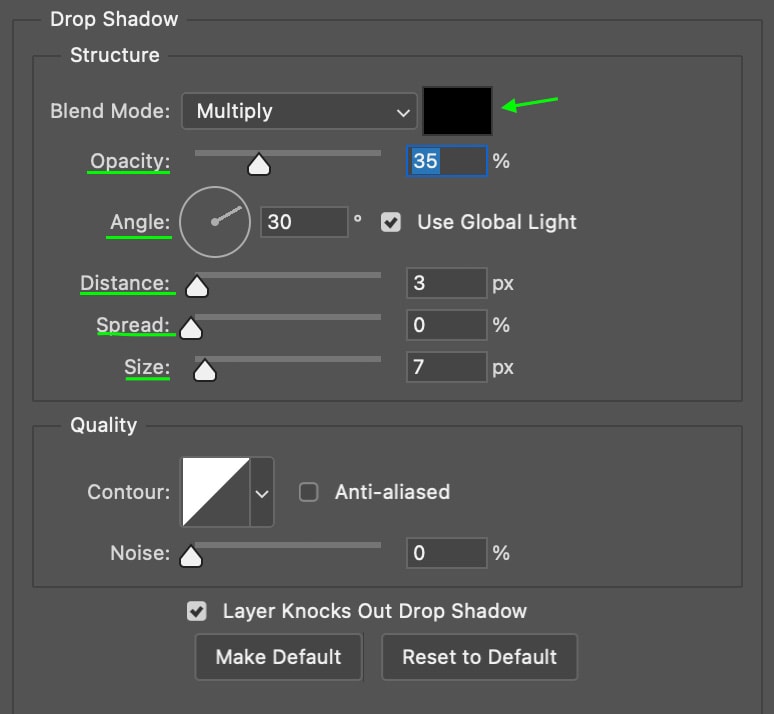
Adjust these as you see fit. For my project, I’ll use a more subtle shadow sitting behind the text to help it stand out against the background.

You have the text with the image behind it. In the next section, you’ll learn how to reposition the image from inside the text without moving the text.

How To Move Your Image Within A Text Layer In Photoshop

You may want to go back and move the image so that a different area of the image appears as the fill of the text. To do this, head to the Layers Panel and click the Image Layer.

Then, click the Move Tool (V).

Click the image layer and drag the cursor until you’re happy with the placement. You can also go back and re-adjust the drop shadow if you’d like. I wanted a softer shadow, so I went and increased the size slider and adjusted the angle to produce the final effect.

If you need to, you can center the text in your document by selecting the whole canvas using Control + A (Win) or Command + A (Mac), then clicking the vertical and horizontal center icons in the Options Bar

This will immediately center your text in the document.

Now, the effect is finished. You can export the text as it is or use it as a basis for your project. You can see my guide to saving images in Photoshop if you aren’t sure how to wrap up your project!

Article By

Brendan Williams

Hey, I'm Brendan! I'm a professional photographer and photo retoucher who has spent the majority of his career shooting or retouching outdoor lifestyle and social media campaigns for brands like G-Adventures, xoxo Bella, P&G, Fitbit, Chevy, Tourism California, and more. These days I primarily focus my efforts on this site, creating guides and tutorials that I wish I had earlier in my career. Each week I publish new tutorials on Photography, Photoshop, Lightroom, and Canva to help you unlock new skills and bring your creativity to new levels! Everything you learn here is backed by real experience, so you can finally skip the fluff and focus only on what matters.


Continue Reading:

How To Invert Colors In Photoshop

Learn how to quickly invert the colors of an image or a layer mask in Photoshop along with tips to selectively invert your colors instead!

How To Invert A Selection In Photoshop

Learn the importance of learning to invert a selection in Photoshop with the help of simple keyboard shortcuts and several other methods.

How To Use The Gradient Tool In Photoshop

Learn the ins and outs of how to use the gradient tool in Photoshop with useful tips to help make the most of this impressive tool!

Adobe Lightroom System Requirements For Mac & PC

Here's a breakdown of the system requirements for Adobe Lightroom Classic and Lightroom CC to make sure it will run smoothly on your computer.

How To Add A Watermark In Lightroom Classic & CC

Learn how to add a text or graphic watermark to a photo in Lightroom Classic and Lightroom CC to protect your photos from theft.

How To Use Dehaze In Lightroom

Learn how to use dehaze in Lightroom along with five different ways you can use the dehaze tool to improve your images in Lightroom.

35+ Best Fonts For Logos In Canva

Here's a list of the best fonts for logos in Canva to help give you inspiration in your next logo design!

How To Create Curved Text In Canva

Learn how to quickly create curved text in Canva desktop and mobile with just a few clicks to spruce up any design!

35 Best Fonts For Teachers In Canva

Discover the best fonts for teachers in Canva to help with your next worksheet or presentation for your class!

The 9 Best SD Cards For Sony

Discover the best SD cards for Sony to find the most reliable and best valued memory cards for your photo and video needs.

The Best Canon Lens For Low Light (10 Top Picks)

Get a complete view of the best Canon lenses for low light photography and video along with tips to make the right buying decision.

Affinity Photo VS Photoshop – Which Should You Choose?

Let's take a deep look at the similarities and differences between Affinity Photo and Photoshop to see which program you should pick.