
Gradients in Photoshop blend two or more colors across the document or specific elements. Typically, you can use the Gradient Tool to create a gradient in a predefined place. However, using Gradient Fill Layers in Photoshop offers you more control and customization options for the gradient.
Here you will learn what gradient fill layers are, how to create a gradient fill layer, and the various settings you can adjust to create a color blend that suits your project. I will also show you how to use this fill layer with text, as a background, and within shapes.
Using a Gradient Fill layer to add blended colors, you can easily edit the gradient type and colors at any stage during your project.
What Are Gradient Fill Layers In Photoshop?

A gradient creates a gradual blend of various colors. You can add two or more colors to the gradient and control how smooth or sharp the blend between colors is. You can also set the gradient type, which controls the shape in which the colors blend together, such as a radial or linear gradient.
In Photoshop, you can use the Gradient Tool to create a gradient, or you can add a Gradient Fill Layer for more control. The fill layer option automatically creates a gradient across the entire canvas based on the settings you use when adding the layer. This adjustment also exists as its own layer and isn’t added to an existing layer.
Creating a new layer for the gradient means you can easily edit or delete the gradient fill at any point. This method gives you more control over the final result and acts as a non-destructive editing feature.
While the fill layer covers the entire layer by default, you can still adjust this to have the fill layer only visible within a shape or text on the canvas. As a result, you can use the fill layer in the same manner as the Gradient Tool, although you have the added benefit of being able to edit the gradient further along in the project.
How To Create Gradient Fill Layers
There are two ways you can create a new gradient fill layer. When creating the new fill layer, you can adjust different settings to customize the gradient, which I will explain in detail in the next section.
First, you can create a Gradient Fill Layer by clicking on the Create New Fill or Adjustment Layer at the bottom of the Layers panel, then selecting Gradient from the options.

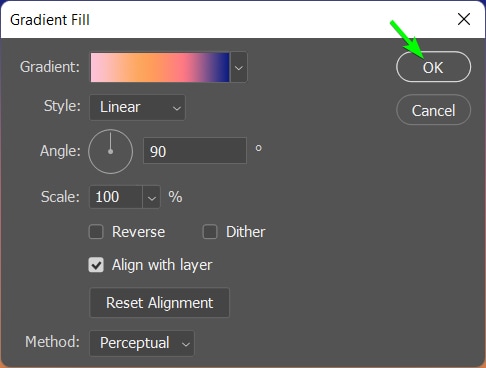
The Gradient Fill window appears, allowing you to adjust the various settings for your gradient. Click OK once the settings are as you need them.

The second way to add a new Gradient Fill layer is by going to Layer > New Fill Layer > Gradient.

You will be prompted to name the new layer. Add a name and click OK.

You can then adjust the settings in the same Gradient Fill window that you see if you use the first method. Click OK once the settings are added.
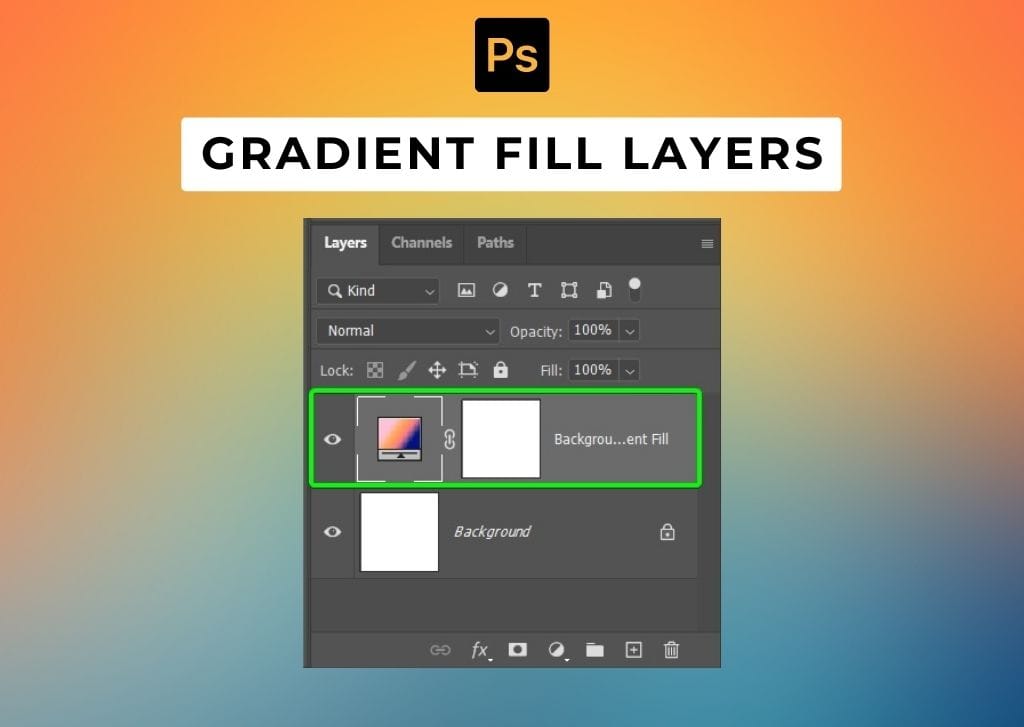
Once you add the layer using either method, you will notice a new Gradient Fill Layer is added as a separate layer in the Layers panel.

The canvas is also now filled with your chosen gradient. You can change these settings at any time, so if you don’t like the look of the gradient you added, you can follow the next section to edit the layer.

How To Edit Gradient Fill Layers In Photoshop
Whether you adjust the settings when you create the gradient fill layer or after adding the layer to the canvas, you have several customization options for the gradient fill. When creating a gradient, adjust the following settings when the Gradient Fill window opens.
To open the settings again, if you have already created a Gradient Fill Layer, double-click on the gradient thumbnail in the Layers panel.

You can then customize the gradient by choosing from the preset gradient options. You can create your own custom gradient fills, change the type of gradient, and much more.

Choosing Preset Gradients
If you don’t want to set custom colors in the gradient, you can choose from Photoshop’s wide range of preset gradients. There are dual or triple-colored gradients, color to transparent gradients, and more to choose from.
Click on the drop-down menu next to Gradient in the settings panel to view the preset options.

Scroll through the panel to find the various tabs offering preset options like Basic, Colors, Pastels, or Neutrals.

Click on a tab and open it to view the various options within the group.

Click on a gradient to select it and click OK to add the new preset gradient to the canvas.

Your chosen gradient is added to the canvas.

Creating Custom Gradient Fills
You can create your own custom gradient fill if you don’t find the colors or style you are looking for under the preset gradient options. This setting lets you pick as many colors as you want for the gradient and how they blend.
To set your own colors, open the gradient preset options, click on the settings icon, and select New Gradient Preset.

The Gradient Editor opens, where you can change the gradient color and the stops. You can choose a preset gradient to begin with or just use the default one that’s set. Then use the Gradient bar near the bottom to adjust the colors.

First, click on an existing Color Stop, which is the small block below the gradient bar. Then, click on the Color Swatch at the bottom of the panel.

The color swatch opens the Color Picker, where you can choose a new color for the start of the gradient. Click OK to set the color.

The color stop you selected will now show the new color. You can add new stops to the gradient bar by clicking anywhere underneath the bar. Once a new stop is created, follow the above step to change the color.

Add as many color stops as you want and adjust the colors as needed.

Once you’ve added the colors, you can change the position of each stop. To change the position, click on the stop and drag it left or right. You can also change the stop by typing a percent into the Location box at the bottom.
Moving the stop position changes how much of that color is visible in the gradient and helps you control the blending of the colors.

You can delete a stop by selecting it and clicking the Delete button at the bottom or pressing Delete on your keyboard.

Once you are happy with the colors and positions, you can name the new preset if you’d like, then click New to add it to the presets list, and click OK to confirm.

You can now select the new gradient from the bottom of the preset list and add it to the canvas.

Your canvas will change to the new colors you set. Using the editor, you can make various gradients, such as creating a rainbow gradient.

Changing The Gradient Type
The last major setting is to adjust the gradient type. The type of gradient you choose determines whether the color blends in a line moves out from a center point or in other ways.
To change the gradient type, click on the drop-down menu next to Style.

You can choose from Linear, Radial, Angle, Reflected, or Diamond.

It’s easier to show you how each style works than to explain how the gradient looks. The previous examples all used the Linear gradient style, so here are the rest.


You can set the type of gradient that matches your project.
Other Gradient Settings
There are a few more gradient settings to adjust, which are less important than the previous settings, but which you may need for your design.
In the same settings window, you can adjust the angle at which the gradient sits on the document by moving the degree in the circle or typing in a new degree amount.
Increase or decrease the scale to change the view of the gradient. This essentially zooms into or out of the gradient, making the edge colors more or less visible.
You can Reverse the gradient, which flips the colors around, and add Dither if you’d like. I recommend you leave the Align with layer box checked and let the Method set itself based on the type of gradient you set.

How To Use Gradient Fill Layers In Your Photoshop Projects
Once you have selected the various settings for your gradient, you can use the gradient in your projects in various ways. The gradient fill layer is not restricted to only covering the entire layer. Here are a few ways to add the Gradient Fill Layer to your project.
You can also use the fill layer to test out various gradient colors and types with multiple elements before committing to one by using the Gradient Tool since you can easily customize and change the settings of the gradient fill.
– With Text
You can add the gradient you’ve chosen to the text you add to your canvas. This will show the gradient only within the text and not over the entire canvas.
To add a gradient fill to text, you can use the previous sections to add a Gradient Fill Layer to the canvas using the colors and settings you want.

Next, add your text to the canvas by selecting the Type Tool (T) and creating a text box. You can change the font and adjust the text settings as you’d like. Place the text over the gradient where you want the colors to show on the text.

Now, move the text layer below the gradient fill layer by clicking and dragging it down in the Layers panel.

The gradient is completely hiding the text layer. To have the gradient layer only visible in the text, right-click (Win) or Control + click (Mac) on the Gradient Fill Layer and select Create Clipping Mask.

A curved arrow icon appears next to the gradient fill thumbnail, indicating that the fill is only applied to the layer directly below it.
On your canvas, you will notice the gradient only appears inside the text and no longer covers the entire canvas.

You can edit the gradient fill as explained previously to try out different effects within the text.

– As Backgrounds
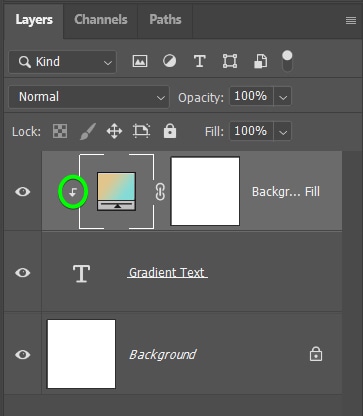
You can also leave the Gradient Fill Layer as it is as a creative background. After creating the fill layer, add different layers, such as text or image layers, to create a layout.
As long as each layer is placed above the Gradient Fill, you can have a unique background with any elements on top. You can even use gradient text as an element in your layout. I have created a New Gradient Fill Layer for the background, kept the gradient text, and added an image with a border in the Layers panel.

The result is a complete layout with the Gradient Fill layer as the background.

– Within Shapes
You can also add a Gradient Fill Layer to a shape in the same way as adding a gradient fill to text. First, select one of the Shape Tools (U) to create a shape on the canvas. For instance, I added an upside-down triangle to the canvas.

Then, add a new Gradient Fill Layer above the shape layer.

The canvas should be filled with the gradient you added.

Right-click (Win) or Control + click (Mac) on the fill layer and select Create Clipping Mask to add the new gradient to the shape layer only.

You can also set the Shape’s fill to Gradient by opening the Fill Panel from the Options Bar and clicking on the Gradient icon when the Shape Tool is active. This method offers you the same customization options since you can edit the gradient at any point using this panel.

Once you add the gradient using either method, you have a shape filled with the gradient.

You can then easily edit each gradient fill layer you added to test out different colors and blends to determine what works best for your project.


