
Using the Crop Tool to crop or straighten images in Photoshop is one of the most useful things for any photographer or graphic designer to know. Whether it be removing unwanted distractions from the edge of frame, straightening a photo, or something in between, the Crop Tool is fast and easy to use.
To access the Crop Tool in Photoshop, press C on your keyboard. A crop overlay will appear over your image that you can click and drag to reposition and resize your cropping area. Once the crop overlay is in position, click the checkmark in the Options Bar to crop your photo.
With that said, there are various methods to crop a picture. You can keep the aspect ratio the same, crop unrestricted, or use the tool to straighten an image. There are even ways to crop a layer or a photo into a specific shape without using the Crop Tool, all of which you’ll learn about here.
Video Tutorial
Understanding The Crop Tool Settings
Once you select the Crop Tool (C) from the toolbar, various settings appear in the Options bar for you to customize the tool. Before you use the Crop Tool, it’s a good idea to understand what each setting does to get the most out of the tool.

Aspect Ratio Settings
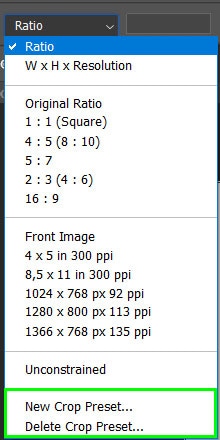
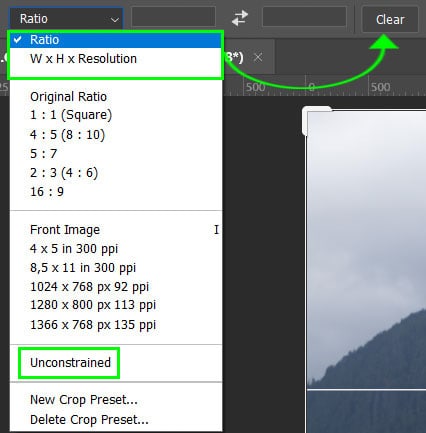
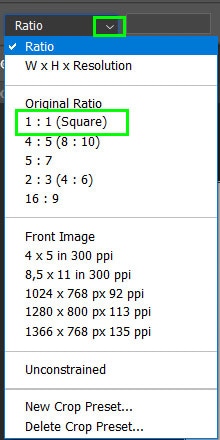
The first setting is the Aspect Ratio drop-down menu that allows you to set and change the ratio of the crop. Choosing Ratio or W x H x Resolution lets you input the specific values yourself.
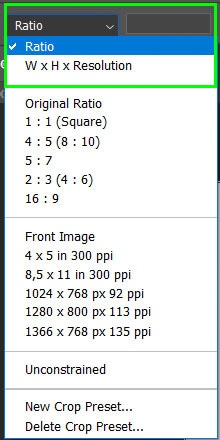
The next group of options lets you choose one of Photoshop’s default aspect ratios to crop the image to. These ratios are helpful if you need to re-size a picture that will be printed and placed in a specific frame size or to keep the original ratio of the photo. The default ratios are common photo ratios used in print.
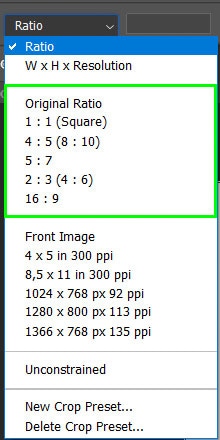
Further down in the menu, you can also choose specific pixel sizes for your image, along with pre-set Pixels Per Inch (PPI) resolutions.

The unconstrained option allows you to free-crop the image without a set ratio. This means you can crop the length of the image without affecting the height or vice versa.
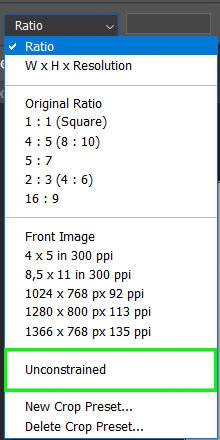
Lastly, in the menu, you can save your own crop presets using the New Crop Preset option and then Delete Crop Preset if you’re no longer using them.
Ratio Input Boxes
Next in the Options bar is the space to input your own ratio values. Type a value in each box to set the Width (the first box) and the Height (the second box).

The two arrows in between the boxes let you quickly swap the values around, switching the width and height constraints.

Press the Clear button to remove the values from the boxes.

When the Aspect Ratio is set to W x H x Resolution, the settings will change, giving you a third box to add a resolution value. You can use the drop-down menu to toggle between pixels per inch or pixels per centimeter.

The Straighten Tool
Next in the Options bar is the Straighten feature, which allows you to fix up any images that are slanted. This tool is helpful when correcting pictures with horizon lines or vertical lines on a building — especially when a tripod wasn’t available during shooting. I will go into detail about this feature later on.

Overlay Settings
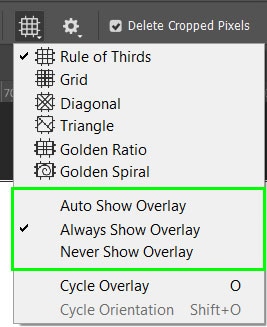
Further on, you can choose an Overlay Option in the drop-down menu by clicking the grid icon. These options add a light gray overlay to the canvas to provide guidance when you crop the image.
There are shortcuts for the overlay options, which are to press O to cycle through the overlay options and press Shift + O to change the orientation when using the Triangle or Golden Spiral overlays.
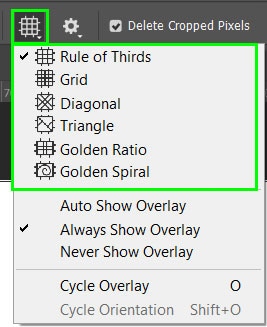
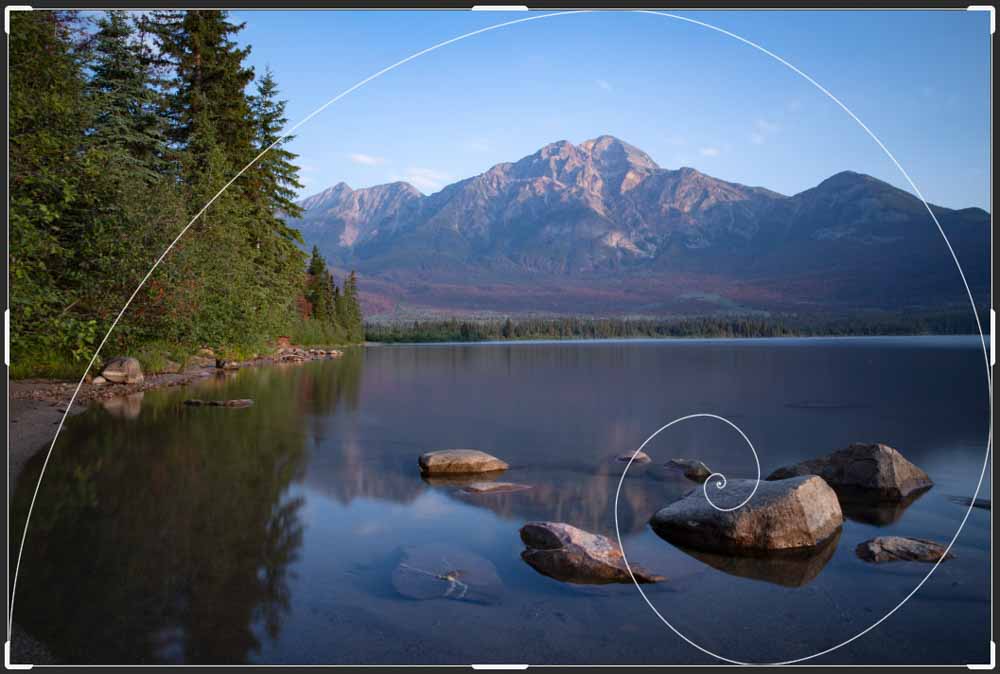
Select a crop overlay to crop the photo using common compositions such as the Rule of Thirds (the crop tools default overlay), Golden Ratio, or Golden Spiral.

In the Overlay menu, you can also choose to show or hide the overlay.
Additional Settings
In the Options bar, click the Gear icon for more settings, such as showing the cropped area and changing the opacity.
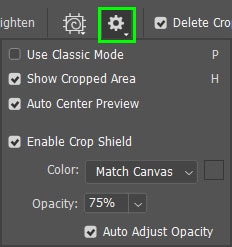
The next two check boxes let you delete the cropped pixels — which means you can’t undo the crop later on — and make a content-aware crop. The content-aware option enables you to extend the image, and Photoshop fills in the extra space with what the program thinks is the correct pixels.

The content-aware option works well when extending areas with consistent color, like the sky. However, the program usually incorrectly fills in more complex spaces with various textures, colors, and tones.
Lastly, you can reset the crop box and aspect ratio using the curved arrow icon, cancel the crop, or accept the crop using the check icon.

How To Crop An Image With The Crop Tool
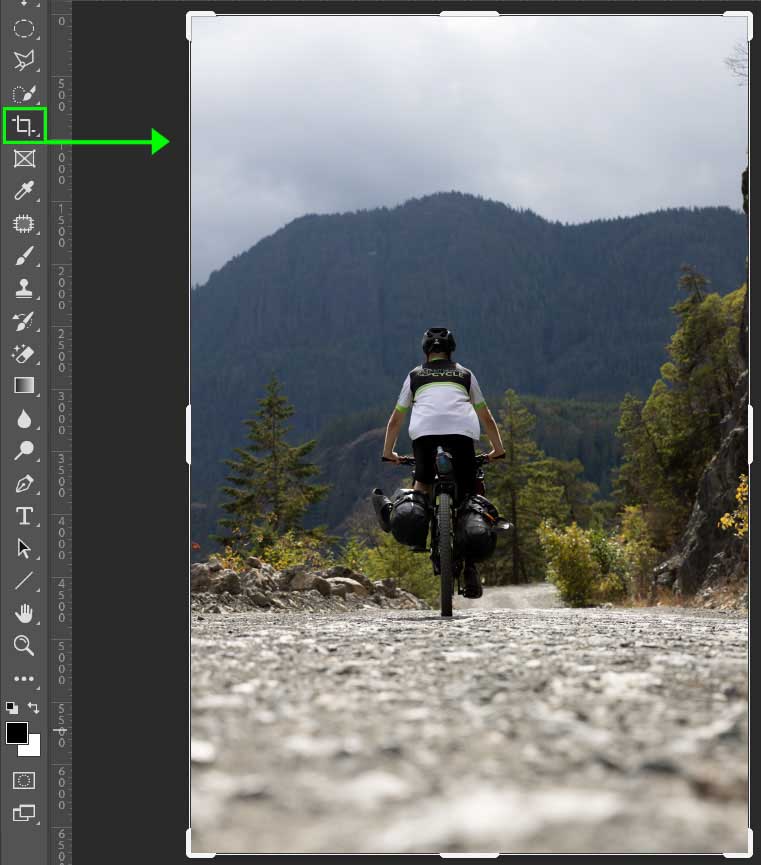
To crop an image using the Crop Tool, first select the tool from the toolbar or press C. You will notice a border surrounds the photo in the workspace.
For this example, I will be free cropping the image, which means I can crop the photo without a set ratio. There are three ways to free crop — select either Ratio, W x H x Resolution, or Unconstrained from the Aspect Ratio menu. If you choose one of the first two options, ensure the Input boxes are empty by clicking the Clear button.
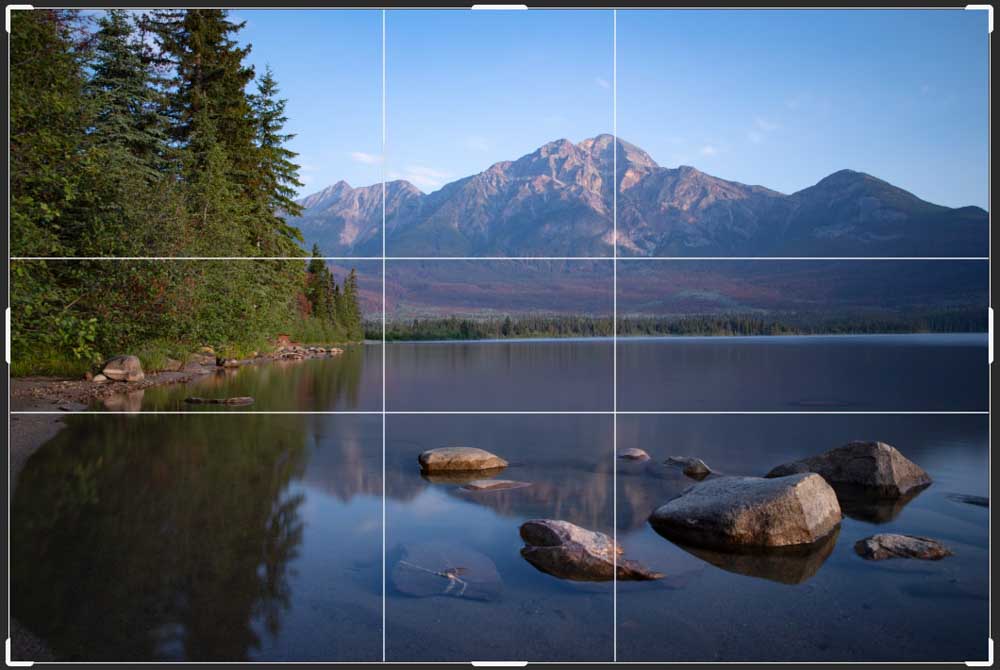
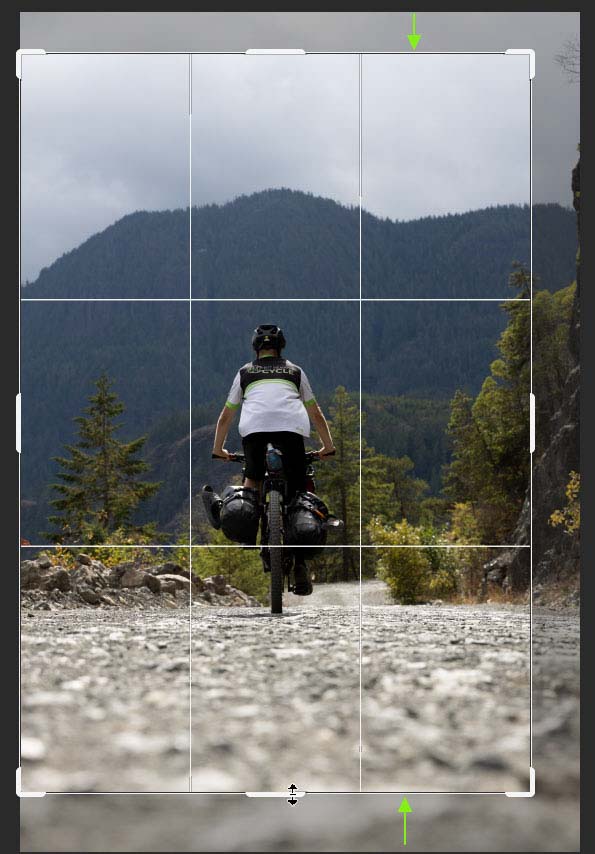
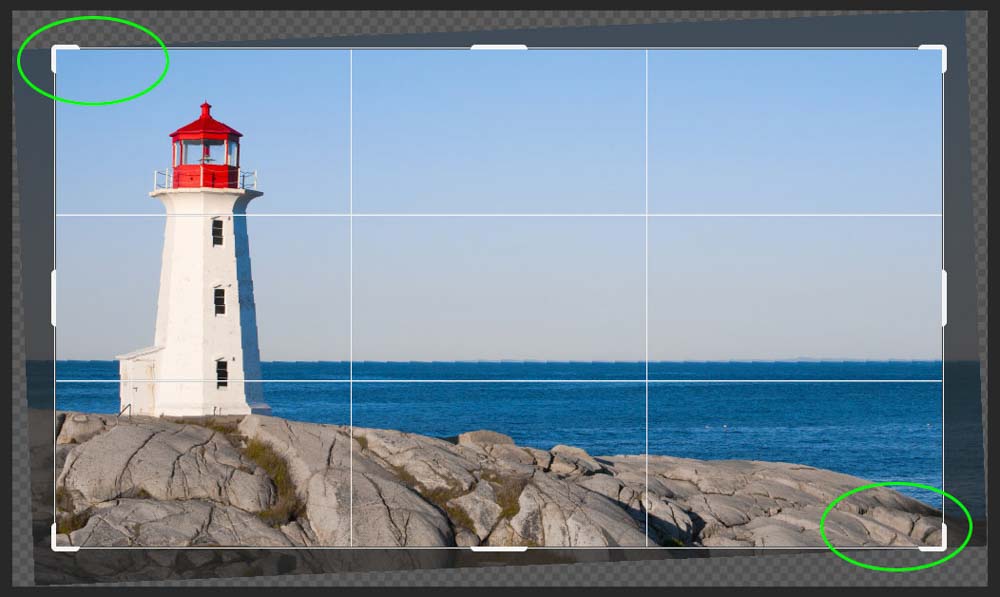
Then select an overlay option if you’d like — for this image, I want to center the subject, so I have chosen the Rule of Thirds overlay. I recommend you uncheck the Delete Cropped Pixels box so that you can reverse or update the crop later in the project.

Once your settings on correct, hover your mouse over the edge or corner of the crop box until a double arrow appears.
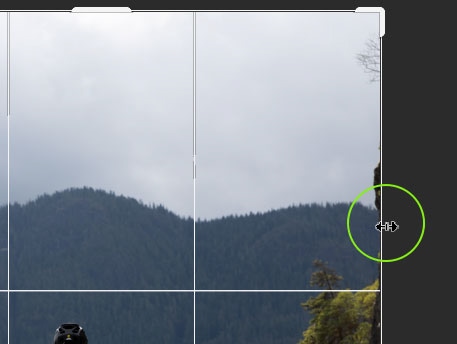
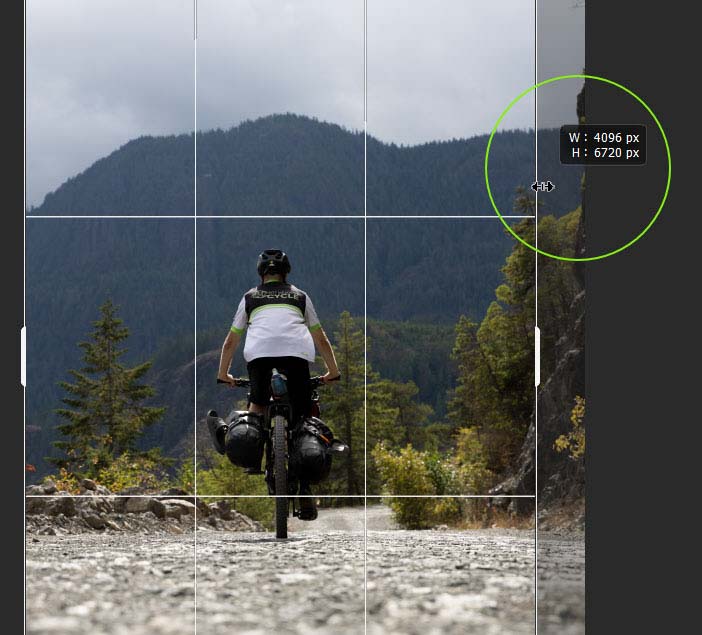
When the double-arrow appears, click and drag the box inwards to crop the image. You can drag the box in on the edge you clicked, or if you select a corner, you can crop the width and height at the same time. While dragging, a box will appear to show you the new width and height of the image in real-time.
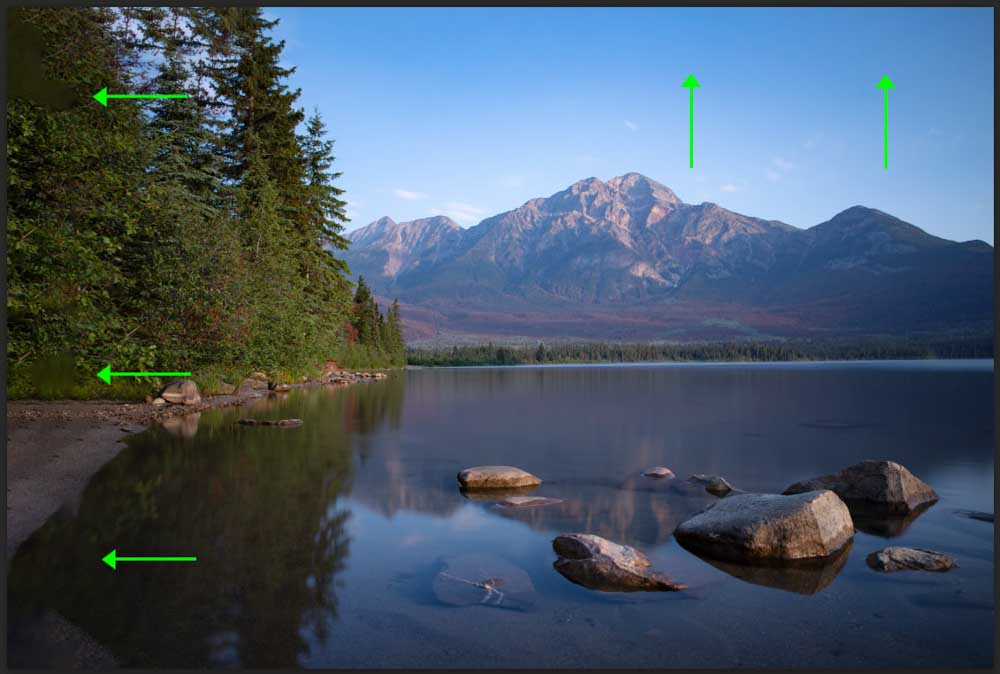
Once you have centered the subject horizontally, click and drag down from the bottom and top edge to crop the picture vertically.
Once you are happy with your crop, select the Checkmark in the Options bar or press Enter to make the crop.
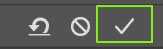
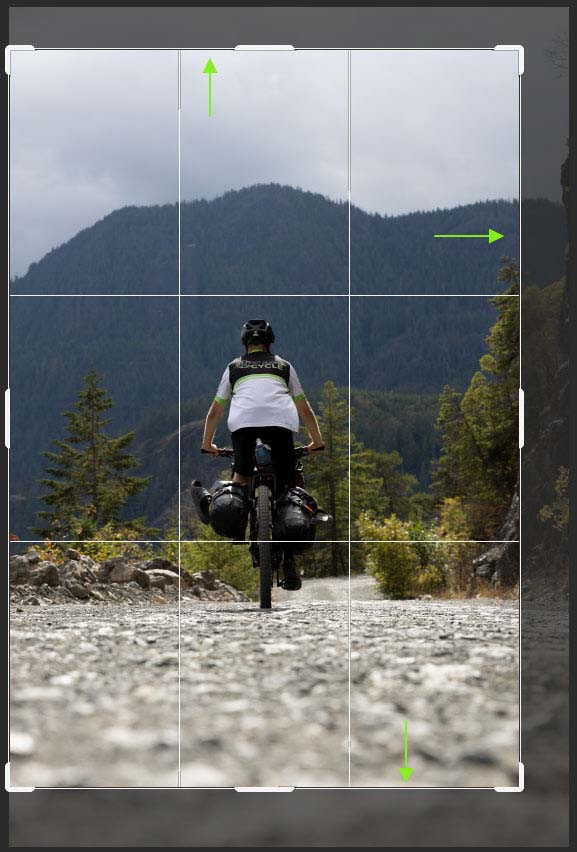
Your image is now cropped to the new size.


If you want to recover the cropped pixels later on — since you unchecked Delete Cropped Pixels — you can easily adjust the crop by re-selecting the tool. Once the tool is selected, click anywhere in the image, and the previously cropped pixels will appear outside the crop box.
Simply drag the crop box outwards to include the areas you want and press Enter to accept the crop.

Crop Without Changing The Aspect Ratio
If you want to crop an image to a specific ratio, you can set the ratio before cropping. This method is useful if you want to frame the print using a standard frame size. In other cases, you may need to crop a picture to a specific size to fit a project. In this case, I will show you how to crop the image below into a square.

First, select the Crop Tool, open the Aspect Ratio menu, and select 1:1 (Square) or any other aspect ratio you need.
You will notice the input boxes now have 1 and 1 in them, indicating a square ratio. Now, adjust the settings as needed. I have set the Overlay to Golden Spiral and unchecked Delete Cropped Pixels so that I can recover the cropped pixels if I need to.

The crop box will appear over the photo with the overlay you have chosen. The crop box isn’t sitting where I want to crop the image in my image below.
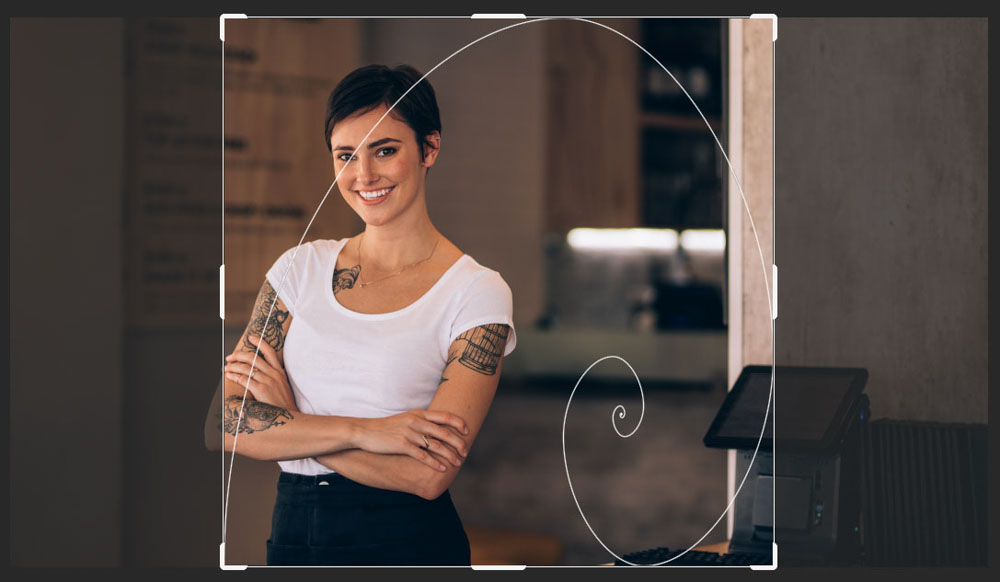
To reposition the crop box, either click and drag the image to a new spot or use the arrow keys on the keyboard to move the image. Note that you are moving the picture and not the crop box.
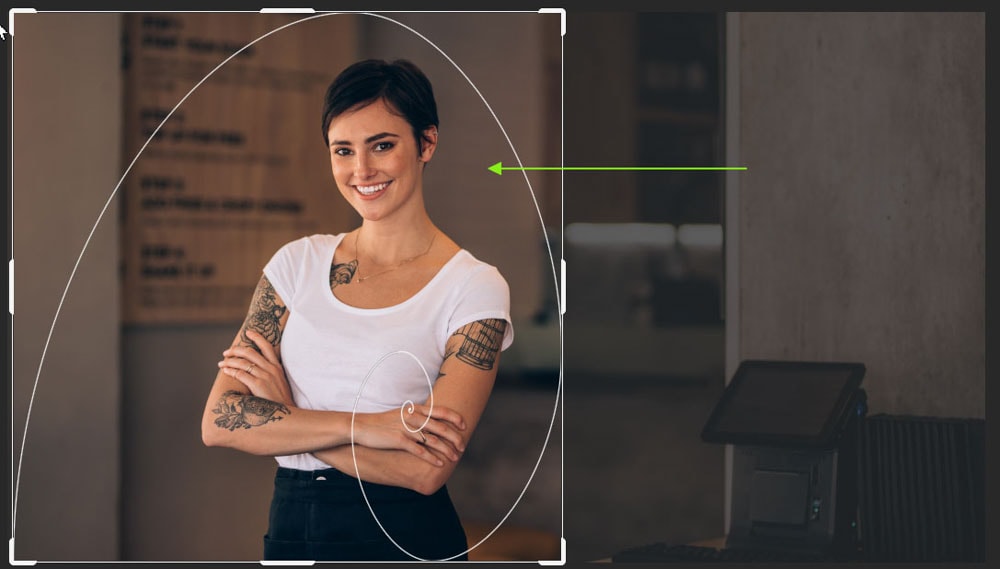
Then to resize the crop box, hover over the corner or any side and drag it inwards or outwards. Since you have set the ratio to square, no matter how you move the box, it will keep the square shape.
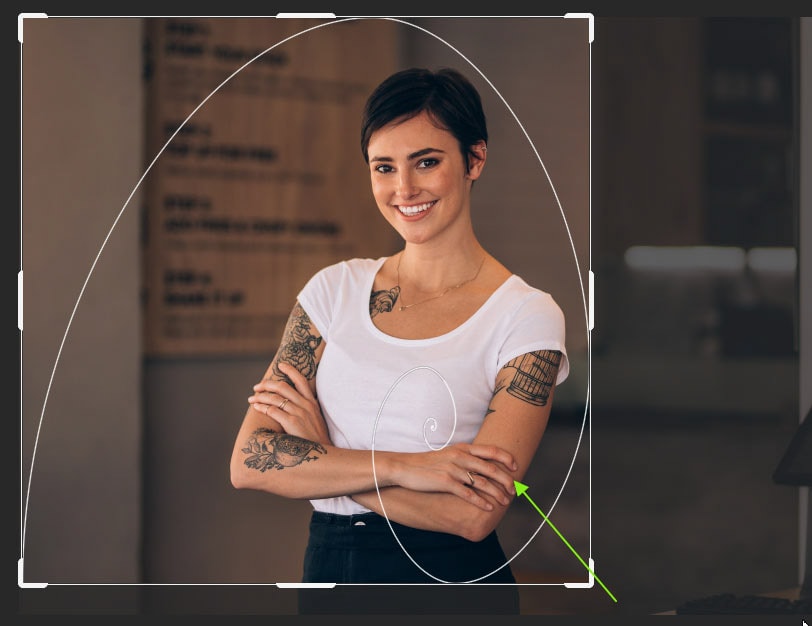
When you are happy with the crop, select the Checkmark in the Options bar or press Enter on your keyboard.
You will now have an image cropped to a square ratio, ready to use in your design or to go to the printers.

How To Straighten An Image In Photoshop
The Crop Tool has another useful feature: the Straighten feature, which allows you to rotate your image to correct lines in the picture. This feature is commonly used to straighten horizon lines, which can come out slightly slanted when a tripod isn’t used.
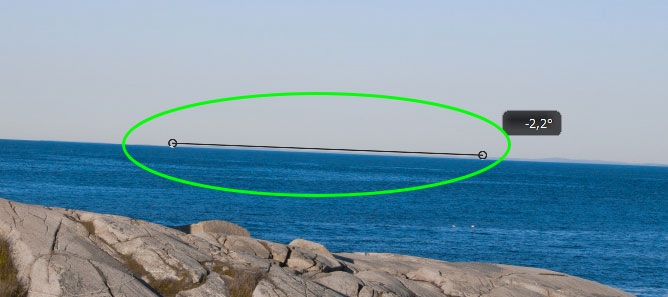
To demonstrate this feature, I will use the image below, which has a slanted horizon line.

There are two ways to correct an image once the Crop Tool is selected. Firstly, once you have activated the tool, you can hover the mouse just outside the crop box until a curved double-arrow appears.
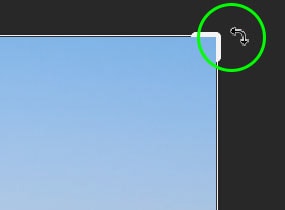
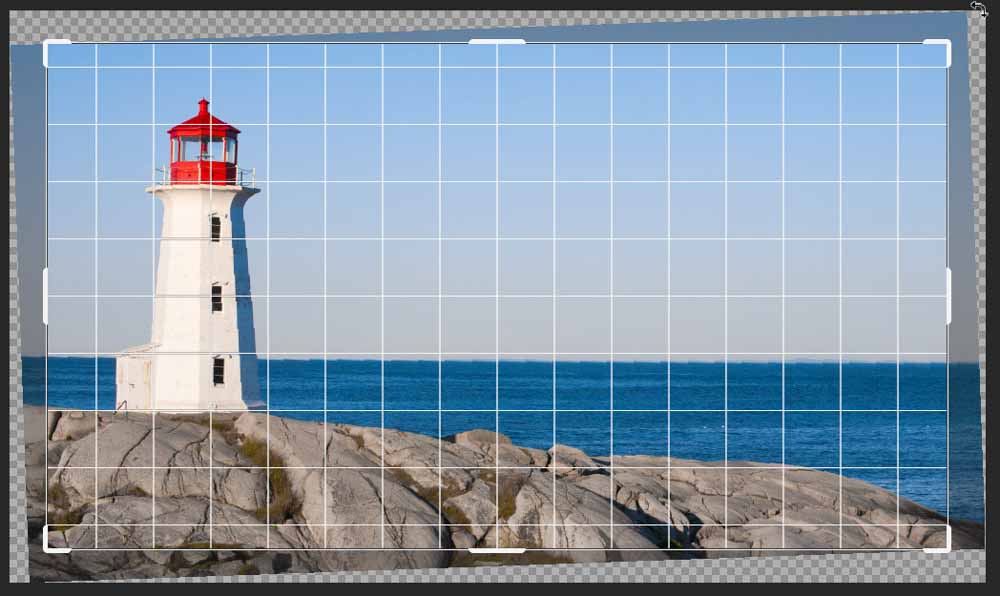
When the curved arrows appear, click and drag to rotate the image in your desired direction. Gridlines will appear to help you line up the horizon.
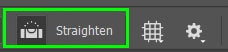
The other method is to click on the Straighten icon to select it. Then click and drag on the image to draw a line on the horizon — or any straight line. The image will straighten by rotating the image until the line you drew reaches 0 degrees.
You will notice that the image is cropped to avoid any gaps around the image caused by the straightening effect.
Now, you can change the crop if you’d like by dragging the edges of the crop box and then pressing Enter to confirm the crop and straighten. Your horizon line is now straight.

How To Crop A Layer In Photoshop
To crop a layer in Photoshop, you can create a selection around the area you want to keep and add a layer mask to hide the rest of the layer. Once you have cropped the layer, the canvas remains the same size, letting you add other elements or layers to the project.
To crop a layer, choose a selection tool to create a selection around the area you want to keep on the layer. I will use the Rectangular Marquee Tool (M) in this case.

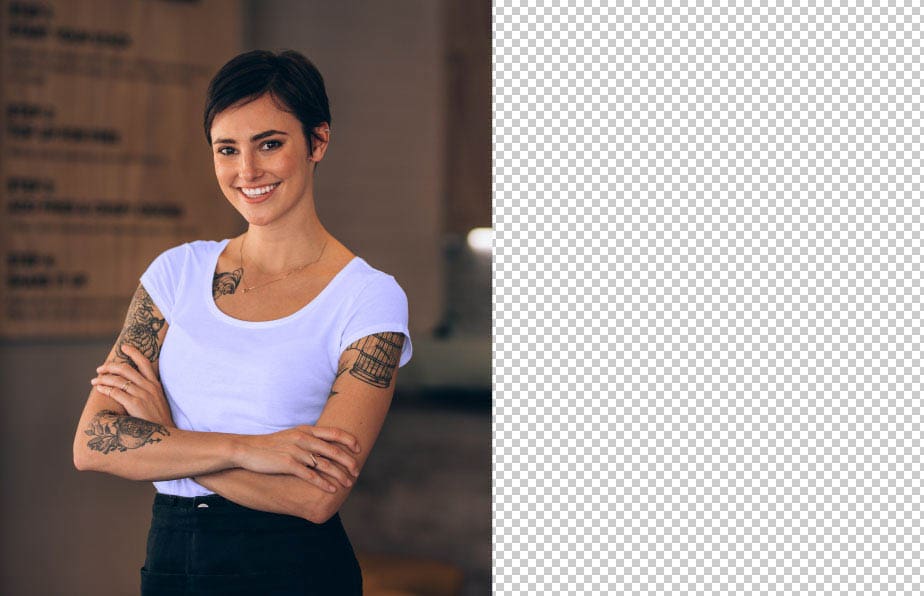
Click and drag to create a selection on the layer. The area you select is the part that is kept after cropping.

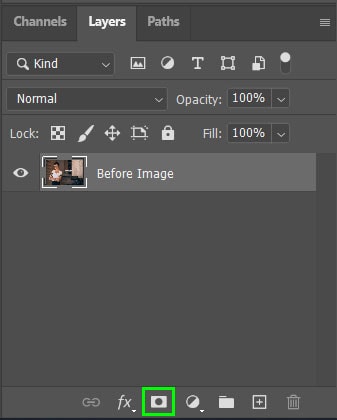
Once you are happy with the selection, click on the Add layer mask icon at the bottom of the Layers panel.
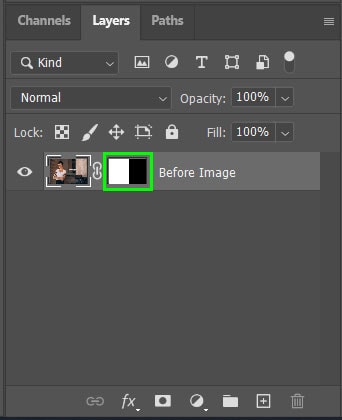
The section of the layer that you didn’t select is now hidden by the layer mask while keeping the area of the layer that you selected visible. The transparent canvas — shown by the white and gray blocks — stays the same size.
In the Layers panel, you will notice a new thumbnail added to the image layer, indicating the layer mask. The black area represents what is hidden on the layer, and the white shows what is visible on the layer.
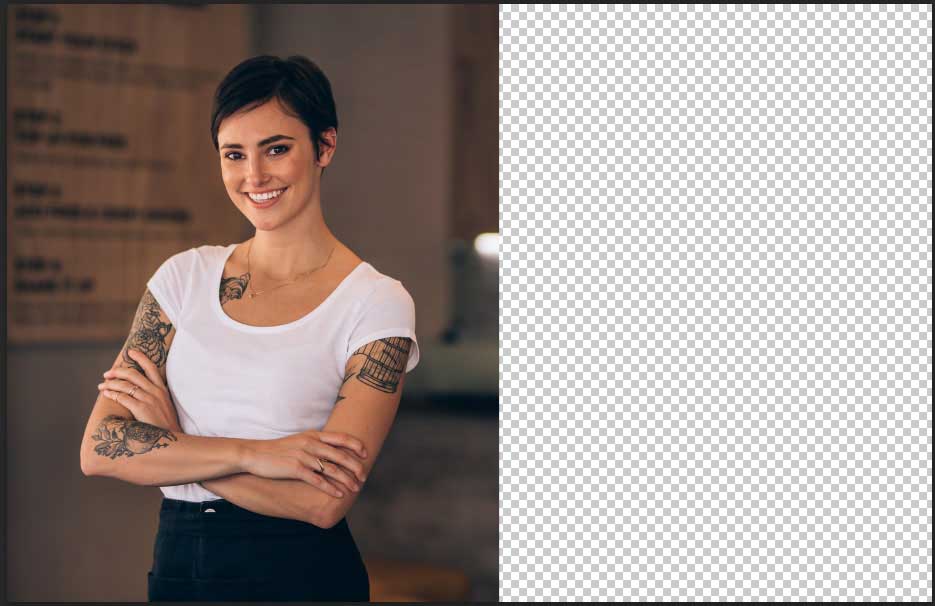
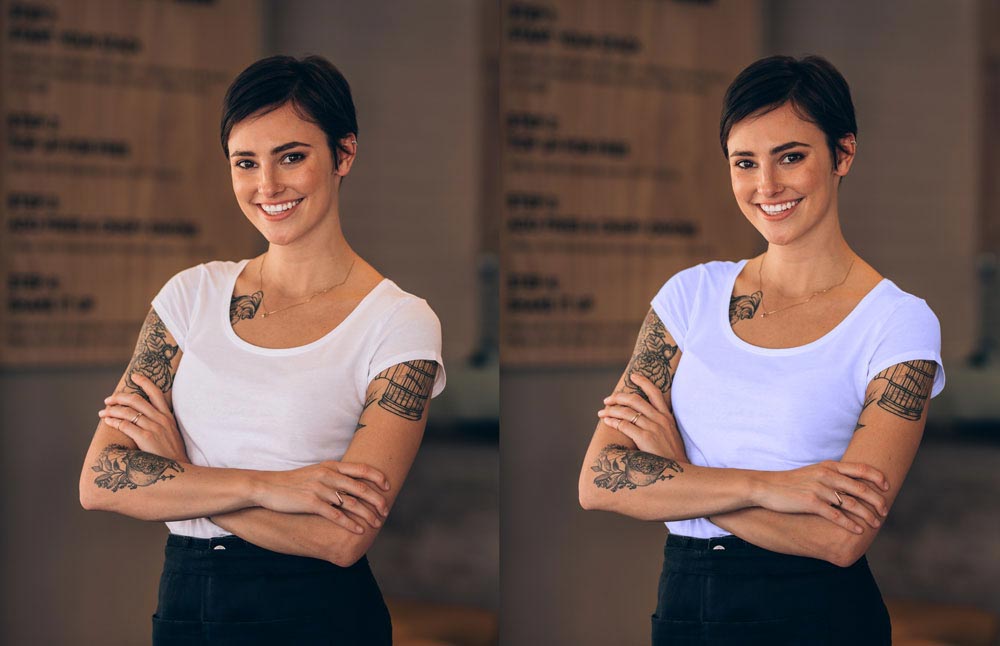
Cropping a layer rather than the entire canvas has many uses, such as creating a quick Before and After layout. To make this design, add the new image as another layer in the document.
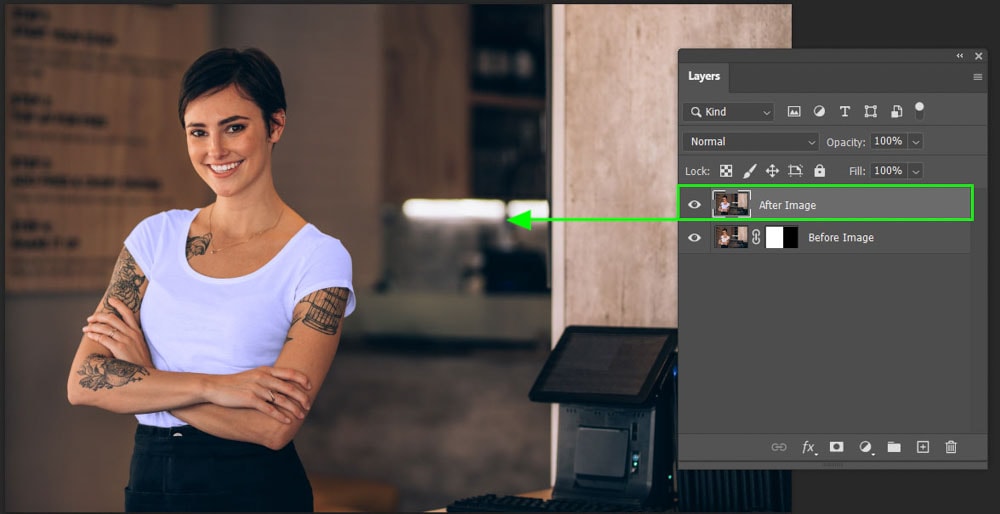
Then repeat the process of cropping the layer with the After Image layer by creating the selection and adding a layer mask.
Lastly, select the Move Tool (V) and shift the After Image layer to the right of the canvas. You now have a Before and After layout to which you can add text or other elements.
How To Crop Images Into A Shape
You can crop an image into a specific shape using the same theory of cropping a layer. To crop images into a shape, create the shape using the Shape Tool on the Path setting, convert the path into a Selection, and then add a layer mask to the layer. You can edit the layer mask at any stage to delete or adjust the crop.
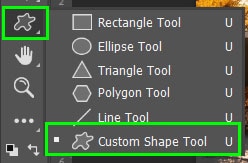
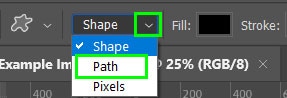
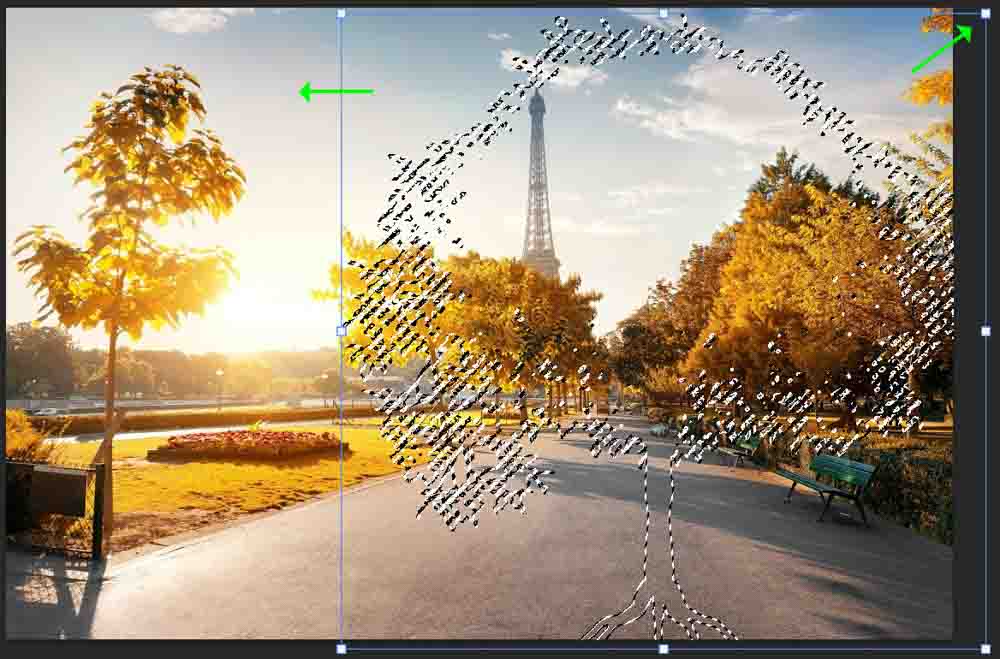
This process lets you create unique layouts — you can use a simple rectangle or ellipse shape or get more creative with a custom shape. Start by opening the image you want to crop and select the Custom Shape Tool from the fly-out shape menu.

Then in the Options bar, set the tool mode to Path in the drop-down menu next to Shape.
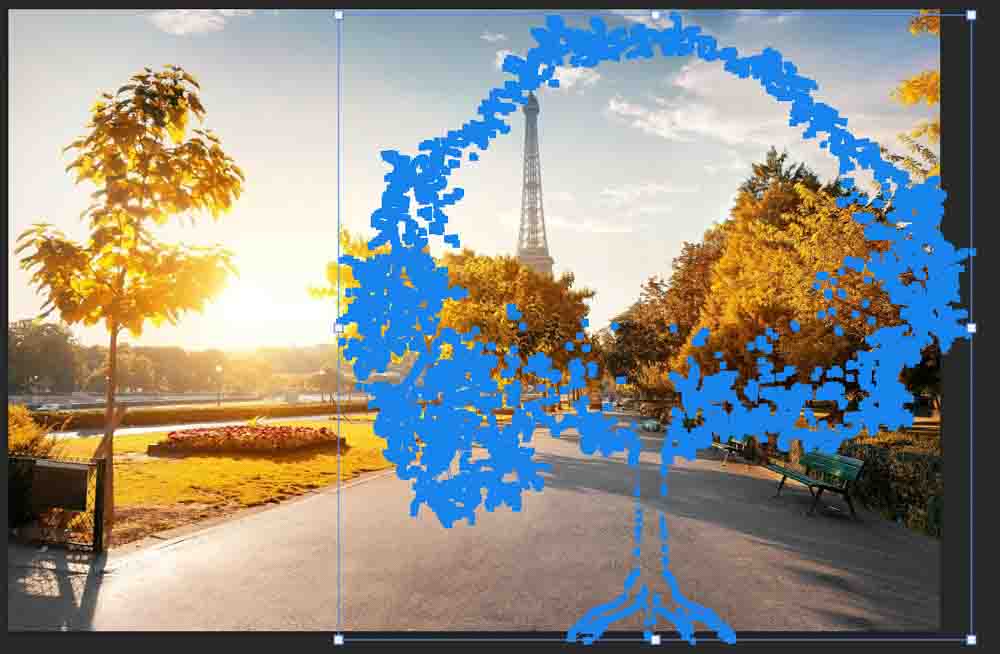
Next, select a custom shape from the Custom Shape Picker menu. I have chosen a maple tree for this example.

Once you have the shape, click and drag on the canvas to create the shape where you’d like it. The shape has a blue border with anchor points indicating the Path.
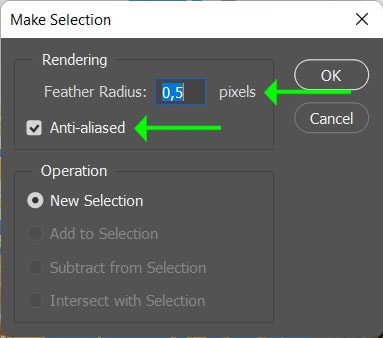
Then, click on Selection next to Make in the Options bar to turn the path into a selection. A dialogue box opens where you can add a Feather to the selection if you’d like, but it isn’t entirely necessary. Check the box next to Anti-aliased to prevent jagged edges around the selection. Lastly, click OK to create the selection.

There is now a selection in the shape you have chosen on the image.

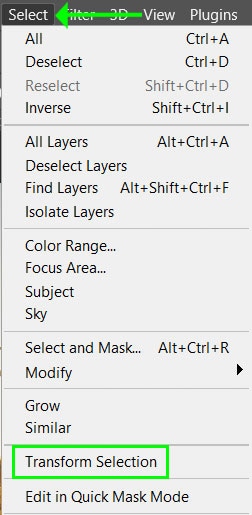
If you want to reposition the selection before cropping the image, navigate to Select > Transform Selection. A transform box will appear around the selection, allowing you to move the selection or resize it by clicking and dragging the box. Press Enter when you are happy with the size and position.
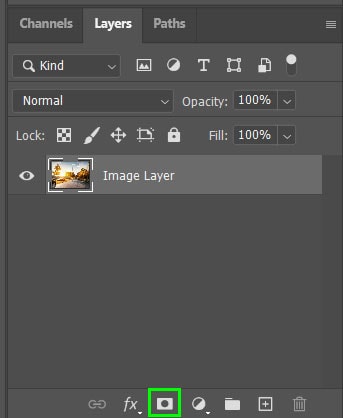
Now that your selection is set, crop the image by clicking on the Add layer mask icon in the Layers panel.
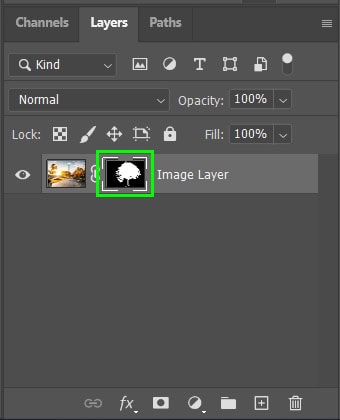
The layer mask is now added to the layer in the Layers panel, indicating the hidden pixels with black and the visible pixels with white.
Your image is now cropped to the selected shape without affecting the canvas size.
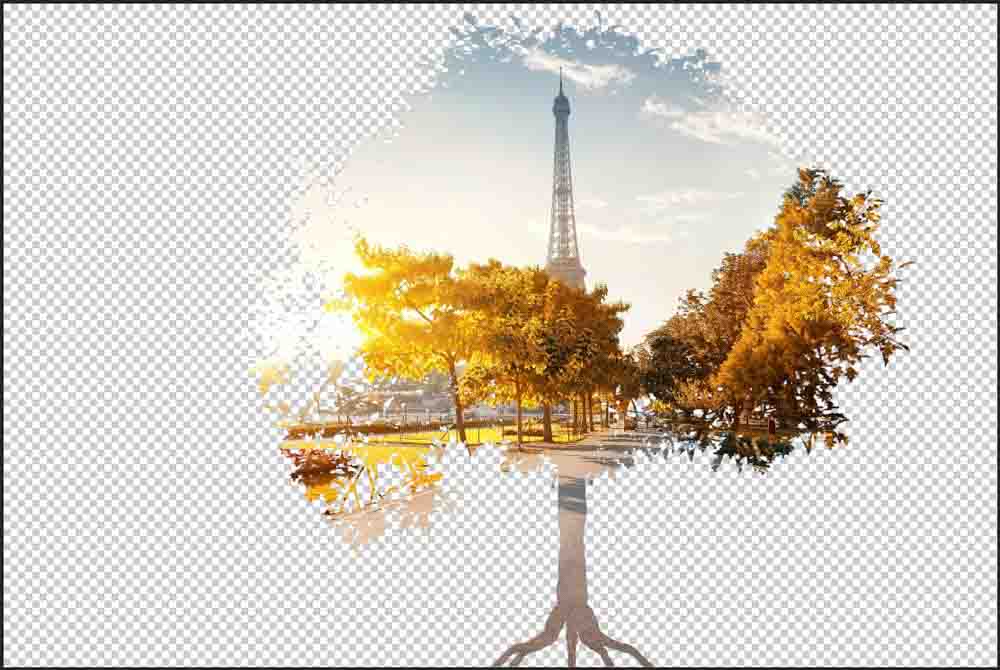
If you crop your image into a specific shape like this, you will be left with a transparent background. To preserve this transparency upon export, you will need to save your file as a PNG. If you’re unsure how to do that, I explain the whole process in my guide to saving transparent backgrounds in Photoshop.


