

What Does Rasterize Mean In Photoshop?
Whether you’re working with text, shapes, or smart objects, you’ll find yourself coming across the need to “rasterize” the layer. Perhaps you need to edit the layer, change the color, or erase parts of the image, but it’s not possible without rasterization. This word might seem a little mysterious as the difference between a rasterized layer and a vector are not all that different.
Rasterizing a layer means you are converting a vector layer to pixels. This changes how your layer is displayed and what editing capabilities you have. When a vector becomes rasterized, you can see the pixels along the edges instead of a clean line. However, you gain the ability to directly edit the layer.
To better understand the meaning behind rasterizing in Photoshop, let’s go through the purposes of this feature.
What Is The Purpose Of Rasterizing A Layer?
Rasterizing a layer will convert any type of vector layer into pixels. As a vector layer, the image is made up of geometric formulas to create the contents of your image. This is perfect for graphics that need to have clean edges or be scaled up significantly.
The problem with vectors is they are not compatible with pixel effects such as brush adjustments or the eraser tool. That means in some instances, you won’t be able to apply the effects you need to a vector layer because it can’t be mixed with a pixel layer.
That’s where rasterizing comes into play. By rasterizing the layer, you can convert the vector from a geometric formula and turn it into pixels. That way you can apply pixel type effects onto your layer without any issues.
How Do You Rasterize A Layer?
Any vector layer or smart object can be quickly rasterized in one of two ways.
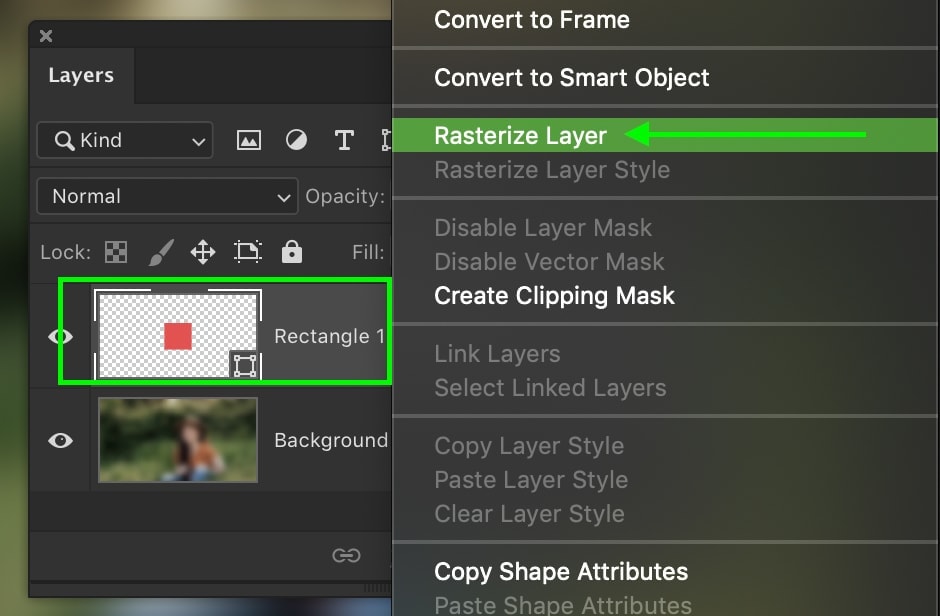
The first and fastest, way to rasterize a layer is to right-click on it in your layers panel, and choose “Rasterize.”
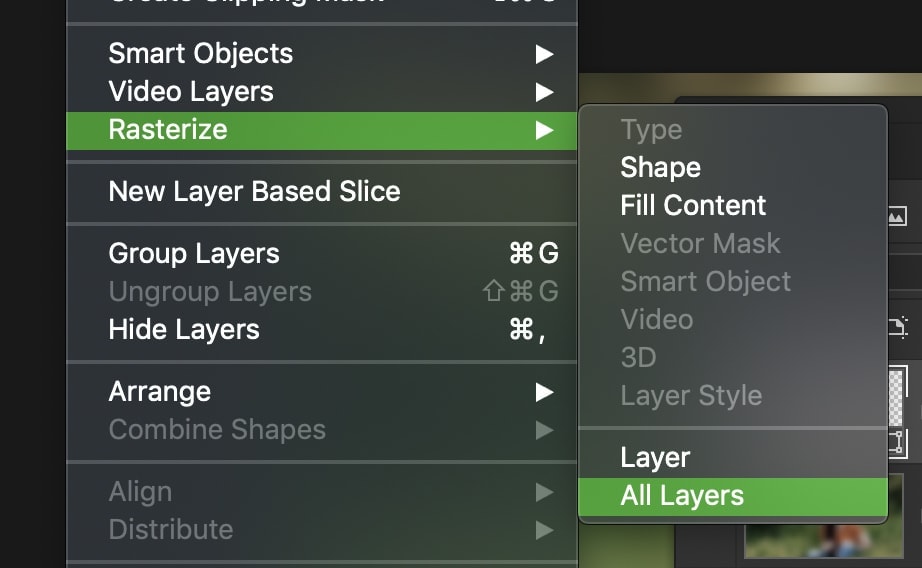
Alternatively, you can go up to Layer > Rasterize and select which type of layer(s) you want to rasterize.
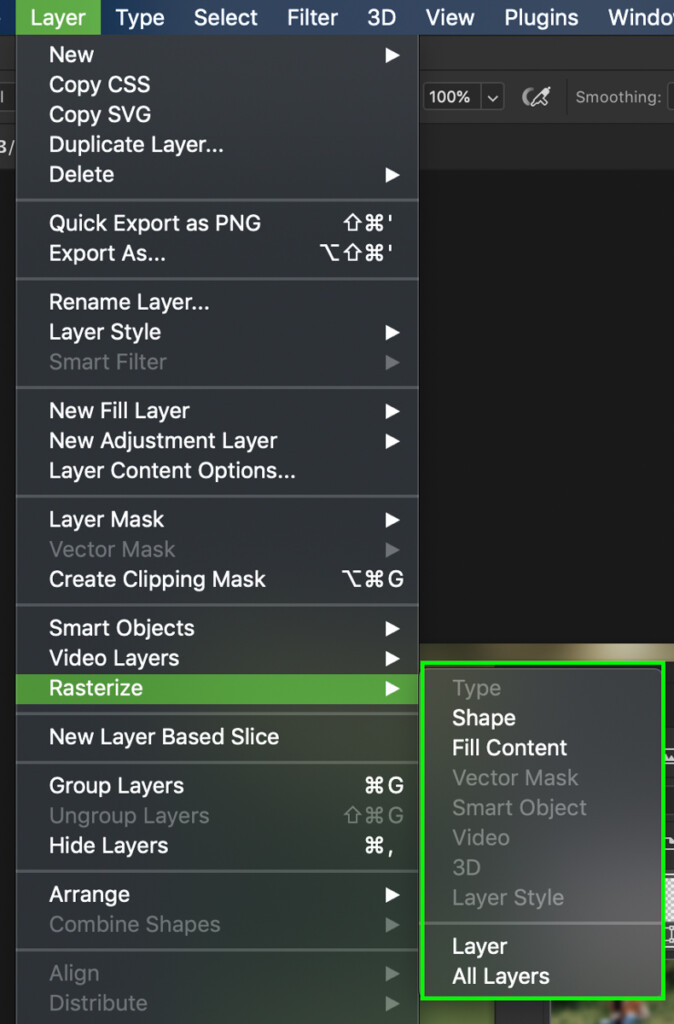
If your layer has multiple vector effects on it, this method lets you choose which areas you want to rasterize. For example, you could rasterize layer effects without affecting your vector text.
If you just want to rasterize your entire layer, select it in your layers panel go Layer > Rasterize > Layer.
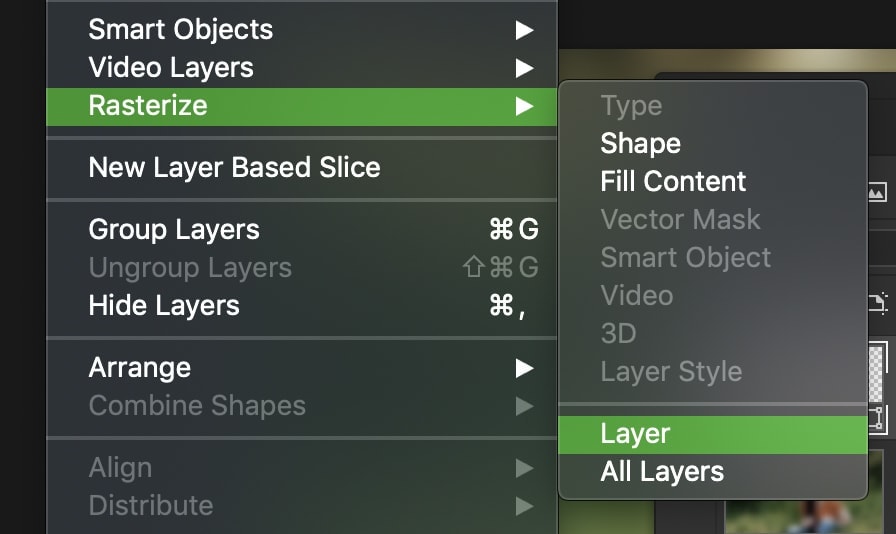
If you want to rasterize all your vector layers at once, you can use Layer > Rasterize > All Layers instead.
When Should You Rasterize A Layer In Photoshop?
In some cases, you won’t have any option but to rasterize your layer to get the types of effects you’re going for. For any pixel type adjustments, you won’t be able to apply them without rasterizing first.
With that said, rasterizing a layer isn’t a good way of editing non-destructively. Since it would be a permanent change, it’s not necessarily a good idea. After all, what if you change your mind and want to go back to your original vector?
After rasterizing a layer, this won’t be possible.
Whenever you can, it’s far more advantageous to duplicate and rasterize your vector layers so you always have a backup.
For example, if I wanted to edit my shape layer directly, I would duplicate the layer and rasterize the duplicate. That way I have an option to change my mind later on or start all over if I make the wrong adjustment.
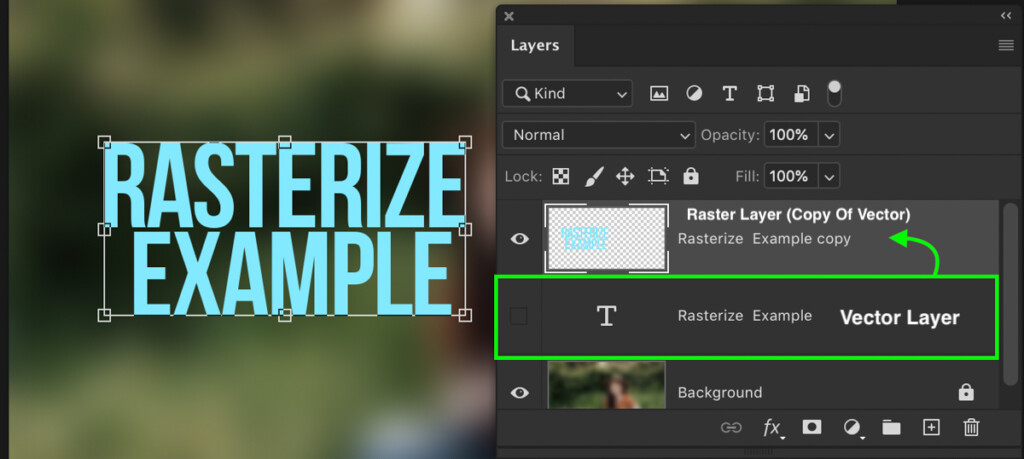
In short, if you need to rasterize a layer to make a pixel-based adjustment, do so on a duplicate layer.
Does Rasterizing Reduce Quality?
Although you won’t technically lose any image quality from rasterizing a layer, there are some important changes to be aware of.
– Rasterizing Layers Changes The Look Of Edges

When you first rasterize a layer, things won’t look all that different at first. The real difference comes when you zoom in. Although rasterizing a layer doesn’t necessarily reduce the quality, it does change how the edges of your text, layers, or shapes appear.
In the example above you can how the edge of the shape is sharp and crisp in the first photo, but somewhat boxy looking in the second. This is the big difference between vector and raster layers.
After rasterizing, your image is converted into pixels and needs to fit within the parameters of the pixels in your document. That’s why you end up with a pixelated looking edge when zoomed in.
– You Won’t Be Able To Rescale Without Quality Loss

Leaving your layer as is won’t reduce its quality after it’s rasterized. However, you’ll notice significant quality loss if you’re scaling up and down a rasterized layer.
Since a rasterized layer needs to fit within the pixels of your document, scaling it up or down changes how many pixels it can work with. When you scale down, it suddenly has fewer pixels to use and compresses itself. Going the opposite direction and scaling back up, those few pixels now have to be expanded into a larger number. This results in serious quality loss.
Looking at the two shapes above, you can see the clear difference in quality between a raster layer and a vector layer after significant scaling.
Why Does Photoshop Say You Need To Rasterize A Layer?
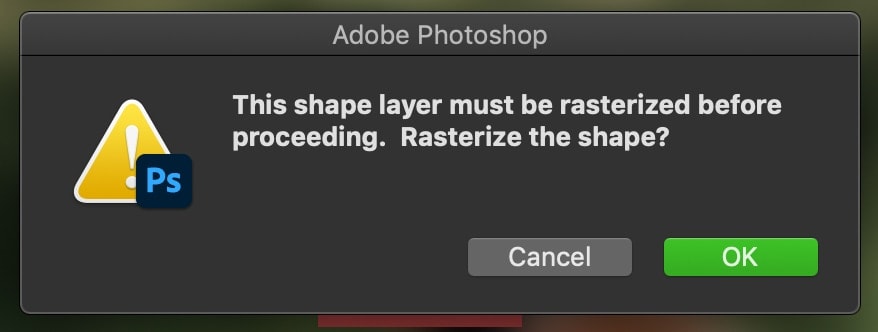
For example, if you were to try to use your brush tool on a text layer, you would get an error message asking to rasterize your layer. This is Photoshops way of telling you that you cannot make that specific adjustment unless you give up the vector layer functionality.
Things like layer filters, the brush tool, eraser tool, and paint bucket adjustments cannot be made unless you rasterize a layer.
What Kinds Of Layers Can Be Rasterized?
Not every layer is made the same. Only certain types of layers will have the option to be rasterized. Here are a few kinds of layers that you may have to rasterize at some point in Photoshop:
- Shapes
- Text
- Smart Objects
Although shapes and text are considered as vector layers, smart objects are a little different. Since smart objects act as “packaging” for regular raster layers, it can’t be directly edited. That’s why you won’t be able to directly edit any smart object layer without first rasterizing it into a regular layer.
You can learn more about smart objects and how they work in this post.
To edit non-destructively, it’s worthwhile to duplicate vector layers so you always have a backup plan. Even when there are error messages saying you can’t make adjustments to a vector layer, having a second layer is an easy workaround. Additionally, you can use a new layer with a clipping mask to directly edit any vector layer you need. That way you never have to sacrifice quality for an adjustment.
Happy editing!
– Brendan 🙂
