

While the Brush Tool is simple enough to use, you may find some difficulty creating a smooth brush stroke in Photoshop. Especially while using a mouse, drawing smooth lines is a lot harder than it seems.
This is largely due to the fact that Photoshop’s brush tools simply lay down the pixels based on the path you make with your cursor. Photoshop does not automatically smooth out the natural unevenness due to hand-shaking when you make a brush stroke using your mouse or editing tablet.
Luckily, there are some easy ways to ensure your brush strokes appear smooth instead of uneven and bumpy. Even if you’re a total beginner!
How To Smooth Brush Strokes In Photoshop
To smooth brush strokes in Photoshop, select the Brush Tool, then increase the Smoothing percentage in the Options Bar. To create smooth brush strokes without too much lag, set the smoothing amount to 10% – 45% for optimal performance. Now, your next brush stroke will appear smoother.
Let’s break that down a bit further.
Step 1: Select The Brush Tool (B)
If you’re looking to draw smooth lines, one of the major features that will help is Photoshop’s smoothing scale. This will determine how much Photoshop automatically smoothes the lines you make.
To start, select the Brush Tool (B) from the Toolbar.

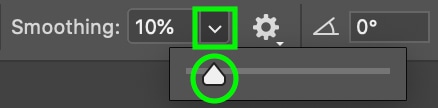
Step 2: Adjust The Smoothing Setting In The Options Bar
You’ll see the smoothing setting in the Options Bar once the Brush Tool is active.

Click the dropdown arrow, and you’ll see a slider where you can increase or decrease the smoothing. Increase the smoothing to somewhere between 10% and 45%.
Step 3: Draw A Line On The Canvas
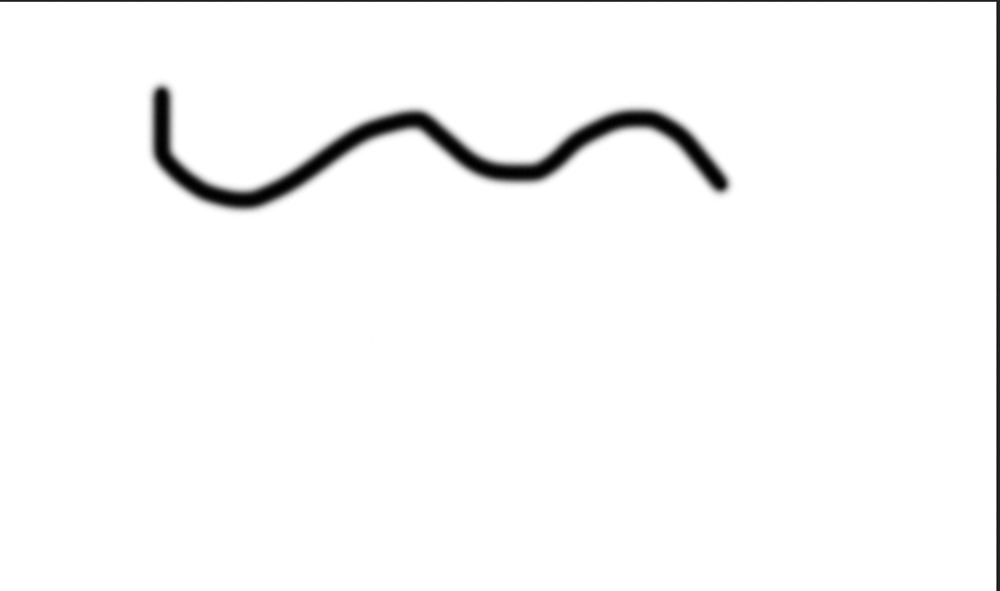
Click and drag to draw a line on the canvas. If you set the smoothing at 0%, the line you draw will most likely be a bit bumpy due to hand-shaking.
However, by increasing the percentage, you can create a much cleaner version of the line. Even 45% makes a massive difference.

The benefit of this tool is that it’s super quick and easy to use, but if you’re attempting to draw a complex shape, much of it could be lost to the automatic smoothing process.
There is a somewhat bothersome lag when drawing the line that can disrupt the drawing you’re trying to make.
So, if you want to draw a complex shape, you’ll need to draw slowly and with added precision to create the shape you want.
How To Draw Smooth Straight Lines In Photoshop
To draw smooth, straight lines in Photoshop, select the Brush Tool by pressing B and click once on your canvas to set the starting point of your line. Now hold Shift and click on another area of your Canvas. Photoshop will automatically connect the two points with a perfectly straight brush stroke.
Let me give you a more in-depth example.
This is what happens when I draw a straight line freehand using the Pencil brush tip.

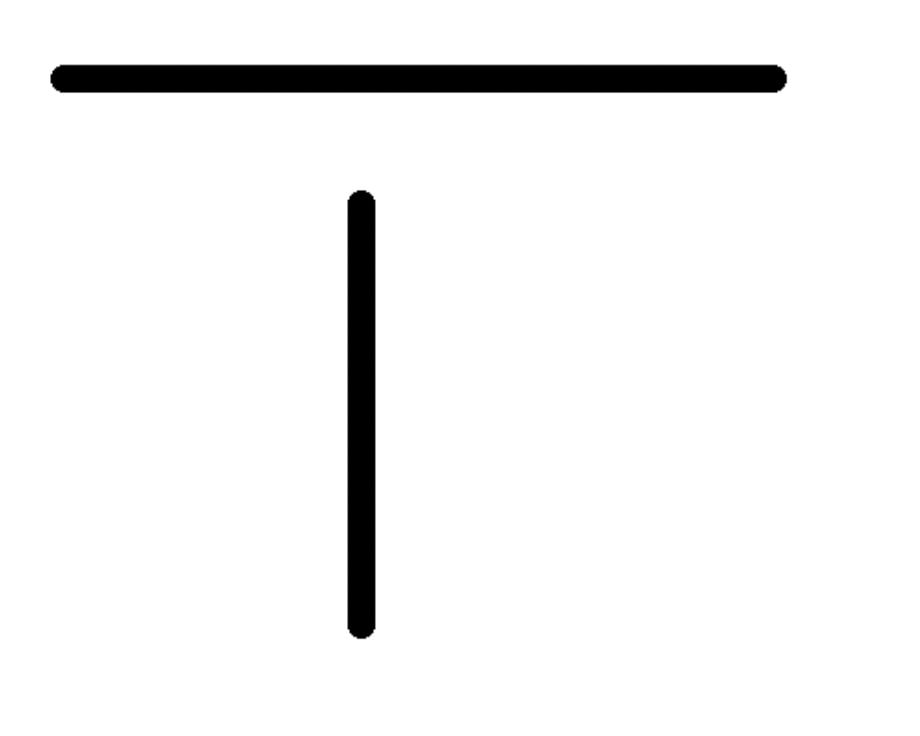
Not great-looking. However, if I hold down Shift and click two points, Photoshop will create a perfectly straight line between those points.

The only thing you’ll notice is some pixelation, as the line is straight but angled. To get rid of any pixelation, hold Shift before you draw your line. When you go to draw the line, you’ll notice the line is drawn perfectly horizontal or vertical, depending on the direction you’re drawing in.
Obviously, this limits you to strictly vertical or horizontal lines, but at least the lines will not be pixelated. However, you can somewhat create smooth curves with this method by holding Shift and clicking in small increments to form a curved shape. It’s a bit inefficient, but it works!
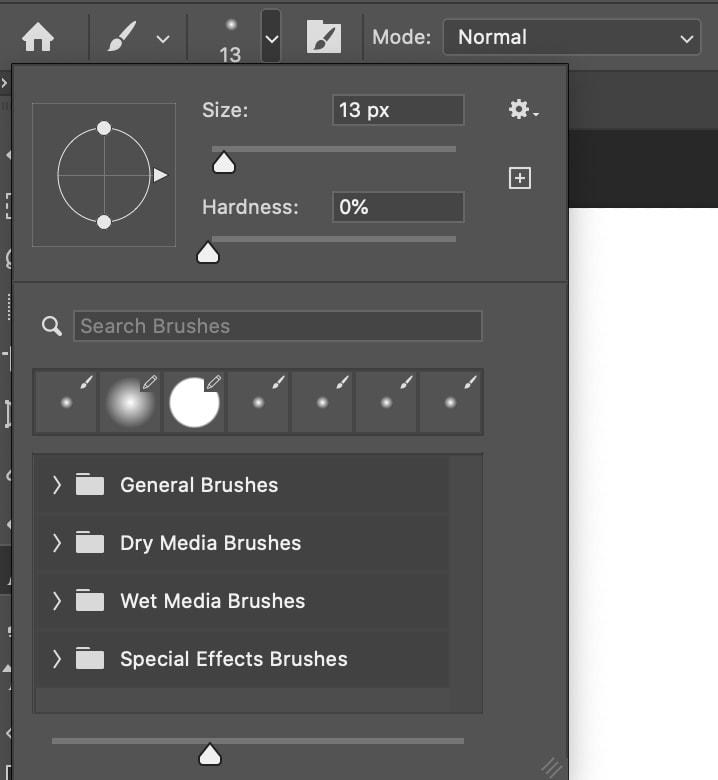
Brush Smoothing Settings Explained
There are a few other smoothing settings that will help you create smooth, precise lines. Next to the Smoothing percentage, you’ll notice a gear icon. Click this, and you’ll see a few more settings that will have a different overall effect on the line you draw.
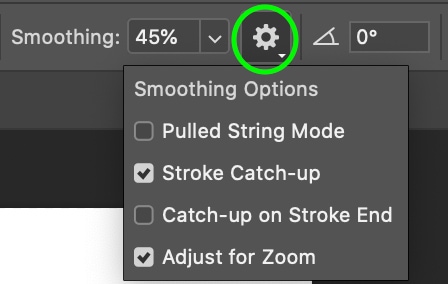
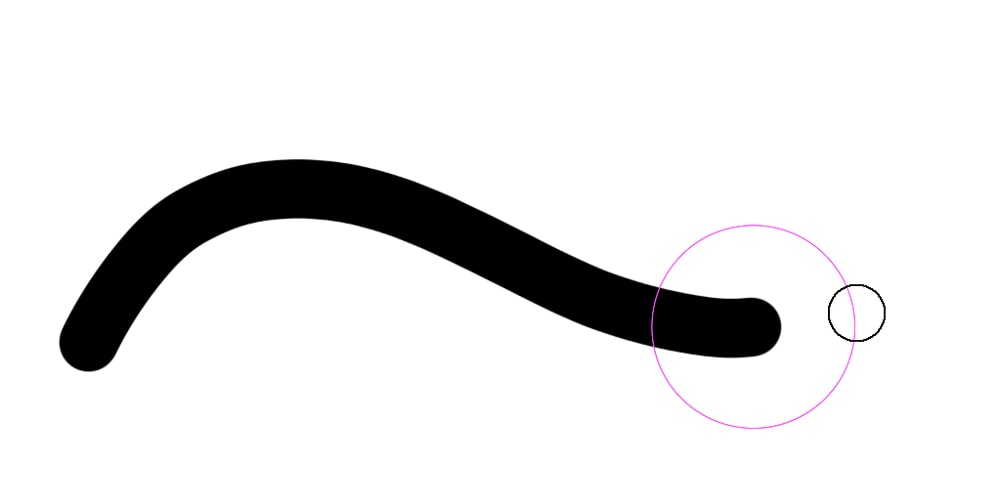
The Pulled String Mode
The Pulled String Mode will show a circle when you click, and your line will be drawn only once you drag your cursor outside of the circle.
This can make a smoother, more precise line because the lag gives you time to choose exactly where you’d like your line to go. You can also increase or decrease the size of this circle using the Smoothing slider. This mode comes in handy for times when your device might not be steady.
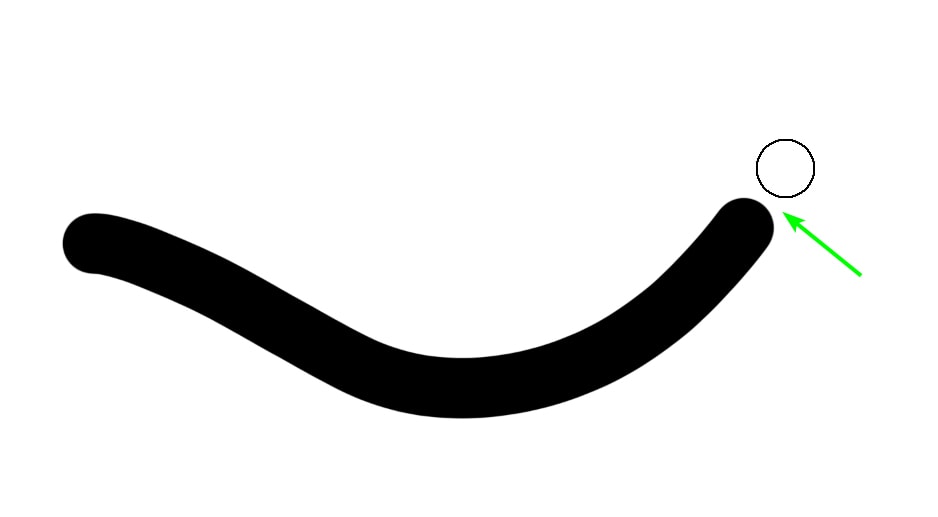
The Stroke Catch-up Mode
With Stroke Catch-up enabled you’ll notice the line follows the cursor more closely the slower you draw and trails a bit farther behind the faster you draw. Here, you can see your cursor guiding the line, giving you the illusion of extra precision. This is particularly useful when drawing fine details or sharp curves and corners.
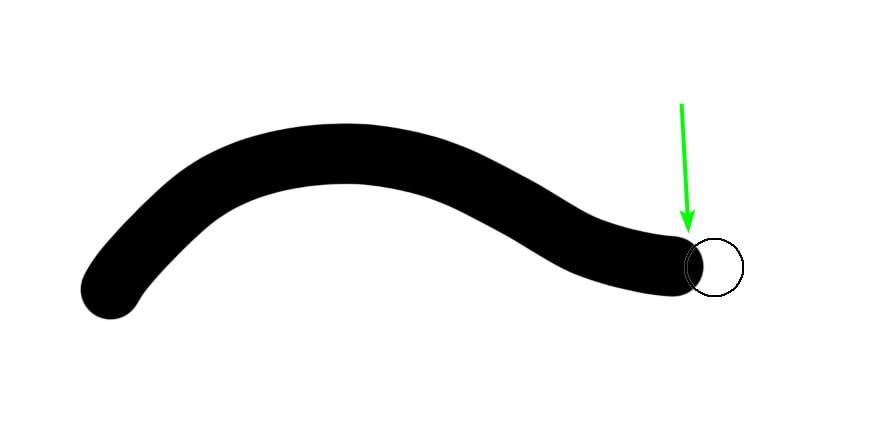
The Catch-up On Stroke End Mode
Catch-up on Stroke End will give the opposite effect, as your line will always be close to your cursor. Some people prefer this mode as too much of a lag can be distracting.
The Adjust For Zoom Mode
Adjust for Zoom will adjust the smoothing effect depending on how zoomed in you are to your canvas. For instance, if smoothing is set to 20% with the canvas at 150% zoom, the smoothing effect won’t be as strong as if you drew a line at, say, 75% zoom.
I recommend keeping the Stroke Catch-up and Adjust for Zoom features selected, as they offer you the most precision when drawing your line.
Catch-up on Stroke End is usually unnecessary, while Pulled String Mode is really only useful in the situations mentioned above (and will make the other options unavailable when selected).
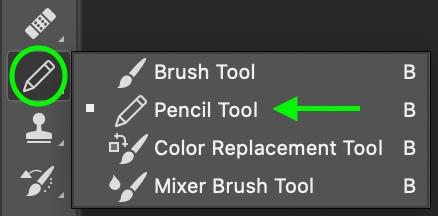
Types Of Photoshop Brushes To Help With Smooth Brush Strokes
Another way to ensure your brush strokes are smooth is to select the correct type of brush. This is an important step, as Photoshop has a wide range of brush options, and some are naturally smoother than others. You wouldn’t want to use the airbrush, for instance, as its nature is to create an uneven, “messy” effect.
To find the brush options, select the Brush Tool (B).
To see the different brush options you have, click the drop-down arrow next to the brush-tip to reveal your brush tip presets.

The Pencil Tool (B) tends to create the smoothest lines, particularly when the hardness setting is low and the size is small. To change the brush to a pencil, click and hold the brush icon in the toolbar and select Pencil Tool. You’ll notice the icon changes to a pencil.
Let’s compare the pencil to the hard round brush tool.
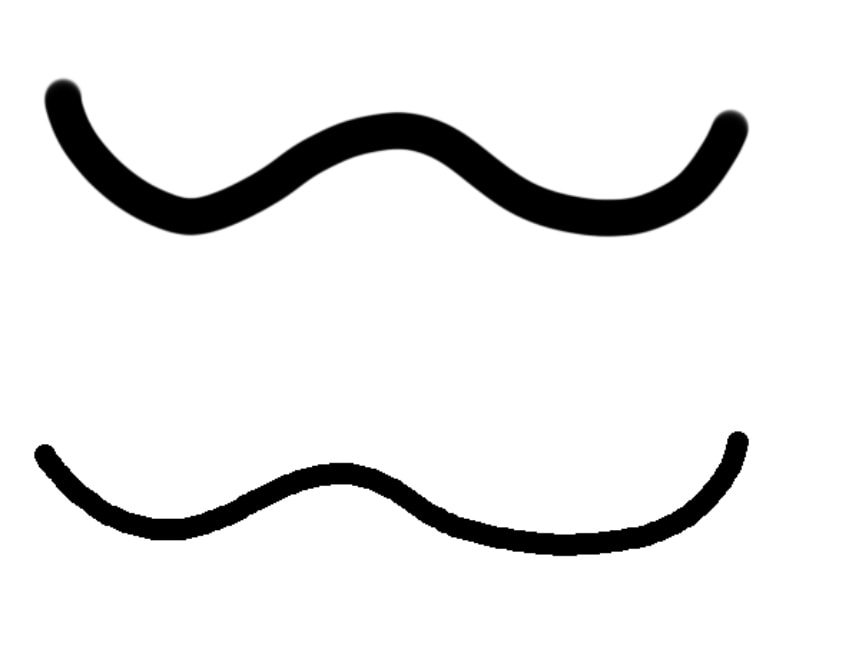
If we look at the line created with the pencil (top line) compared with a line created with the hard round brush (bottom line), both set to 40% smoothing, you can notice the pencil line is smoother than the hard round line.
We can also see that brush hardness has an effect on the smoothness of your lines. Look at the lines created by the hard and soft round brushes below.
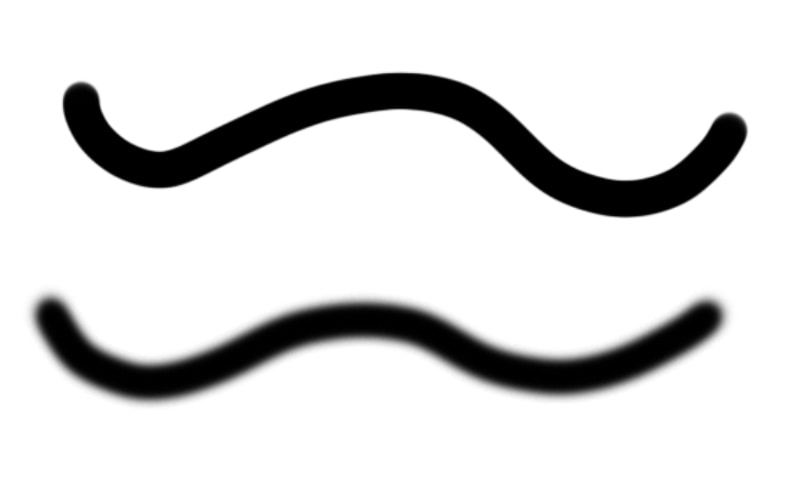
With smoothing set to 40% for both brushes, you can see the soft round brush appears smoother. If you’re not concerned with creating a hard line, it would be best, then, to use a lower brush hardness. If you would like to create a hard line and avoid the soft edges, the pencil-tipped brush would be best.
Smooth brush strokes (or lack thereof) can massively affect the overall appearance of whatever you set out to create in Photoshop. The settings and features detailed above will help you keep your lines smooth regardless of factors like hand-shake, making your strokes appear clean and intentional instead of messy and uneven.
Happy Drawing!
