
Large file sizes in Photoshop can interrupt your workflow by slowing down the processes, causing crashes, or taking too long to save your file. Changing a few small elements can help speed things up. Here is how to make a photoshop file smaller.
The easiest way to make a Photoshop file smaller is to change the size of the image. By going to Image > Image size you can type in a new smaller dimension for your image to be. To further reduce the file size, you can lower the resolution to 72PPI if you are using the image for digital media.
Even if you have a large amount of RAM on your computer and your Photoshop is running at optimal speeds, large Photoshop (PSD) file sizes can cause problems. To send or download the project to team members, printers, or clients you will need a small file size.
Here are 12 ways to reduce the file size of your project to improve your workflow.
12 Ways To Make A Photoshop File Smaller
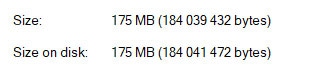
You can decrease your PSD file size without affecting the quality of your project with these easy methods. I will start with a project that has a size of 177 MB and show how much each method will decrease the file size.

1. Add A Color Fill Layer To The Top Of The Layer Stack
One of the simplest ways to reduce your file size is by adding a blank color fill layer on top of your image and other editing layers. The file preview feature which shows the thumbnail of your project in programs like Bridge adds a lot of extra weight to your file.
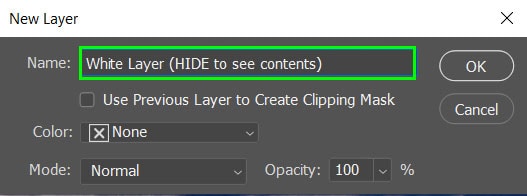
Before you save your PSD file, navigate to Layer > New Fill Layer > Solid Color… to add the white layer.

A window will pop up where you can rename the layer. If you are sending the file to a client or someone who doesn’t understand Photoshop too well, you can add a helpful name to show them they need to hide the layer.
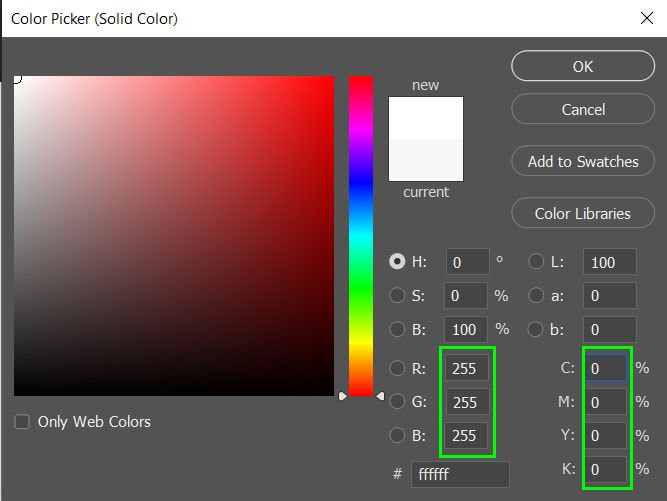
Once you select OK, another window will open. Select a pure white for the layers fill color. You can change the RGB to R255 B255 G255 or change the CYMK to C0 Y0 M0 K0.
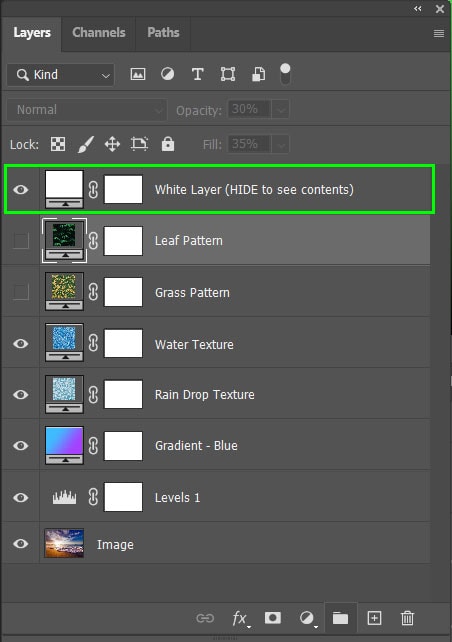
The white fill layer will appear in your Layers panel. If it is not at the top of the layer, click and drag the white layer to the top of the layer stack.
This method is highly effective as the file size may decrease slightly or even by 50% depending on the contents of the file.
Adding a white layer decreased the file size from 177 MB to 164 MB.

2. Apply Layer Masks
If you have added any layer masks to your image, you can apply them to the layer to reduce the file size. Once the layer mask is applied, it will add the effect to the layer and you won’t be able to edit the layer mask again.
To apply the layer mask, right-click on the layer and select “Apply Layer Mask”.
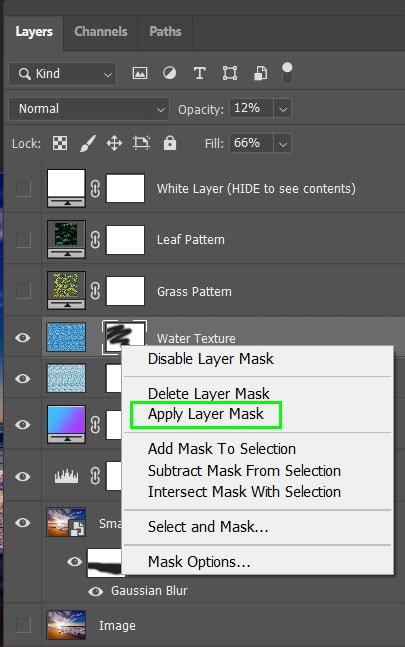
You can see where the mask is applied in the layer’s thumbnail. This method varies on how much it reduces the file size based on how much space the layer masks are taking up.

Applying two layer masks decreased the file size from 177 MB to 175 MB.
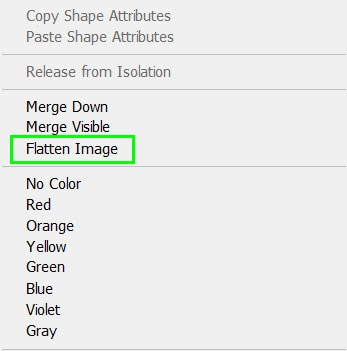
3. Flatten Layers
Another effective way to reduce the file size is to flatten the layers into one layer. While you will cut a lot of size off the file, keep in mind it will mean that you can’t edit the layers you had previously.
If you need to go back and edit any of the layers at a later stage, you can duplicate your project to have a backup option.
To flatten the layers in Photoshop, right-click anywhere in the Layers panel and select “Flatten Image”.
If you have any hidden layers a window will pop up asking if you would like to discard any hidden layers. If you want any of the hidden layers applied to the image, go back and unhide them before flattening the image. If they can be deleted, select “OK”.
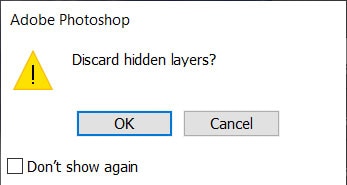
There will now only be one layer in the Layers panel with all the unhidden layers applied to the image.

Flattening the image decreased the file size from 177 MB to 17.9 MB.

4. Hide All Layers
Hiding layers will reduce the file size to some degree. This method may not take off too much size, but it will allow you to send the individual layers along with the file. Keeping the layers will allow the receiver to edit each layer in the file.
To hide all your layers, click on the eye icon next to each layer until they are all hidden, including the background layer.


Don’t worry about the blank canvas, as the recipient can unhide each layer to see your edits.
Hiding the layers decreased the file size from 177 MB to 162 MB.

5. Delete Unnecessary Layers
If you have any layers in your document that are not being used you can delete them to save up space. This project has a few layers which are hidden.
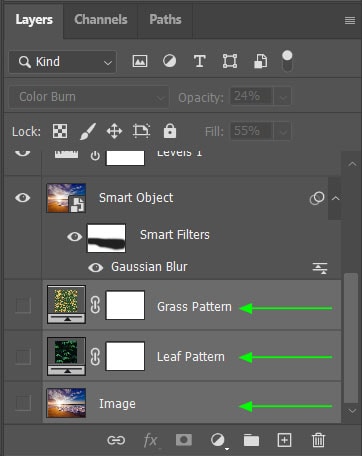
If you are not going to use these hidden layers at any time in your project, you should delete them. While hiding layers does decrease file size, it will be decreased more if the layers are deleted.
To delete the layers, drag each layer to the bin icon at the bottom of the Layers panel and release once your mouse is over the bin.
You can select all three layers by holding in Control (Windows) or Command (Mac) while clicking on each layer. Then drag them all to the bin together.
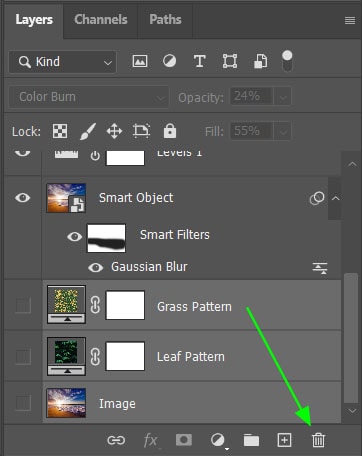
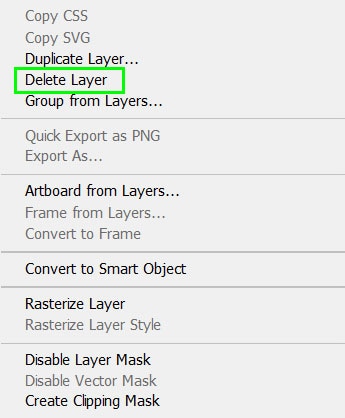
Another method to delete a layer is to right-click on the layer and select “Delete Layer”. You can also use a shortcut by pressing Delete on your keyboard when the layers are selected.
Deleting unused layers decreased the file size from 177 MB to 135 MB.

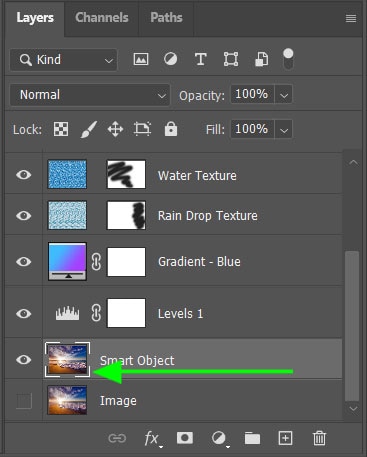
6. Rasterize Smart Objects
Smart objects increase a file size as they require more information to allow the extra editing capabilities. The more smart filters you add to the object, the higher the file size will become.
You can rasterize your smart objects to make the file size smaller, but you won’t be able to navigate back to the smart filters to re-edit them.
To convert your smart objects right-click on the layer and select “Rasterize Layer”.
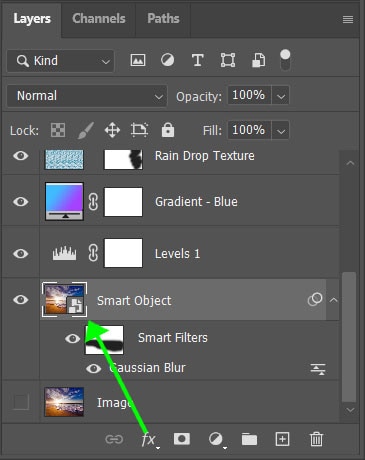
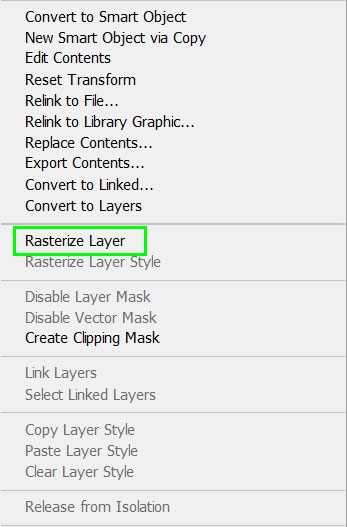
The layer will become a normal layer without the icon in the bottom right corner of the thumbnail.
Rasterizing the smart object decreased the file size from 177 MB to 103 MB.

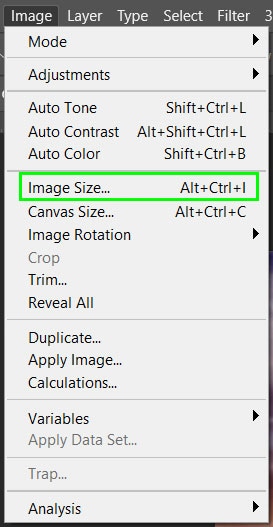
7. Change The Image Size And Resolution
You can alter your image size and resolution to reduce the file size if you are editing an image for digital media. This solution won’t work if you need your image to be a specific size for print.
To change the image size and resolution navigate to Image > Image Size or use the shortcut Alt + Control + I (Windows) or Option + Command + I (Mac).
Reduce the image size by reducing the pixel width and height in the blocks. Then change the resolution to 72 Pixels/Inch for images that will be used on digital platforms.

If you want to keep the dimensions of your image the same ratio, make sure linking is enabled before you change the width. The height will automatically change to keep the dimensions the same.
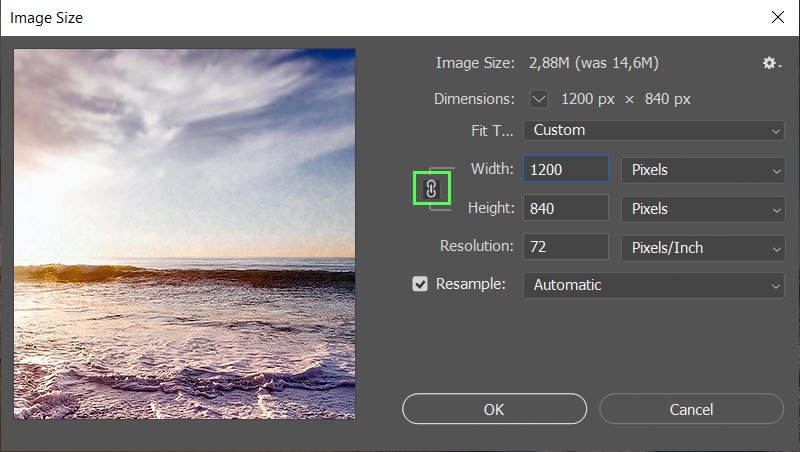
Changing the image size and resolution decreases the file size from 177 MB to 82.9 MB.

8. Delete Alpha Channels
Alpha channels are a useful tool in Photoshop as they allow you to save selections to re-edit or use later in the project. Alpha channels also increase the file size while it stores the extra information. If you no longer need the alpha channel later in the project, delete it.
Navigate to the Channels panel which is next to the Layers panel. Then click and hold on the alpha channel while dragging it to the bin icon at the bottom of the screen.

Another way to delete it is to right-click on the alpha channel and select “Delete Channel”.
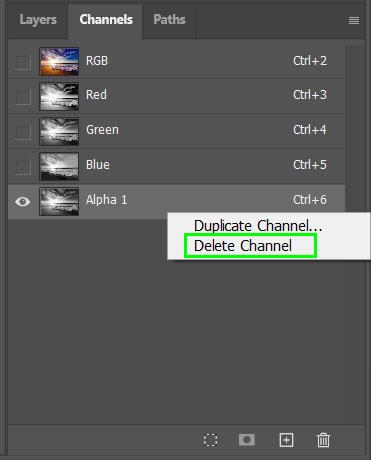
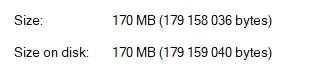
Deleting the alpha channel decreased the file size from 177 MB to 170 MB.
9. Delete Paths
Paths are another useful tool in Photoshop which you can use to deep etch an image in another program or make selections that you can change at a later stage via anchor points on the path.
Since paths can also add extra to your file size, delete them if you will no longer be using them.
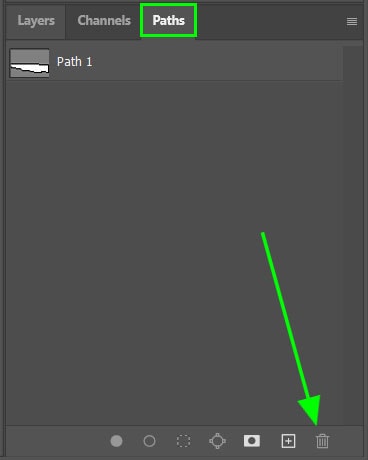
Navigate to the Paths panel next to the Channels panel and click onto the path while holding and dragging it to the bin before releasing.
Another way to delete the path is to right-click on the path and select “Delete Path”.
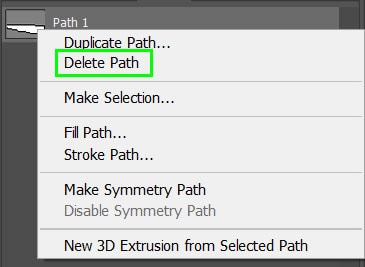
Deleting the path layer decreased the file size from 177 MB to 175 MB.
10. Use Adjustment Layers
If you duplicate layers to add adjustments to your image while still keeping a copy of the original you are adding to your file size. Using adjustment layers work off your original image and add the effect in a separate smaller layer.
To use adjustment layers navigate to Layer > New Adjustment Layer and select the adjustment you would like to make.
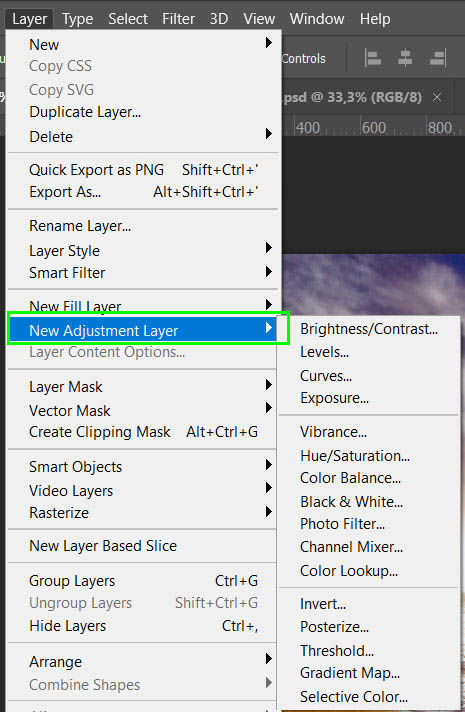
After choosing an adjustment, it ends up in your Layers panel as a separate layer. You can also navigate back to the layer and edit it later.
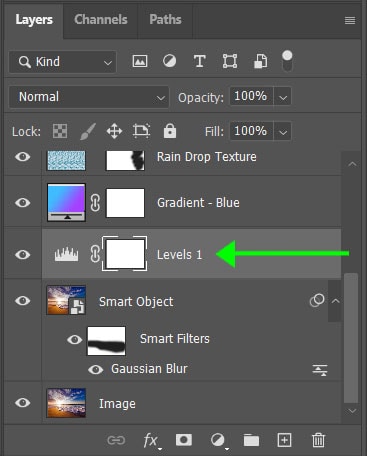
By deleting the duplicate image layer used to add the Levels adjustment originally, the file size is reduced.
The file decreased from 177 MB to 160 MB after deleting a duplicate layer used for adjustments.
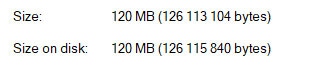
11. Save The File As A TIFF File
Saving your PSD project as a TIFF file can decrease the file size as long as you ZIP it when saving. The file can then be opened in Photoshop and all the layers and effects will be available to edit again.
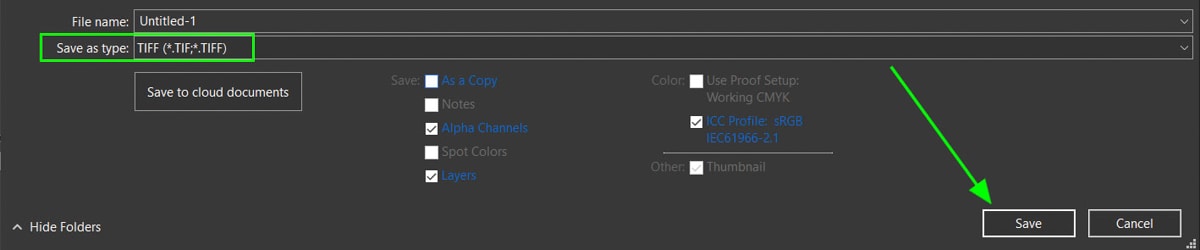
To save your project as a TIFF file navigate to File > Save As or use the shortcut Shift + Control + S (Windows) or Shift + Command + S (Mac).
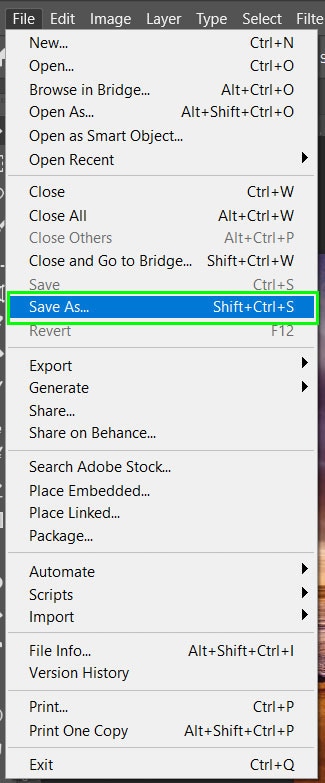
When the save window appears click on the drop-down list next to “Save as type:” and select TIFF (*.TIF,*.TIFF). Then click “Save” at the bottom right of the window.
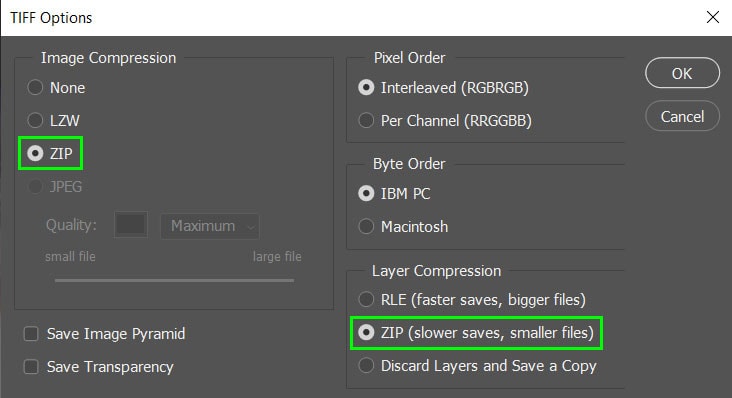
Another window will appear which gives you more options to choose from. Make sure that ZIP is selected under Image Compression and Layer Compression. The file will take longer to save, but it will be a lot smaller than the PSD file.
Saving your Photoshop file as a TIFF file decreased the size from 177 MB to 120 MB.
12. Combine The Methods
To decrease the file size by a lot, you may need to do a combination of the above methods to reduce the file enough to send and download it.
I combined the following methods to reduce the file size:
- Used an adjustment layer rather than duplicating the layer and applying an adjustment directly to the image
- Deleted unused layers
- Deleted the Alpha channel and the Path layer
- Changed the image size to 1200 x 840 pixels
- Reduced the resolution to 72 PPI
- Added a blank layer on top of the other layers
I am still able to edit the layers that have been used and the smart object is still open for editing.
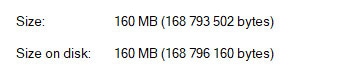
I reduced the file size with a combination of methods from 177 MB to 69.8 MB.

You should decide on what layers you may still need to use and choose the combination that saves the important layers and effects that you or a team member will need to continue editing on. With these 12 tips in mind, you can easily reduce the load on your computer and make sending projects easier than ever. If Photoshop is running a bit slow on your computer, even after using these methods, this post will help solve any problems!
Happy Editing!


