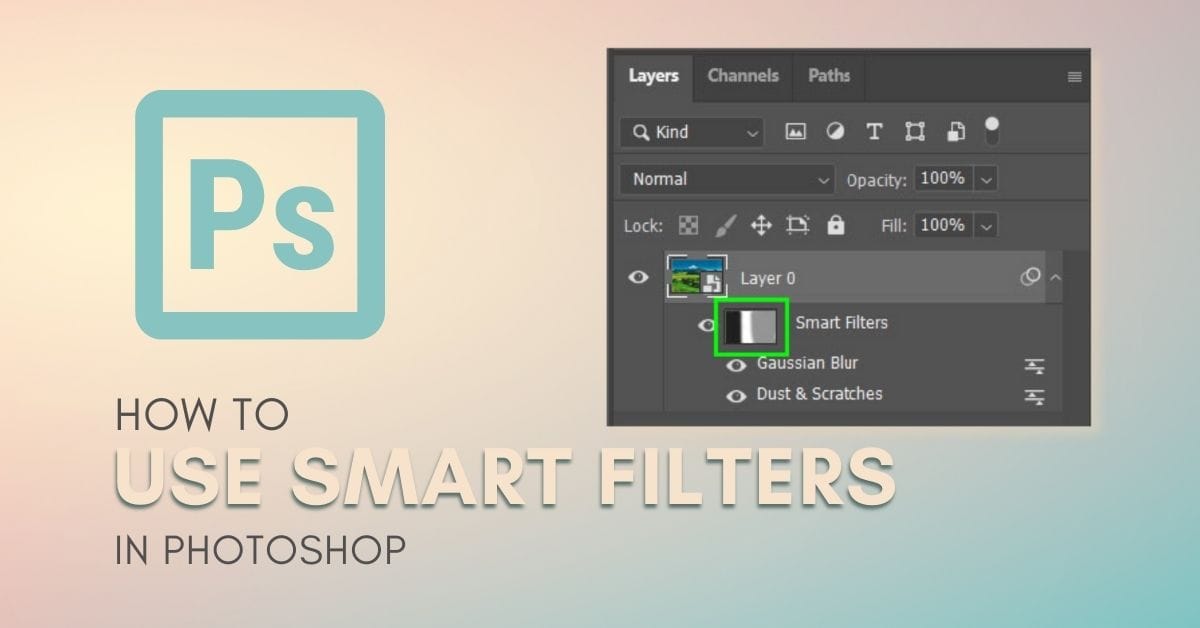
Filters offer a creative element to your images as you can create unique effects with these features. If you want to improve your editing skills and your workflow, using smart filters is your solution.
A smart filter in Photoshop is a filter that is applied to a smart object. Rather than being applied to the layer directly, a smart filter can be edited afterward via the filter settings, or the smart filter layer mask. Smart filters allow you to use Photoshop filters non-destructively.
Smart filters give you a wider range of editing options as, unlike regular filters, smart filters allow you to go back and edit them at a later stage. You can also easily delete smart filters no matter how early you applied them in your project. Ultimately, smart filters provide flexibility to your editing workflow. However, if you don’t know how to use them to their full potential, you may be missing out on some valuable features.
So to help you make the most of smart filters in Photoshop, this complete guide will share everything you need to know!
What Is A Smart Filter In Photoshop?
To fully understand what a smart filter is, you need to first know about normal filters and how they can be used on your images.
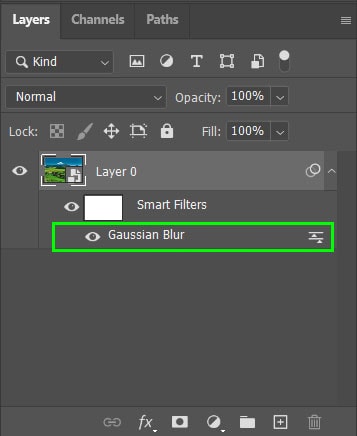
Filters are layers that you can add over your original image to change the appearance of the photo. You can use a simple filter such as the blur filter to blur your entire image or parts of your image by varying degrees. Filters like the blur filter also offer different types of blurs including Gaussian blur, radial blur, or shape blur.

You can also try a more advanced filter such as making your image look like it was hand-drawn using the sketch filter. Each of these filters can be adjusted with different settings including opacity and blend mode.
A smart filter is any Photoshop filter placed over a smart object instead of a regular layer. While your image will still be altered in the same way, smart filters allow you to edit the filter after it’s applied. Without smart filters, any Photoshop filter is applied directly to the layer.
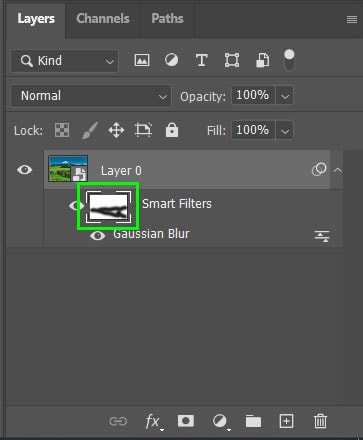
You can also edit the smart filter layer mask to mask parts of your filter adjustments. For example, you can add a blur filter to your image then isolate the effects using the layer mask.
What Are The Benefits Of Using Smart Filters?
Smart filters are more beneficial than regular filters as they offer more flexibility to your editing. Adding smart filters is also a non-destructive method of editing your image without losing image quality. You can easily delete a smart filter if you change your mind.
Smart filters allow you to navigate back to them later on in the project and re-edit them. This is useful if you realize your edits aren’t looking the way you hoped. With a single click, you can update any smart filter that you’ve applied.
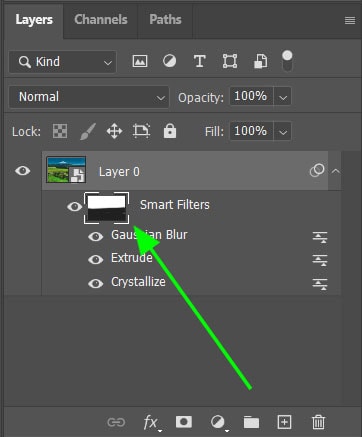
When smart filters are enabled, you can then add multiple other smart filters on the same smart object. This allows you to apply various effects while still being able to edit each filter individually. One thing to note, however, is that there is only one shared layer mask for all the filter effects.
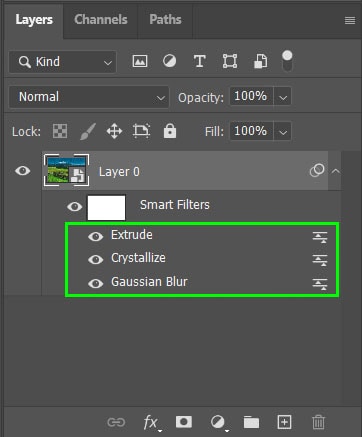
When using multiple smart filters on a smart object you can move the filters around to order the layering of the filters. This will change the effects that the collection of smart filters has on your image.
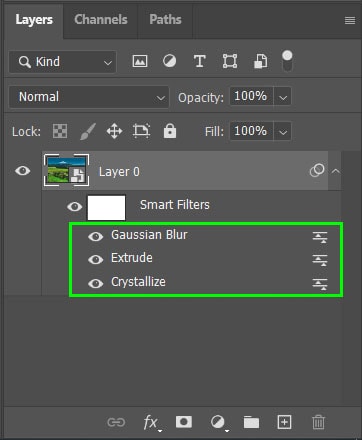
Another benefit of using smart filters is that you can easily copy the filters. You can then place them onto another layer in your project or even to a completely new project in a different tab. This allows you to apply the same effects to multiple images and projects.
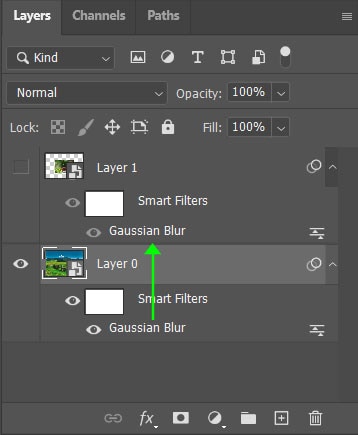
Using a smart object along with smart filters allows you to edit over all your adjustments without needing to merge your layers.
For instance, when you want to sharpen your image, you can simply apply it to the smart object while still keeping your filter layers separate, so you can always go back and edit them.
Smart filters also keep your layers panel clean as each filter fits neatly underneath the smart object.
The Drawbacks Of Using Smart Filters
While smart filters offer several benefits there are a few drawbacks. Since you need to create a smart object before being able to apply a smart filter your project will be limited by this.
When using a smart object you can’t use editing tools that alter the pixels of the layer directly such as the cloning, burning, dodging, or brush tool. To use these tools, you will need to convert the smart object to a rasterized layer.
Smart objects also increase the file size of your project. Be mindful that Photoshop may slow down slightly if you don’t have a lot of RAM on your computer when editing larger files.
How To Use Smart Filters In Photoshop
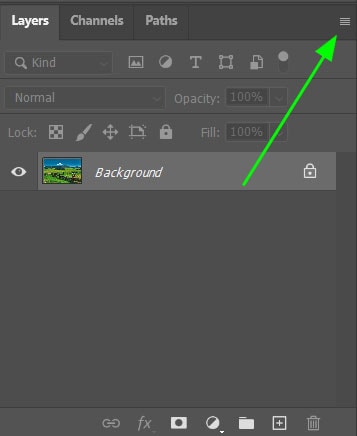
To use a smart filter in Photoshop, you first need to convert your image to a smart object. There are two ways to do this. To begin, make sure your background layer (or the layer with your image) is selected.
To use the first method, select the drop-down menu from your layers panel and select “Convert to Smart Object”.
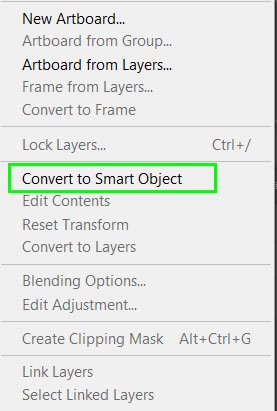
The other way is to right-click on your image layer and select “Convert to Smart Object”.
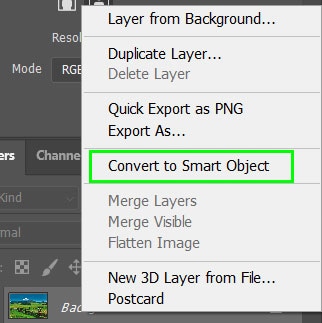
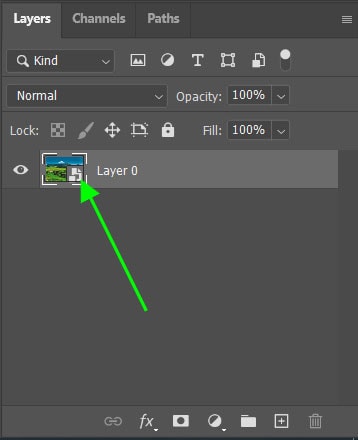
Now your image is converted to a smart object as you can see by the icon in the bottom right corner of the thumbnail.
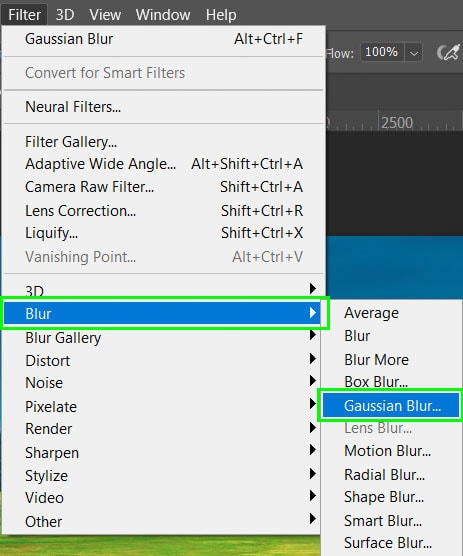
You can now add any smart filter you would like to your image, let’s try the blur filter. To do this, select Filter > Blur > Gaussian Blur.
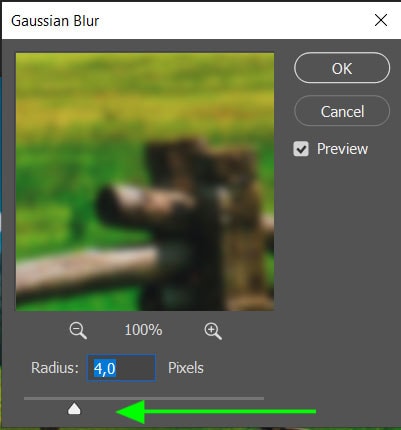
You can then adjust and apply the filter by sliding the radius slider before clicking “OK”. The radius will determine how blurred the image will look. Since you can always come back to the adjustments window, you don’t have to worry about it too much at this stage.
If you want to apply the previous filter you used again with new settings, you can use the shortcut Control + F (Windows) or Command + F (Mac). This shortcut will only bring up the previous filter you used. If you want a new filter, you must navigate back to the Filter menu.
Once the filter has been applied you will see a new sub-layer appear underneath your smart object. When adding new filters they will appear in a list here and can be edited at any time.

How To Edit Smart Filters
To edit a smart filter after it’s applied, double click on the name of the filter you wish to edit. A setting dialogue box will appear where you can update the filters settings. To edit where the smart filter is applied, select the Brush Tool and paint white or black on the smart filter layer mask.
At any time during your editing, you can navigate back to your smart filters to update them. You can even change the original adjustments, which is not possible on regular filters. Two common ways to edit a smart filter are by re-editing the original adjustments or editing the layer mask.
Option 1: Editing The Filter Adjustments
If you need to adjust the original settings of your smart filter, you can easily re-edit these elements.
To edit an existing smart filter, double-click on the name of the filter. This can be found underneath your smart object in the Layers panel.

The adjustments window will open once more and you can readjust the settings. To view the changes on your image before applying them, make sure the “Preview” box is ticked.
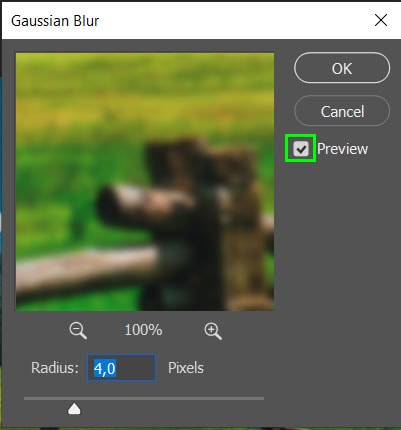
Once you click “OK”, the changes will be applied. Since smart filters are non-destructive, the settings will update to replace the original ones.
Option 2: Editing The Smart Filter Layer Mask
Smart filters automatically have a layer mask applied to them. This provides you with even more editing capabilities as you can remove the applied filter from specific areas of your image.
To edit the smart filter layer mask, click on the white block next to the name “Smart Filters” to select it. You will notice a border around it to let you know it has been selected.
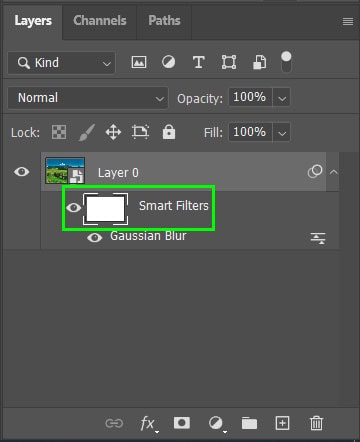
Next, select the brush tool from your toolbar or press B on your keyboard. This allows you to paint over the areas where you want to hide the filter effects.


You can alter the brush opacity in the top options bar to change how much of the smart filter you want to hide. To mask out parts of it completely, leave the opacity at 100%.

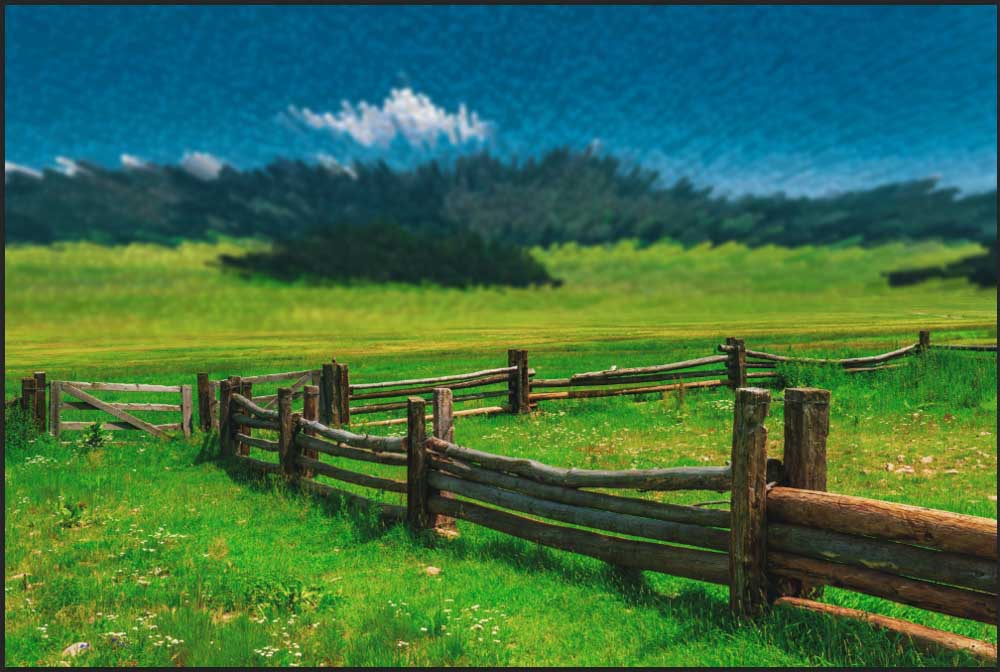
How To Change Smart Filters Blend Mode & Opacity
Another way to edit a smart filter is by changing the blend mode and opacity. This allows you to edit the filters further by altering how they appear or reducing the intensity of the filter.
The blend mode will alter how the filter blends in with the original contents of the smart object. The opacity affects how strong or weak the filter should be over the original layer.
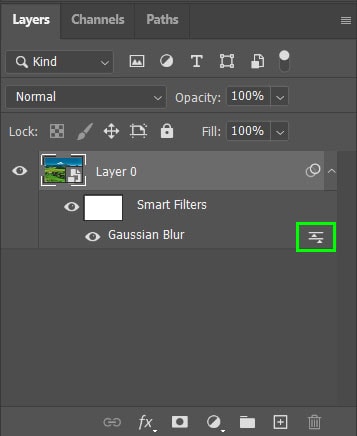
To change these two elements double-click on the slider icon at the right of the smart filter that has been applied.
This will open up the Blending Options window where you can adjust the blend mode and opacity. Select the drop-down menu next to “Mode” to choose a blending mode. Otherwise, choose a percentage next to “Opacity” to reduce or increase the strength of the filter.
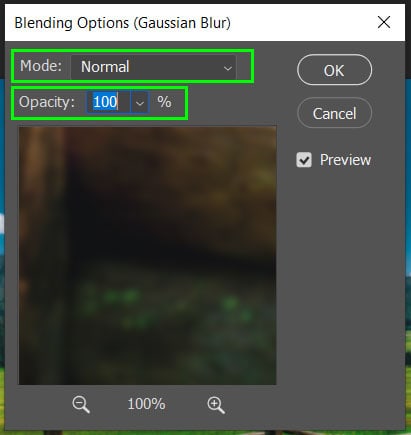
These two adjustments will only affect the filter that has been applied to the smart object. This is different from the opacity and blend mode options found at the top of the Layers panel. The layer panel options will alter the entire layer as it interacts with the layer below it.
How To Turn Smart Filters On & Off
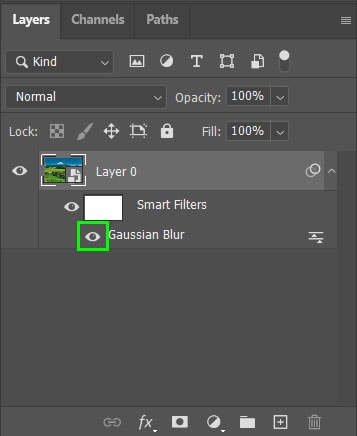
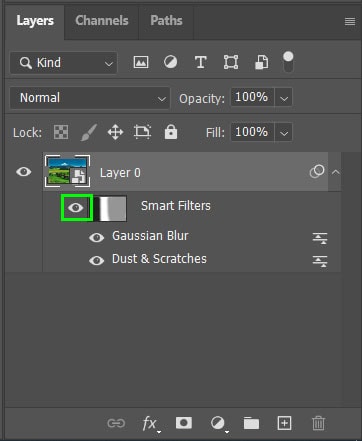
You can turn a smart filter on or off by clicking on the eyeball icon beside the Smart Filters layer mask. If you want to only hide individual filters, click the eyeball icon beside the desired smart filter instead.
As with any other layers in Photoshop, you can toggle the smart filters on and off. This is useful if you want to hide the filter or compare your changes to the original image.
Click on the eye icon to the left of the smart filter to switch it off and on. When the eye is visible, the effects of the smart filter will show on the image. When the eye is not visible, the effects will not show on your smart object.
How To Duplicate Smart Filters
One of the main benefits of smart filters is that you can easily duplicate and add them to other layers; even if they’re in a completely different project. This allows you to apply the same effect across multiple layers or images.
It is important to note that the layer you want to add your smart filter to must be a smart object. If it is not, you will need to convert it to a smart object before duplicating the filter.
To duplicate the smart filter hold down Alt (Windows) or Option (Mac) while clicking on the smart filter and dragging it to where you want to duplicate it. If you have another smart object in your Layers panel, you can drop the smart filter on the thumbnail to add it to the layer.

You could also duplicate the entire smart object layer along with the smart filters attached to it. You can right-click on the smart object and choose the “Duplicate Layer…” option. Then type in the name for the new layer and select “OK”.
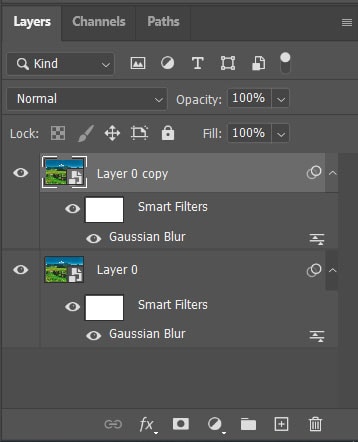
Alternatively, once your smart object is selected press Control + J (Windows) or Command + J (Mac). A third method is to hold Alt (Windows) or Option (Mac), then click and drag the smart object layer to a blank spot in the Layers panel and release.
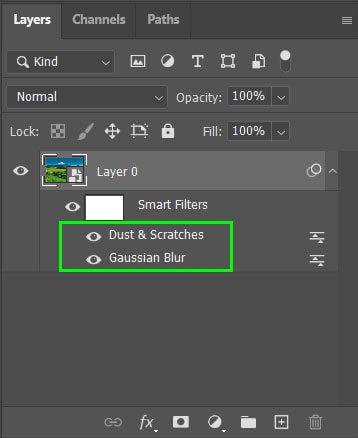
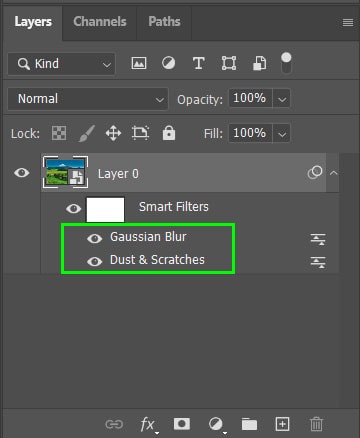
Before or after you duplicate the smart filter or smart object, you can change the order of the smart filters if you have applied more than one. This is important as the layers on top of others are visible over the bottom layers.
To move a smart filter, click and hold on the smart filter and drag it to the desired position before releasing.
How To Delete Smart Filters From A Layer
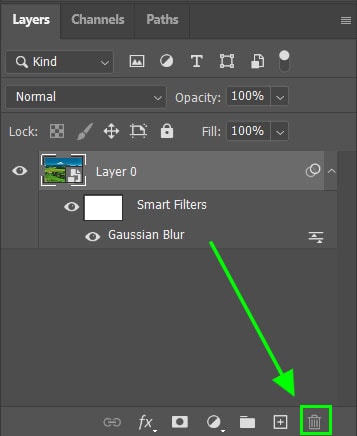
Deleting a smart filter from a layer is simple and works the same as deleting any other layer or adjustment layer. Click and hold on the smart filter you would like to delete and drag it down to the bin icon at the bottom of the Layers panel. Release the mouse once it is hovering over the bin.
How To Use The Smart Filter Mask In Photoshop
Ultimately, smart filters give you an extensive range of non-destructive editing abilities. Using the mask on the smart filter lets you edit specific areas of your image. This is helpful if you only want your smart filter applied to your subject or the background for example.
Once you have added your filter(s) to your image you can reduce the effect in areas by using the brush tool. Photoshop applies smart filter effects to the entire image by default.
To edit areas of the smart filter, select the brush tool by pressing B on your keyboard, then choose the color you would like to use on your toolbar.

The color you paint on the mask will determine how your smart filter is affected:
Black: Is transparent and will hide any smart filter adjustments you paint over.
White: Is visible and reveals any smart filter adjustments you paint over. This is useful in case you took out the filter effects in areas that you want to put it back in. By default, the smart filter mask is 100% white (100% visible).
Grey: Hides or reveals the original layer with some degree of transparency. If you choose 50% grey, wherever you paint will have a 50% opacity for example.
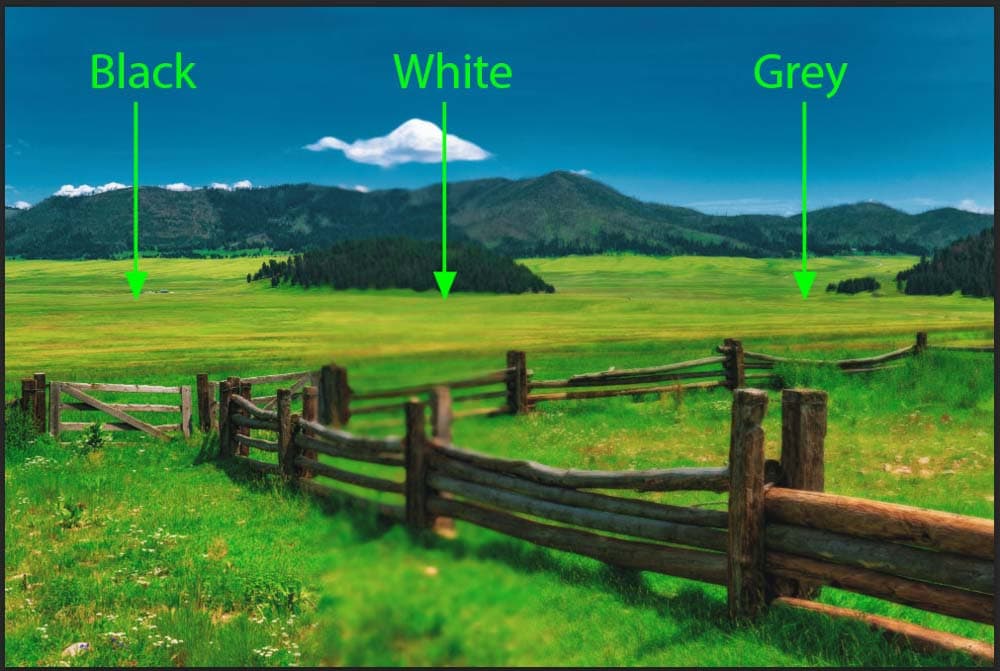
The smart filter mask will show the areas that have been painted over with the various colors. You can see this in the thumbnail next to the layer mask section.
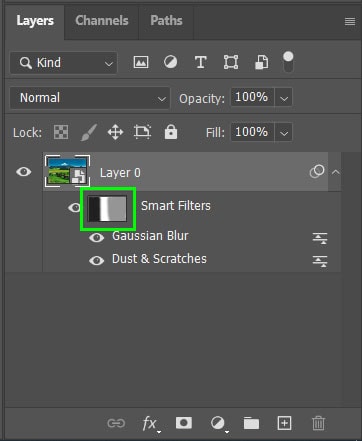
You can also toggle the layer mask on and off to keep track of the effects that are being applied. To turn the layer mask on and off click on the eye icon next to the layer mask.
It is important to note that smart filter layer masks will apply to all the smart filters added to the smart object. When you use the brush tool to edit areas, it will mask all of the smart filters that are applied to the smart object.
There is no way to apply a layer mask to individual smart filters. To do this, you will need to duplicate the smart object and apply a separate smart filter. You can then edit the layer mask on that individual smart filter.
When using more than one smart filter, it is easier to edit the filter at the top. If you try to edit the smart filter(s) underneath the top filter, by double-clicking on the filter, a message will pop up.
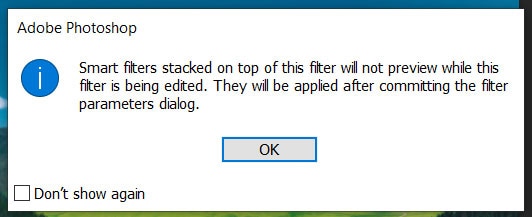
This means that when editing the bottom layer, you won’t be able to see the final effects. It will appear after you have applied the changes. If you want to edit while seeing the changes, you will need to move the smart filter, that you are editing, to the top.
So although there is a lot to remember when working with smart filters in Photoshop, they are a useful tool for editing non-destructively. With smart filters, you always have the option to update your filter adjustments, and even copy them between multiple layers. Now that you understand how to use smart filters, let’s get into how to use smart filters in Photoshop!
Happy Editing!
