


Creating selections is a common task to add selective edits and remove objects from images. My favorite method to quickly select the main focus of the image is using Select Subject in Photoshop.
The process uses AI technology that detects the likely subject in an image based on the contrast between pixels. Adobe has greatly improved this function in more recent versions, and now I’m here to show you how to use this effective selection method.
How To Access The Select Subject Button
When you need to make a selection of the subject in your picture, there are four different ways to access the Select Subject button.
The Contextual Taskbar
The first way to access the Select Subject option is by clicking on the button in the Contextual Taskbar. This taskbar is visible in the latest versions of Photoshop and floats around the workspace unless you pin it in position.
When a pixel layer is selected, you will see the Select Subject button that you can click to use the function.

The Options Bar
When using the Options Bar, you need to have a selection tool active. The selection tools that support the Select Subject function are the Object Selection Tool (W), the Quick Selection Tool (W), and the Magic Wand Tool (W).
Once one of these tools is active, you can find the Select Subject button in the Options bar.


The Menu Bar
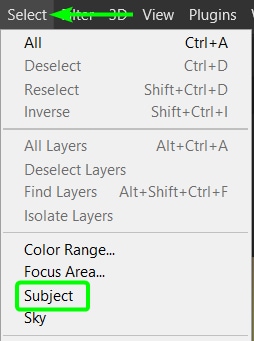
You can also find the Select Subject function using the traditional method, which is the Menu Bar. Simply go to Select > Subject to run this feature.
The Properties Panel
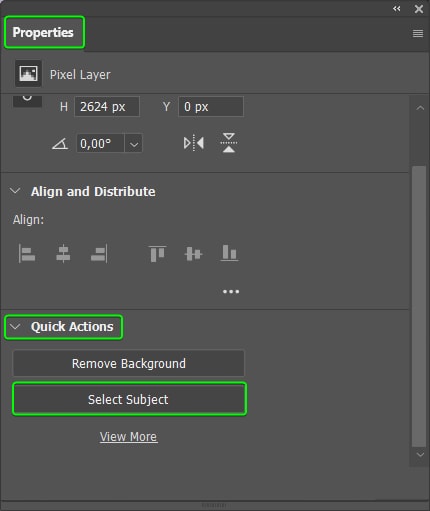
The other way to access the Select Subject button is under Quick Actions in the Properties Panel. The section is only visible if you are working on a layer that isn’t a locked background layer.
To access the button this way, unlock your background layer (if editing the background layer) by clicking on the Lock icon next to the layer.
You could also duplicate the layer by pressing Control + J (Win) or Command + J (Mac) and work on the copied layer.

Once the layer is duplicated or unlocked and selected, navigate to the Properties Panel.
Then, scroll down in the Properties Panel until you locate Quick Actions. Use the arrow to open the section if needed, and you will see the Select Subject button there.
How To Use The Select Subject Button In Photoshop
When you are ready to make a selection around the subject in your image, this tool is straightforward to use. It only takes a few moments after one click, and your subject is (the majority of the time) accurately selected.
To find the button, use one of the methods above to access it.
For this example, I will show you the technique using the Quick Selection Tool, so you can refine the selection if necessary. To start, select the Quick Selection Tool (W) from the Toolbar (or one of the other selection tools in the group).

Once your chosen selection tool is selected, find the Select Subject button in the Options bar. Then, click the button and give Photoshop a few moments to detect the subject in the image and create the selection. You will notice the loading cursor while the program processes your request.


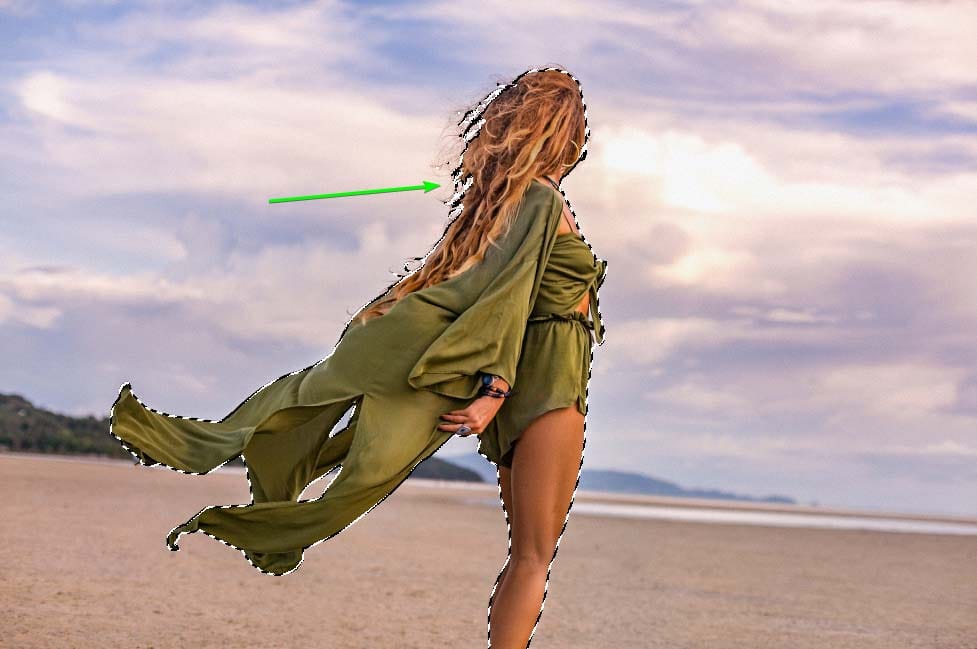
After a few seconds, your subject is selected in your image. As you can see, Photoshop does a relatively good job despite a few tricky edges of my particular subject.
If the selection isn’t perfect, you can change or modify the selection using this guide or refine the selection using this guide.
You can now use the selection as needed, whether you plan to make selective adjustments or remove the image’s background. In my case, I will remove the background by adding a layer mask and then add a new background to show how accurately Photoshop selected the subject.

Device VS Cloud Select Subject Options Explained
A recent addition to the Select Subject function in the August 2022 release (version 23.5.0) of Photoshop is the option to use either an Adobe Cloud selection or a Device Selection.
To access these options, click on the arrow next to the Select Subject button in the Options Bar. These options aren’t available when using the function from the Properties Panel, the Menu Bar, or the Contextual Taskbar.

By default, Photoshop uses the Device option when you use the Select Subject function, but you can switch between the two as needed.
The Device option uses your system’s processor to create the selection in your photo. This method produces the fastest results, which may not be as accurate as possible.
The Cloud option uses resources from Adobe’s servers, which slows down the process but creates a more accurate and detailed selection in your photo. The Cloud method requires you to be connected to the internet.
The differences between the two options are noticeable, and the method you choose should be based on whether you want speed or accuracy, but most importantly, how complex your image is.
For example, I used the Device method to select the subjects in my image, which took Photoshop about 7 seconds to analyze the image, detect the subjects, and make the selection. However, there are several noticeable errors in the selection, which I need to fix up.
- The areas between the woman’s hair are left unselected
- The woman’s shoe isn’t selected
- The man’s coffee cup isn’t selected
- Parts of the man’s shirt aren’t correctly selected
Since I need to fix the selection a lot, this method may take longer than the alternative.

To use the Adobe Cloud method, click the arrow next to Select Subject and click on Cloud (Detailed results). Then click on the Select Subject button.

The Cloud method takes slightly longer, as shown by the progress bar that appears while Photoshop processes the request. However, it only took about 10 seconds for my image. This time may increase slightly for more complex photos.

Once the selection is made, you can see a noticeable improvement in the selection. All the problems that occurred when using the Device method are corrected.

How To Change The Select Subject Default Rendering Option
Every time you use the Select Subject button, it’s set to Device by default. Even when you change the option to Cloud, once you make a selection, it reverts to Device, which means that the next time you use the method, it will use your device’s processor.
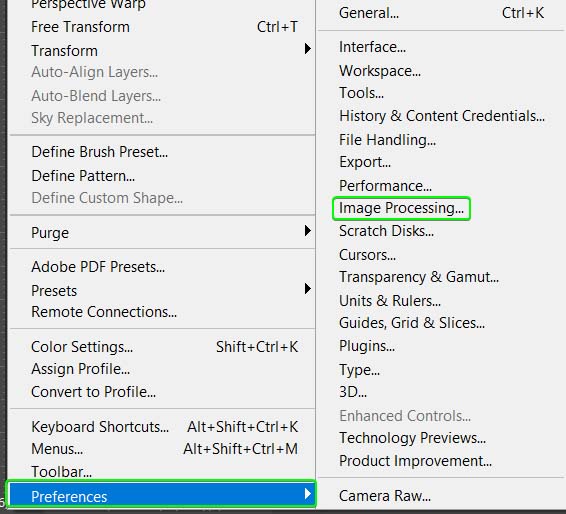
If you find this a hassle and want to use the Cloud as the option, you can easily change this by heading to Edit > Preferences > Image Processing (Win) or Photoshop > Preferences > Image Processing (Mac).

Once the window opens, select the drop-down menu next to Select Subject Processing, set it to Cloud (Detailed Results), and click OK.

Next time you use the Select Subject, it’s automatically set to Cloud as long as you are connected to the internet. This method allows you to select a subject accurately in seconds.

The Select Subject VS Remove Background Button
The difference between the Select Subject and Remove Background Buttons is in the name. The Select Subject Button will create a selection that you can edit or apply to a mask. The Remove Background Button auto-selects your subject and applies it to a mask directly to remove the background instead.

While the Select Subject button detects and creates a selection around an image’s obvious subject(s), you can decide what to do with the selection once it’s made. You can non-destructively remove the background from the image using a layer mask or add selective edits to an image. You decide what happens to the picture after you select the subject.
The Remove Background button non-destructively removes the supposed background from an image by automatically adding a layer mask to the layer. When you click this button, Photoshop detects the supposed subject(s) in the photos and hides everything around the subjects.
Once the background is removed, you can make any corrections on the layer mask using the Brush Tool (B). The difference between selecting the subject is that no selection is made in this method, which means you can’t make any selection refinements before removing the background.
To see this button in action, unlock or duplicate the background layer and click the Remove Background button in the Properties Panel.
After a few moments, Photoshop deletes the background, leaving transparent space around the subject(s).

You will also notice that a layer mask is added to the image layer, with black representing the hidden areas of the photo.

Happy Editing!
