

Exporting a GIF from Photoshop is straightforward if you don’t want much control over the final file size and quality. However, it gets complicated when you need to adjust the various export settings to ensure you export your file at the right size and standard.
Luckily, after this guide, you can export your GIF at the best quality possible while ensuring the file size is as small or large as you want. I will also explain the quality limitations of this file type.
How To Save An Animated GIF In Photoshop
Photoshop fully supports the GIF (Graphics Interchange Format) file type, which means you can create this file type, or if you have an existing file, you can edit the file and change the GIF speed in Photoshop.
Whether you have created the file or edited it in Photoshop, you can quickly export it too.
Before exporting, ensure you have added the frames to the Timeline Panel and edited the GIF as you’d like. Once you are ready to export the file, follow these steps.
Step 1: Go To File > Export > Save For Web (Legacy)
To export the GIF, you need to use the Save For Web function. To access this function, go to File > Export > Save for Web (Legacy) or use the shortcut Shift + Control + Alt + S (Win) or Shift + Command + Option + S (Mac).
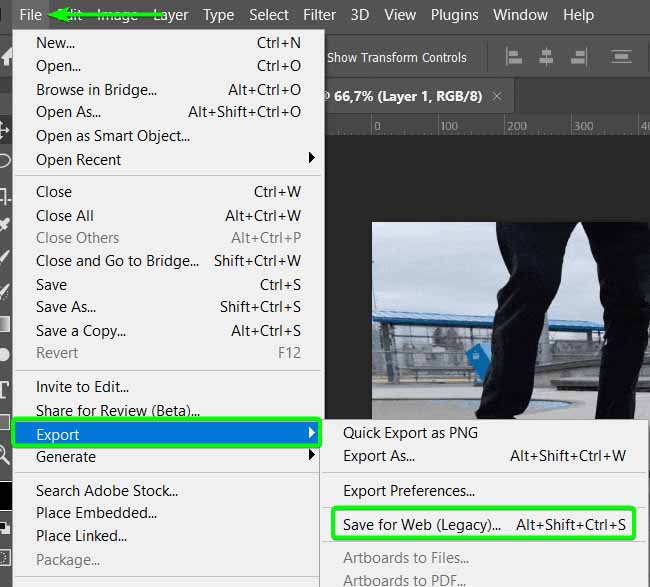
On older versions of Photoshop, the window you are looking for may be under File > Save for Web & Devices.
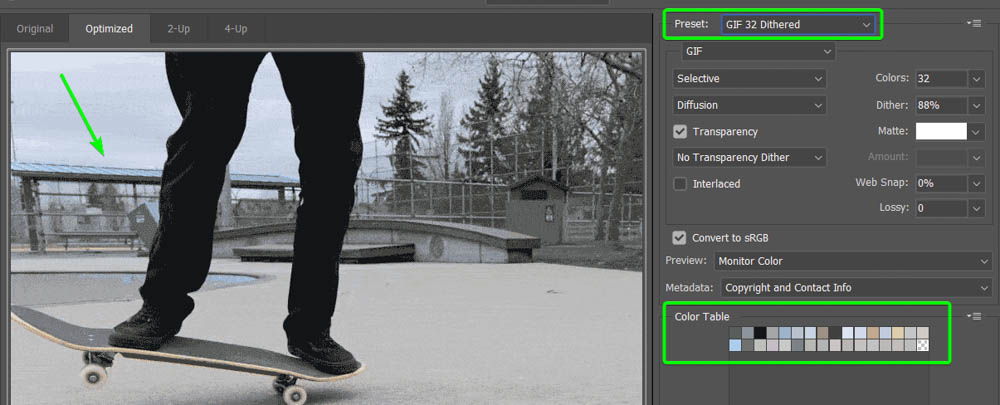
Once you find the options and open the export settings, you will see the Save for Web window, which may look complicated at first, but I will guide you through every setting you need to worry about.
You will see the preview panel of your file and the settings you need to adjust on the right-hand side.
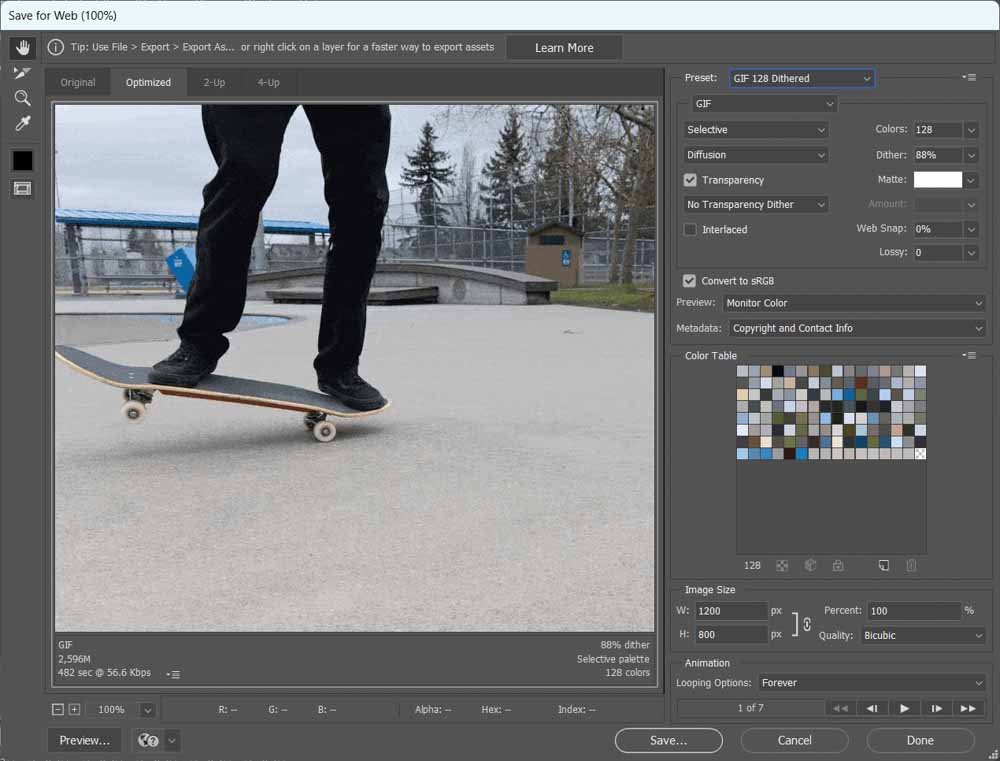
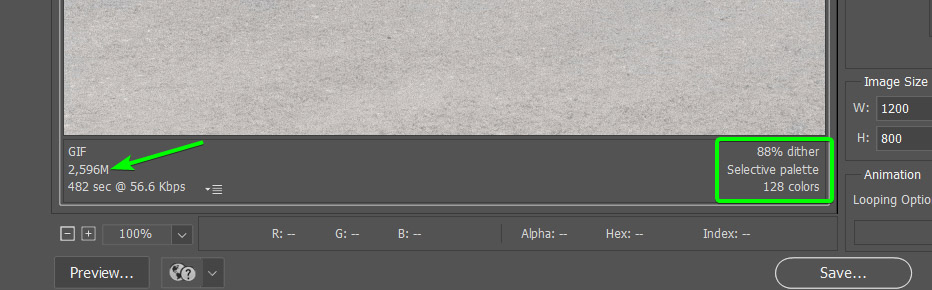
Underneath the preview of your file, you will see the size that the saved file will be on your hard drive on the left. You will also see the dither, color reduction mode, and color range on the right, which I will explain under the next two headings.
Step 2: Select A Preset
The first setting to change is the preset. You must select a GIF preset for the file to work as intended. If you save the file format as a PNG or JPEG, the image will be static and won’t contain the animation you created.
At the top of the settings on the right, locate the preset drop-down menu. Depending on your previously used settings when saving your files, it may be set to JPEG or PNG.
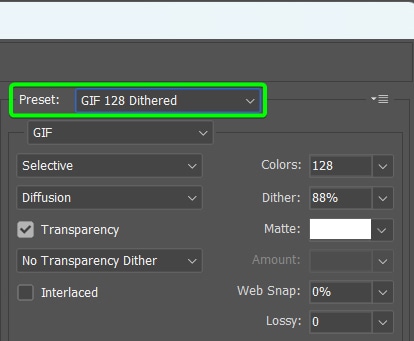
You will notice there are a few GIF preset options to choose from. Each preset is either dithered or has no dither and has a number next to it which indicates the color range. The preset you choose will depend on the outcome you want.
There is also the GIF Restrictive option, which is a color reduction method detailed in the next section.
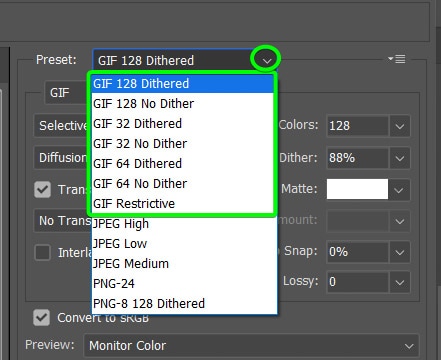
Dithered Vs. No Dither
When choosing a preset, you must decide whether you want the GIF dithered or to have no dither. This setting affects the quality of the saved file.
Dithering refers to how the GIF deals with missing colors since the file type is restricted to a maximum of 256 colors. If your file contains more colors, then Photoshop must replace these colors.
The dithered option creates a more natural-looking GIF as it uses two available colors from the palette to create a third color through shading. The process groups the available colors in certain patterns to create the illusion of more colors in the file.
The No Dither option replaces the missing colors with a color from the palette that is closest to the missing color. This results in a lower-quality GIF but also reduces the file size, making the GIF more suitable for the web and other digital platforms.
Once you have selected a preset, you can manually alter the dither amount using the Dither slider if you want a different value.

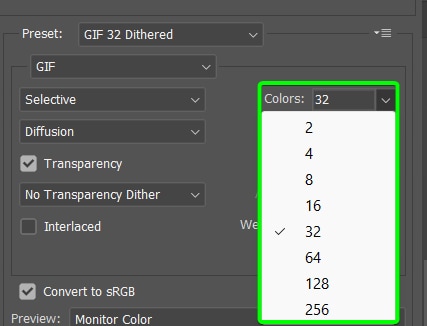
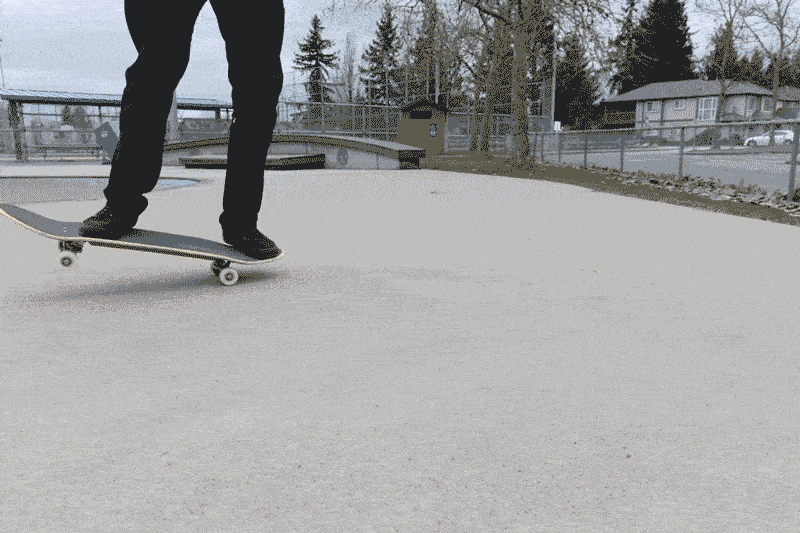
Color Ranges: 32, 64, 128
Apart from the dithering, the presets also have different color ranges you can choose from. The color range option will also affect the quality of the GIF and the final file size. You can choose between 32, 64, or 128 when selecting a color range from the presets.
The numbers show how many colors will be included in the saved file. This means that choosing a lower color range will create unrealistic colors in certain areas where there are not enough colors.
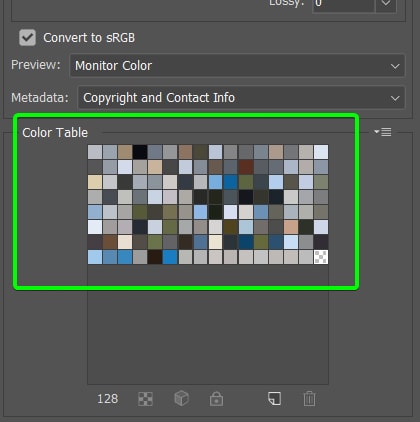
The available colors are shown in the Color Table.
For example, setting my GIF’s color range to 128 will show the blue areas of the roof in the background.
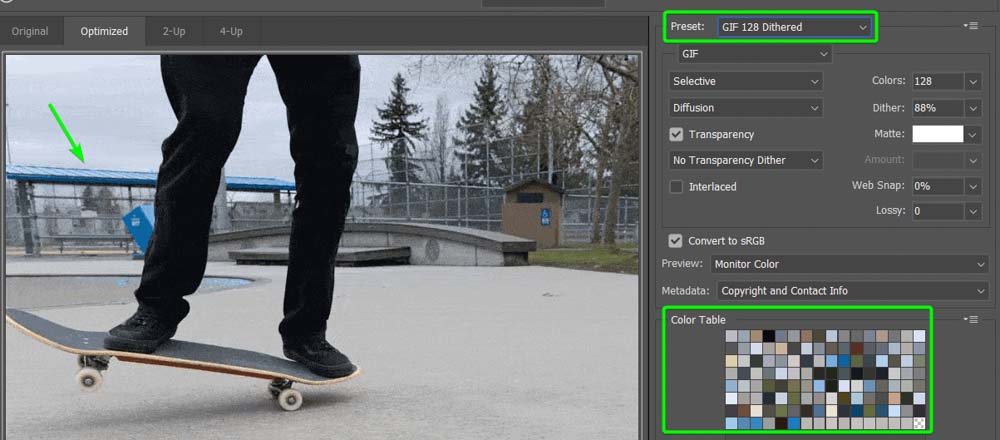
If I reduce the amount to 32, you will see the roof has turned dull because of the lack of available colors, even with the preset set to Dithered.
You can manually adjust the color range using the Colors drop-down menu if you want fewer or more colors. You can choose from only having 2 colors up to 256 colors, which is the limit for GIF files.
When selecting the dither and color range options, you need to balance whether you want a better-quality file or a smaller file size.
Step 3: Adjust The Preset Settings
Once you have chosen a preset as the base, you can further adjust the settings manually to determine how the exported file looks. Move through these settings to change various aspects, such as transparency and diffusion options.
Color Reduction Mode (Selective)
The first option to consider is the Color Reduction Mode, which is most likely set to Selective. When you click on the menu, you will have a few options to choose from. The main options are Perceptual, Selective, Adaptive, Restrictive, or Custom.
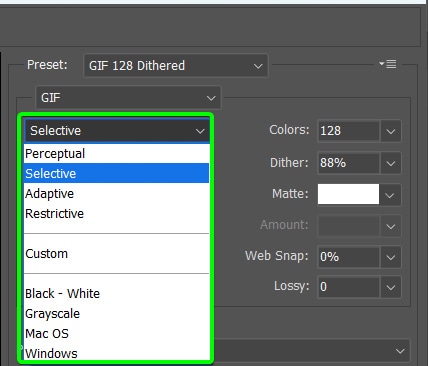
Perceptual creates a custom color table including most colors easily seen by the human eye.
Selective is the most common mode for GIFs as it works best to balance quality and file size. This mode preserves web colors and includes broad strokes of color in the file.
Adaptive changes with the image and works best when the colors in the picture are close together on the color spectrum.
Restrictive includes 216 colors, which is standard for web use on Windows and Mac devices. This may make the file size quite large.
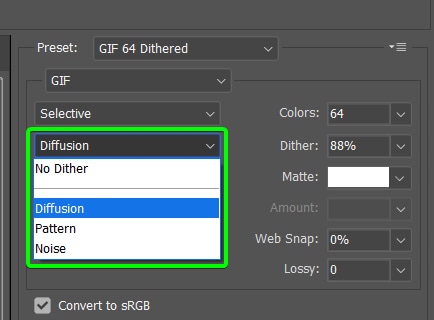
Dither Method (Diffusion)
The Dither Method determines how the dithering works on the GIF. You can set it to No dither, Diffusion, Pattern, or Noise. The Diffusion setting creates a random pattern and works the best on most GIFs, the Pattern option creates a halftone-like look, and the Noise option adds more noise to the image.
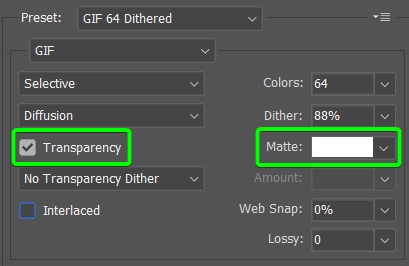
Transparency And Matte
Check the Transparent box if your GIF contains any transparent areas you want to keep fully transparent. The Matte color will fill any partially transparent pixels. If you don’t want any transparent areas, turn off the Transparency option and use the Matte box to select a color to appear instead of the transparent areas.
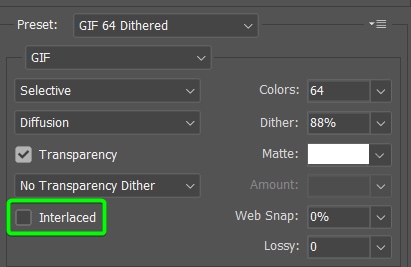
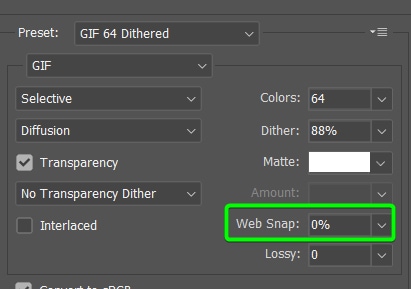
Interlaced, Web Snap, And Lossy
The Interlaced option creates an embedded low-resolution version of the GIF into the file. The low-res version will appear on a web page while the full image downloads to give the impression of faster load times. While this is beneficial on web pages, it also increases the overall file size.
Check the box to turn the option on.
The Web Snap option prevents the GIF from dithering in web browsers by specifying a tolerance value when shifting colors to the closest matches on a web palette.
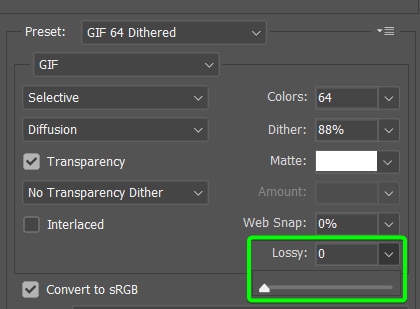
The Lossy slider affects the file size by deleting certain data from the image. A higher lossy setting will discard more data, which may lead to a reduction in quality.
However, using a lossy value between 5 and 10 will help reduce the file size without affecting the quality too much. In some cases, you can increase it to 50 while keeping the quality relatively stable.
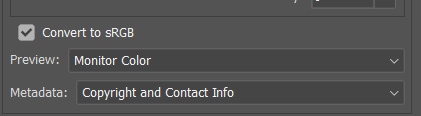
Step 4: Check The Color And Metadata Settings
You usually won’t need to adjust the Color or Metadata settings, but you might need to in specific cases.
I recommend you always keep Convert to sRGB checked, which keeps the colors screen-friendly since GIFs will be used digitally.
You can change the Preview settings depending on your device and choose to include any Metadata if needed.
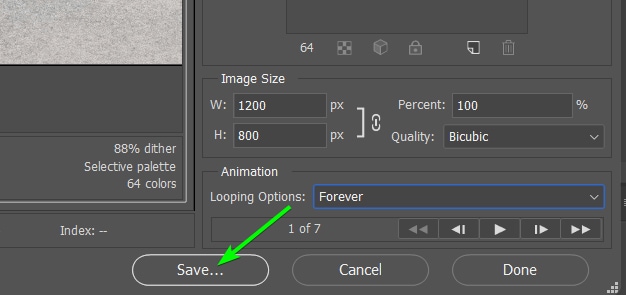
Step 5: Adjust The Size And Looping Options
Next, you can change the size of your GIF if you need to reduce the file size even more. You can adjust the Width and Height values to increase or decrease the size. I recommend keeping the link active to prevent the image from distorting.
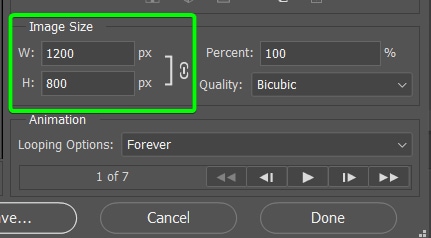
You can also change the size using the Percent value to increase or decrease the GIF size by a certain percentage. The Quality option determines the method of increasing or decreasing the image dimensions.
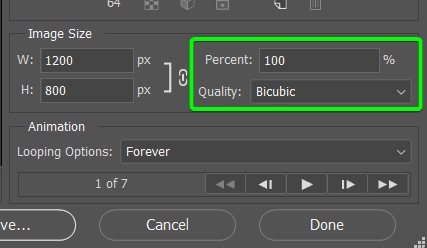
Note: I recommend not altering the image size too much to prevent quality loss. You can usually keep the quality if you reduce the size slightly. However, increasing the image size often decreases the quality.
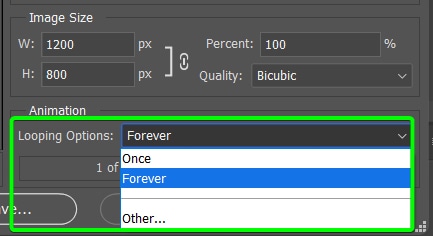
You can set the Looping option in the Photoshop workspace when creating or editing the GIF. However, if you want to change this setting, you can change it in the Save for Web window.
You can set the GIF to loop once, forever, or set an amount by selecting Other.
Step 6: Test The GIF And Export
Once you have adjusted the settings as you’d like, you can preview the GIF in the preview panel. Click the Play button to play the GIF to check if everything looks correct.

Once you have tested the GIF, click Save.
You will be redirected to your Explorer or Finder to add a file name and location to save the GIF.
Can You Save a GIF Without Losing Quality?
No, there is no way to save a GIF without losing any quality, since GIFs, by nature, are lower quality than static images.
A GIF file usually contains several layers to create the animation, and because of the multiple layers, the file size increases quickly. To prevent the file size from becoming unmanageable, there needs to be some amount of quality loss. These files also contain fewer colors than static images to allow the animation function, lowering the quality.
However, you can reduce the quality loss to a certain extent using the various settings described above.
The quality will never be as great as a high-quality image or as good as the image files you used to create the animation, but you can get the quality as high as possible if you don’t mind a large file.
I recommend you keep the GIF file size as low as possible to decrease online load times and to allow people to share the animation. Most people familiar with GIFs expect low quality when sharing these files.
If you want a high-quality animation or moving image, you will need to create a video using suitable software.
