

Designing layouts for products is the first step to creating a new product design. However, knowing if the design will look good on the actual product isn’t easy. This is where knowing how to make a product mockup in Photoshop is crucial for your success.
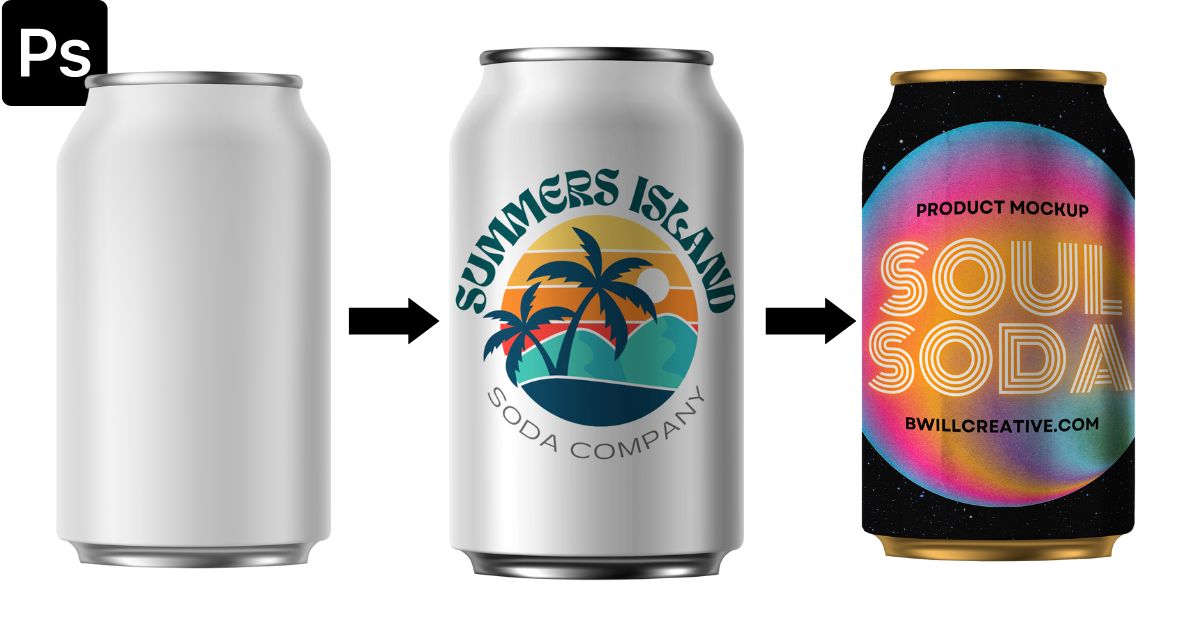
I will show you what you need before you create a mockup and how to make a simple mockup on a computer screen. Lastly, I will show you a more advanced mockup by adding a design onto a soda can. The last section gives you the tools you need to create any type of curved mockup.
What You Need Before Creating Your Own Mockups
Product mockups are created with high-quality product images or computer-generated designs. The mockup contains a 3D version of the product for which you have designed the layout. You simply need to place your design into the mockup to see what it will look like in real life.
There are plenty of pre-made mockups that you can find online to place your design onto. You can find t-shirts, screens, billboards, and much more on sites such as Mockupworld or Envato Elements. However, you might not find the exact product or scene you need for your design.
Sometimes, you may need to use a specific product photo that you captured yourself. As a result, you need to create a product mockup from scratch. Luckily for you, this is simple to make using the tools in Photoshop.
Before you begin creating your own mockup, you need two elements you can’t make from scratch in Photoshop.
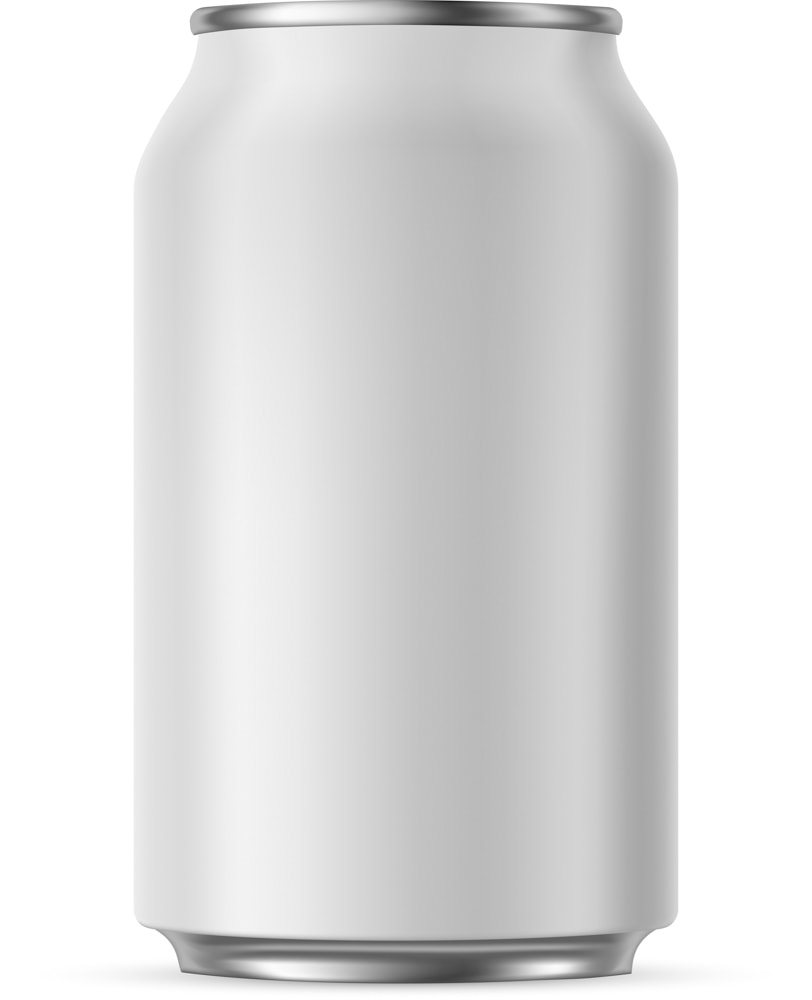
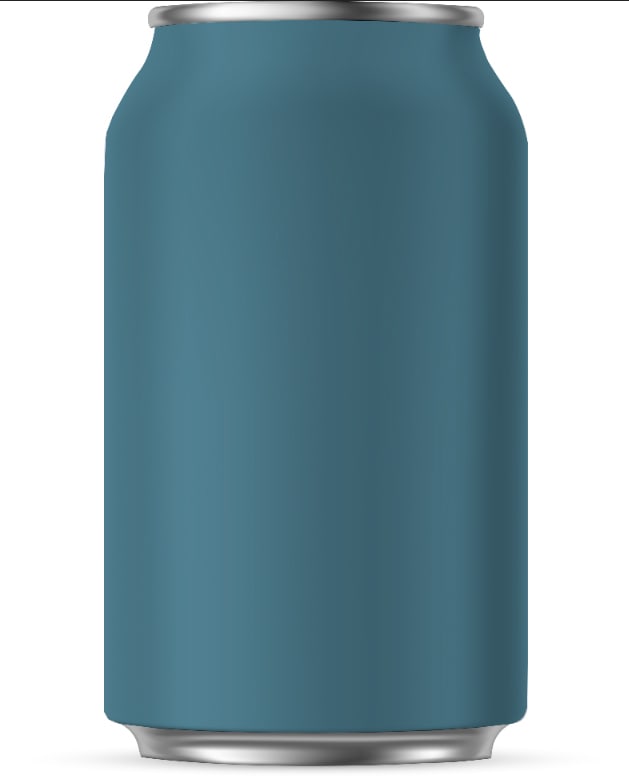
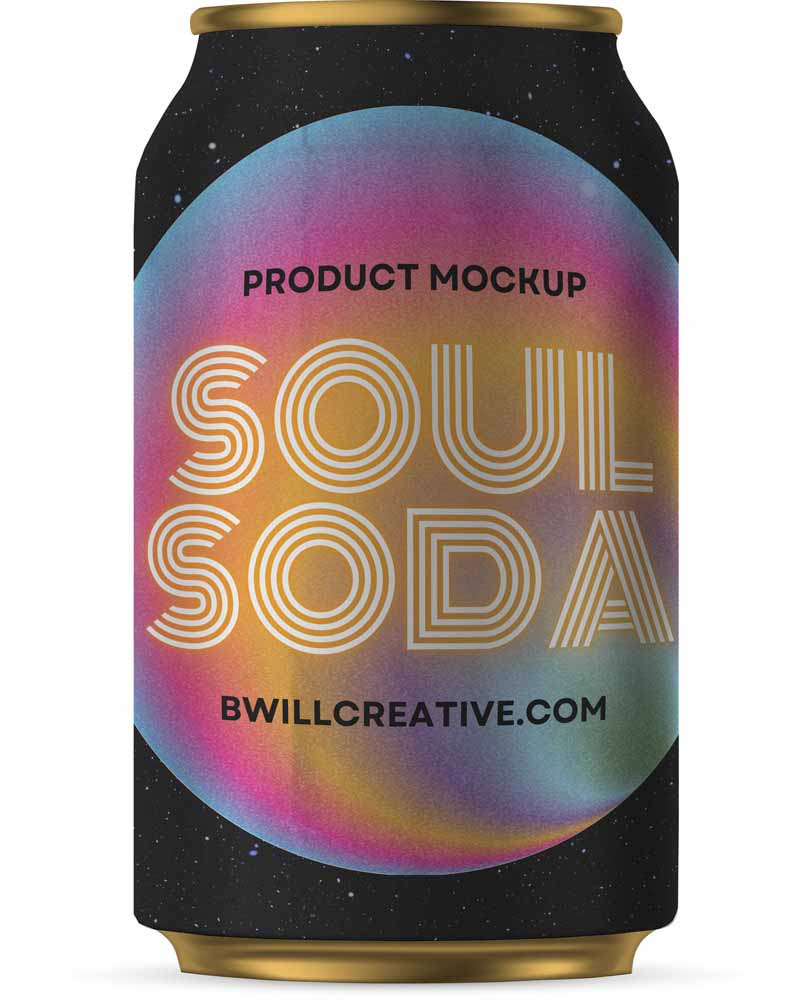
Firstly, you need the base design for the product. The base design can be a high-quality product photograph or a 3D rendition of a product designed in Illustrator or a similar illustration program. The base image can be a blank t-shirt, cardboard box, or computer screen — for example, this image of a can.
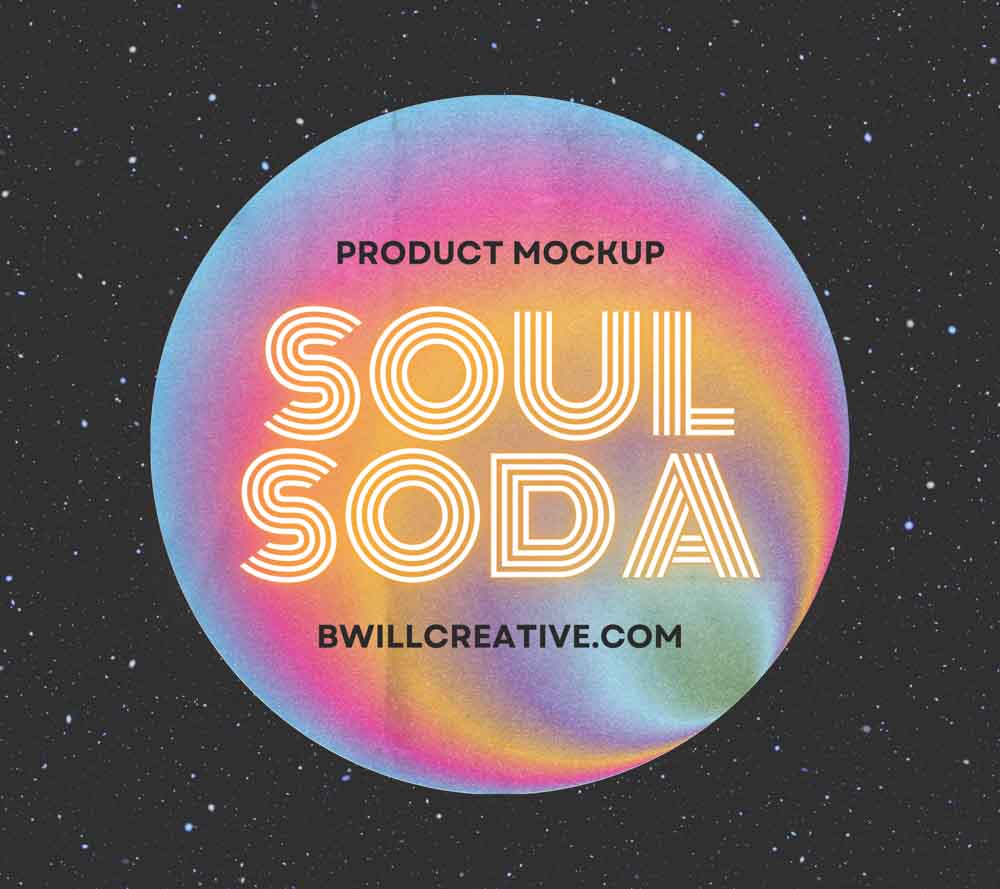
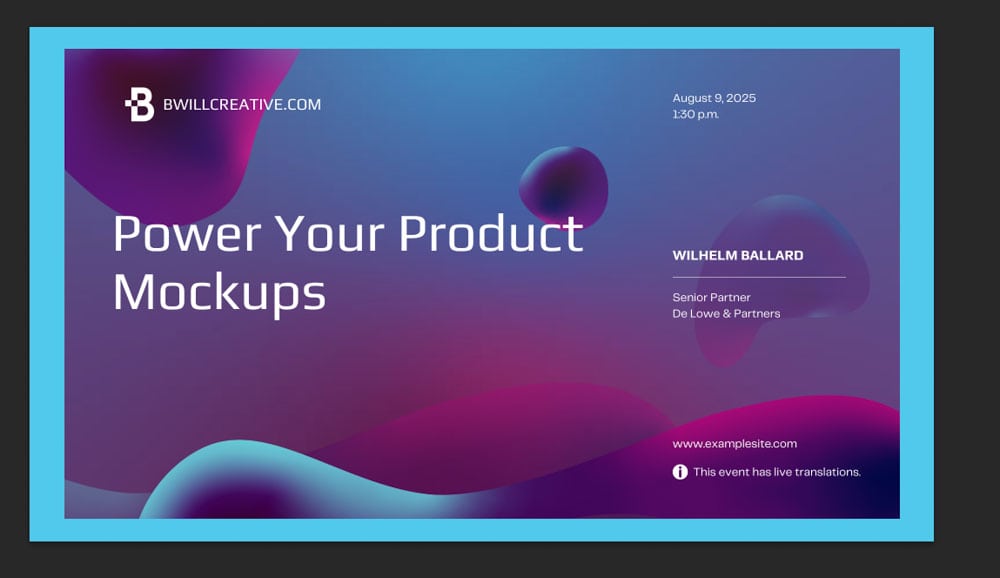
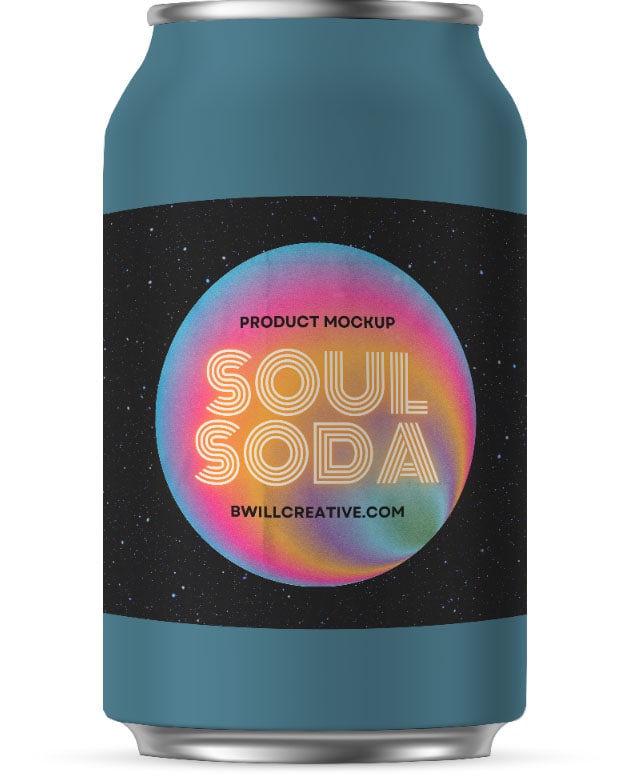
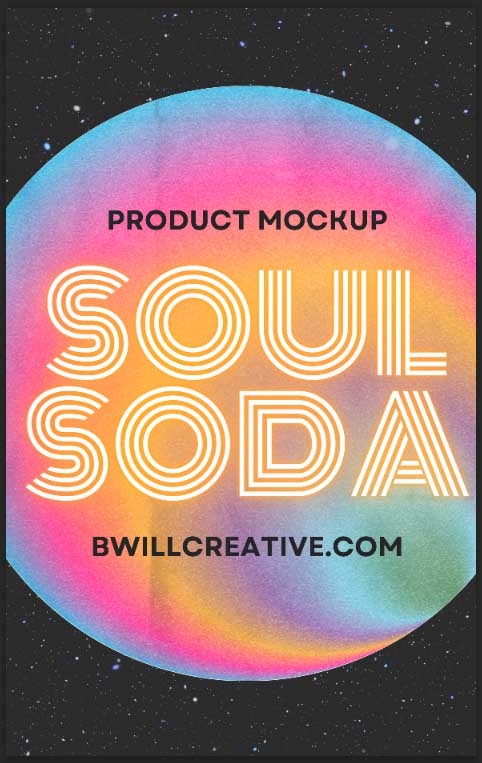
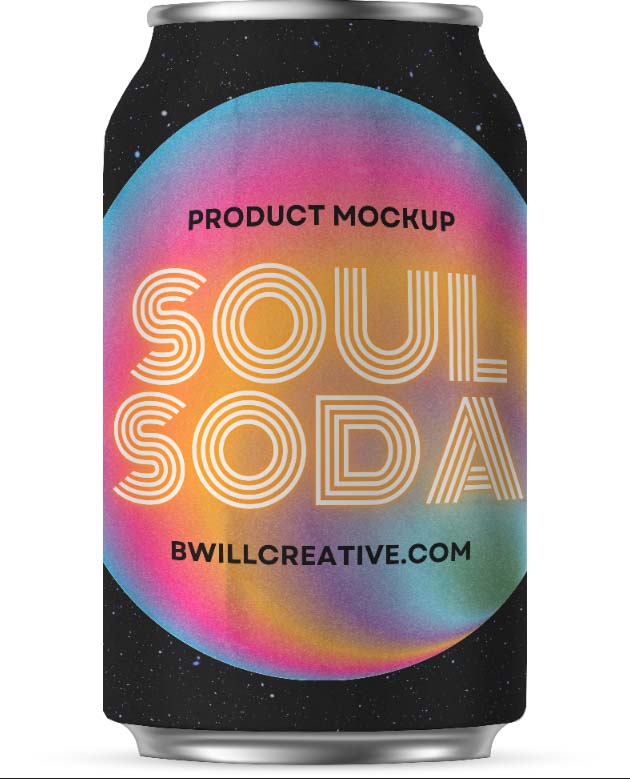
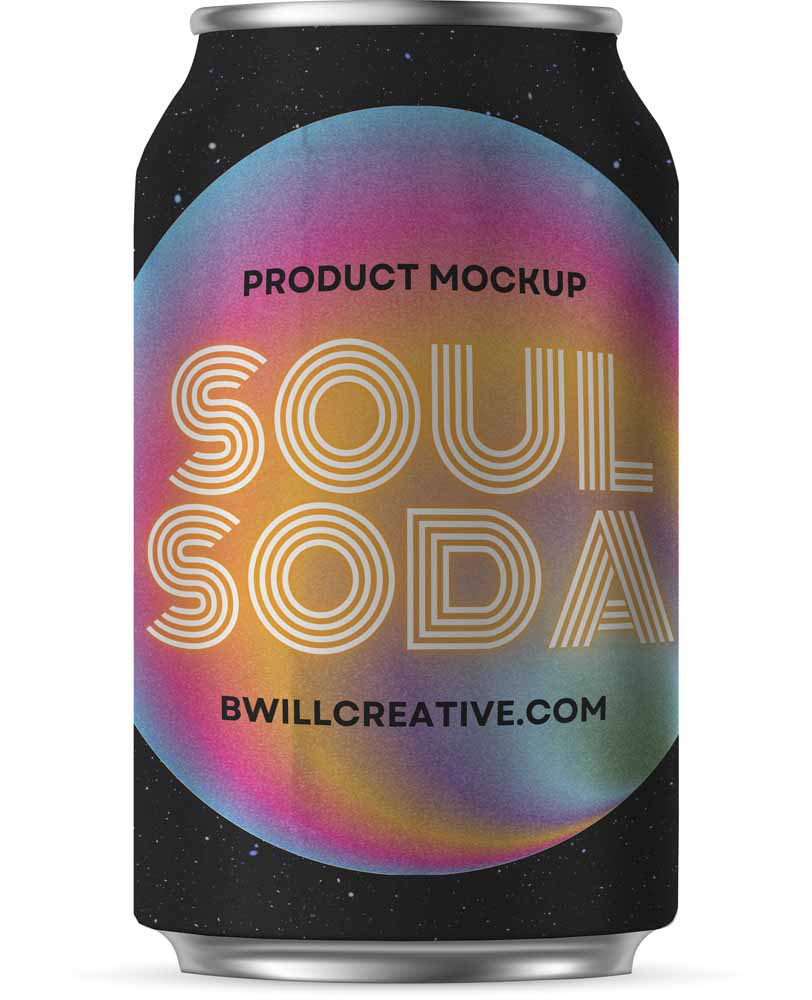
Secondly, you need your designed artwork, of course. You should create your layout design in Indesign if it’s for print purposes or any equivalent design software. For example, this Soul Soda layout I have designed.
The mockup and layout design should be in any format compatible with Photoshop, such as PDF, JPG, or PNG.
Finally, you also need this guide to begin creating your own mockup, so let’s get started.
How To Create A Simple Product Mockup In Photoshop
Follow these steps to create a simple product mockup on a flat surface, such as a screen mockup.
Step 1: Open Your Base Image And Product Design In Separate Tabs
Start by opening up your base image, which is the photo that contains the product itself without the designed layout.
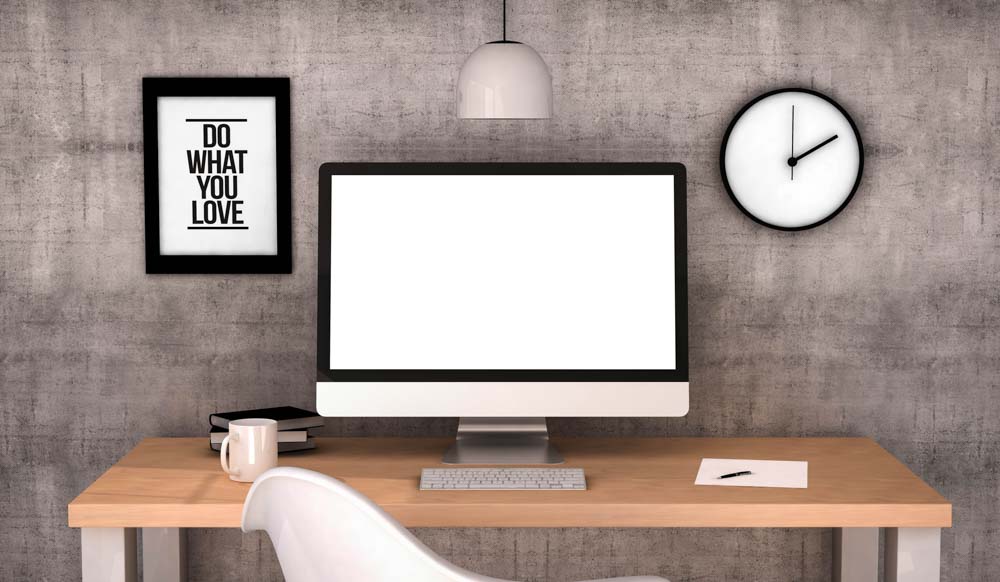
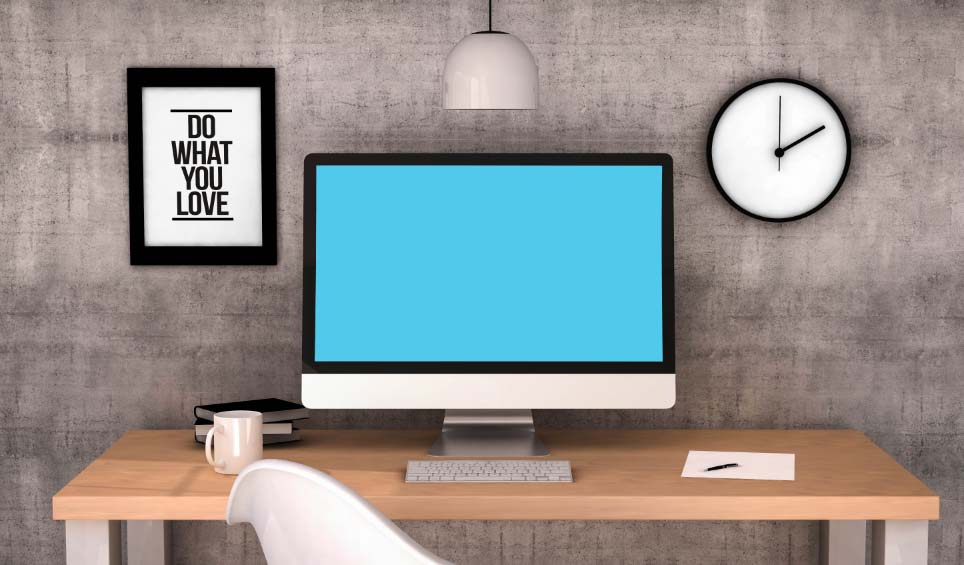
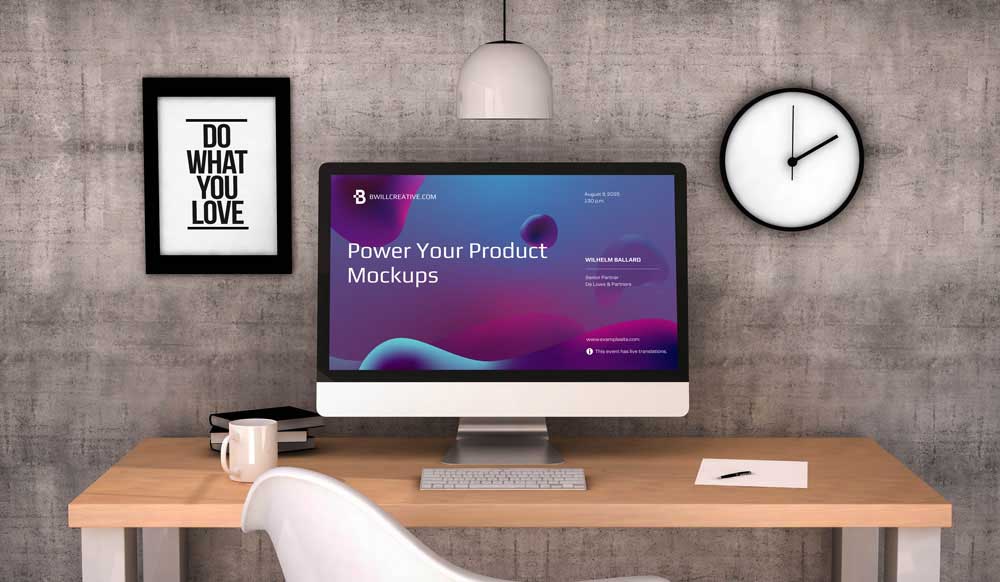
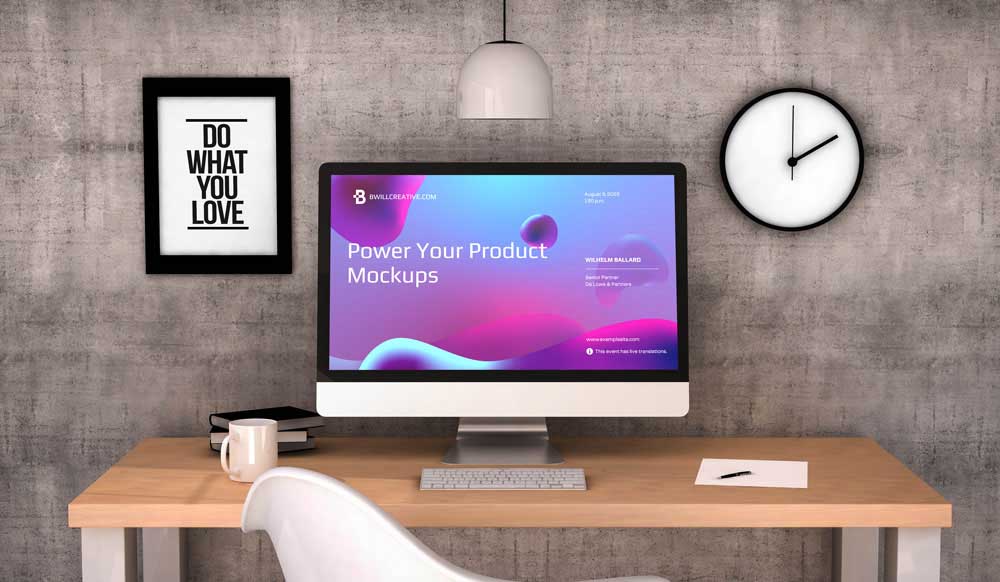
The base image can be a stock image, a photo you’ve taken yourself, or a computer-rendered 3D scene. For this example, I will use this picture of a workstation with a Mac screen on the desk.
Then, open up your designed layout to place onto the product mockup. Once you open the new file, it opens in a separate tab in Photoshop.

For this example, I will use the website layout I have designed for this purpose.
Keep the base image tab open and move on to the next step.
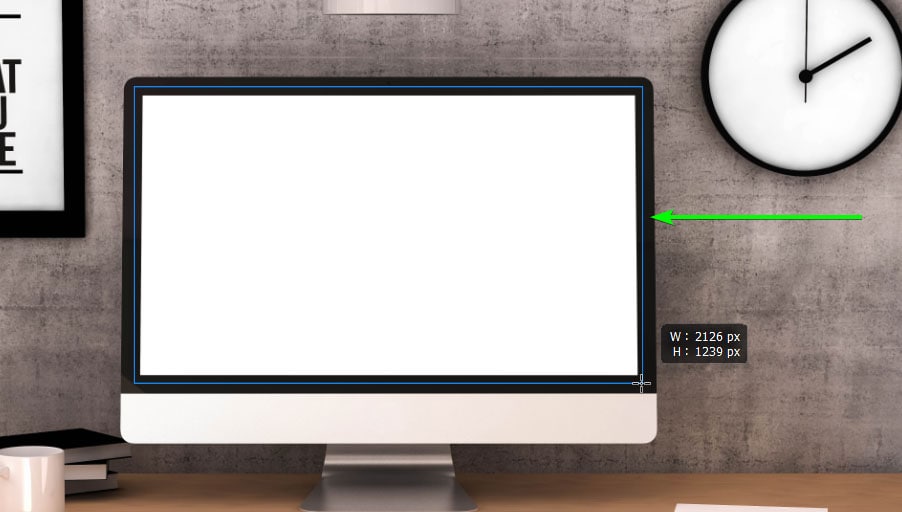
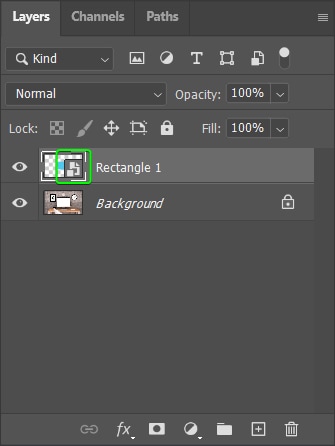
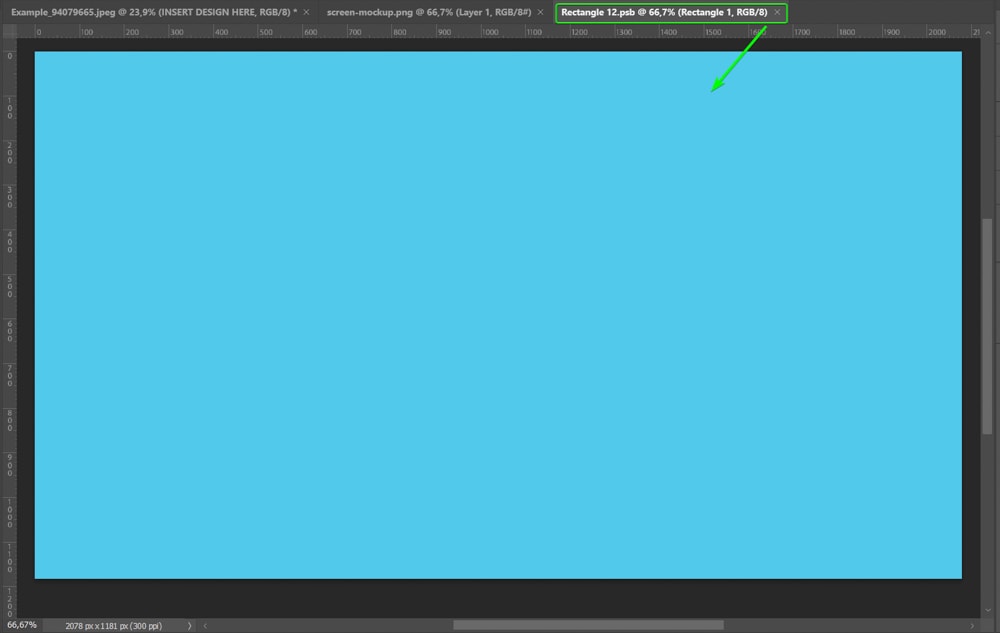
Step 2: Add A Rectangle Shape Layer
Create a rectangle shape to mark where your layout design fits onto the screen in the image. To do this, first, create a new shape layer.
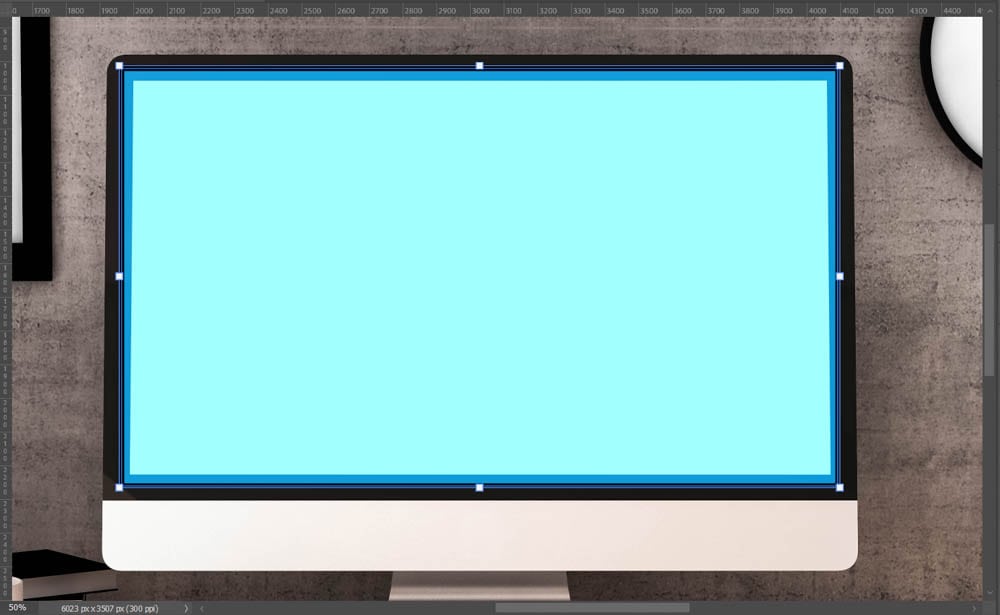
Select the Rectangle Tool (U), and choose a color for the rectangle by changing the Fill Color in the Options bar and ensure the Stroke is set to Transparent. You can select any color to highlight the area where you insert your layout design. The shape color won’t show up in your final design.

Then draw a rectangle over the computer screen. Make sure the shape covers the entire screen.

Step 3: Convert The Shape Layer To A Smart Object
You need to convert the shape layer into a Smart Object to let you insert your design into that spot. Converting the layer also allows you to save the mockup and easily change the screen design at any stage.
To convert the layer, right-click (Win) or Control + click (Mac) on the layer in the Layers panel and select Convert to Smart Object.
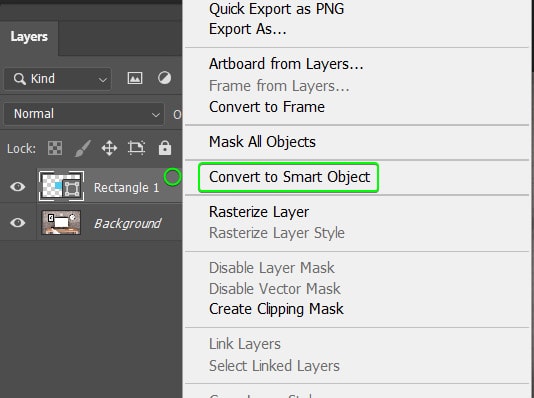
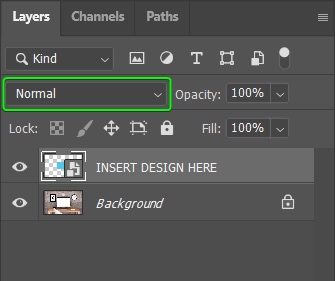
Check that the layer icon in the thumbnail has changed to indicate that the shape layer is now a smart object.
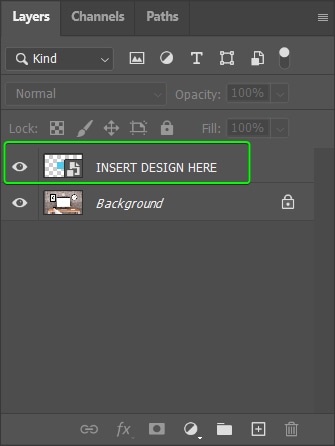
To easily remember where your design should go, you can rename this layer to something like INSERT DESIGN HERE.
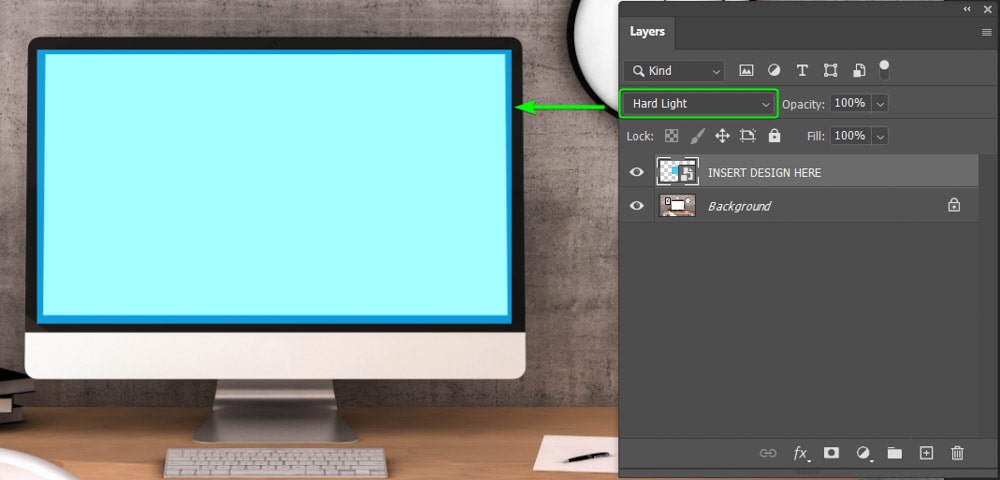
Step 4: Distort The Shape Layer To Fit The Screen
Now, you must distort the shape layer to fit onto your screen correctly to ensure that the design won’t cover the black bezel around the computer screen.
First, change the Blend Mode of the shape layer to Color Burn if your screen has an image on it already or Hard Light if it’s a white screen. The new blend mode lets you see the bottom layer while you line up the shape layer.
When the screen is white, hard light changes the color of the shape block where it sits on the black bezel.
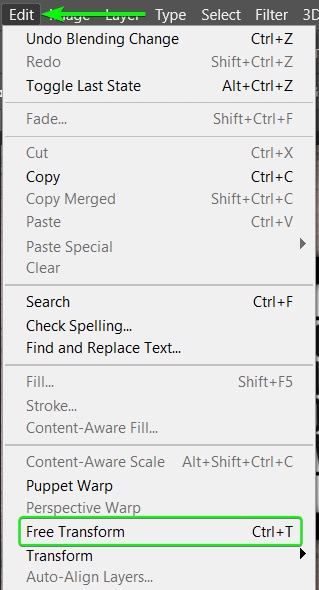
Then, activate Free Transform by navigating to Edit > Free Transform or using the shortcut Control + T (Win) or Command + T (Mac).
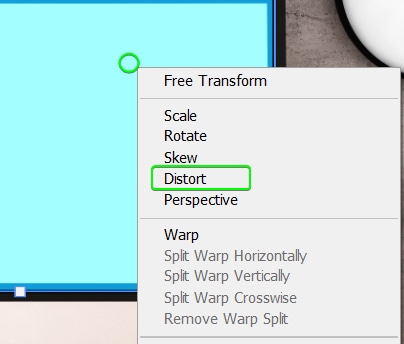
Next, right-click (Win) or Control + click (Mac) on the shape and select Distort. The distort function helps transform the shape to match the angle of the computer screen.
Even though the computer is facing the camera head-on in my example, the screen still isn’t an exact rectangle. The distort function is also perfect for screens angled to the side.
Now, you can zoom in to see the screen better by pressing Control + + (Win) or Command + + (Mac).
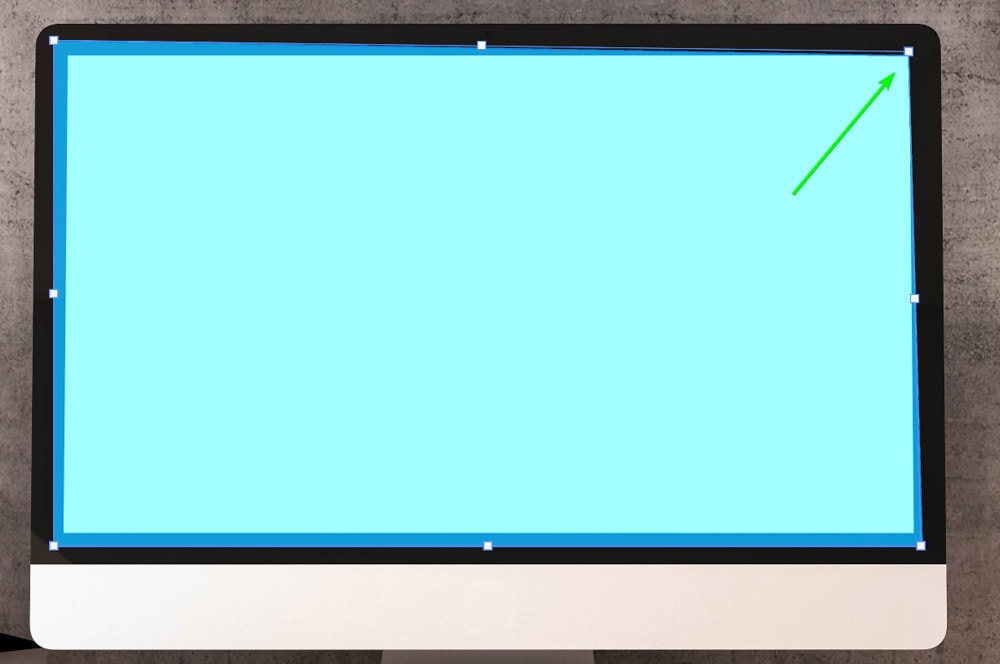
To distort the shape, click on one of the anchor points (the white blocks) and drag it down to where you want it to sit on the corner of the screen. As you move the handle, you will notice that it only distorts the corner you have moved, leaving the rest of the shape unchanged.
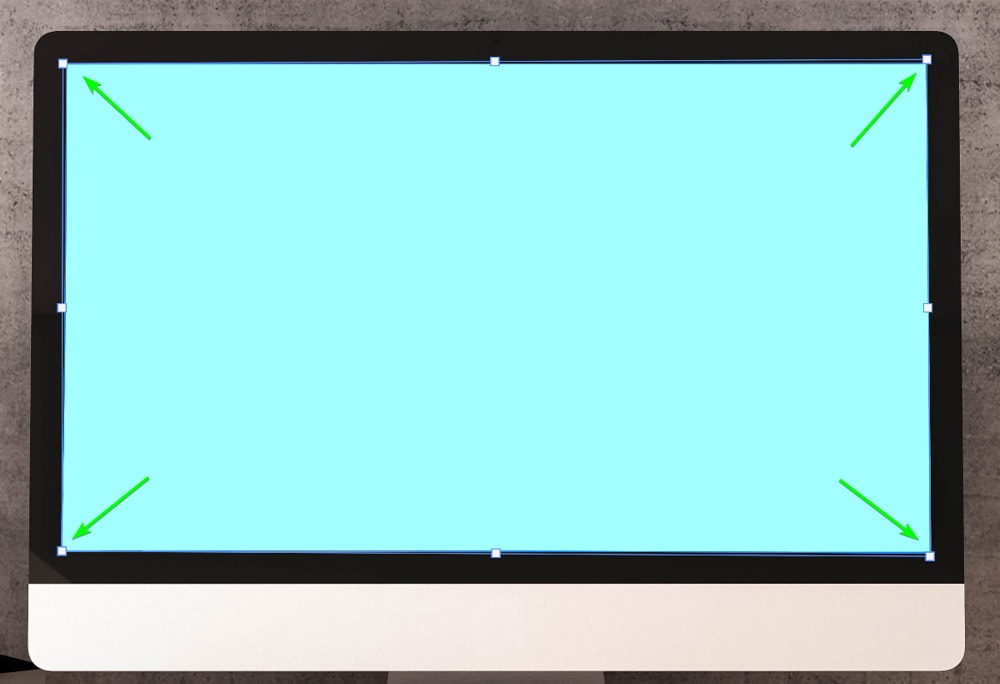
Repeat the above step to pull all the corners to fit on the computer’s screen without overlapping the black bezel.
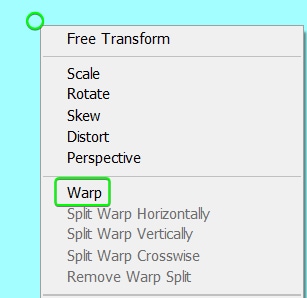
If you are having trouble lining the shape up correctly, right-click (Win) or Control + click (Mac) and select Warp to further distort the shape.
Once you are happy with the placement of the shape, click the checkmark in the Options bar or press Enter to accept the changes.

Then, change the shape layer Blend Mode back to Normal.
You now have a solid color shape fitted into the screen area of the computer.
Step 5: Add Your Layout Design To The Smart Object
You can now add your layout design to the smart object so that it fits on the computer screen. Double-click the smart object icon in the shape layer’s thumbnail to add your design.
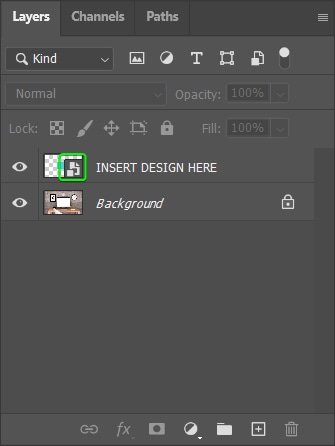
A new tab opens in Photoshop, which is a .psb file of the Smart Object you created. The new tab displays the shape you made as the canvas, where you can place your layout.
You can now add your layout design to the smart object tab. Add the layer by opening the layout tab, making sure the layer is selected, and pressing Control + C (Win) or Command + C (Mac).
Then move back to the smart object tab and press Control + Shift + V (Win) or Command + Shift + V (Mac) to paste the layer in place. In most cases, your layout won’t fit on the layer perfectly.
Adjust the size of your layout by pressing Control + T (Win) or Command + T (Mac). Then drag the corner handles to resize the layout to fit the canvas as best you can. Hold in Shift while resizing when using older versions of Photoshop to prevent the design from distorting.
It’s okay to cut off some of your design on the sides. Just make sure you don’t cut off any crucial information.
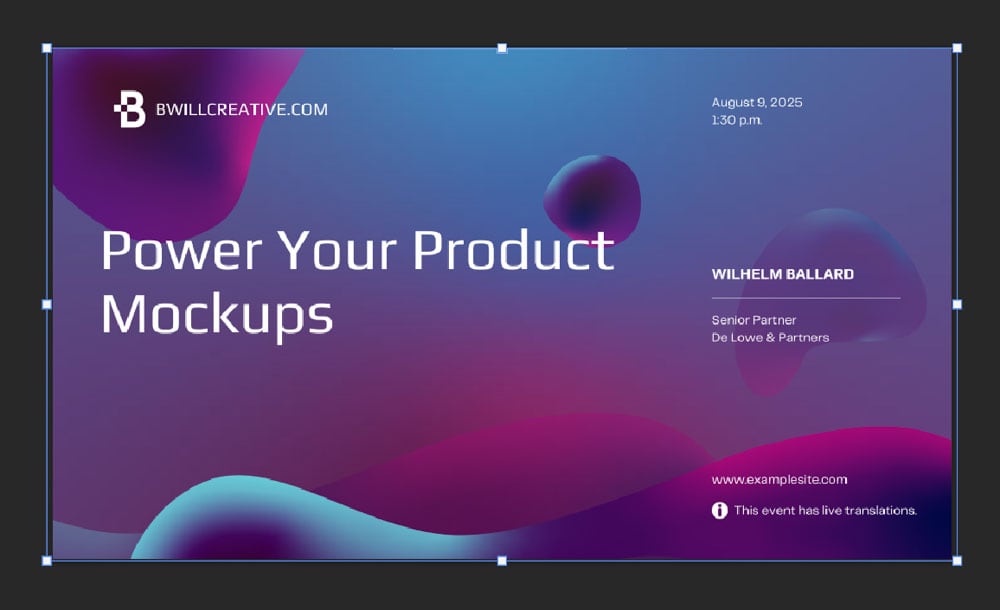
Press Enter to accept the changes. Your layout should fully cover the canvas at this point.
Then, save the smart object file by navigating to File > Save or pressing Control + S (Win) or Command + S (Mac). You can close the tab after saving it.

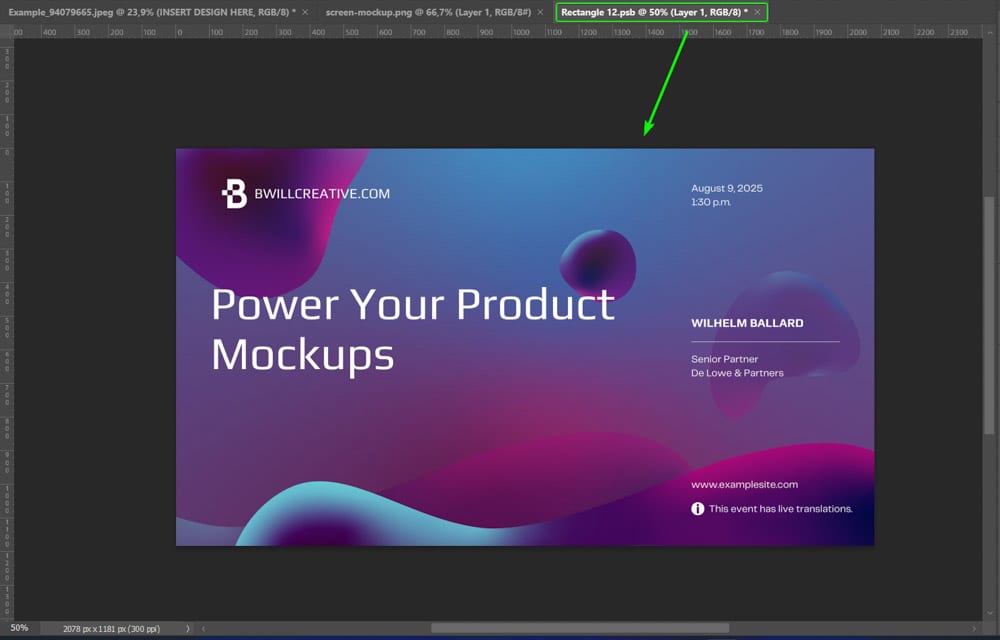
When you switch to your mockup tab again, Photoshop will place your layout perfectly inside the computer screen. You can change the design at any stage by re-opening the smart object in a new tab and placing a new design on the canvas.
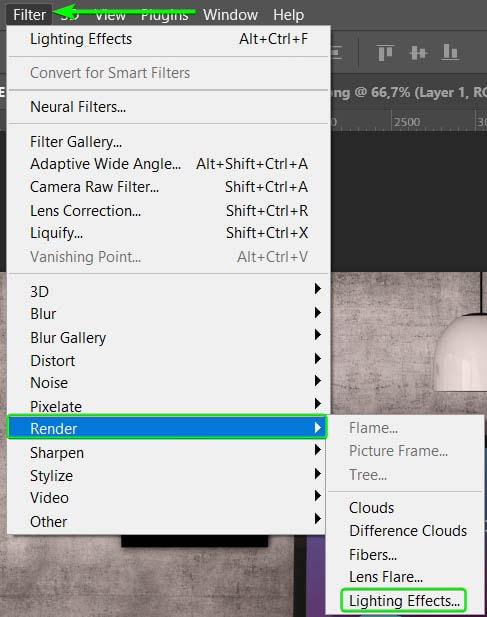
Step 6: Add A Gloss Effect Using Lighting Effects (Optional)
If you’d like to make a more realistic-looking screen, you can add some lighting effects to create a gloss-like effect. The effect is added as a smart filter so you can edit or delete it anytime.
To add the effect, select the smart object layer and navigate to Filter > Render > Lighting Effects.
In the workspace that opens, alter the settings in the right-hand panel to create the lighting effect you’d like. Get creative here, but if you need a starting base, adjust the following:
- Set the Intensity to 80
- Change the Exposure to -59
- Slide the Gloss to 100
- Set the Ambience to 16
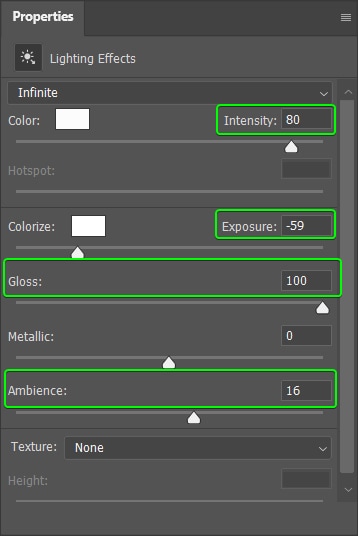
Ensure Preview is checked in the Options bar to see the changes on the screen and click OK when you are happy with the settings.

Double-click the Lighting Effects smart filter in the Layers panel to adjust the settings.
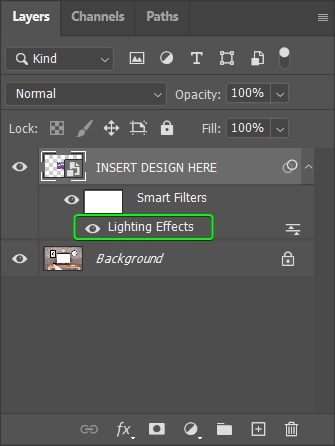
You now have a glossy effect added to your screen to brighten the layout design.
How To Create An Advanced Mockup In Photoshop
The process of creating an advanced mockup is similar to a simple mockup. However, you must further distort the layout design to match curved products. You also need to apply a few extra edits to adjust the lighting and color adjustments to match the original product’s reflections, shadows, and highlights.
Before you begin, you need to open your product and design layout in Photoshop in two separate tabs. Keep the product image open to start.

Step 1: Prepare Your Selections
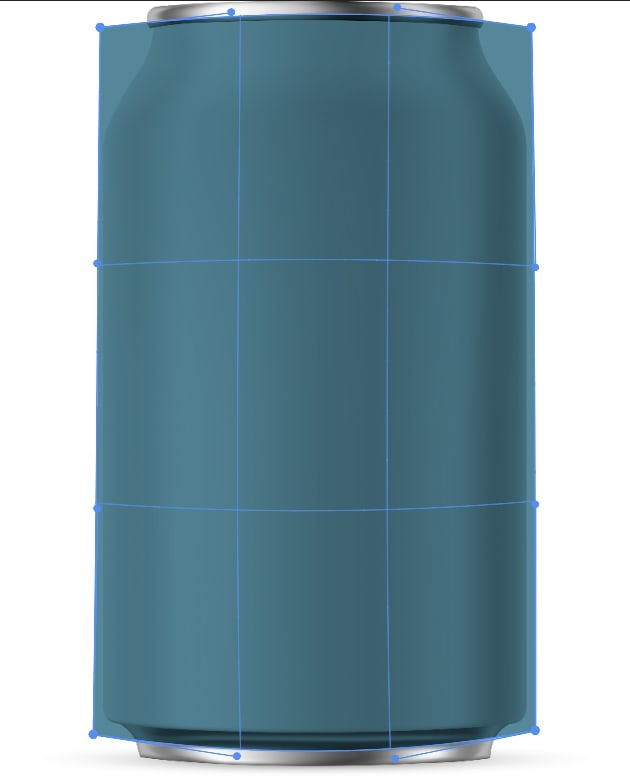
To make the process a lot easier further on, you can start by preparing the selections of the product. In this example, I am working with a can.
If you want to be able to change the color of the top and bottom pieces of the can (or any elements on your specific product image), you need to make all three selections. However, if you don’t need to change the colors, only make the path around the body of the can.
Note: zoom into each section using Control + + (Win) or Command + + (Mac) when using the Pen Tool to create a more precise path.
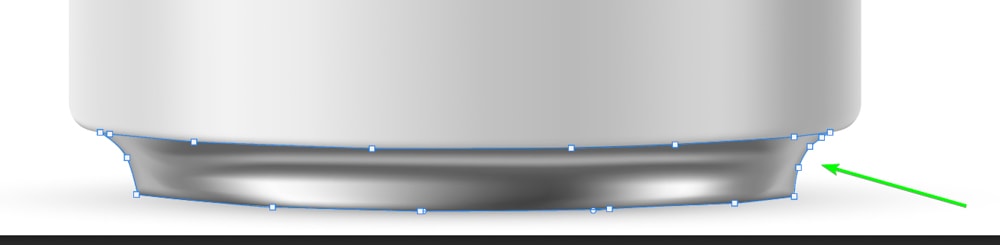
Create A Path Around The Can Lid
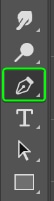
To create a working path around the lid of the can, select the Pen Tool (P) from the Toolbar.
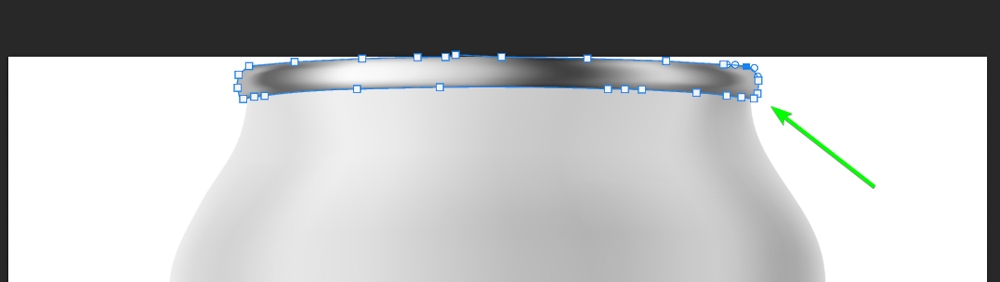
Then, click on any point on the lid to create the path’s starting point. Keep making new points to draw a path around the top. Hold and drag the new anchor point or control handles to curve the line slightly.


To correct any anchor points or the handles while using the Pen Tool, hold in Control (Win) or Command (Mac) while clicking and repositioning the path. The white arrow indicates that you are correcting the path.

Keep drawing and correcting the path, then close the path by clicking on the first anchor point. You should now have the path around the entire lid. Again, this will obviously vary depending on your product. Regardless of the product in use, separating the different sections like this is always a good idea.
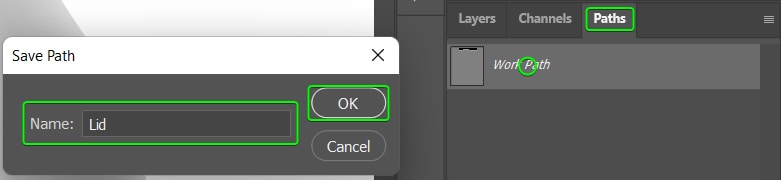
Once the path is complete, open the Paths panel (if it’s not visible, navigate to Window > Paths to open it), then double-click on Work Path to rename the new path to Lid.
Create A Path Around The Can Bottom
Once you’ve created the first path, add a new path by clicking on the Create a new path icon at the bottom of the panel.
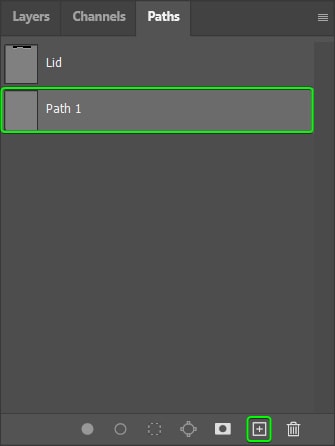
Rename this path “Bottom” and repeat the step above to draw a path around the bottom of the can.
Create A Path Around The Body Of The Can
Repeat the step above to create a new path and draw a path around the body of the can.
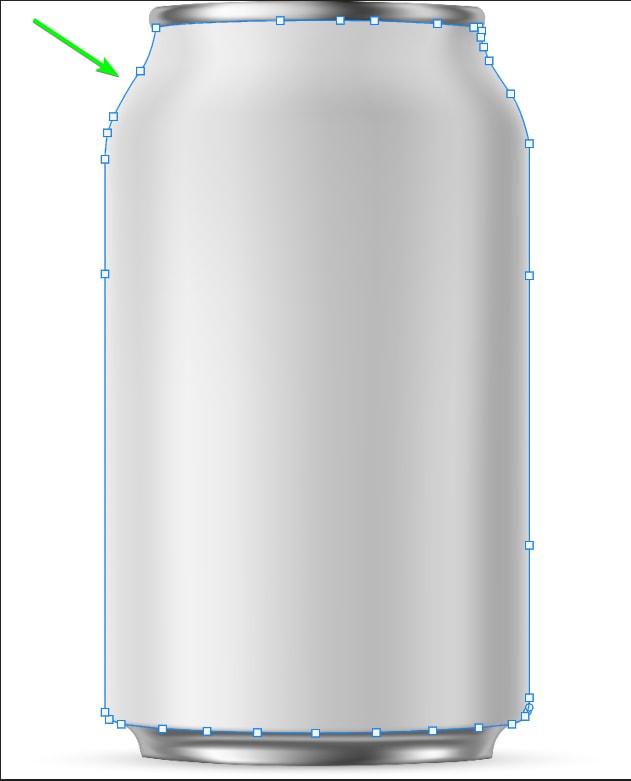
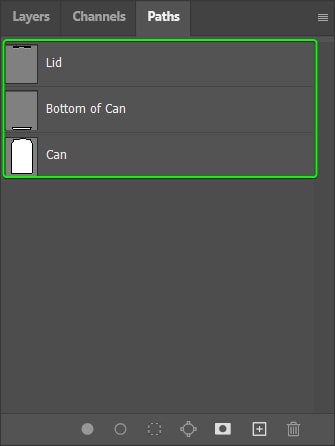
You should now have three separate paths in the Paths panel, which you will use for the mockup. There may be more or fewer sections depending on the product mockup you are creating.
Step 2: Add A Smart Object Shape Layer Over The Product
To make the mockup area for your design layer, you must first add a shape layer over the soda can or product and convert it to a smart object.
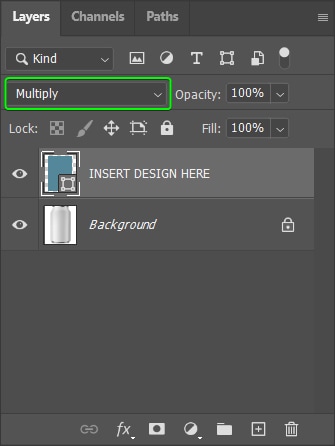
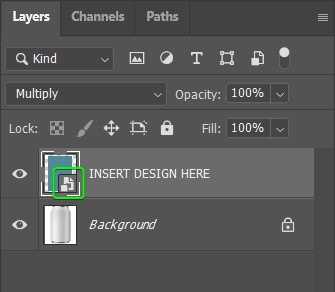
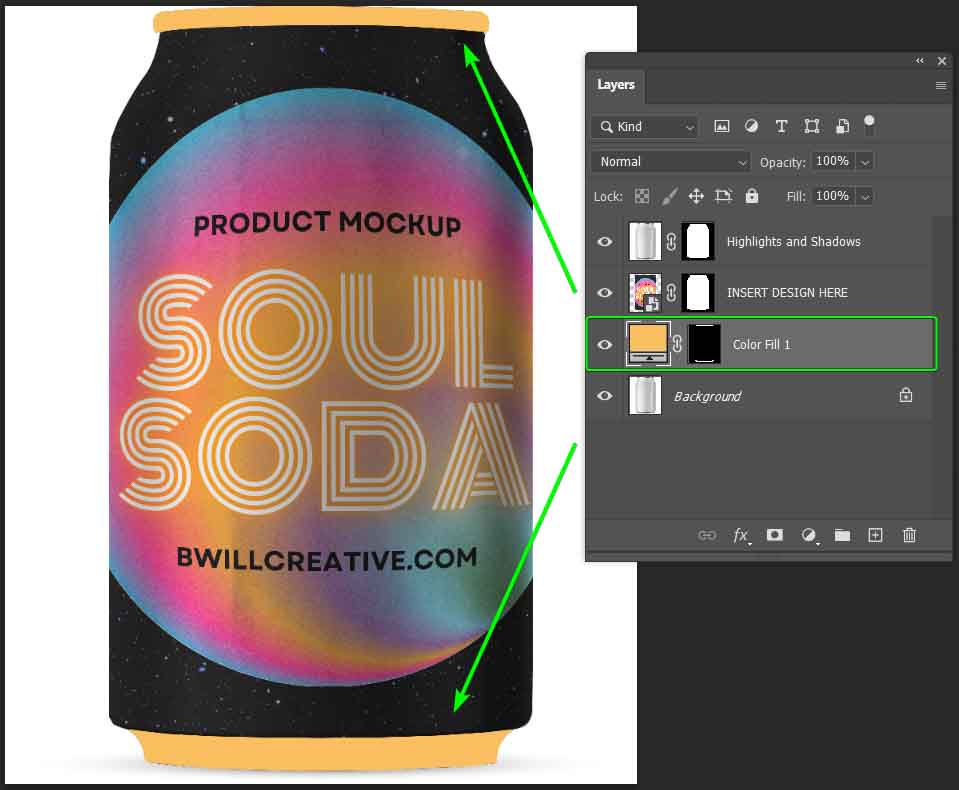
Start by selecting the Rectangle Tool (U) from the Toolbar, and then draw a rectangle covering the body of the can. Leave extra space around the sides as you need the space in the next step. Rename the shape layer to something like INSERT DESIGN HERE.
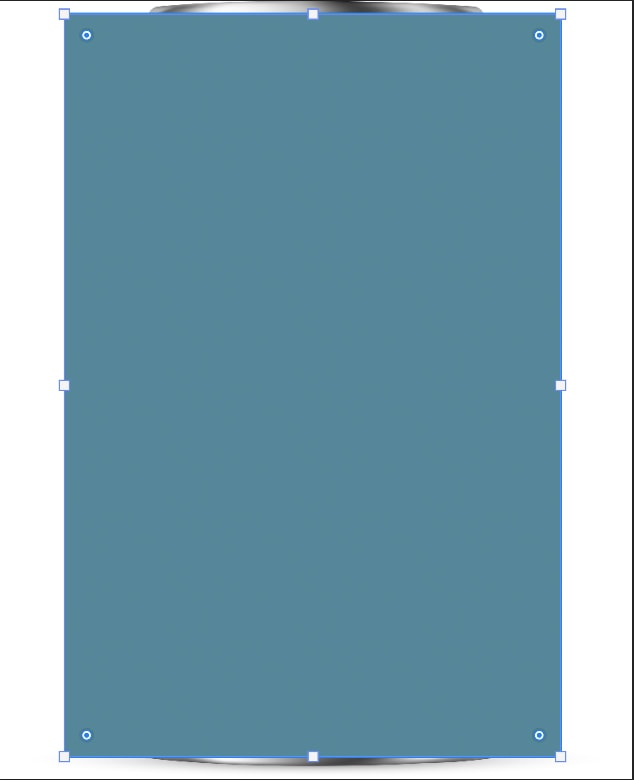
Change the Blend Mode of the shape layer to Multiply. The blend mode is useful if you aren’t placing the design over the entire body of the can. The blend also helps you line up the soda can when you warp the shape in the next step.
Then as in the first mockup example, convert the shape layer to a smart object by right-clicking (Win) or Control + clicking (Mac) on the shape layer and selecting Convert to Smart Object.
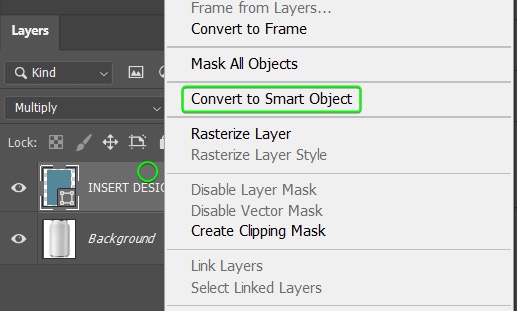
Ensure the layer is a smart object by checking that the icon in the thumbnail has changed.
Step 3: Warp The Shape Layer To Fit The Object
Now, you can warp the shape layer to fit the can better. The warping ensures that the design you add distorts slightly to match the curvature of the can.
First, select the shape layer, press Control + T (Win) or Command + T (Mac), then right-click (Win) or Control + click (Mac) and select Warp.
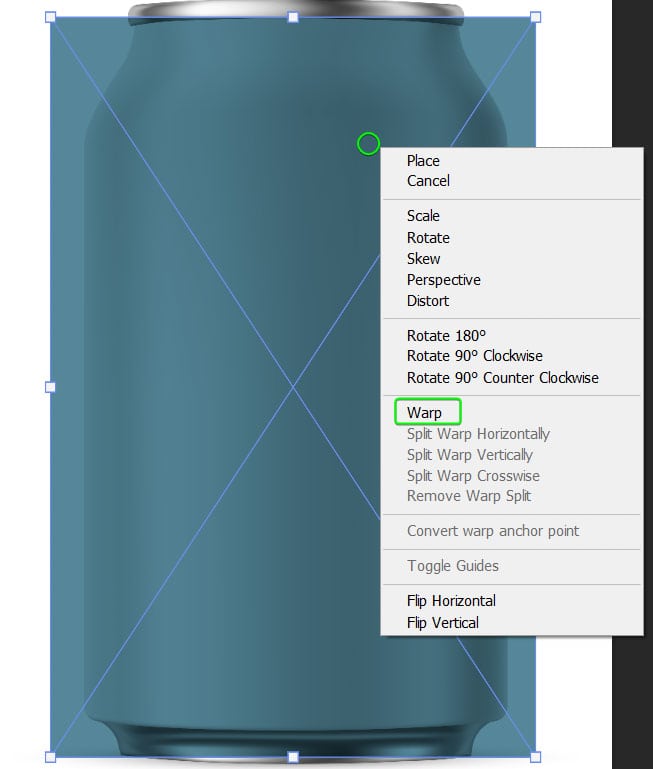
Use the handles around the shape and the gridlines to distort the layer as you’d like. Bring the shape’s edges closer to the body of the can, but always leave space around the sides. Click and drag a handle or grid line inwards to distort that section without affecting the rest of the shape.
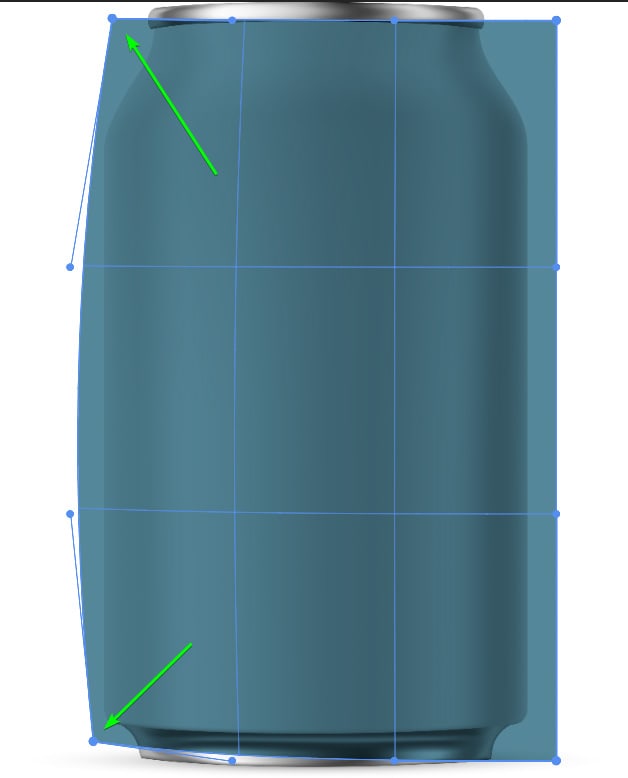
Click and drag the edges of the shape inwards as well.
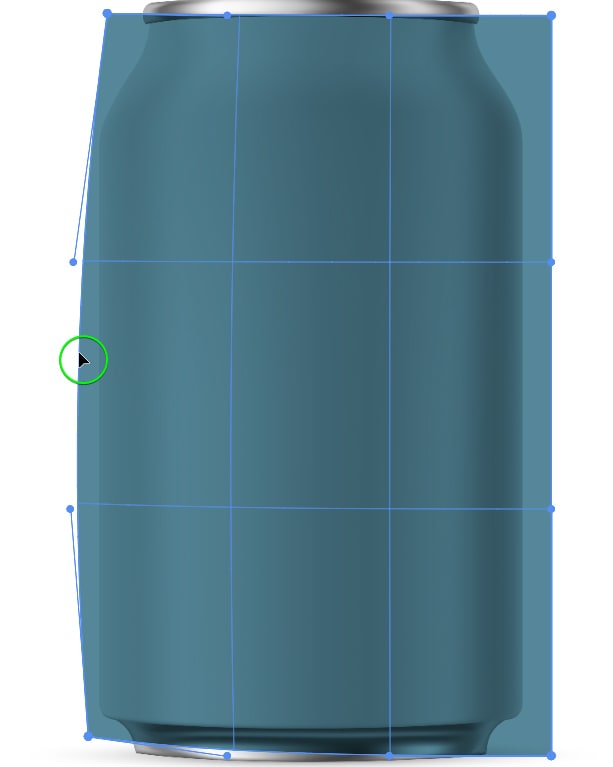
Repeat the distortion around the entire body of the can. Do your best to follow the general shape of the object. In this case, I can also slightly move the inner gridlines to curve inside the shape layer to mimic the soda can’s curves.
Click the checkmark in the Options bar or press Enter when you are happy with your shape.

Step 4: Add A Layer Mask Using Your Premade Paths
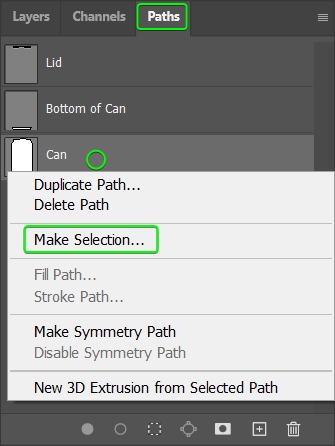
Now it’s time to use the path you created on the can’s body to add a layer mask. This step ensures that the shape layer and the design you add are only shown on the body of the can.
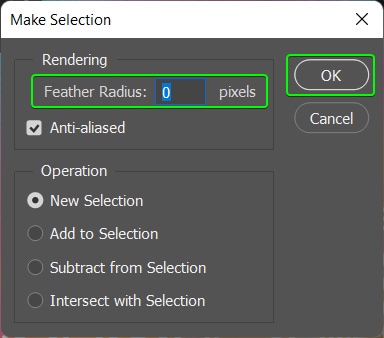
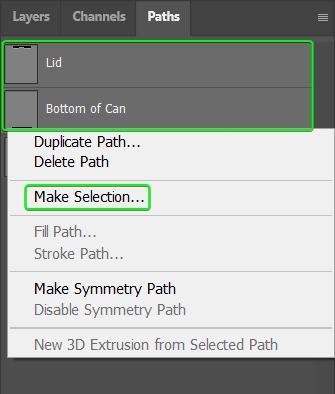
First, open the Paths panel, then right-click (Win) or Control + click (Mac) on the Can path and click Make Selection. In the dialogue box that opens, leave the Feather Radius at 0 and click OK.
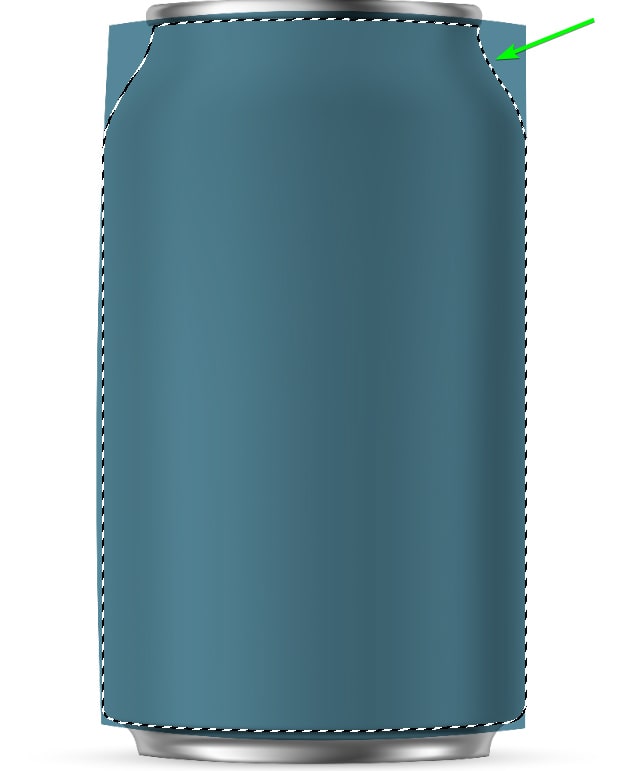
Once you have made the selection, you will see it around the can on your canvas.
Then, click on the Add vector mask icon at the bottom of the Layers panel. You will notice a layer mask appear, showing that the shape is now only applied to the body of the can.

On your canvas, the shape you added will be fitted to the body of the can.
Step 5: Add Your Design Layer To The Smart Object
As the previous example shows, you can now add your design layer to the smart object — double-click on the smart object icon to open it in a new tab. Then copy and paste your design layer into the smart object tab.
For the can design, add it as a sticker on the can or cover the entire can with your design. The amount you resize and place your design in the smart object is entirely up to you.

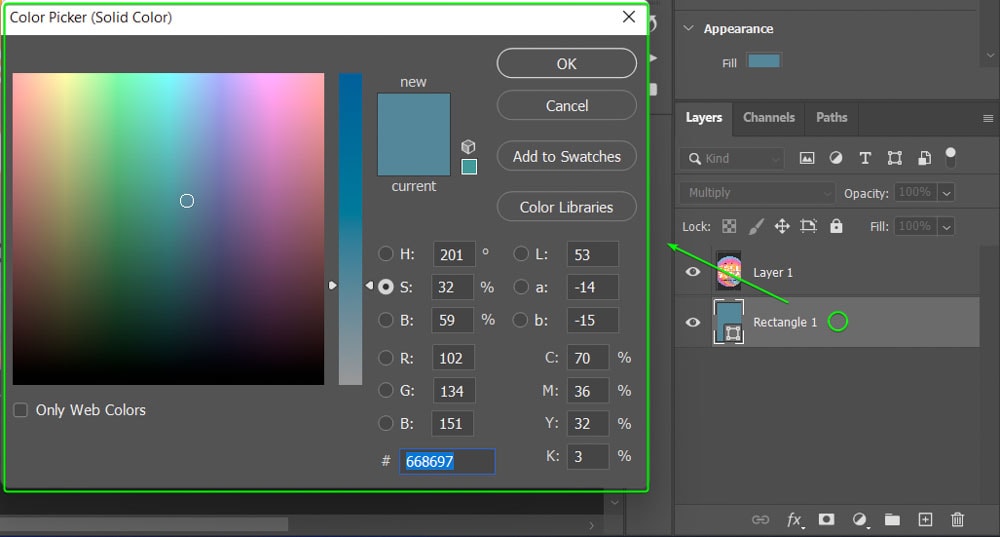
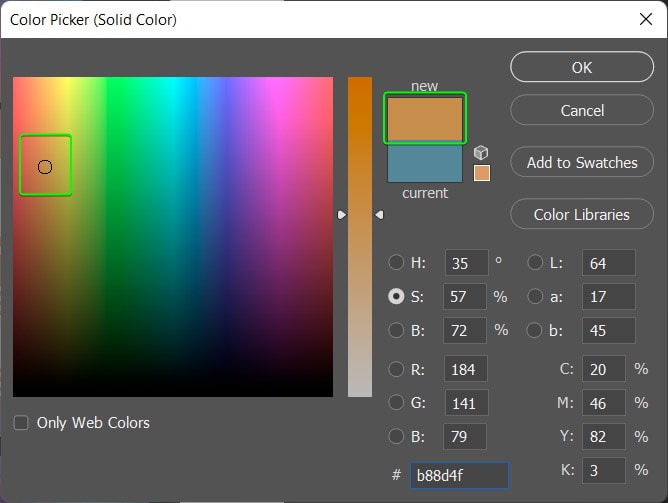
To change the background color on the can, double-click on the rectangle layer in the smart object tab and choose a new color in the Color Picker window.
Step 6: Add The Shadows And Highlights Of The Can
Now that you’ve placed your design on the can, you can add the original shadows and highlights of the can. This step is relatively easy since you already have the original can with the shadows and highlights in the right place.
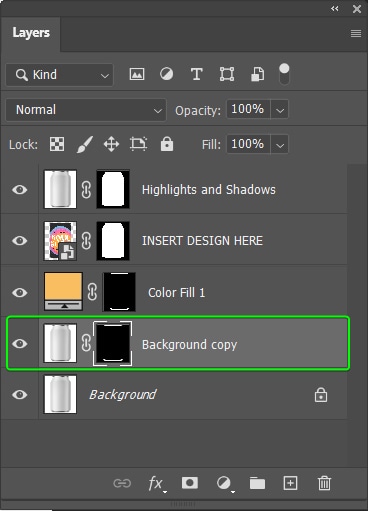
First, duplicate the background layer by dragging it to the Create a new layer icon at the bottom of the Layers panel.
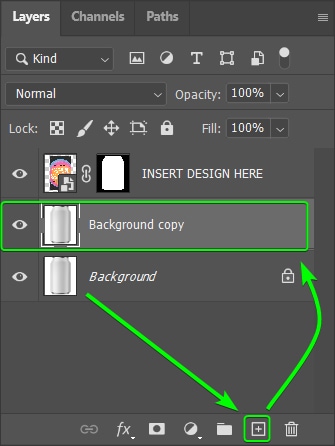
Rename the new layer and drag it above the design layer.
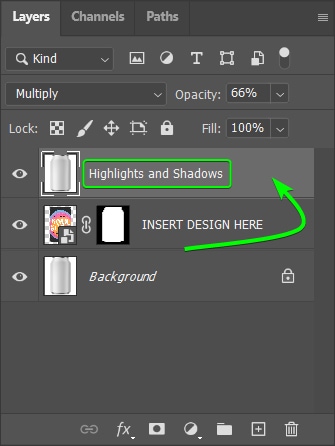
Then, hold Alt (Win) or Option (Mac), click on the layer mask for the design layer and drag it onto the new layer you created. You will have now copied the layer mask onto the new layer.
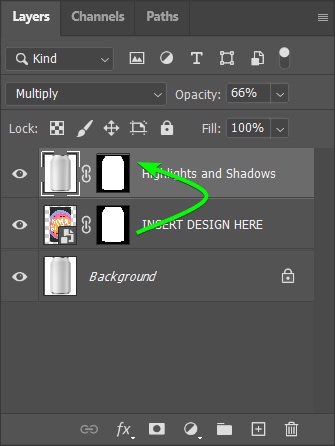
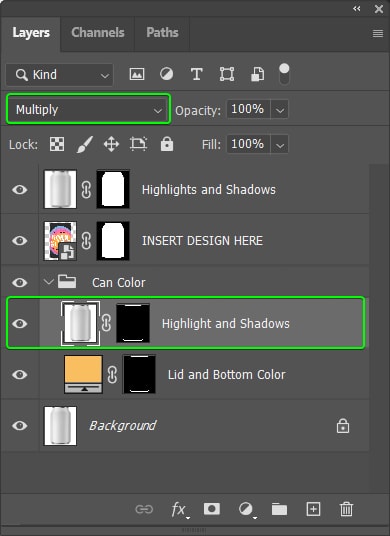
Next, change the Highlights and Shadow layer’s Blend Mode to Multiply and decrease the Opacity to about 65%.
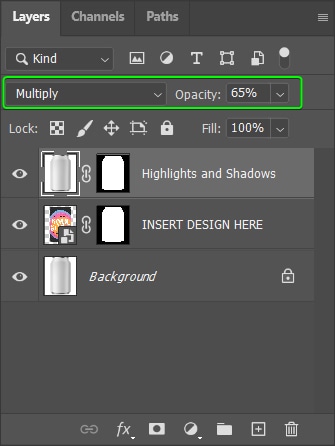
Your soda can now has the subtle effect of the highlights and shadows added to it for a more realistic effect.
Step 7: Add The Option To Change The Can Lid And Bottom (Optional)
Lastly, if you’d like, you can make a quick adjustment to change the color of the lid and bottom of the can.
First, open the Paths panel and select both the lid and bottom paths by holding in Control (Win) or Command (Mac) while clicking on each path. Then right-click and choose Make Selection. Leave the Feather Radius at 0 and click OK.
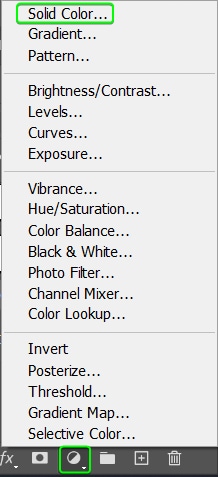
Then, add a new solid color layer by clicking on the Create a new fill or adjustment layer icon at the bottom of the Layers panel and selecting Solid Color.
Use the Color Picker to select the new color you want and click OK.
The color layer is automatically applied to your selections, as shown in the layer mask and on your canvas.
Since the top and bottom no longer look realistic, you need to add the highlights and shadows.
To do this, duplicate the background layer by pressing Control + J (Win) or Command + J (Mac), create the selection of the lid and bottom again using the Paths panel, and then add a layer mask on the new duplicated layer.
Then, move the new layer above the color layer and rename both layers to keep your layers panel organized. You can also use the New group icon at the bottom of the Layers panel to keep these adjustments in a separate group.

Lastly, change the Blend Mode of the new Highlights and Shadows layer to Multiply. The blend mode ensures that the highlights and shadows show through without covering the new color you add.
You now have a soda can complete with your designed mockup and adjustable colors for the body of the can and the lid and bottom if you need.
Then once the hard work is done, you can simply re-edit the smart object layer and apply a new graphic for even more mockups!

Happy Editing!
