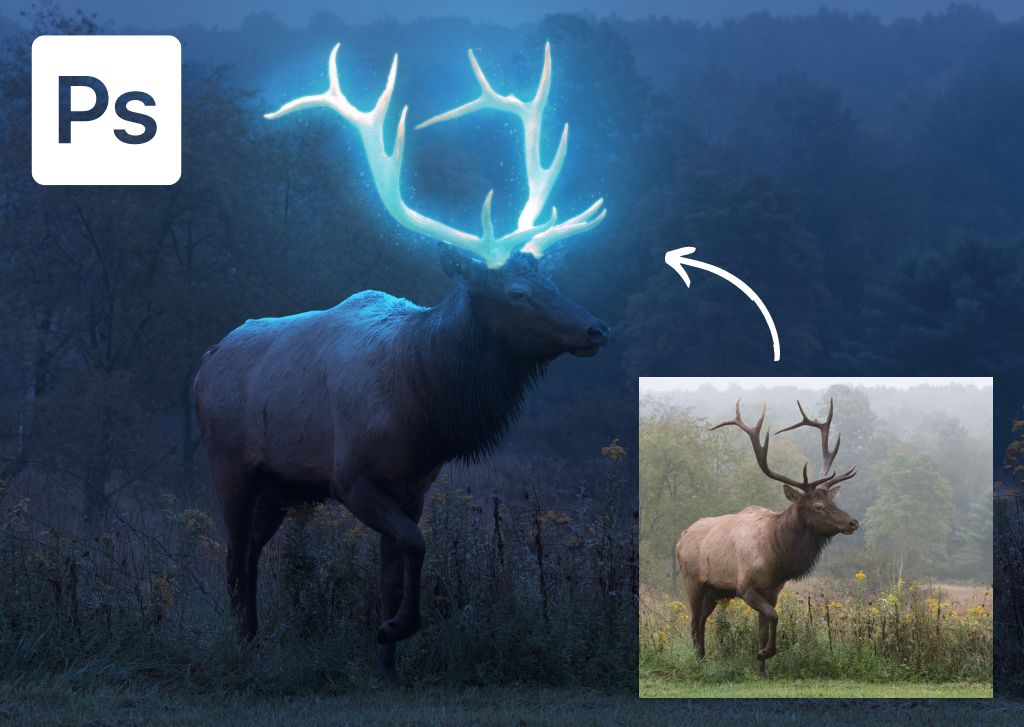

Whether you want to add a pop of color to your photo or create a surreal image, using the glow effect in Photoshop is a great way to add creativity to your project. This effect creates the impression that an object in your photo is lit with a neon light.
The glow effect will work on most images, even if it is well-lit. While adding a glow works better on darker images to pronounce the impact, I have an extra step that darkens lighter images to make the glow more prominent and to complete the overall effect.
How To Make The Glow Effect In Photoshop
Follow these steps to create the glow effect in Photoshop. I initially learned this technique from Spoon Graphics’ video but have added my own color and lighting adjustments and custom brush to elevate the effect.
Follow these steps to create the overall effect, and then use the steps in the next section to take the process further and create your own custom brush to add to the glow effect.
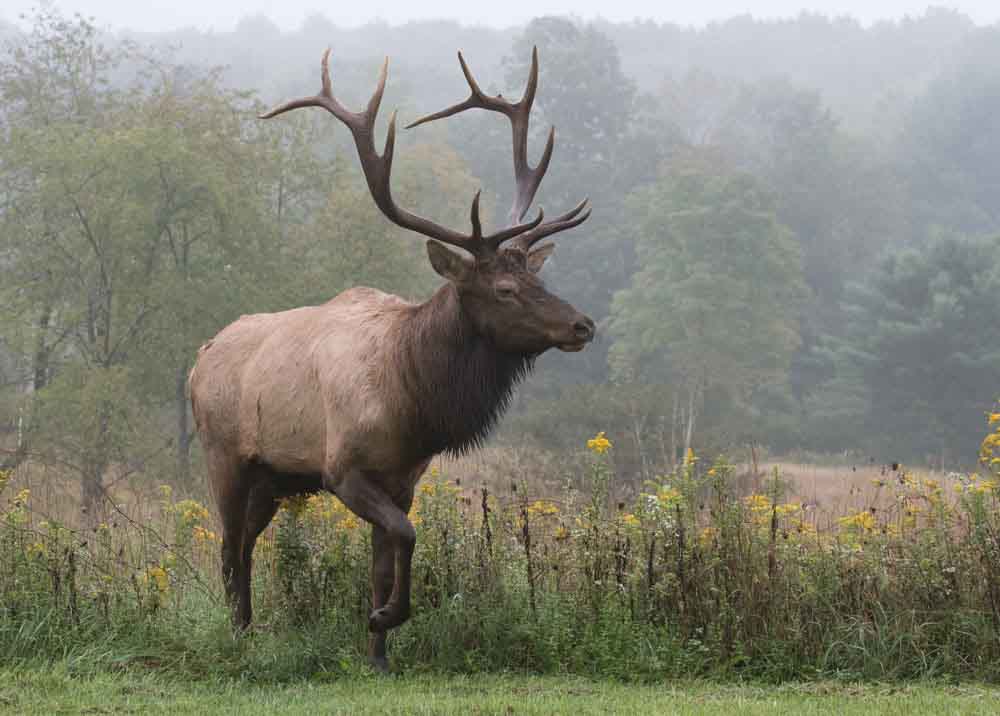
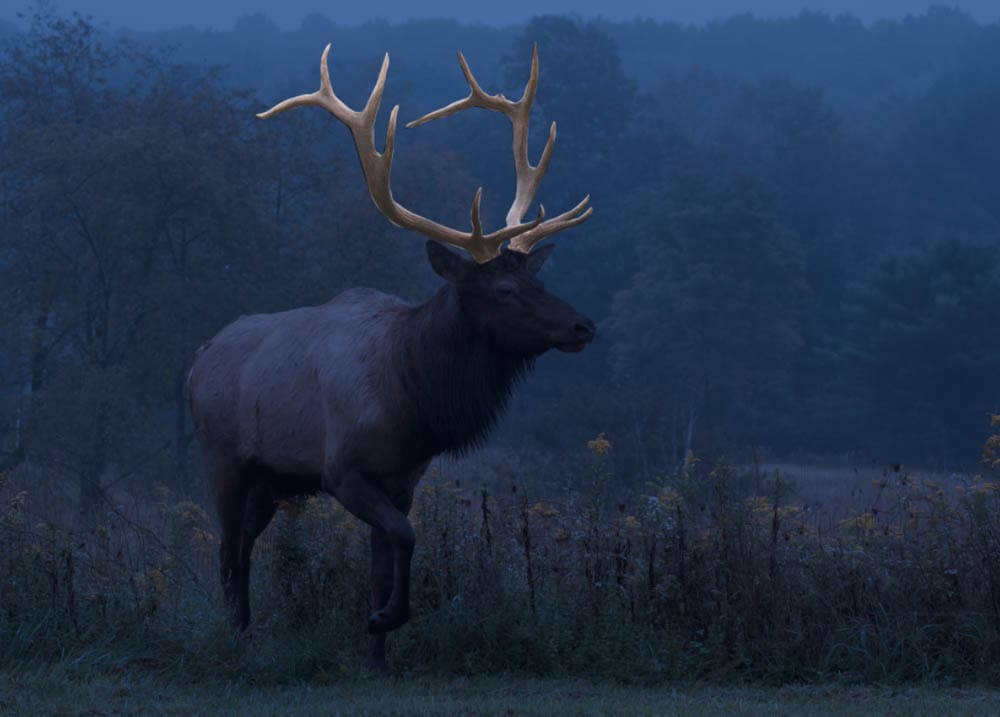
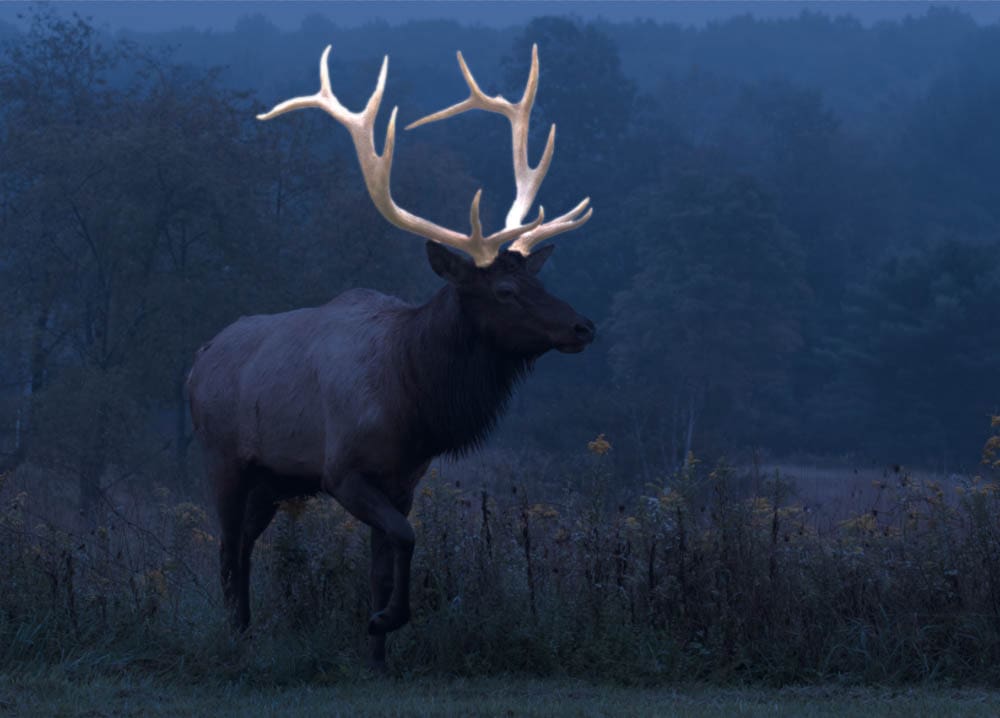
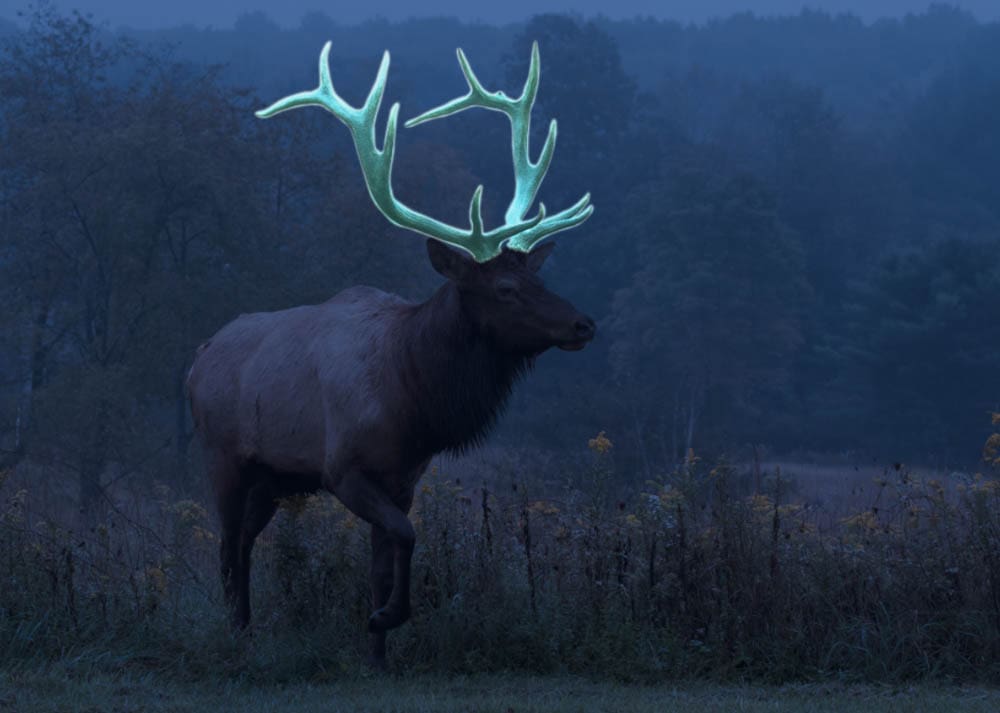
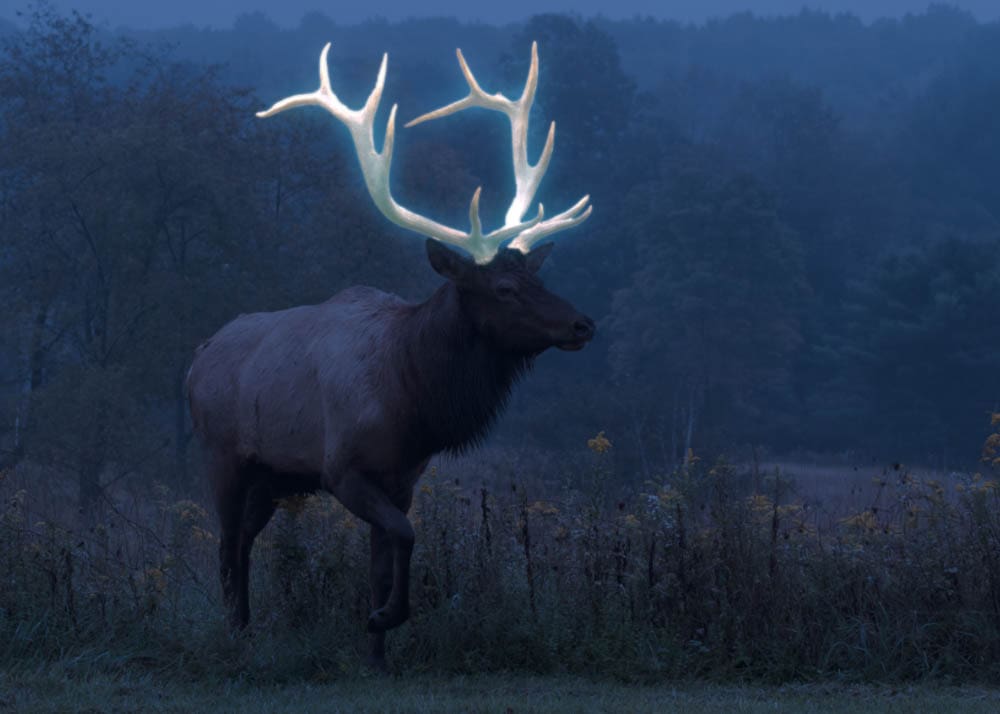
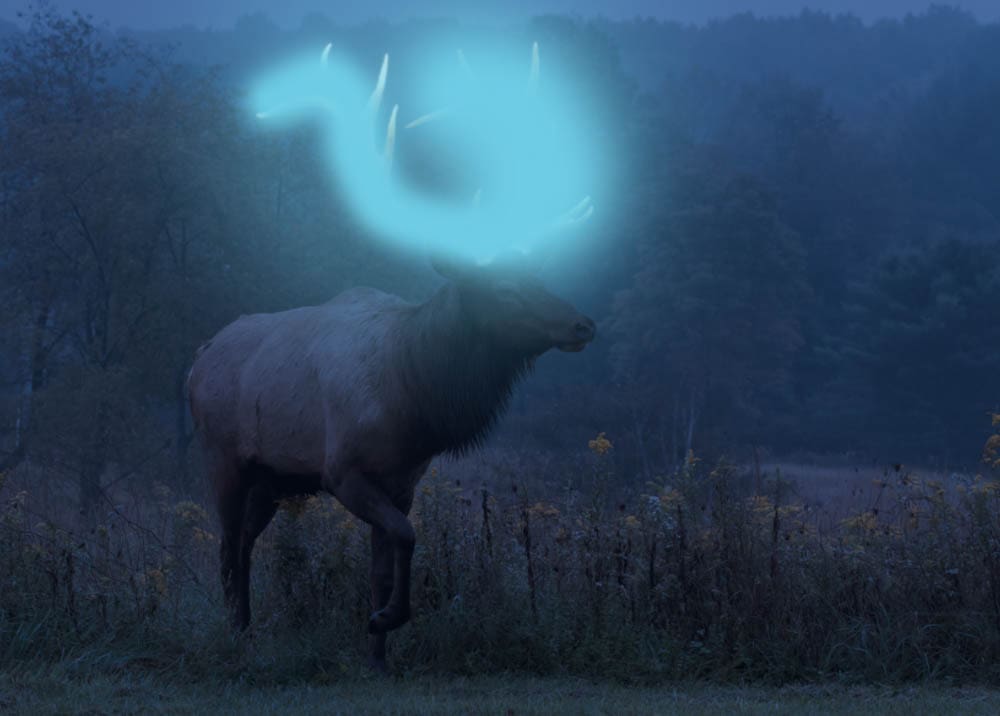
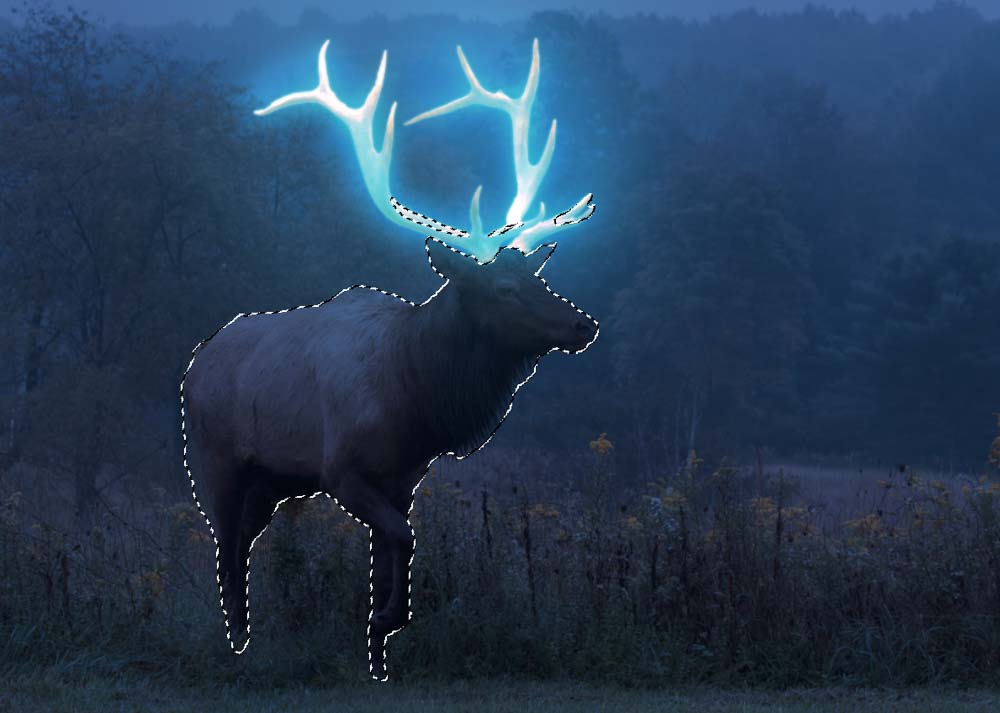
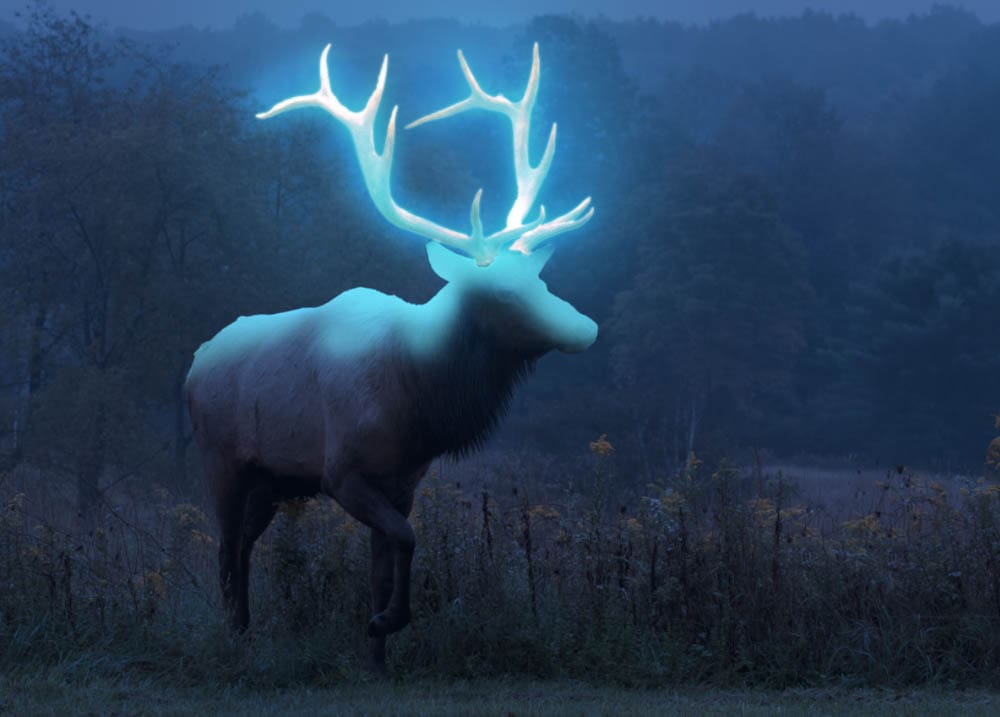
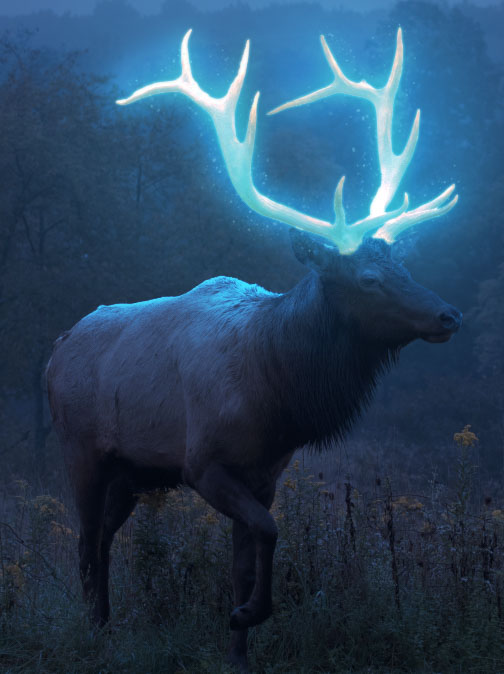
You can add the glow to any object in your image and choose any color to make the glow. In this example, I will use this image of an elk and add the glow effect to the antlers.
Step 1: Select And Duplicate The Object You Want To Add The Glow To
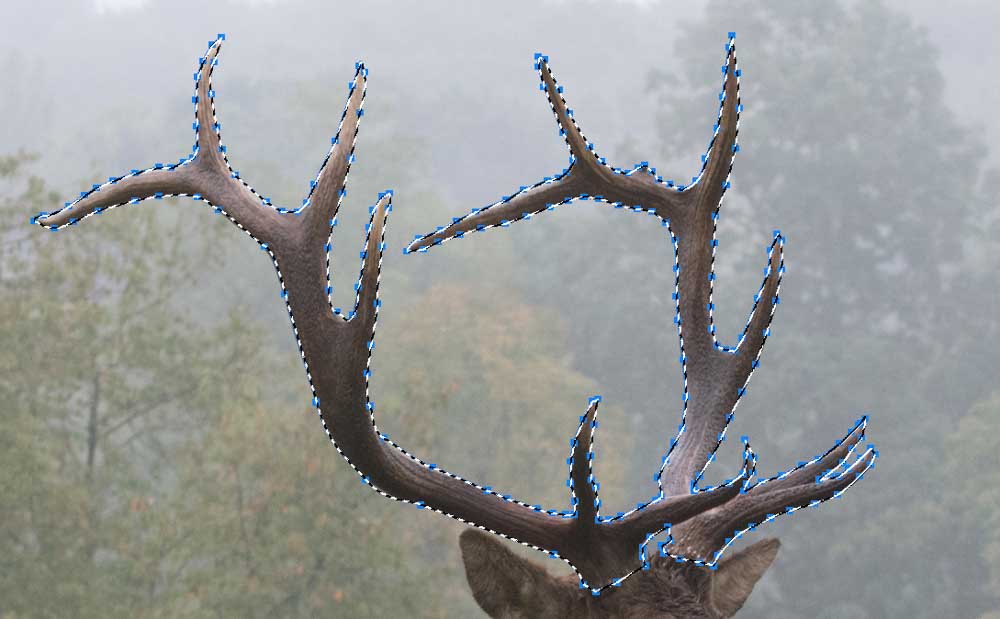
The first step is to isolate the object to which you want to add the glow. This can be swords, sticks, the moon, or in this case, antlers. Once you have selected the object, you must place it on a separate layer so that every effect you add only adjusts the object.
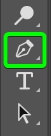
For the most accurate and clean selection, especially on complex shapes and objects, you should use the Pen Tool (P). Select the tool from the Toolbar.
Then, set the mode to Path in the Options bar.

Zoom into the object you are selecting in your image by pressing Control + + (Win) or Command + + (Mac) to control the selection better. Then click once to add the starting point at the base of the object.
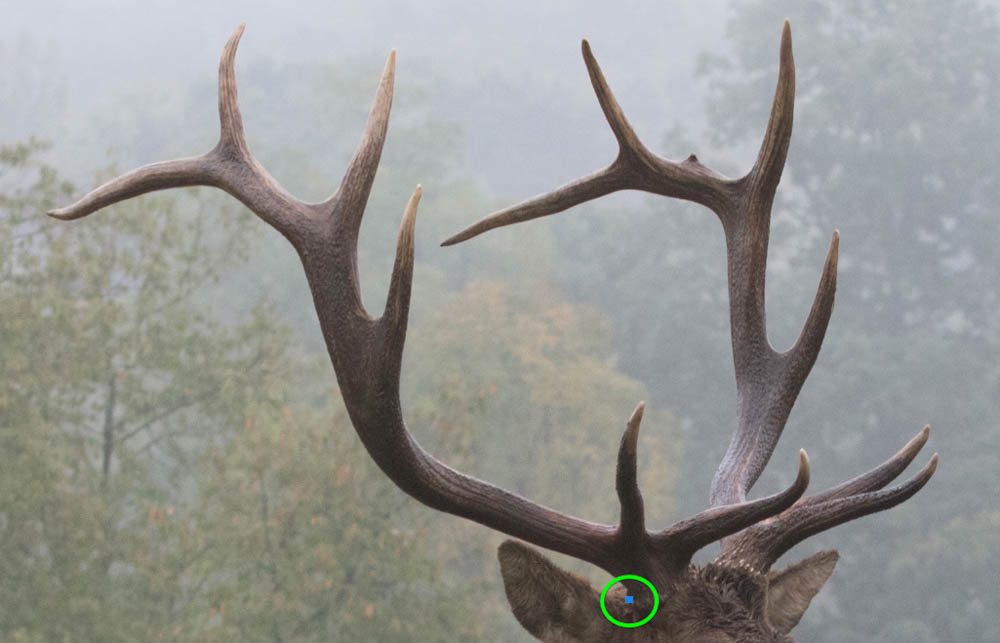
Then click on the next spot to add a new point. If you need to curve the path you are creating with the pen, hold the mouse in after adding the new point and move it around to curve the path.
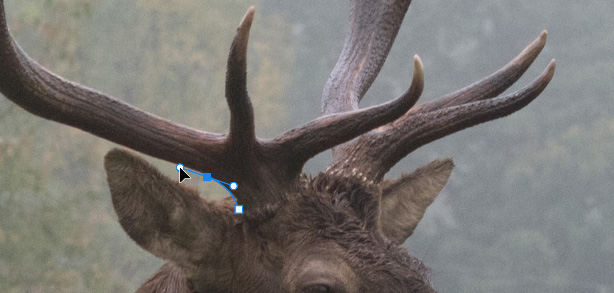
Two control points appear, which you can use to adjust the path as needed. Use the full Pen Tool tutorial to use the tool to its full potential and create a smooth path around the object. Click on the starting anchor point to close the path.
Note: If your object isn’t fully connected, close the path and create a second path. Select both paths before making the selection.
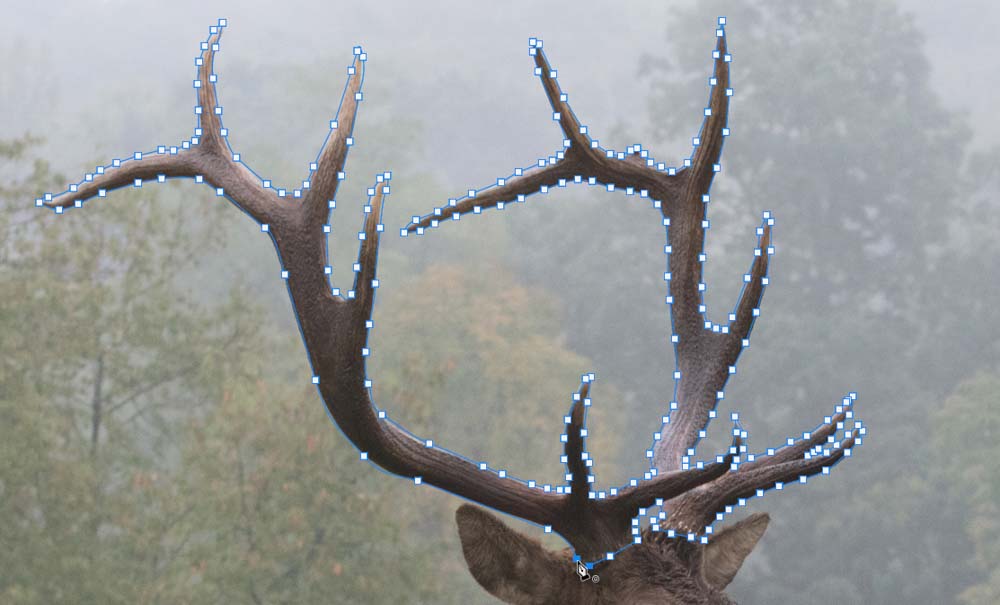
Once the path is closed and complete, it will turn blue. This means you can create the selection now.
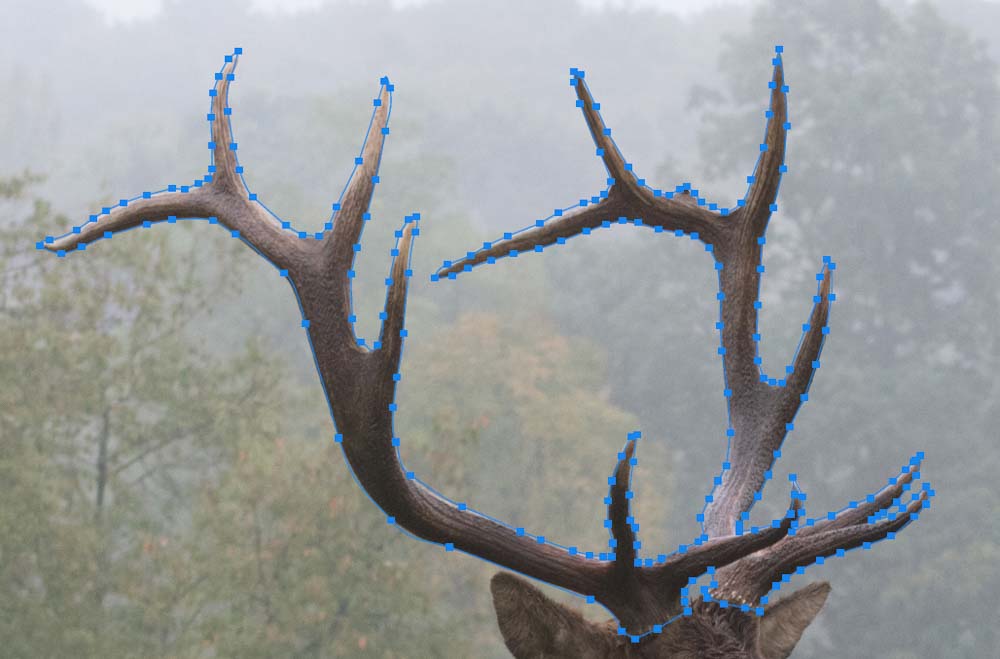
To create the selection, click the Selection button next to Make in the Options bar.

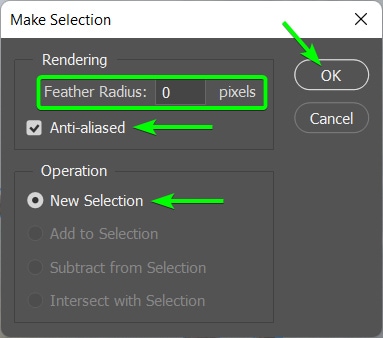
In the make Selection window, set the Feather Radius to 0 pixels, check the Anti-aliased option, and select New Selection. Click OK to create the selection.
You will now see the marching ants over the blue path you created.
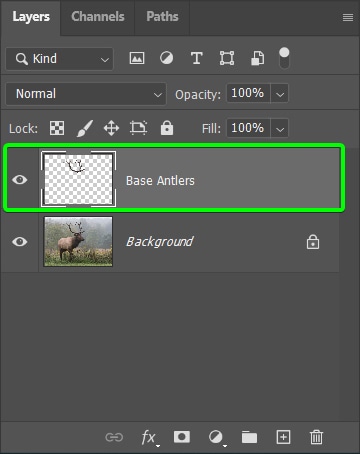
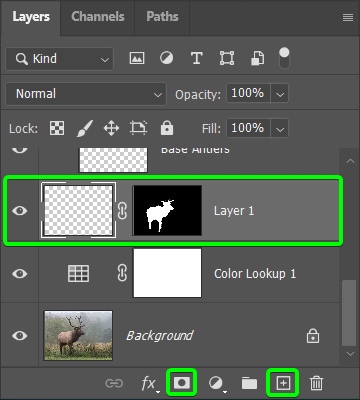
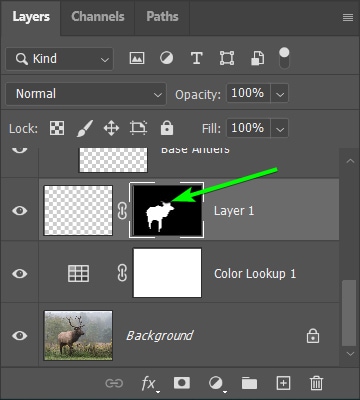
Copy the antlers or your object onto a new layer by pressing Control + J (Win) or Command + J (Mac), and only the antlers will appear on a new layer in the Layers panel. Rename this layer to keep the panel organized, as you will be adding more layers as you go.
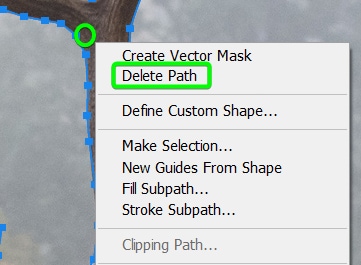
Delete the path from the image since you don’t need it anymore by right-clicking inside the path and clicking on Delete Path.
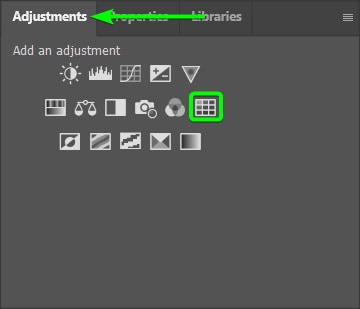
Step 2: Add A Color Lookup Adjustment Layer
The Color Lookup adjustment layer darkens the image and makes the glow pop out more on the page.
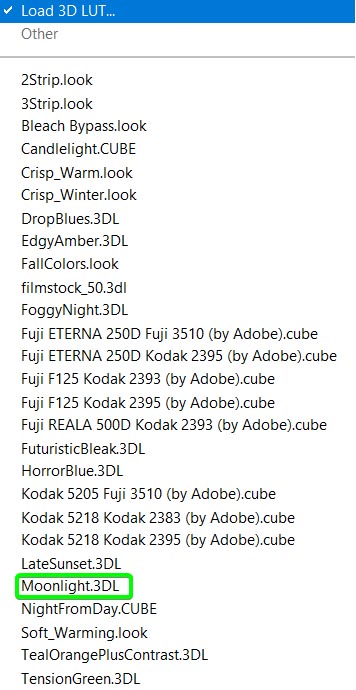
The Color Lookup adjustment layer adds a type of filter over the image to create specific moods. When creating the glow effect, the Moonlight.3DL is a great option to darken the image and add a blue tint.
Add the adjustment layer by selecting your background or image layer, then click on the Color Lookup icon in the Adjustments panel.
When the adjustment layer is added, you will see various options in the Properties panel. Click on the 3DLUT File option and select the drop-down menu.

From the various options, select Moonlight.3DL near the bottom. This file is available in the Photoshop program by default, so you don’t need to download or source the option.
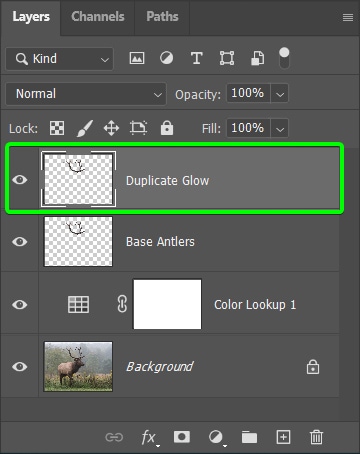
You will notice that the entire image has darkened and has a blue tint to it. However, the duplicated antler or object layer will remain in full color since it should be at the top of the Layers panel.
Step 3: Duplicate The Object Layer And Change To Linear Dodge (Add) Blend Mode
Now, you can continue adding the glow to your object while seeing how it works on the darker image. You will need to add a few layers to create the glow effect on the object itself. The first is to add a duplicate layer and change the blend mode.
Duplicate the base antlers (or your object) layer by selecting it and pressing Control + J (Win) or Command + J (Mac). Rename the new layer in the Layers panel.
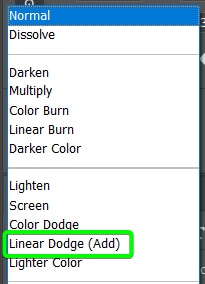
Ensure the new layer is selected and use the Blend Mode drop-down menu (which is set to Normal by default) and choose Linear Dodge (Add) from the options.

You will notice that your object now has a subtle glow, which begins the glow effect.
Step 4: Duplicate The Blended Object Layer And Add A Color Overlay
You now want the object to have a glow that sits around it as if the light is coming off your object and illuminating the space around it. To add the extra glow, you must duplicate the object layer again. You can use the layer you changed the blend mode on.
Select the layer and press Control + J (Win) or Command + J (Mac) to duplicate it. Rename the layer in the Layers panel.
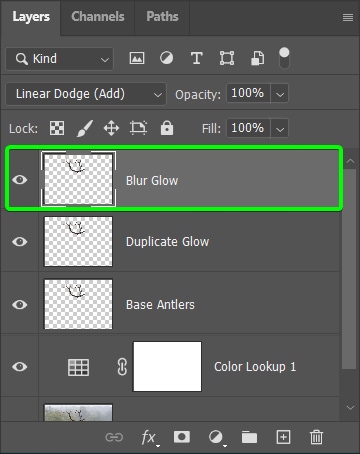
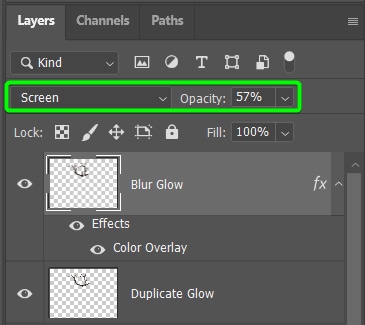
Now, you can add a color overlay to the duplicated layer, which will start adding a color of your choice to the glow. To add the overlay, double-click on the layer you just created, which I have named Blur Glow, to open the Layer Styles window.
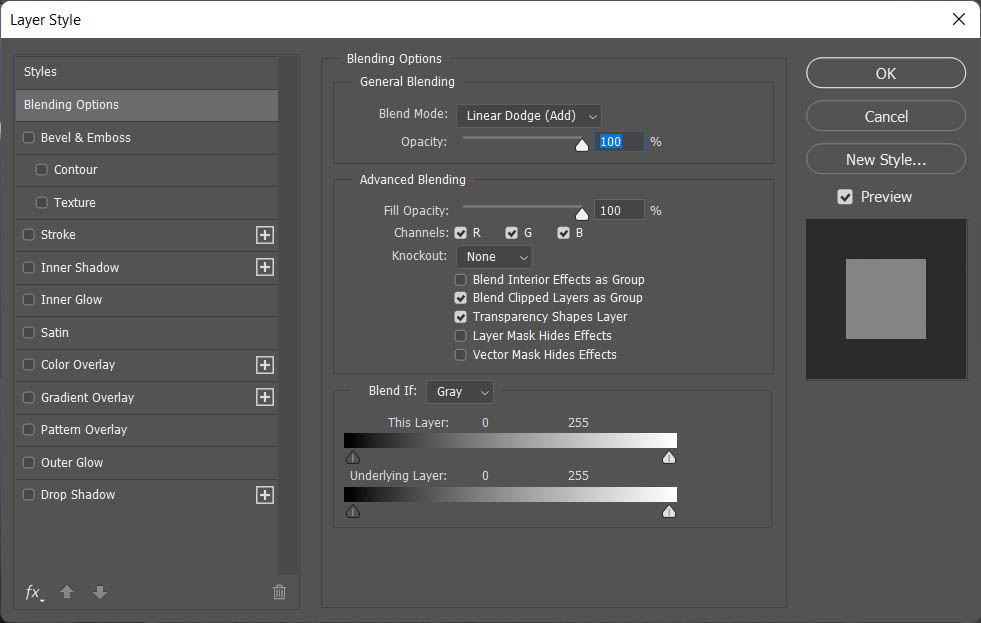
Click on the Color Overlay option in the lefthand panel to add a color overlay to the image.
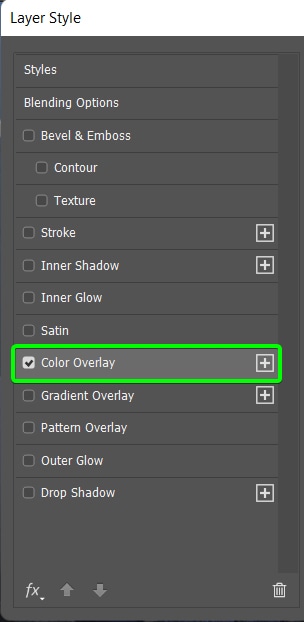
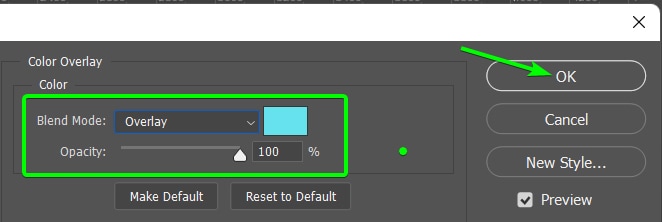
There aren’t many options to adjust here, but the two important ones are the blend mode and color. Select Overlay from the Blend Mode options, then click on the color block to select the color you want for your glow.
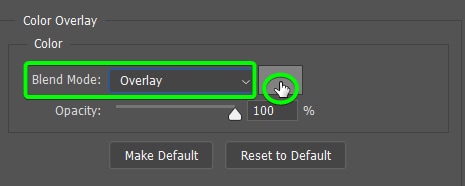
Once you have selected the color from the Color Picker (I chose cyan), leave the Opacity at 100% and click OK to add the color overlay.
The color won’t look right on the image at this stage, but two more adjustments will blend the overlay nicely.
Change the layer Blend Mode to Screen and then lower the Opacity, using the slider next to the Blend Mode drop-down, to around 40%–60%.
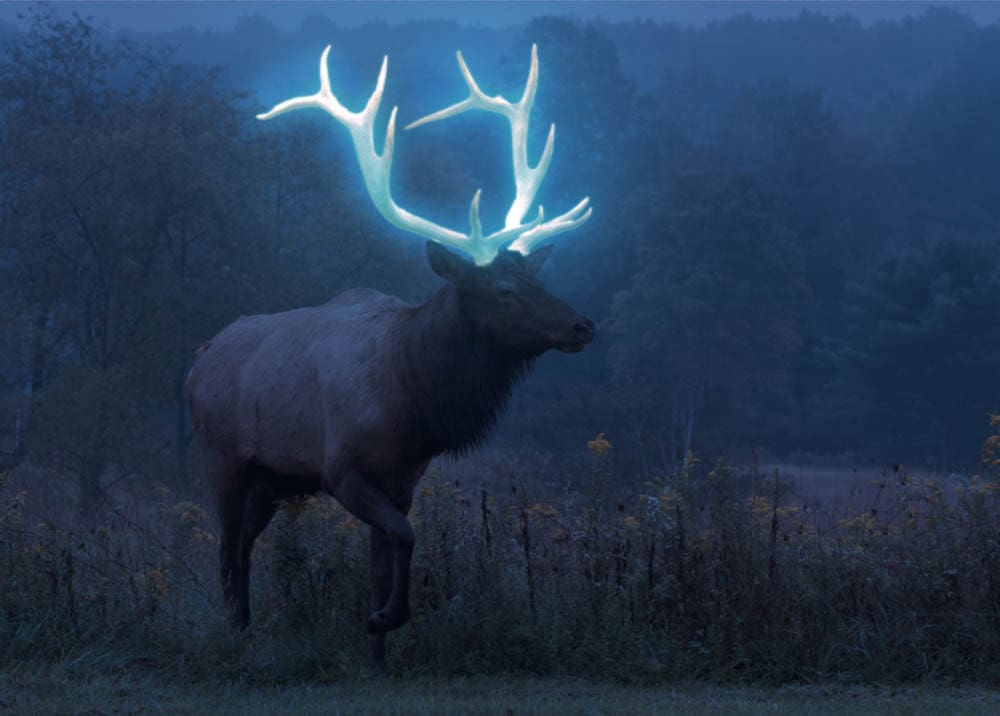
The glow effect should be more prominent now, with the glow blurred around the object, extending slightly away from it.
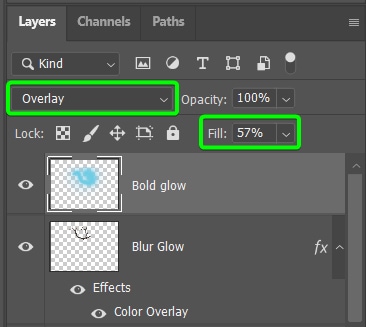
Step 5: Paint A Blue Glow Around The Object Using The Brush Tool
To bulk up the glow effect and add a bolder glow around the object, you need to use a stronger effect, such as painting the color on using the Brush Tool (B).
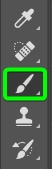
Select the Brush Tool from the Toolbar or press B to activate it.
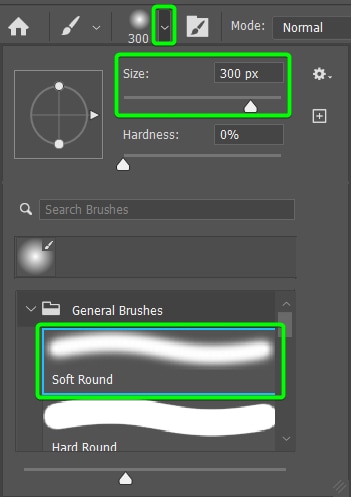
Open the Brush Preset Picker panel, select the Soft Round brush, and adjust the size, so the brush is slightly larger than the parts of your object.
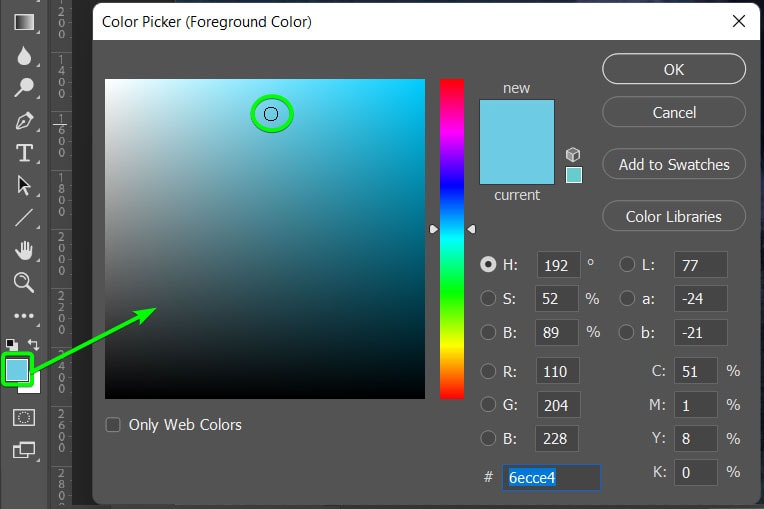
Then, select a color for the highlight, which should be a variation of the color you used to create the Color Overlay. To choose a color, click on the foreground swatch in the Toolbar, then select a color from the Color Picker.
Once you’ve selected the color, add a new layer for the brush strokes by clicking on the Create a New Layer icon at the bottom of the Layers panel. Rename the layer to keep your panel organized.
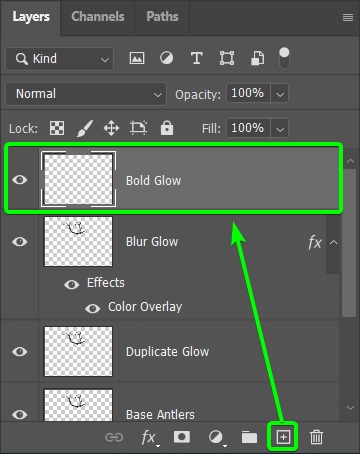
Then, click and drag on the canvas to create brush strokes over the object. The strokes can be rough but should cover the main parts of the object well. Then lower the Brush Opacity to around 30% in the Options bar.

Continue adding brush strokes around the edges of the object until you have roughly covered your object.
To lighten the brush strokes, change the layer’s Blend Mode to Overlay and drop the Fill (located underneath the Opacity slider) to between 40% and 60%.
The bold glow is now blended into the image and creates the glow effect you are looking for.
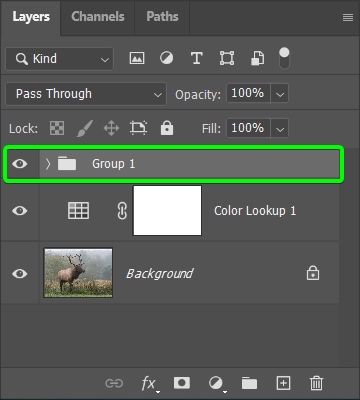
Step 6: Group The Object Glow Layers
To keep your workspace organized and avoid getting confused with all the layers, you can quickly group the layers you’ve added to create the glow effect on the object. To group the layers, select the top glow layer, hold in Shift, and click on the bottom glow layer.
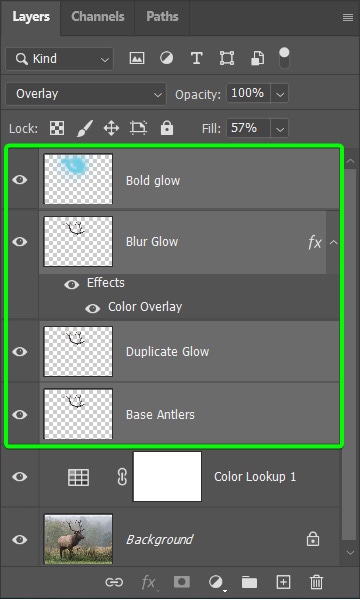
Then, group the layers by pressing Control + G (Win) or Command + G (Mac). You can close the group, as you won’t be working on those layers anymore unless you need to go back and adjust the edits at any stage.
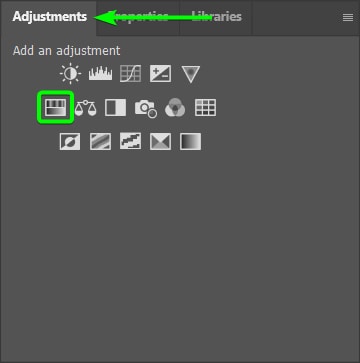
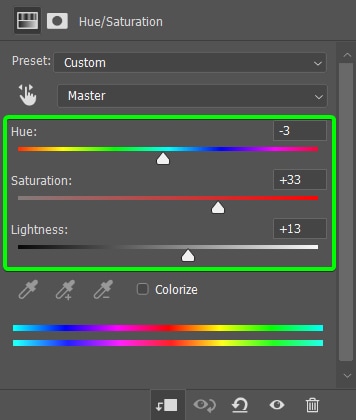
Step 7: Add A Hue/Saturation Layer
You can now customize the color and intensity of the glow around the object using a Hue/Saturation layer. This layer gives you control over the glow effect’s lightness, saturation, and hue (color).
Ensure you have selected the object group to add the adjustment layer above it. Then select the Hue/Saturation adjustment layer from the Adjustments panel.
Then, to add the adjustments to the glowing object without affecting the rest of the image, click on the clipping mask icon at the bottom of the Properties panel.
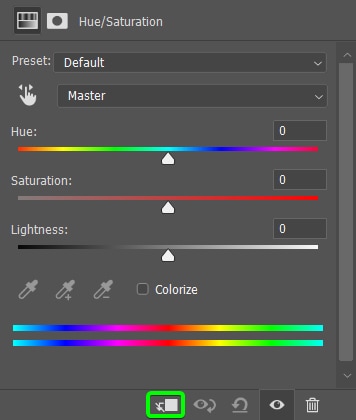
Now, you can adjust the sliders to customize the effect. Move the Hue slider to change the glow color, shift the Saturation slider to increase or decrease the color’s intensity, and adjust the Lightness slider to make the glow lighter or darker. This is how I changed the sliders for my image.
Step 8: Add A New Layer For The Base Highlight Color Around The Object
To complete the glow effect further, you need to add highlights on the subject around the glowing object. If a neon light glowed from the object, it would bounce off things close to it. You can easily replicate this effect similarly to creating light in a photo.
First, you must select the subject to which you want to add the highlights. In my case, I need to choose the elk without the antlers. You can make your selection using any selection tools.
I will select the background layer, then use the Object Selection Tool (W) from the Toolbar and click on the subject to select it.
Next, add a new layer above the Color Lookup layer by clicking on the Create a New layer icon at the bottom of the Layers panel. Then click on the Layer Mask icon to add the selection to a layer mask.
If you selected a bit of the glowing object (antlers in my case), you can select the Brush Tool (B), set the color to black, and brush over the unintentionally selected areas to hide them using the layer mask.
Once the subject is masked correctly, select the blank layer thumbnail again, and keeping the Brush Tool active, select the same color you used when painting the blue glow around the object. You are repeating that process to add the lighting glow to the subject.
Brush over the subject where you want the lighting effect added. Adjust the brush opacity in the Options bar as you paint to create lighter and darker areas. You should also adjust the brush size using [ to decrease and ] to increase the size.
This allows you to add bolder spots of color where the light is more potent. Your brush strokes should come out something like this, depending on your object and how the light would be on the subject.
Tone down the lighting and blend it into the image by changing the Blend Mode to Overlay.

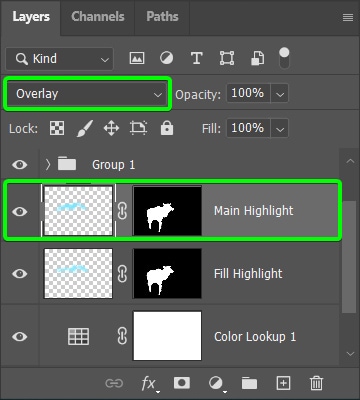
Step 9: Duplicate The Layer For The Main Highlight Color
To deepen the highlight effect and make the lighting more realistic, you should add another highlight layer with more brush strokes and varying degrees of opacity and size. To do this, add a new layer above the first highlight layer.
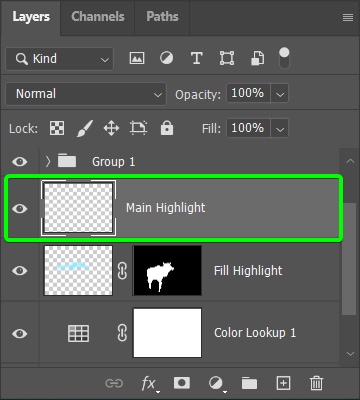
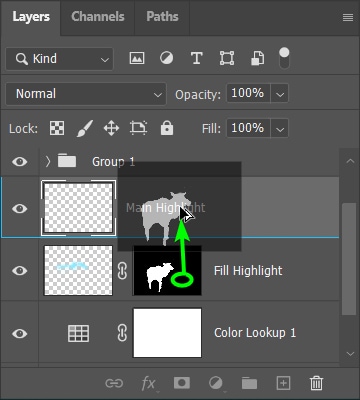
Then, hold in Alt (Win) or Option (Mac), click on the layer mask for the first highlight layer, drag it, and let it go on top of the new layer. This step copies the layer mask to the new layer.
Now, grab the Brush Tool (B) and paint more strokes over the subject in the areas you want to add light to. Depending on your subject, it should look something like this.
Change the layer’s Blend Mode to Overlay to blend the highlights into the photo.
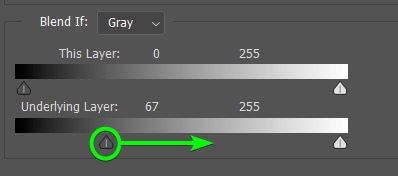
If the colors are still a bit too bold and you want to blend them in further, you can do this using advanced blending. To do this, double-click on the layer in the Layers panel to open the Layer style window.
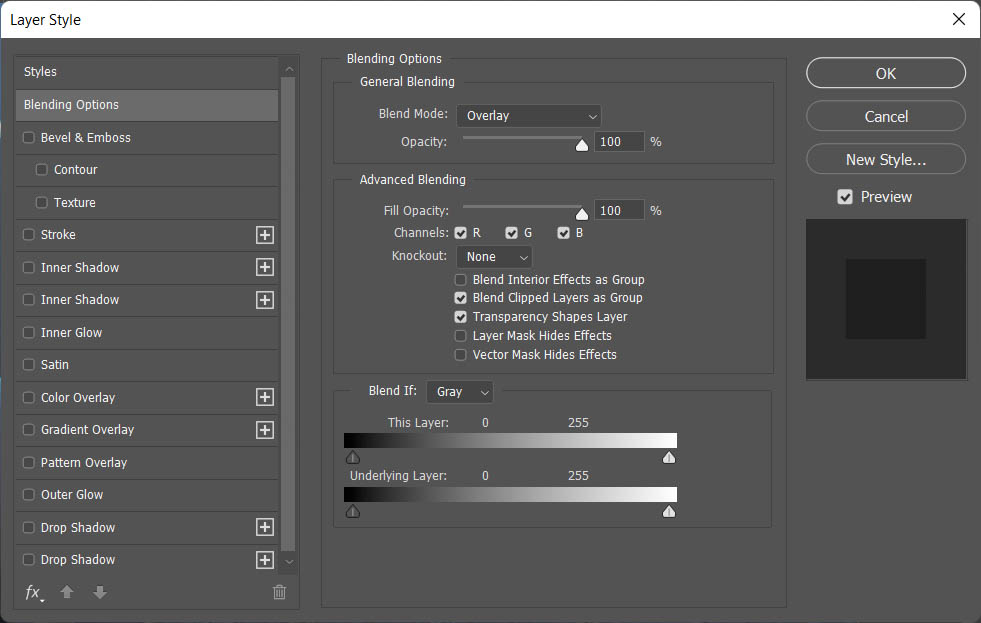
You will automatically be in the Blending Options panel, so move down to the bottom, where you can see a Blend If option and the Underlying Layer.
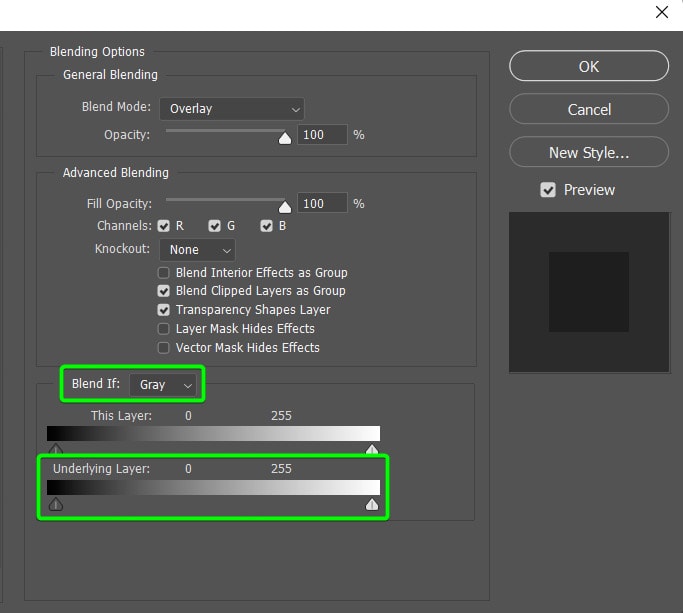
You must drag the shadow handle to the right to blend the colors.
Then, to blend the colors even more, split the handle and drag half of it further right. To split the handle, hold in Alt (Win) or Option (Mac), click, and drag the right side of the handle to the right.
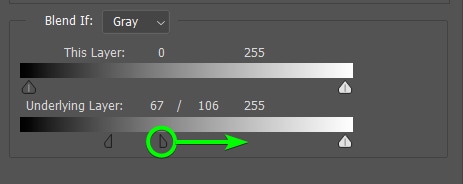
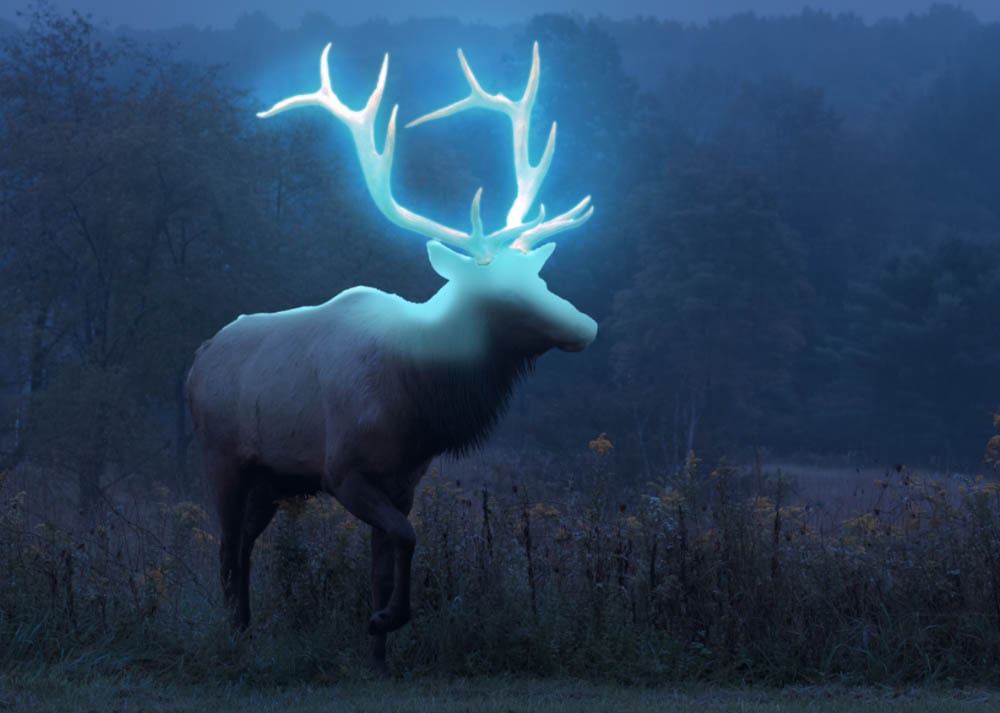
Click OK to accept the changes, and you will have finished the glow effect, complete with realistic lighting on the rest of the subject.

Creating A Custom Glow Particle Brush In Photoshop
Once you have added the glow effect to an image, you can further the effect and add more flair to the project. You can add to this effect by creating a glow brush and bright neon flecks around the glowing object.
This process is easy and only takes a few steps, but it will add a lot to your final image.
Step 1: Create A New Document At 500 x 500 Pixels And 300PPI
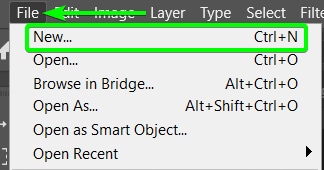
To create the glow brush, you need to create a new document by going to File > New or pressing Control + N (Win) or Command + N (Mac).
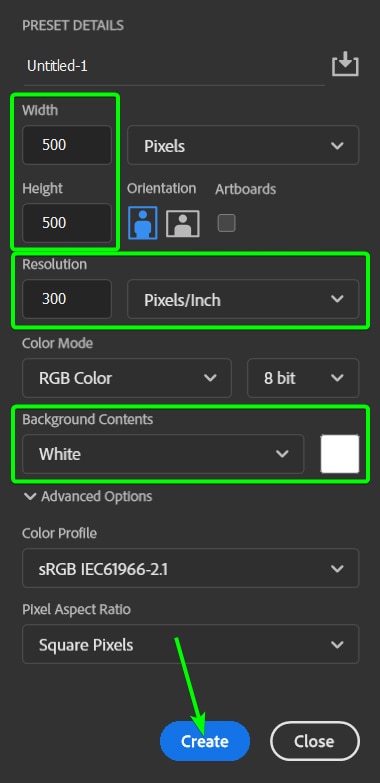
In the New Document window, type 500 pixels in the Width and Height blocks. Set the Resolution to 300 Pixels/Inch, and ensure the background color is white. Click Create to make the document.
Step 2: Create Ovals Around The Page Using The Ellipse Shape Tool (U)
You can now create small oval shapes that will become flecks around the glowing object. Select the Ellipse Tool (U) from the Toolbar to do this.
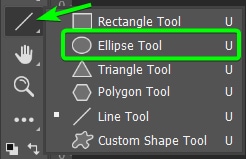
Then, set the foreground color to black. When creating a brush preset, the shapes or elements you want to add to the brush must be black.
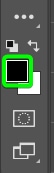
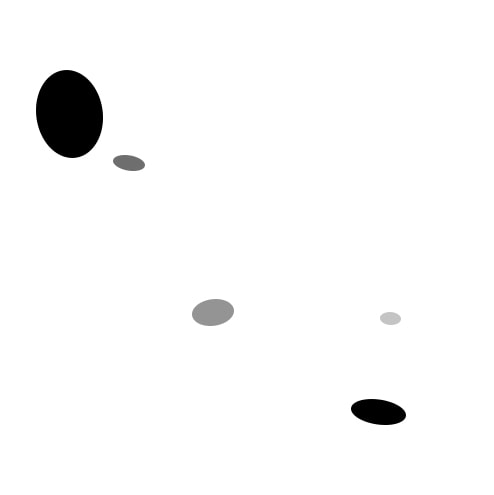
You can now add the ovals to the document by clicking and dragging on the canvas to create various-sized and shaped ovals. Create each oval on a separate layer. You only need a handful of ovals for the brush. I made five ovals.

Step 3: Reduce The Layer Opacity On Some Ovals
Reduce the layer opacity of a few ovals to create a varied effect. You can leave some at 100%, reduce one to 57%, and move one down to 23% Opacity. These amounts don’t have to be specific.
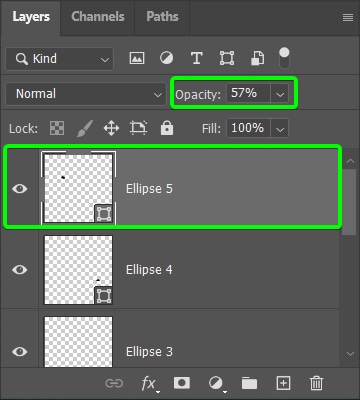
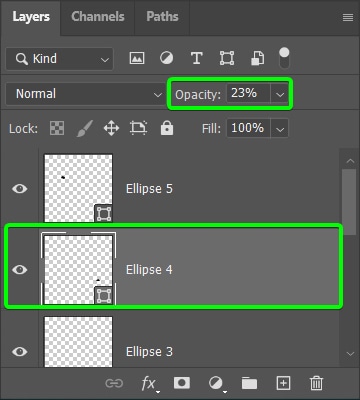
You just want to create a canvas of specks with varying degrees of opacity. So your document should look something like the example I made.
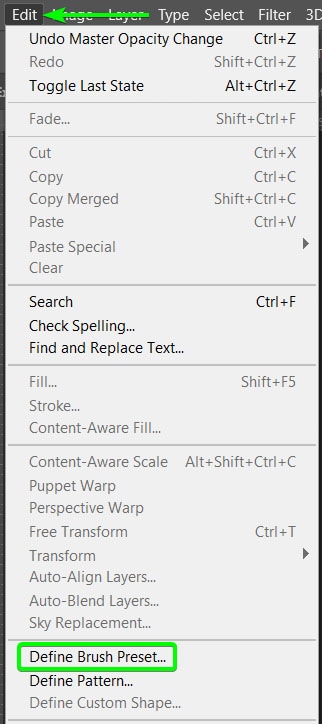
Step 4: Create A New Brush Preset
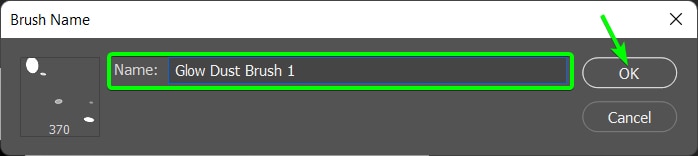
You can now create the brush preset by clicking Edit > Define Brush Preset.
A dialog box appears where you can add a name to the new brush you are creating. Click OK to create the brush.
Step 5: Adjust The Brush Settings
Re-open your glow image and create a new layer at the top of the layer stack. You will be adding the brush specks to this layer.
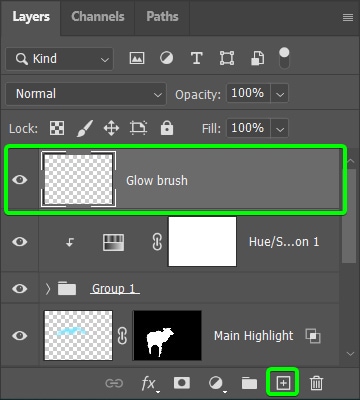
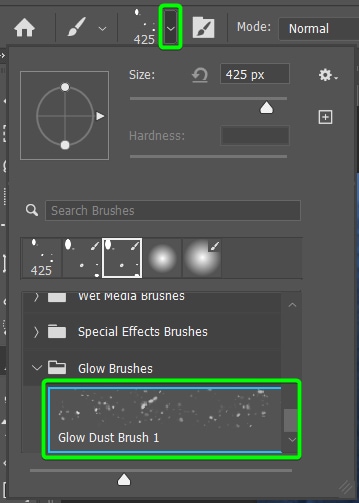
Select the Brush Tool (B) and find your new brush preset in the Brush Preset Picker at the bottom of the list.
Then, you need to adjust a few settings before you use the brush on the image. To access the brush settings, open the panel by going to Window > Brush Settings.
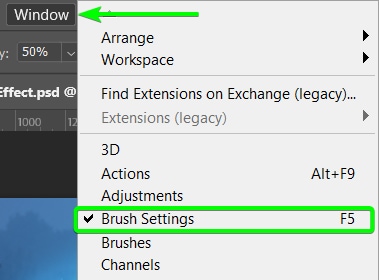
There are a few settings to adjust here, so navigate through the tabs on the left and change the settings as follows.
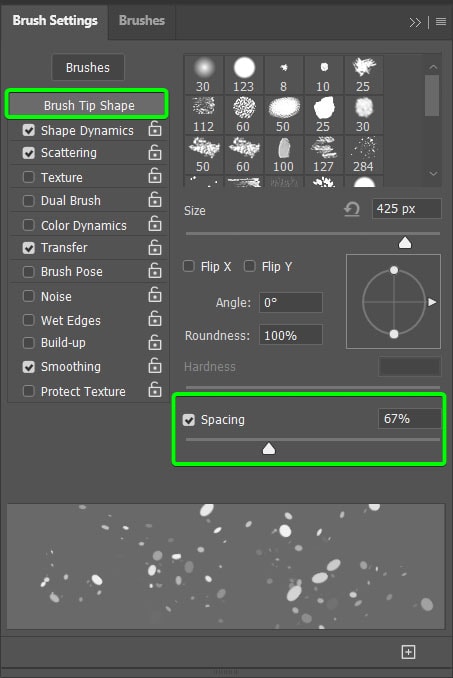
Brush Tip Shape Tab
Increase the Spacing to somewhere between 60% and 80%.
Shape Dynamics Tab
Increase the Size Jitter and the Roundness Jitter to over 50% each.

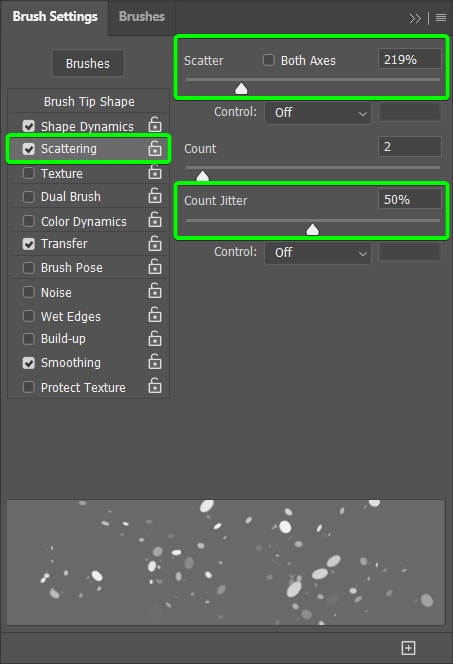
Scattering Tab
Increase Scatter to around 220% and the Count Jitter to about 50%.
Transfer Tab
Increase the Opacity Jitter to 100% and the Flow Jitter to around 50%.
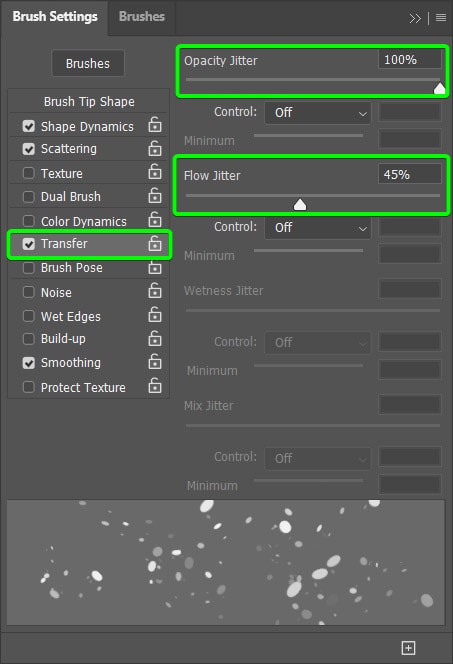
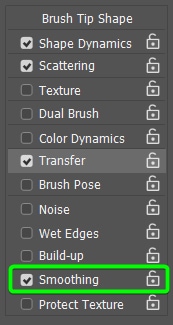
Lastly, check the box next to Smoothing, and your brush is ready.
Step 6: Choose The Color And Adjust The Brush Opacity
Next, you can set the color for the specks, which should be similar to the color of the glow you added. Use the foreground swatch and Color Picker to set the color.

Then adjust the Brush Opacity in the Options bar as you’d like. I set mine to 50%.

Step 7: Paint The Glow Brush Over The Glowing Object
Now, you can adjust the brush size as you go and paint over your glowing object to add the dust specks. Change the brush size as you paint to create a dynamic effect.
Painting with a large brush size in some areas and a very small brush size in others creates a realistic and varied effect. You have now successfully added the glow effect to your image with glowing specks around it.
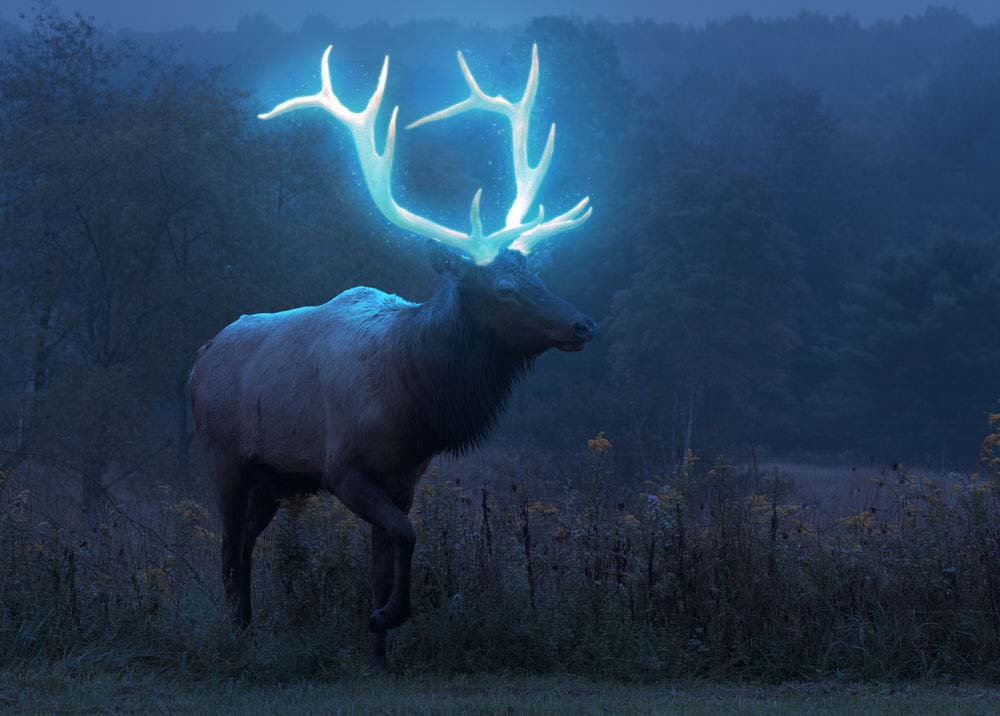
Remember, you can adjust a few settings and colors to create your own effects on your images to make them unique. You can also add the glow effect to any objects and shapes in an image. Another cool trick is to create neon text to add to your project if you want.


