

After creating a design in Photoshop with text, shapes, or paths, you can easily export EPS files from Photoshop to use in Illustrator (or a third-party vector program). This way, you can ensure your graphics have the highest possible quality in other programs, plus you have access to the path information to edit later on!
If the concept of an EPS file confuses you, don’t worry. This guide will cover exactly what an EPS file is and how to export one to use in another program without any issues.
Before You Start
Before you export an EPS file from Photoshop, ensure there are vector elements within the document as separate layers. Vector elements in Photoshop are text and shape layers or paths.
You need to have vector elements to be able to save the file as an EPS and then edit these elements in a vector-based program. You won’t be able to edit rasterized elements in Illustrator without pixelation and quality loss.
Vector elements are also important as these elements retain their quality even when upsized or downsized multiple times. Ensuring your file has vector elements means that you will be able to continue editing the artwork with optimal quality.
How To Export An EPS File From Photoshop
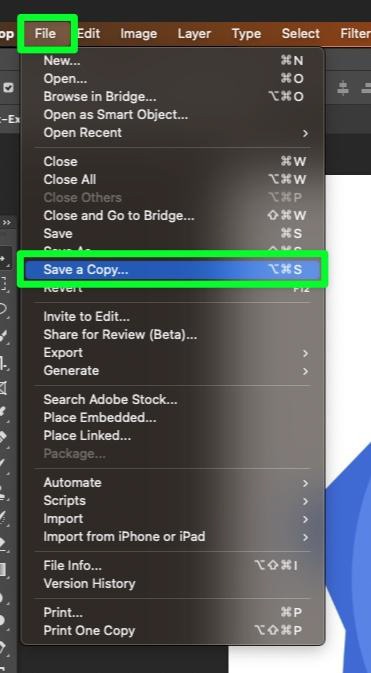
Step 1: Go To File > Save A Copy
To save your EPS file, go to File > Save A Copy.
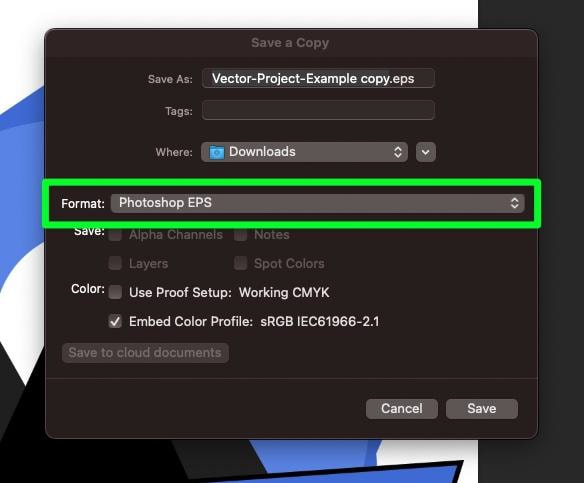
Step 2: Change The Format To Photoshop EPS
You’ll find the Format drop-down menu in the middle of the Save A Copy options menu. Choose Photoshop EPS from this menu.
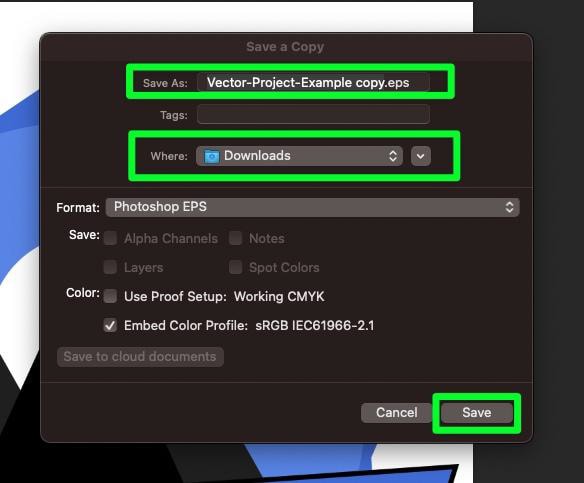
Step 3: Choose The File Name And Destination
In the Save As box, type out the name you want to use for your file. In the Where box, browse through your hard drive and select a destination. Click Save when you’re ready.
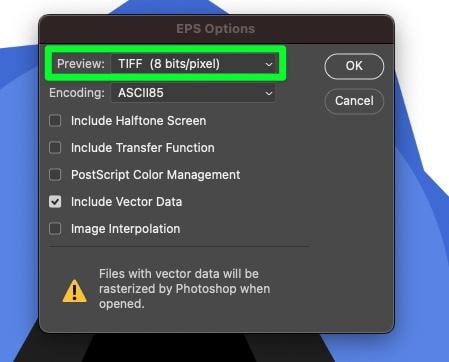
Step 4: Choose A Preview Option
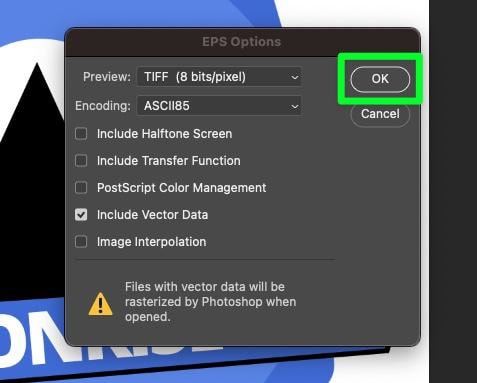
Once you click Save, the EPS Options window appears, where you can customize the save settings for your file.
Firstly, you can change the quality of this preview image in the EPS Options menu. To do this, open up the Preview drop-down menu, then choose the quality of the preview image.
You have three options to choose from:
- None – Choose this option if you don’t want any preview image. This is a good way to limit the file size.
- TIFF (1 Bit/Pixel) – This option will create a black & white preview image containing less information, which means a smaller file size than the next option.
- TIFF (8 Bits/Pixel) – This option gives you a fully colored version of your preview image. This is the best-looking preview image but will add the most data to your file, resulting in a larger file size.
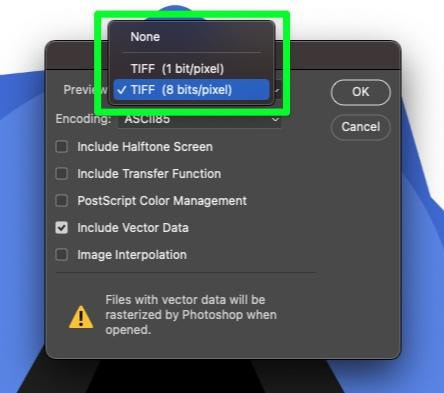
Note: The option you choose in the drop-down menu only affects the preview image and won’t alter the information in the EPS file.
Step 5: Choose Your Encoding Quality
When it comes to encoding, you can leave this option at the default setting of ASCII85. However, if you want to change the encoding for your EPS file. Here are your options:
- ASCII / ASCII85 – These two options are specially used for Windows systems when printing the file.
- Binary – This option is used for Macintosh systems. Certain applications may have problems reading binary data, so be careful when choosing this option.
- JPG (Low Quality to High Quality) – This option refers to the data within the EPS, not the image format. This option is a universal encoding option that should work on any system. If you want to reduce the overall file size, make sure to choose a lower-quality option.
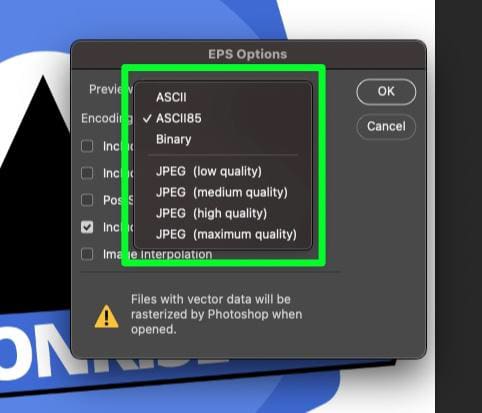
For more information about encoding options, click here to see Adobe’s breakdown of these settings.
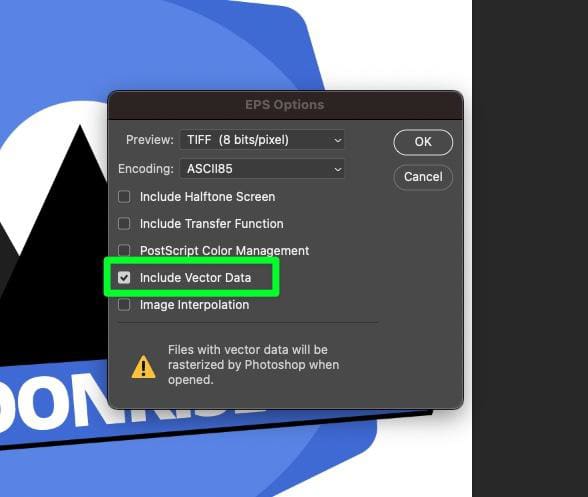
Step 6: Select Include Vector Data
Make sure Include Vector Data is checked on. If this option is not checked on, you won’t be able to interact with the individual layers in Illustrator.
Step 7: Click OK To Export The File
The other options in the EPS Options Menu are only used in specific instances, so leave them unchecked. If you want more information about these options, you can find it on the Adobe Help page.
Once you’re ready, click OK to save the EPS to your hard drive.
To ensure everything is exported correctly, open the EPS file in Illustrator or the third-party program vector-based program you’re using.
Why Is The “Include Vector Data” Greyed Out When Exporting EPS Files From Photoshop?
For the “Include Vector Data” option to be available, your project needs to have one or all of the following types of layers:
- Path layers
- Shape layers
- Type layers
The “Include Vector Data” option will be greyed out if your project lacks any of these layer types.
What Are EPS Files?
An EPS (Encapsulated PostScript) file is a vector image format that has grown in popularity over the years. This format is mainly used for graphics and illustrations.
EPS files are suitable for print-based projects, as you can scale these files without the fear of losing image quality. This means you can enlarge or reduce the size of an EPS file as much as you want without compromising its resolution.
EPS files are commonly used for logos, illustrations, and other types of digital artwork. They can be used to create sharp, high-resolution images that can be reprinted in virtually any size.
EPS files are also used in web design when an image needs to be embedded within a page.
