
One of my favorite creative editing techniques is to turn a photo into a sketch in Photoshop. Making a photo look like a drawn image seems like it takes a lot of time and effort, but actually, it’s super easy to achieve.
While there are so many filters now that allow you to add various effects to your images, nothing beats the authentic nature of creating the effect yourself. Creating your own sketched look in Photoshop will enable you to add extra flair to a photo without being an artist.
Simply follow the steps below with your image of choice, and you’ll be done in just a few minutes!
How To Make A Photo Look Like A Sketch In Photoshop
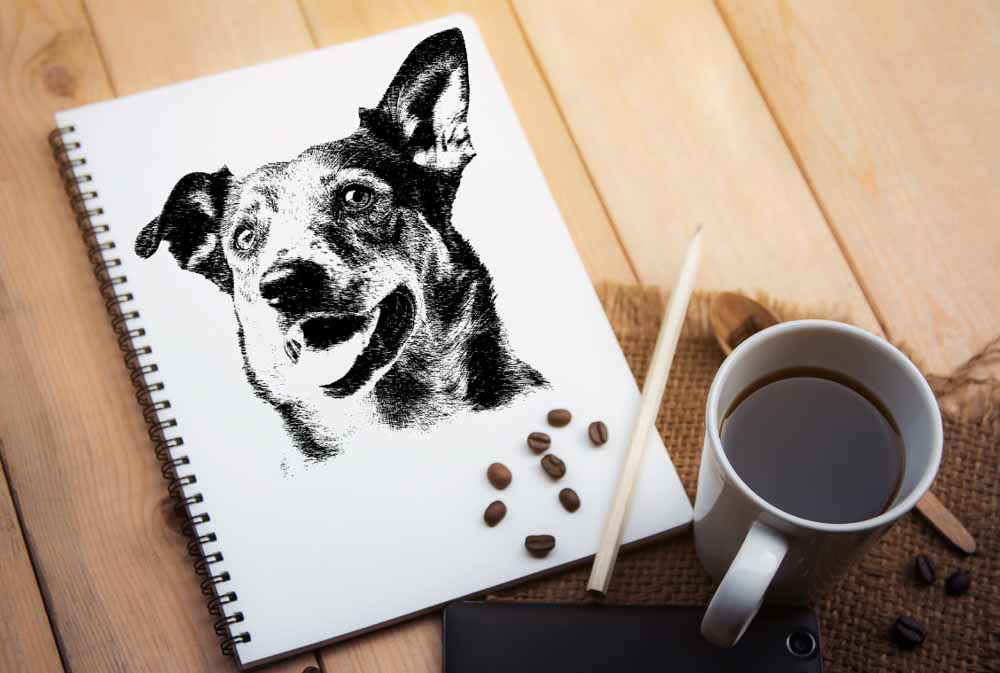
You can create the sketched look on any image as it is, but it looks much better when you add it to a background image of a book or sketchpad.
If you want to place the sketched image onto a background, you must do it at the beginning since the settings will be slightly different depending on your photo and background image. The process remains the same, but the adjustments differ.
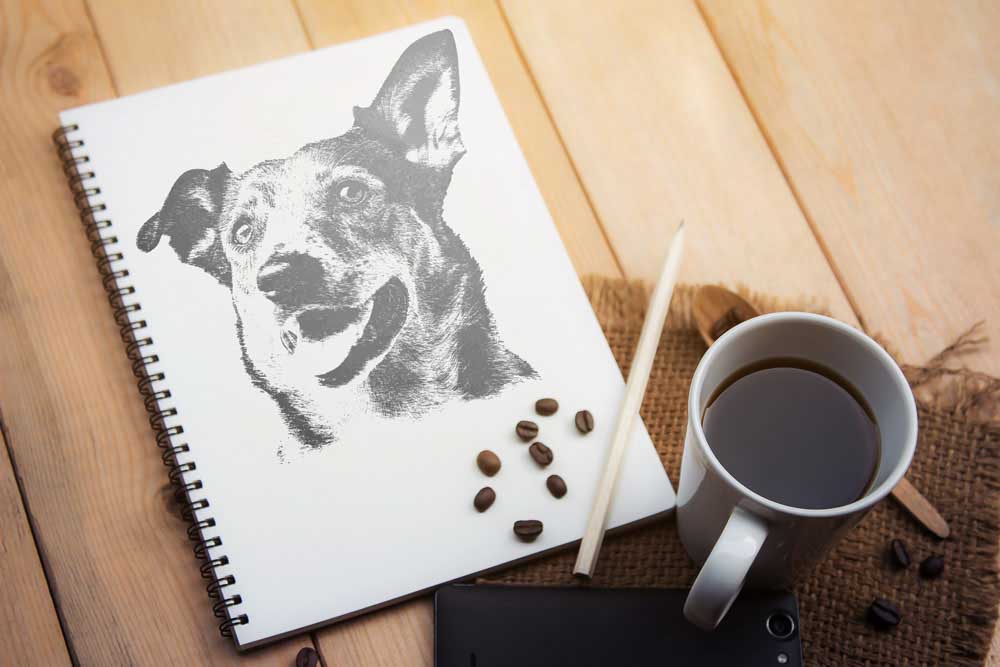
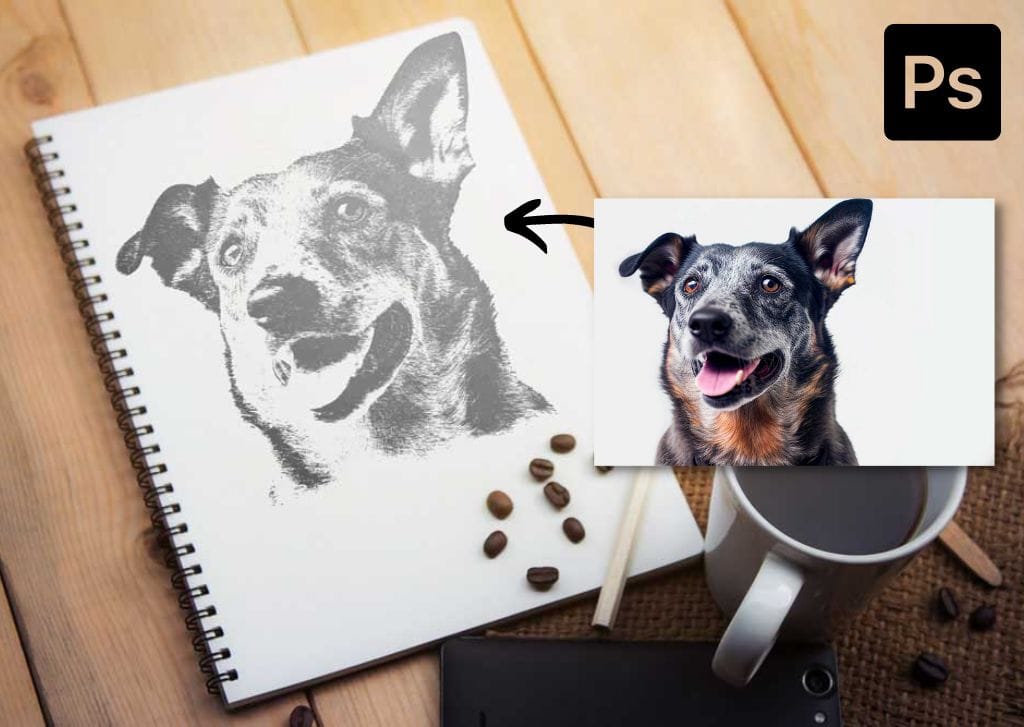
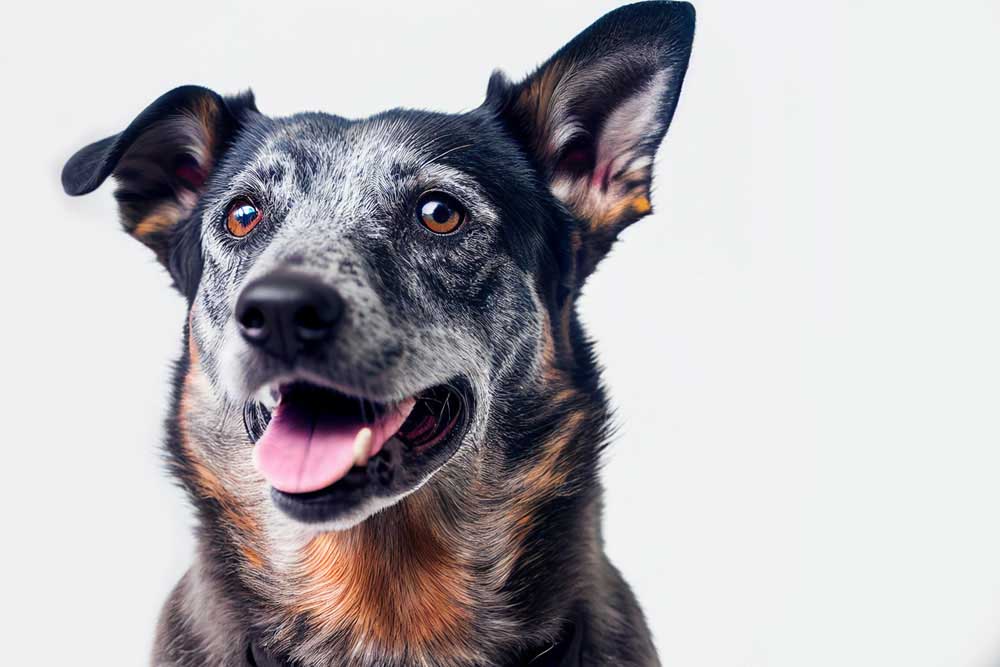
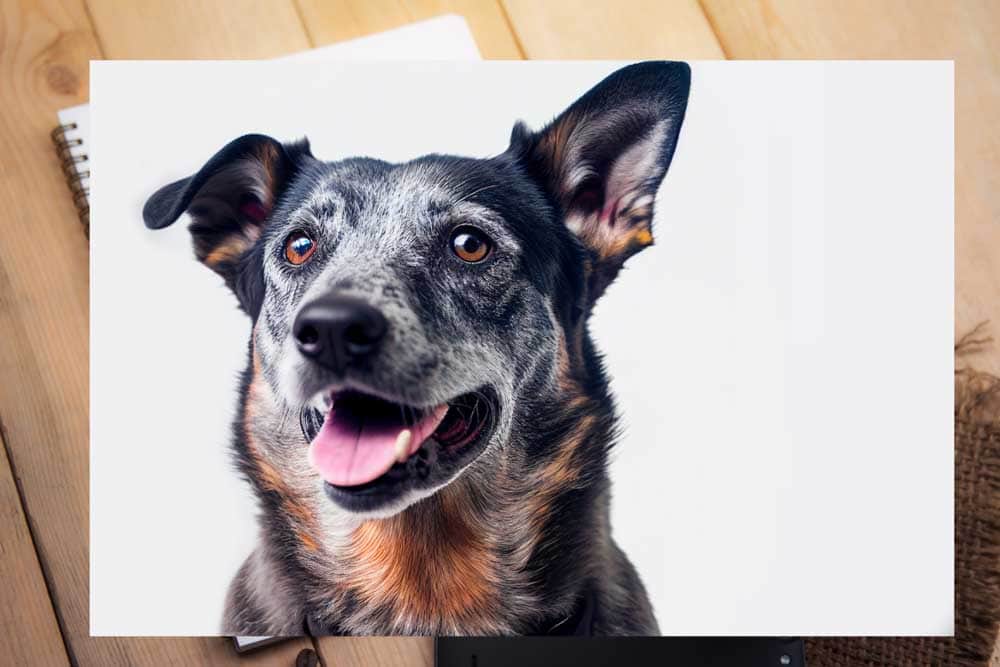
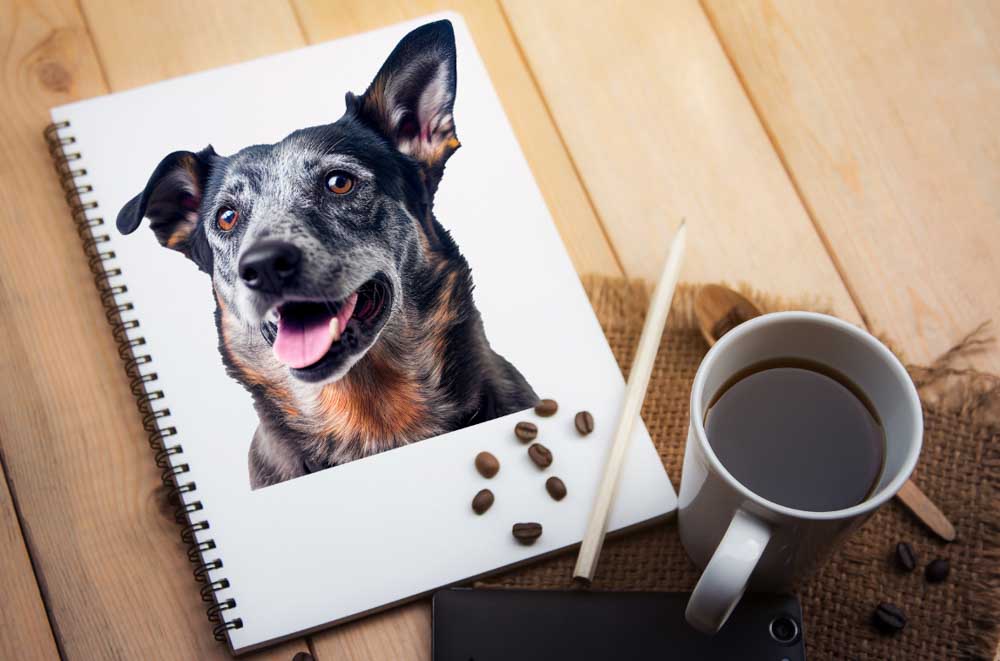
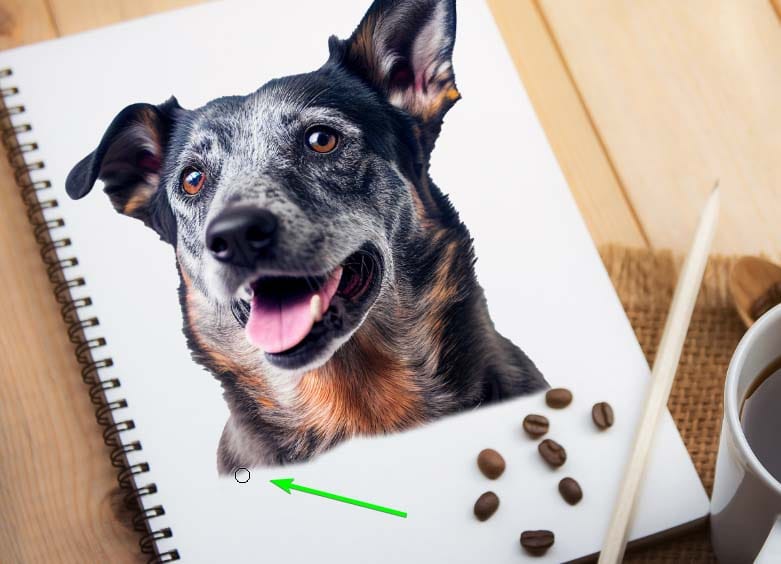
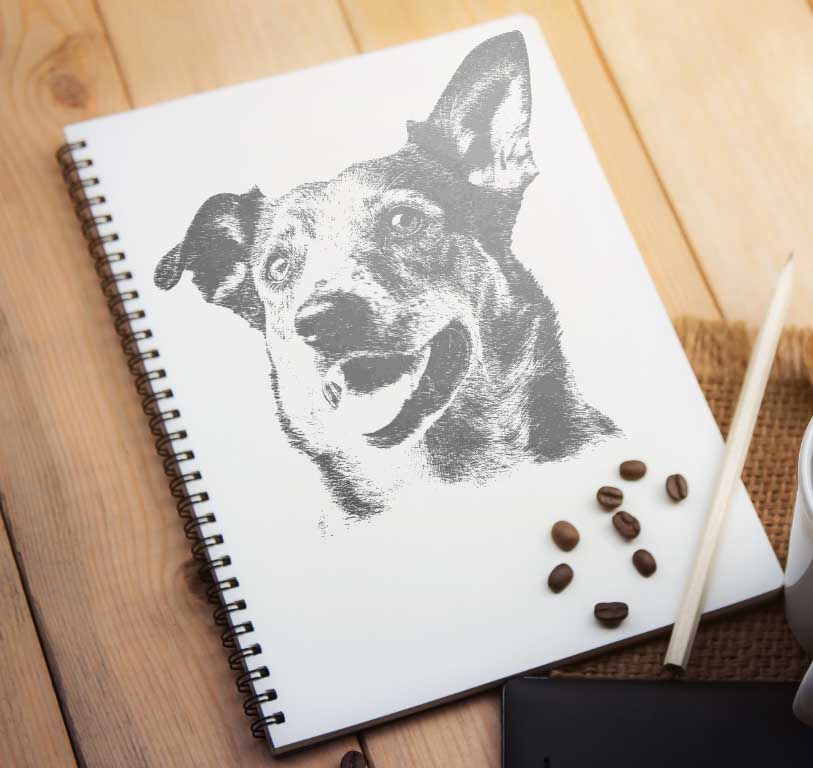
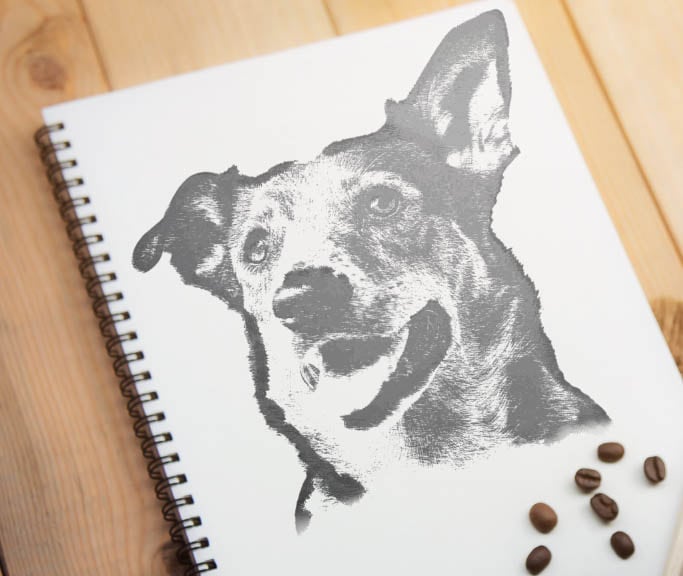
For this example, I will convert this image of a dog into a sketch and place it onto the sketch pad image. You can find several free stock images to use as the background on Pexels, and I am using this White Sketch Pad Beside a Cup of Coffee photo.

Step 1: Remove The Image Background And Feather The Subject
To start the effect, you need to open both images onto one document with the photo you want to sketch at the top.
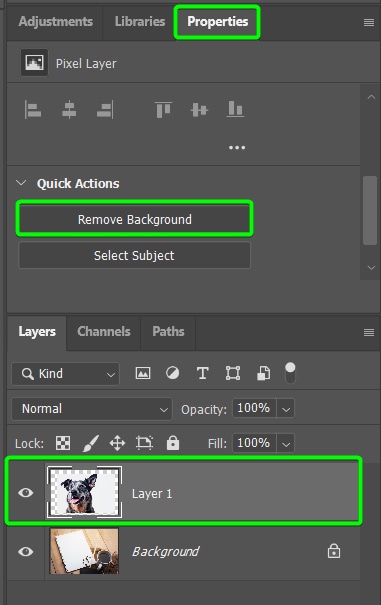
Then, since I only want the image’s subject sketched, I want to remove the background. You can simply use a layer mask and brush out the areas you don’t want to be included in the effect. You can also use any background removal technique to remove the background.
Since my subject is on a simple white background, I will use a Quick Action by selecting the image layer and scrolling down the Properties Panel until I find the Remove Background button. This action hides the background by adding a layer mask.
After Photoshop removes the background, which takes a few seconds on simple images, you can position the subject onto the sketch pad or book. To do this, open the Transform Tool by pressing Control + T (Win) or Command + T (Mac). You can then click and drag on the control points around the subject to resize it.
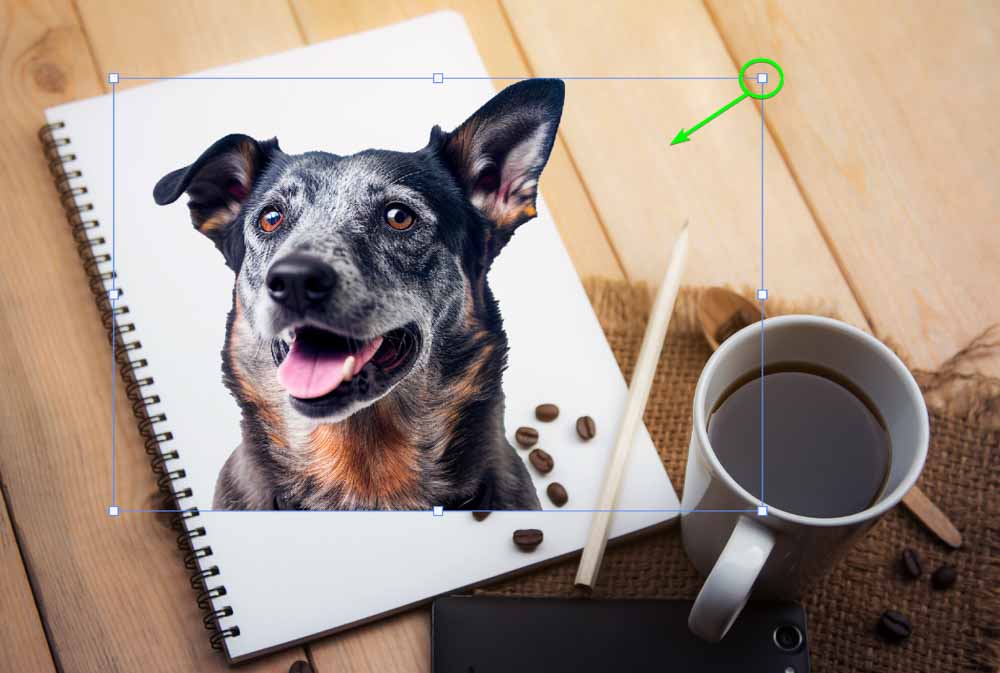
If you need to change the angle of the subject as I do, hover your mouse next to the transform box until a double-curved arrow appears. Then click and drag up or down to change the angle of the subject.
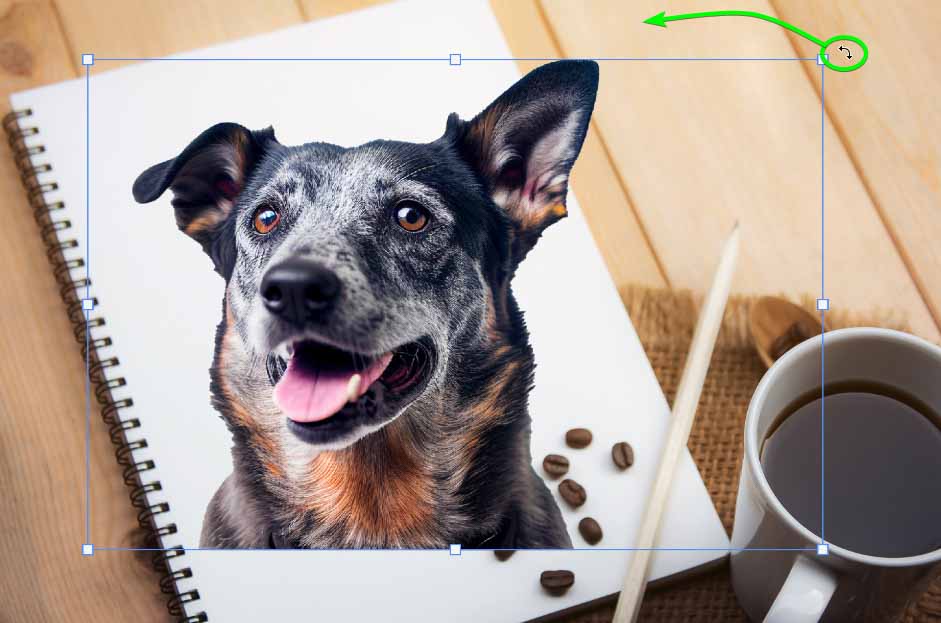
Keep resizing and changing the angle until the subject sits perfectly on your sketch pad or book.
Then, to add realism to the sketch, the bottom of the subject shouldn’t have a hard-straight line (unless this is the look you are going for). To make this more realistic, feather the image out at the bottom or on some edges.
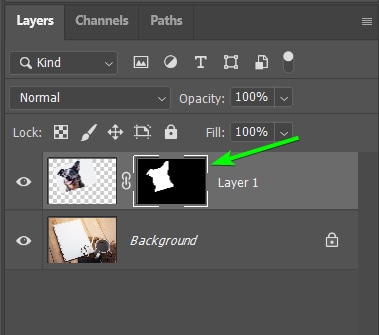
To do this, select the layer mask in the Layers Panel. The mask is selected when there is a white border around the thumbnail.
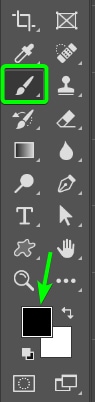
Then, select the Brush Tool (B) and set the foreground color to black (when working with layer masks, black hides, and white reveals) since I want to hide a bit of the edge.
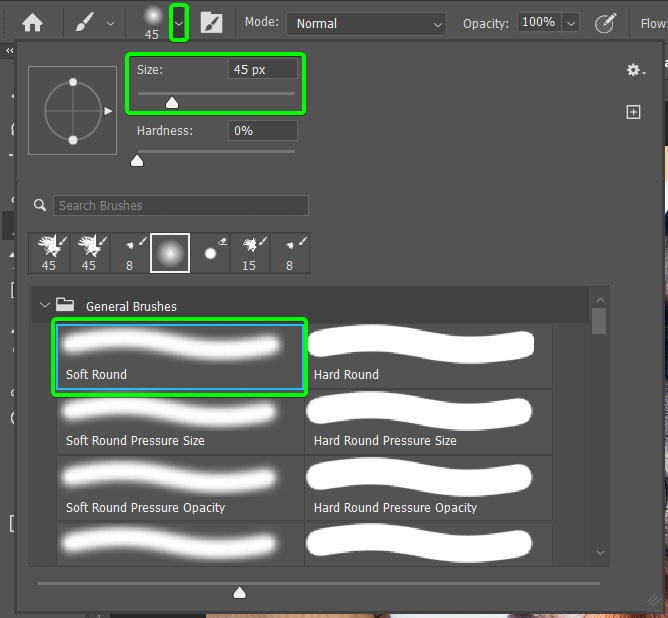
Then, use the Brush Preset Picker menu in the Options Bar to select a Soft Round Brush and set the size based on your image.
Then, click and drag to remove the hard edge of the subject.
Now, to feather the edge a bit better, reduce the Flow of the brush down to 20% in the Options Bar.

Then, continue brushing around the edge to create a feathered effect.
Step 2: Add A Solid White Background And Convert Both Layers To One Smart Object
Next, you need to add a solid white layer behind the subject. This step helps bring out the sketched effect and won’t be visible on the page.
To add a solid color layer, click on the Background Layer, click on the Create new fill or adjustment layer icon, and select Solid Color from the list.
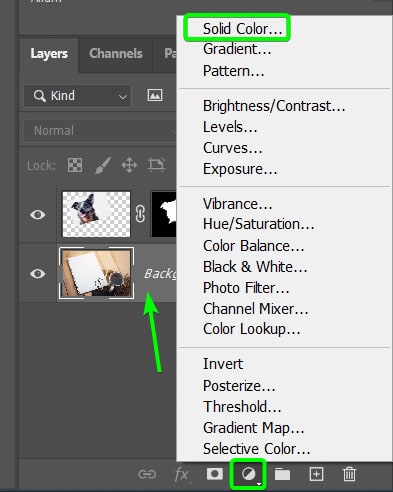
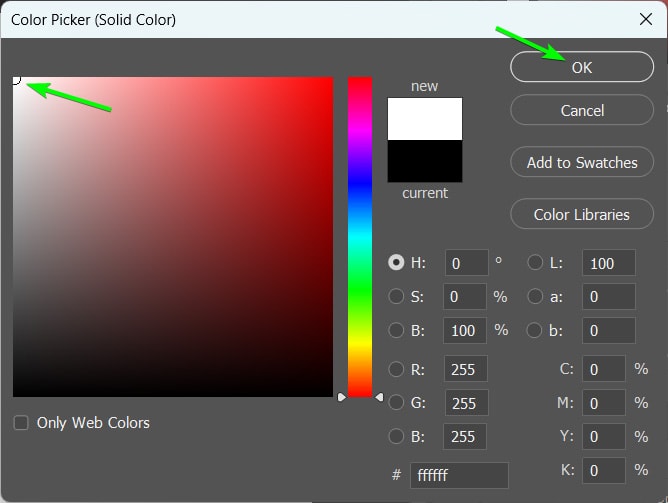
In the Color Picker window that appears, select white and click OK.
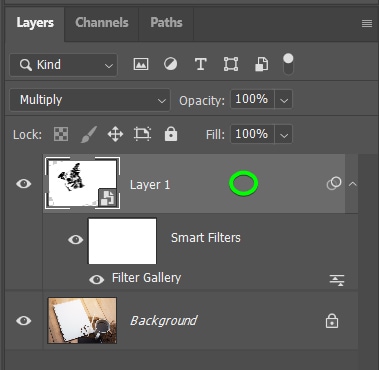
Now, you need to convert these two layers to a smart object. When you create a smart object, you can go back and edit the contents of the layer at any time by double-clicking on the thumbnail.
Also, any filters added to the layer are added as smart filters, which also enables you to edit the filters at any time by double-clicking on the filter.
If you select two layers and convert them to a smart object, they will be combined into the smart layer but remain on separate layers if you go into the object to edit it.
To do this, click on the first layer, hold in Control (Win) or Command (Mac), and select the second layer, then right-click or Control + click on any selected layer and select Convert to Smart Object.
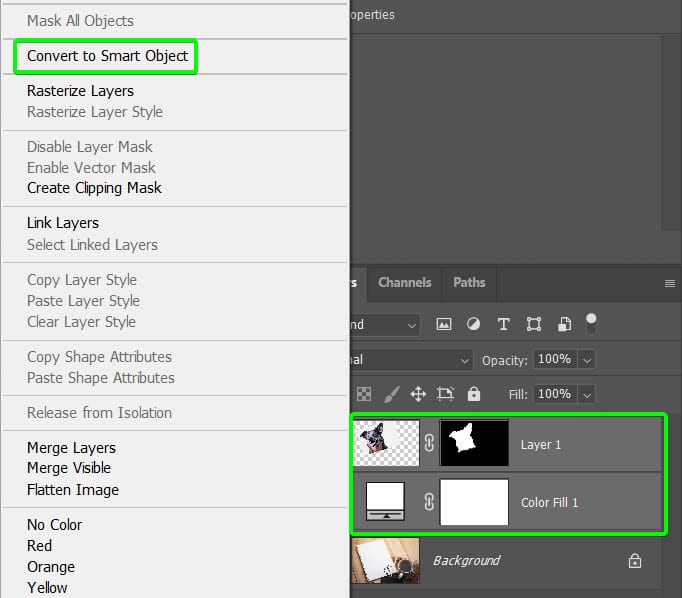
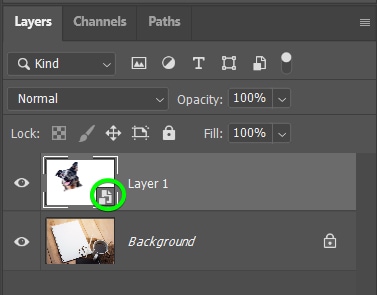
The layers will combine, and you will notice the smart object icon in the layer’s thumbnail.
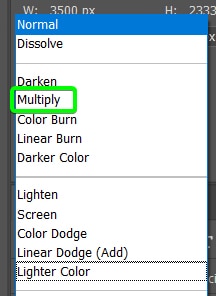
Step 3: Change The Blend Mode To Multiply
Since I don’t want the white background to cover the background layer, I need to change the layer’s blending mode. To do this, locate the drop-down menu that says Normal in the Layers Panel, as this is the default blend mode of every layer.

Open the drop-down menu and select Multiply.
Your image is ready for you to add the sketch effect. You can go back and re-size or position the image and edit the feathering until you are prepared to add the effect.

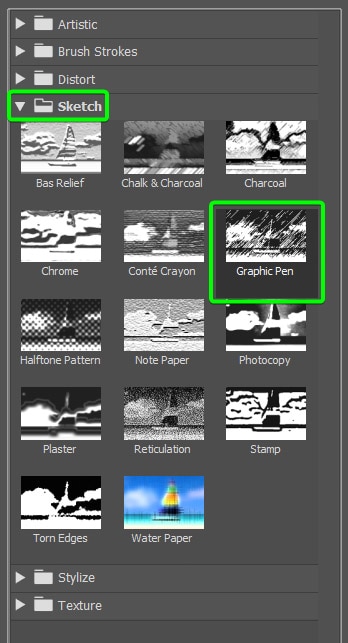
Step 4: Add A Graphic Pen Sketch Filter To The Image
To add the base of the sketch effect, you need to add a sketch filter to the image. You can use many sketch filters, but I will show you my favorite one. To find the sketch filters, select the image layer and go to Filter > Filter Gallery.
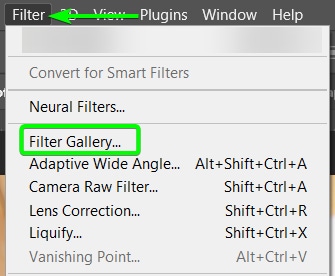
When the Filter Gallery opens, select the Sketch folder and click on Graphic Pen.
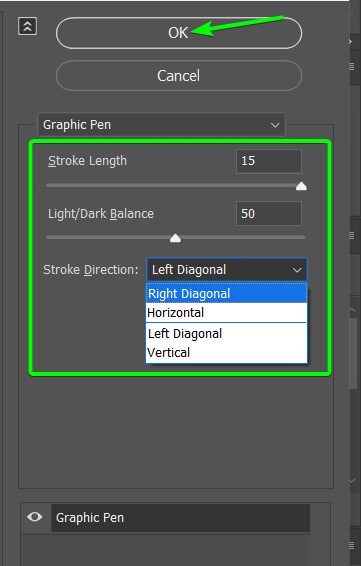
You will see a preview of your image with the filter applied in the lefthand panel.

You can then use the settings on the right to adjust the effect.
Use the Stroke Length slider to adjust how short or long the pen strokes are on the image. Then, adjust the Light/Dark Balance based on how bold or light you want the sketch to look. You can also use the drop-down menu to choose the Stroke Direction. Adjust these settings based on what works for your image.
Click OK when you have changed the settings to confirm the effect.
Your image will now have a sketched look, but it will likely seem too dark and unrealistic, which I will show you how to fix in the next steps.
Step 5: Adjust The Blend If Slider And The Layer Opacity
The first adjustment you can make to create a more realistic effect is to blend the sketched image into the background using the Blend If sliders. When drawing with a pen and paper, you usually see parts of the paper through the sketch since pencil strokes aren’t entirely black.
To blend the sketch into the background, open up the Layer Styles panel by double-clicking on the image layer.
In the Layer Styles window, look at the bottom to find the Blend If section and locate the Underlying Layer slider since you want to blend the sketched image into the underlying background layer.
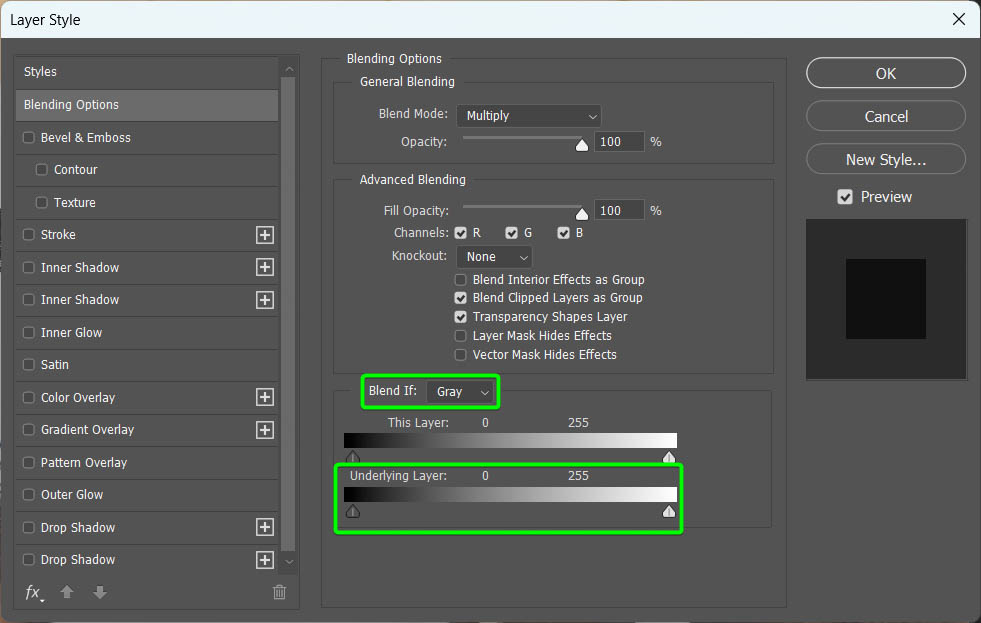
Now, I only want to affect the darker areas and blend them into the lighter areas below. To do this, I will focus on the toggle in the highlights (on the right side of the slider). If I simply move the toggle to the left, the effect will be too harsh, so I need to split the toggle in two and create a feathered blend effect.
To only move half the toggle and add a feathered transition, hold in Alt (Win) or Option (Mac), click on the toggle, and drag it to the left.
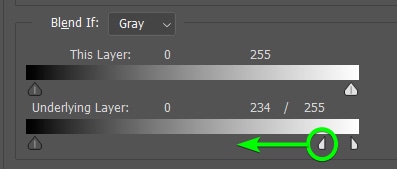
Move the slider until you are happy with the blend effect, and click OK. You will see how your image has slightly blended into the background to make it more realistic.
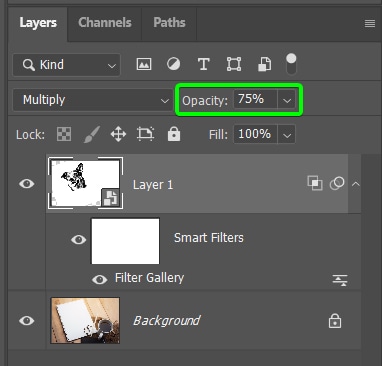
Since the Blend If function only focuses on specific areas of the sketch, it may look too dark. To lighten the drawing more, you can reduce the layer’s opacity.
Select the layer and use the Opacity slider in the Layers Panel to reduce the opacity. I dropped the opacity to 75%, which worked for my image.
Your image should look much more blended in and faded like an actual sketch at this stage.
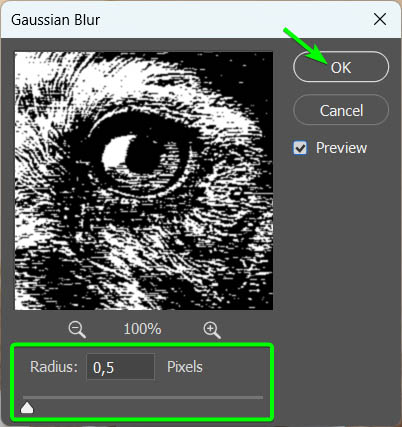
Step 6: Add A Gaussian Blur To The Sketch
The last filter to add to the sketch is a slight blur. Since the sketched image probably looks too clean at this stage since it’s made up of pixels, it needs to be blurred to give a more realistic look.
To add a blur to the sketch, go to Filter > Blur > Gaussian Blur.

In the Gaussian Blur window, adjust the Radius slider to add as much blur as your image needs. I recommend you keep the Radius amount relatively low so as not to blur the sketch completely. A Radius of 0.5 works for my image. Click OK to add the blur effect.
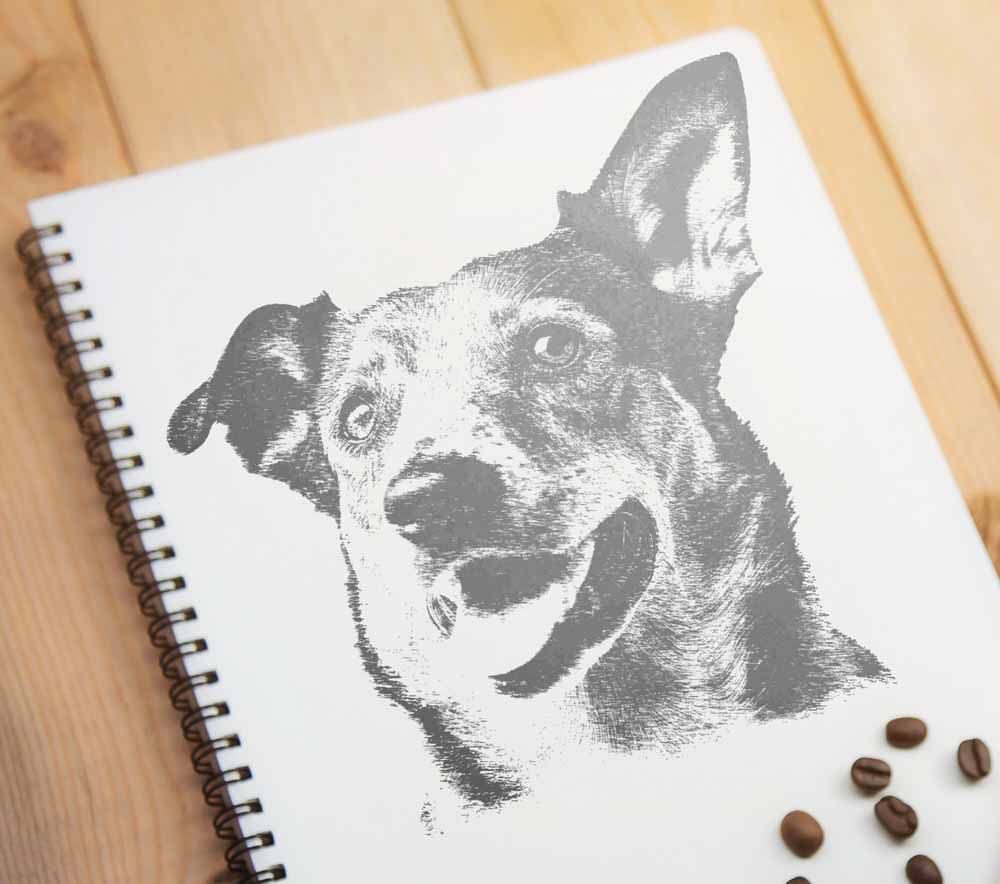
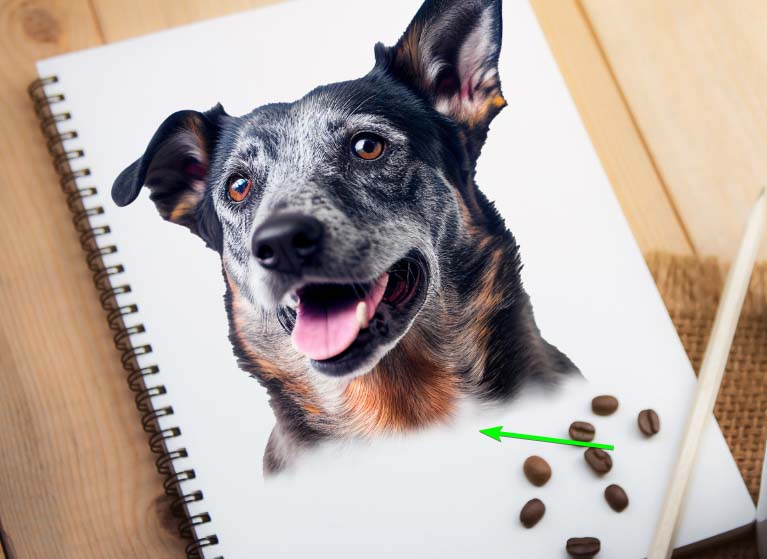
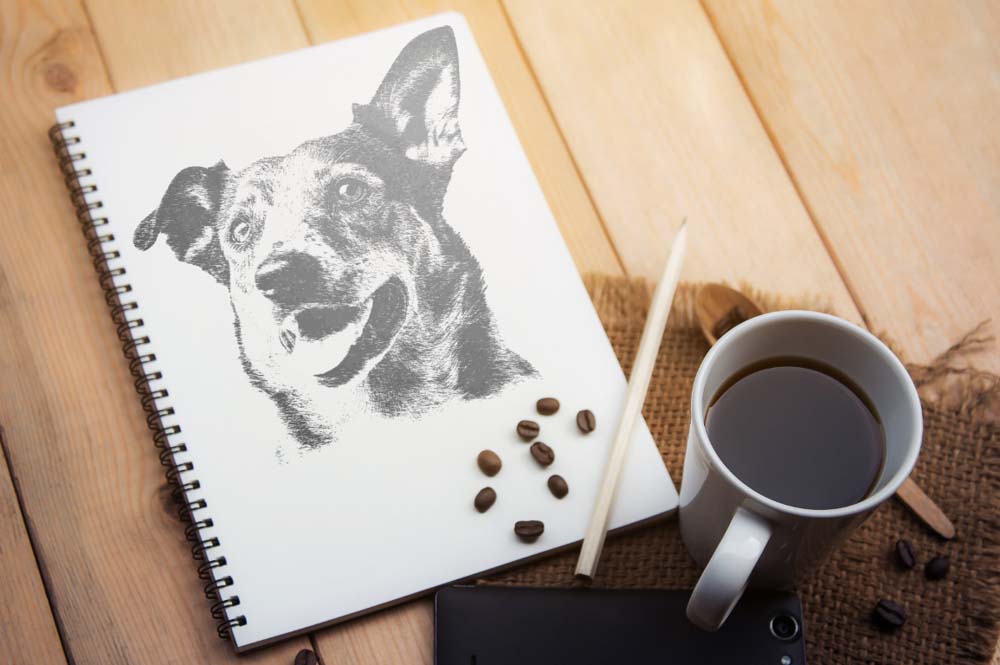
At this stage, your image is much more realistic as it’s blended into the page, and the brush strokes aren’t too clean. You can keep the image as it is at this stage or take it a step further to add a rougher effect that completes the realistic sketched look.
Step 7: Add Additional Pencil Brush Strokes
If you want to add your own mark to the effect and create a genuinely unique sketched look on a photo, you can draw freehand brush strokes to roughen up the result. Now before you grab a brush and start adding strokes, there are a few things you need to do first.
Add a new layer to the top of your layer stack so that any brush strokes you add are on a separate layer. This way, you can easily erase or delete the brush strokes if you change your mind or make a mistake.
Add a layer by clicking on the Add new layer icon. I renamed the layer to Sketch Outlines.
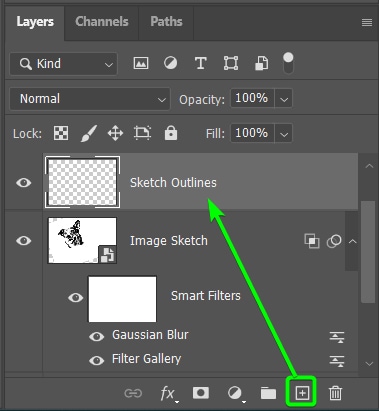
If you were to draw brush strokes on the layer, the strokes would come out much darker than the sketch layer. A neat trick to avoid this and keep the brush strokes the same lightness as the sketch layer is to add a clipping mask to clip the new layer to the sketch layer.
To clip the layer, hold in Alt (Win) or Option (Mac) and hover the mouse between the two layers until the clip icon appears, then click to clip the top layer to the bottom, effectively adding a clipping mask.
Now, you can select the Brush Tool (B) and set the foreground color to black.
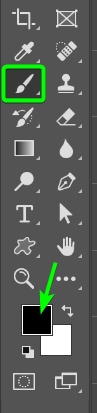
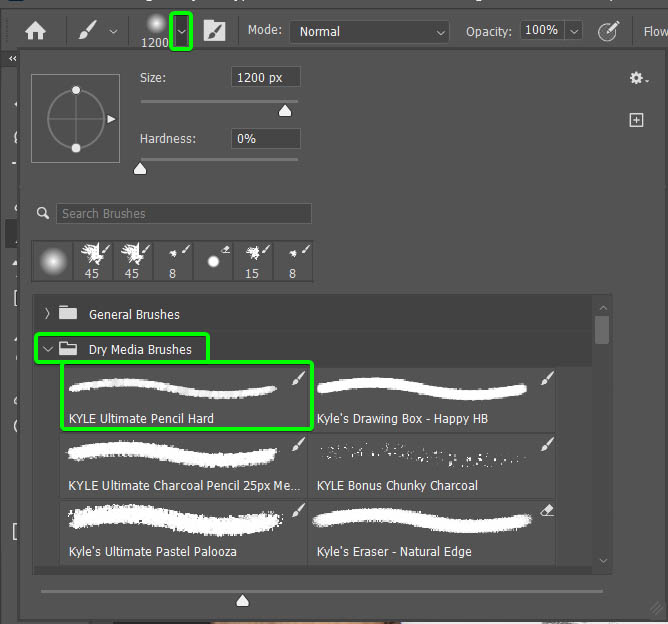
Next, open the Brush Preset Window and choose a brush to use, such as the built-in Kyle Ultimate Pencil Hard brush, which you can find in the Dry Media Brushes folder.
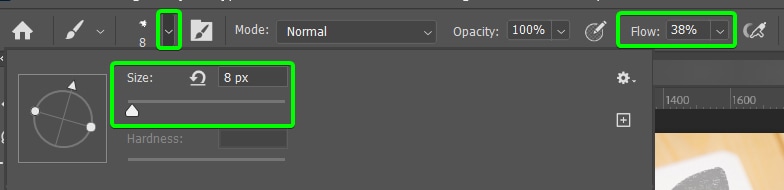
Now, you can start adding the brush strokes around the sketch. Adjust the brush size and flow as you paint to create a varied and realistic effect. You can change the size and flow in the Options Bar.
Add strokes wherever you want to emphasize the sketch effect. This is how I added the brush strokes to my example.
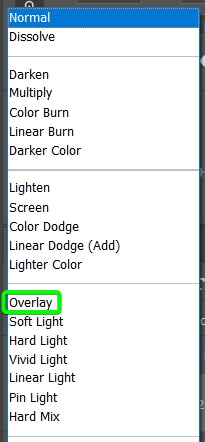
As you can see, the brush strokes are too harsh. To blend them into the sketch better and finish the effect, change the Sketch Outlines layer’s blend mode to Overlay using the drop-down menu next to Normal.
The brush strokes are blended in, and the effect is complete. You can edit any of the filters if needed to adjust and perfect the sketch effect.