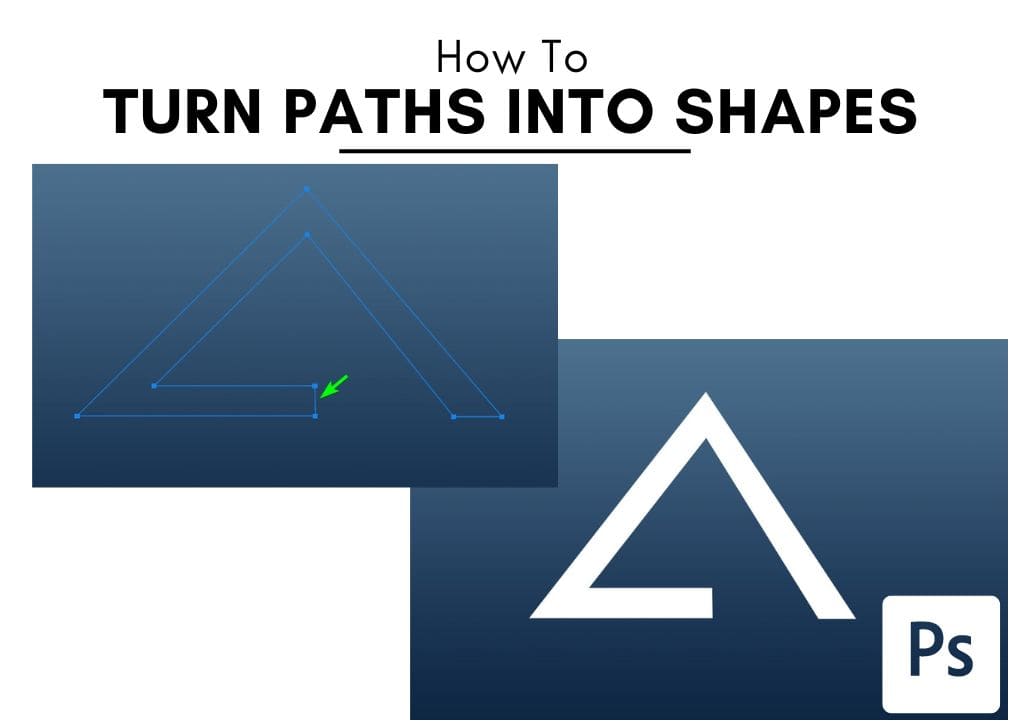
Paths are an essential feature of Photoshop and can be used in various ways in your designs. You can turn a path into a shape in Photoshop or make a selection out of the path to create precise selections. While these paths are created using the Pen Tool, a basic path doesn’t have much use until it’s turned into something else. 

Many beginners may feel overwhelmed by paths because they can seem complicated to create and work with. However, after some practice, the process becomes much easier, and it is a necessary editing skill for any photo editor or graphic designer.

Here, I will detail precisely how to create a shape from a path, which is useful if you want to make custom shapes and elements for your design or edit. Once a path is a shape, you can add an outline and fill color and go further by adding filters and other layer effects if you convert the shape to a smart object.

How To Turn A Path Into A Shape In Photoshop

Turning a path into a shape is beneficial as you can make a unique shape and save it to use in any project you want. To create the shape, work on a new document or an open project, and select the Pen Tool (P).

Create the path by clicking to add different points. Hold and drag an anchor point as you create it to curve the line if you want.

When making shapes from a path, it’s important to note the end of the path. You can leave the path open (without clicking again on the starting point to close it). Such as I have done. 

However, when you turn the path into a shape, a straight line will automatically be drawn to close the shape. So if you want to have a curved line at the end, you will need to add it and complete the shape.

I only need a straight line for my shape, so I can undo the curve I did to demonstrate by pressing Control + Z (Win) or Command + Z (Mac). Then, close the shape with a straight line (which isn’t entirely necessary).

To create the shape, right-click or Control + click on the document, and select Define Custom Shape.

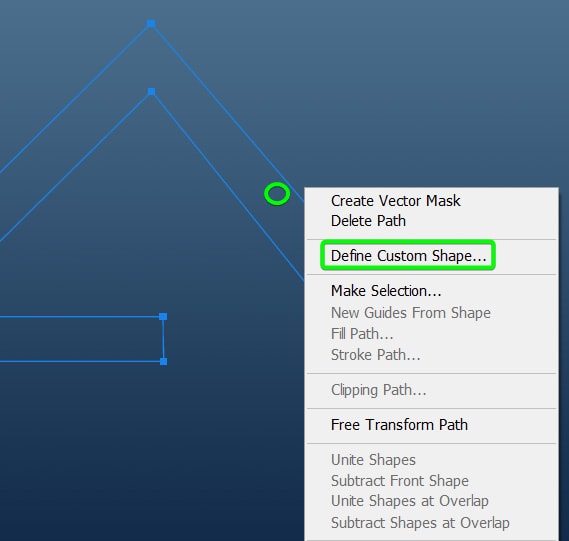
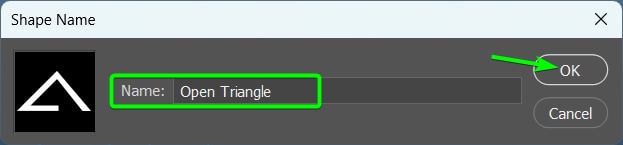
A window appears where you can add a name for your custom shape and click OK once you’re done.

It will seem as though nothing has changed as the path is still on your canvas. This path would disappear if you were to draw a shape or use a new tool. 

However, you don’t need the path anymore as you have saved the shape. You can delete the path by right-clicking or Control + clicking and selecting Delete Path.

To find and use your saved custom shape, select the Custom Shape Tool (U) by clicking and holding on the Shape Tool that’s visible in the Toolbar to open the fly-out menu.

Then, open the shape selector by clicking on the drop-down menu in the Options bar. You will find your saved custom shape at the bottom of the panel.

Click on the shape to select it. Then you can click and drag on the canvas to draw the shape. You can now change the fill and outline colors and edit the shape as you would with any other shape.

You can also use the shape you’ve created in other projects, such as adding it to an image half behind the subject. Do this by duplicating the image and removing the background with a quick action to place the shape between the background and the subject. Then, use the layer mask to reveal areas of the shape while keeping others hidden.

How To Turn Multiple Paths Into A Single Shape

You can also turn a path into a shape if you want to create multiple paths and save them as one shape. However, there’s an important setting to ensure is active to convert all the paths together.

You can add a separate path using the Pen Tool (P) after you’ve closed your first path. Alternatively, if you want, you can add new paths using the basic shape tools. Select the desired shape tool from the Toolbar to create a path using a shape tool.

Open the drop-down menu next to “shape” in the Options bar and select Path.

You can now click and drag on the page to create another path in that shape.

Now, you have two separate paths you need to convert into one shape. First, ensure that the Combine Shapes setting in the Properties Panel is enabled to turn them into a shape. This setting is the first icon under the Pathfinder settings.

If you don’t activate the setting above, you will need to activate the Direct Selection Tool (A) and then drag over all the paths to select them together.

Once all the paths are selected using one of the methods above, you can make the new shape by right-clicking or Control + clicking on the path and selecting Define Custom Shape.

Then, add the name for your new custom shape and click OK.

You now have a new shape you can find and use as you did in the previous section by activating the Custom Shape Tool (U), selecting the shape from the shape picker in the Options bar, and then clicking and dragging to add the shape to your document.

You can then use the new shape in any project, such as adding it to an image and changing the blending mode.

How To Turn A Path Into A Line In Photoshop

You can also turn paths into basic lines. To make a line from a path, you need to use a slightly different method than before. You can’t create a path using the Line Tool (U) as it doesn’t let you change the shape type, as I did with the Ellipse Shape Tool.

This method uses the brush settings, such as the width and color you previously used, so a good first step is to check and set the brush settings how you want your line to appear. So, firstly select the Brush Tool (B).

Then change the foreground color to the color you want your line to be using the color swatch in the Toolbar.

Next, adjust the rest of the settings in the Options bar, such as the brush type and size and the opacity and blend mode.

Once you’ve adjusted the settings, you can draw a test line on the canvas to see if you like how the line will look. Undo the brush stroke by pressing Control + Z (Win) or Command + Z (Mac).

You can now use the Pen Tool (P) to draw a line using the same process as the first section. Make the path how you want the line to look. If you want a straight line, hold in Shift while adding new anchor points.
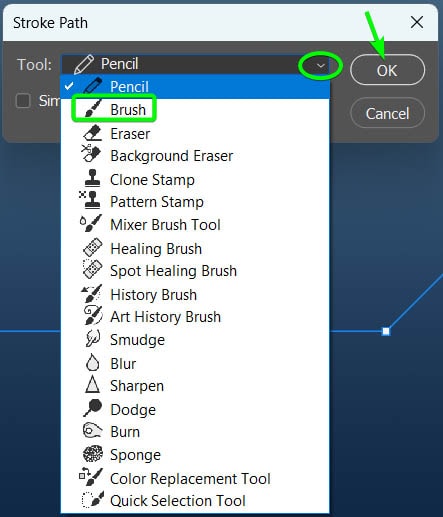
To create the shape, right-click or Control + click next to the path and select Stroke Path.

When the Stroke Path window appears, use the drop-down menu to select Brush, then click OK.

The line appears using the previous brush settings you adjusted before creating the path. The path will also still be visible on top of the line. 

You can delete the path by right-clicking or Control + clicking and selecting Delete Path. Then, you will have only your line on your page. This will not be saved in your custom shapes, and you will need to repeat the steps each time you want to create a line.

What To Do If You Cannot Save Your Path As A Shape

Sometimes, you may find that the option to select Define Custom Shape is greyed out, and you can’t choose the option. This may be because Photoshop can’t detect the path correctly, and you will need to make the path more obvious before creating the shape.

Once you have created the path, right-click or Control + click and select Fill Path to make the path more obvious.

Then, use the Contents drop-down menu to select a color to fill the path. You can choose any color as you can change this later. I will leave it as Foreground Color. Leave the other settings and click OK.

Your path will fill with your selected color on the document.

Once the shape is filled with color, right-click or Control + click, and you should be able to select Define Custom Shape and continue to create the shape as described in the first section.

What’s The Difference Between A Shape And A Path In Photoshop?

Paths and shapes are two different elements in Photoshop, and the properties and ways you can use them in your edits differ. This makes it important to understand the differences between the two, so you can select the right one for the correct purpose.

A shape is an element made up of one or more paths. As I described above, you can turn a path into a shape. The shapes you create in Photoshop are determined by the lines and anchor points that connect them, and you can edit shapes using any of the Shape Tools. 

The available shape tools are the Rectangle Tool, Ellipse Tool, Triangle Tool, Polygon Tool, Line Tool, and Custom Shape Tool.

Once you have created a shape, you can customize it by changing the fill or stroke colors, the stroke width, and other attributes. You can also further edit a shape layer by adding filters and layer effects after converting the shape to a Smart Object.

A path is a series of connected anchor points that you can turn into a selection or a shape. The paths are created and edited using the Pen Tool, which allows you to create any type of shape, including complex shapes, by freehand drawing the path or tracing objects in an image. 

Paths are vectors, so you can scale the path as much as you’d like without affecting the quality. However, to use the path, you will need to convert it to a selection or a shape where it turns into a raster element.

A big difference between paths and shapes is that paths are flexible, and you can adjust and edit the points to change the look of the path. Shapes are fixed, and you can’t adjust the anchor points of a shape unless you convert it to a path first.