

A watermark on a photo helps identify who the photographer is so that when an image is (inevitably) shared online, that name follows along and expresses ownership. Lightroom allows you to add a watermark quite easily, and you can even make one directly in the program itself.
To apply a watermark to a photo in Lightroom, select your image(s) and go to File > Export. In the export window, find the Watermark Panel and check the watermark option. Click the menu within the Watermark Setting to choose an existing watermark, or click Edit Watermark to create a new one.
Lightroom’s interface grants you the ability to create and utilize watermarks with ease and even automate their reproduction on each photo. So, let’s learn how to design, modify, and paste watermarks with a few simple clicks to help watermarks become an integral part of your photography workflow!
How To Create A Watermark In Lightroom
Using legible text is a quick and easy way to express ownership and advertise your photography business in an image.
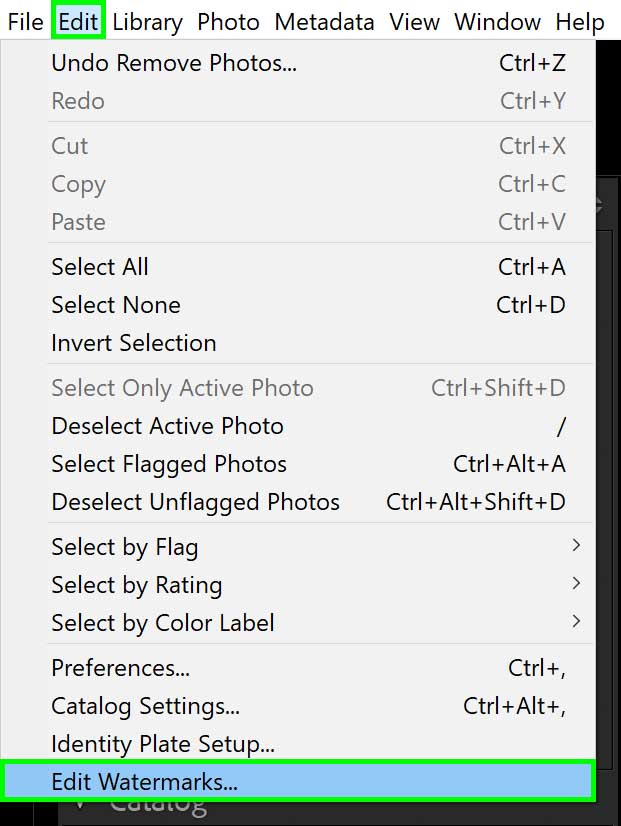
Step 1: Go to Edit > Edit Watermarks
Regardless of what module in Lightroom Classic you are in, look to the top left of your window and press Edit > Edit Watermarks (Win) or Lightroom > Edit Watermarks (Mac).
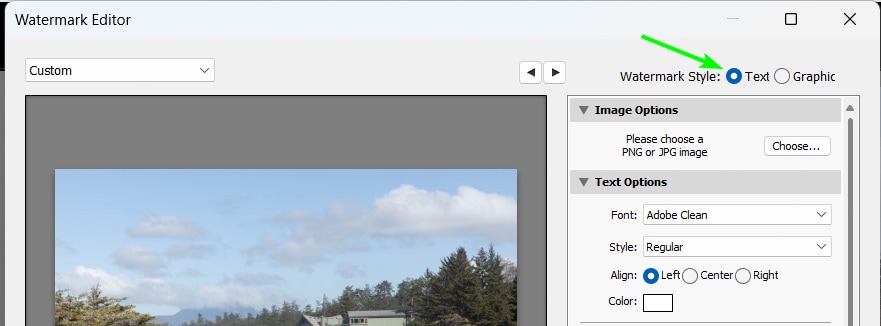
Step 2: Set The Watermark Style To “Text”
A Watermark Editor window will appear.
In this window, make sure Watermark Style: Text is selected.
Step 3: Type In The Text For The Watermark
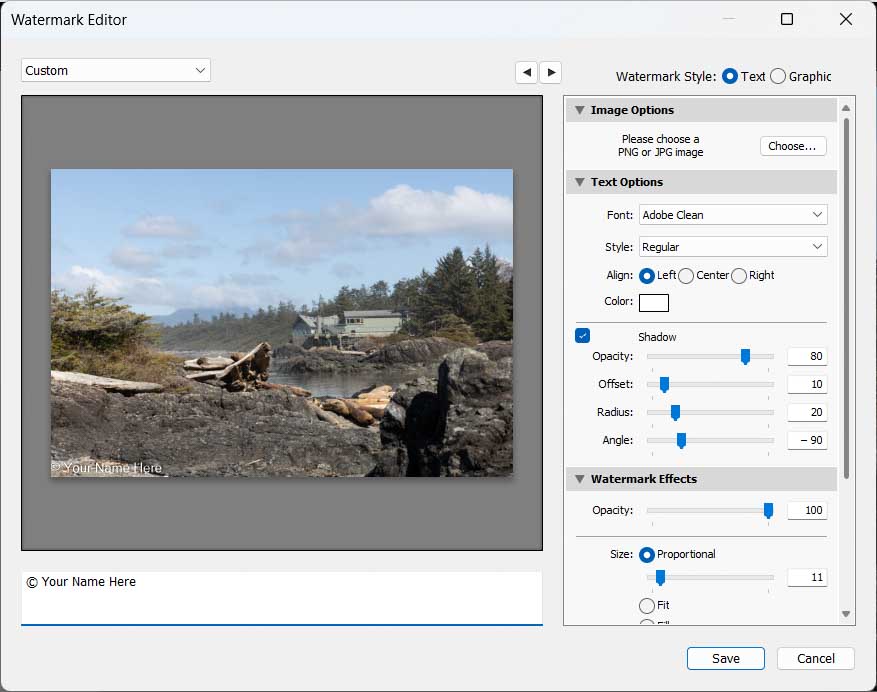
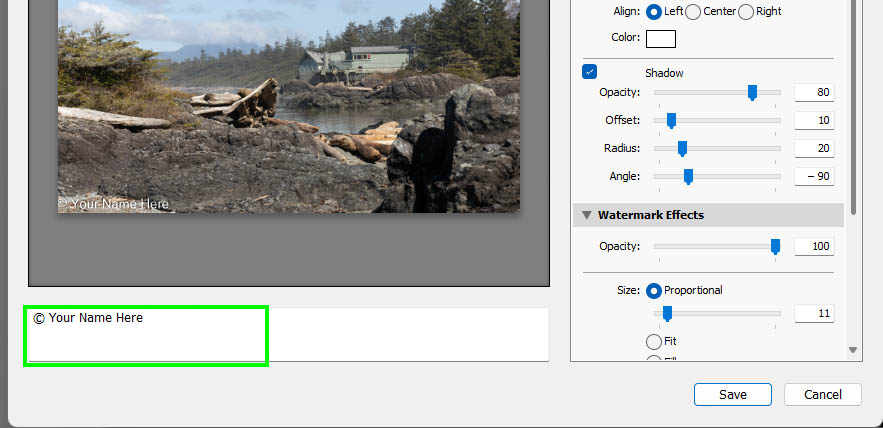
At the very bottom of the preview image, you will see a large white box. This is where you type in the text you want to be featured in the watermark. It is highly advised to add the © Copyright symbol to your watermark.
To type the copyright symbol, press Alt + 0169 (Win) or Option + G (Mac).
Step 4: Adjust The Text Options Settings
In the Text Options tab, you can select the type of font you’d like to use, the text alignment, and whether or not a drop shadow should exist. If you’ve ever used text effects in other programs, these settings will be quite familiar.
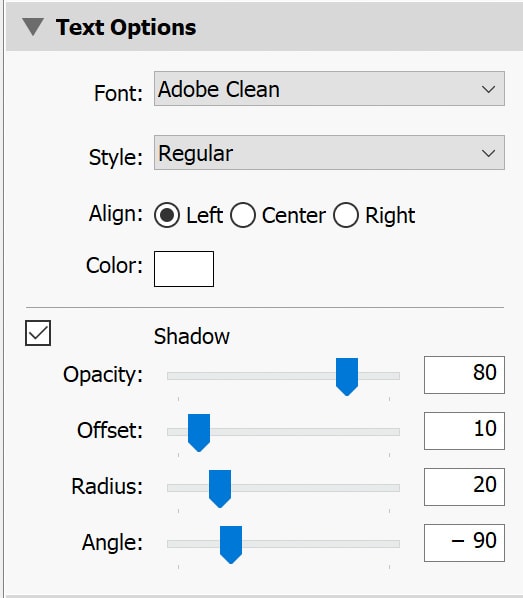
My suggestion would be to use a font that is easy to read (otherwise, the purpose of the watermark is lost) and to mark it as “Bold” to help it stand out. Regular text can be rather thin and easy to lose in a photograph with a lot of detail.
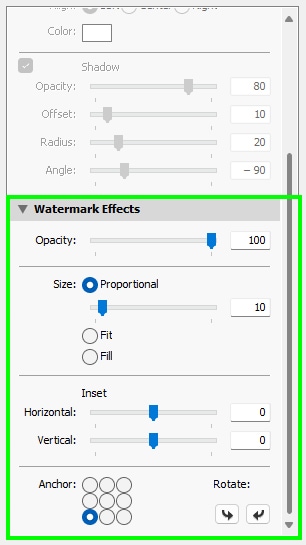
Step 5: Adjust The Watermark Effects (Opacity, Size, And Location)
Under the Watermark Effects tab, you can adjust the mark’s opacity, size, and location on the image.
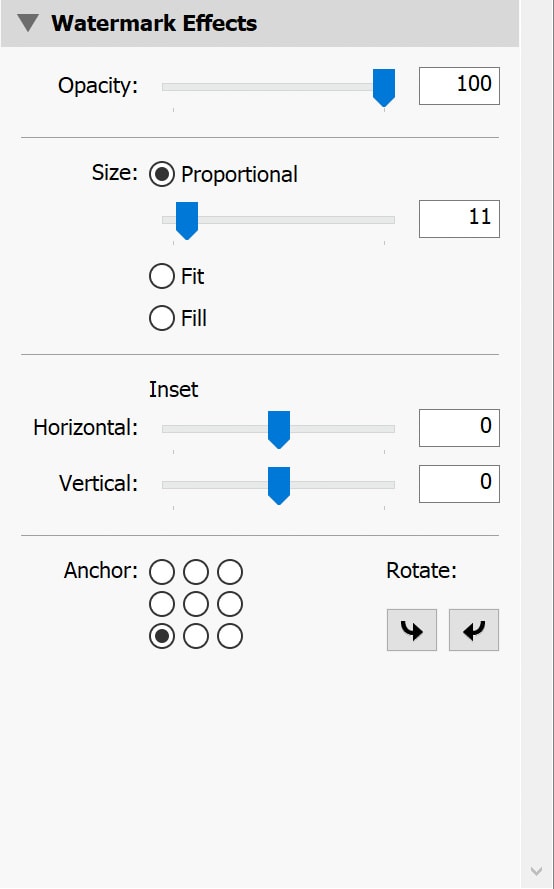
Opacity refers to how transparent the watermark is, and I advise making it transparent enough not to get lost but equally not distract from the image. As for size, the same thought applies: not too big to be distracting, but big enough to be read.
The Inset and Anchor options tend to be the most important when creating a watermark. Both of these options refer to where a watermark will go when you apply it to images. The Inset and Anchor settings will apply equally to horizontal and vertical photos, so keep that in mind.
A good practice is to anchor the watermark somewhere in the corners of the image rather than the center of the frame. Make sure the watermark is not touching the corner or border too much because it can be hard to read. Give it a little bit of breathing room.
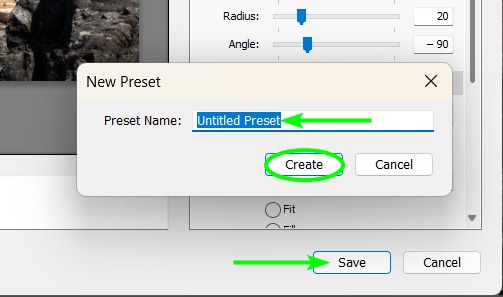
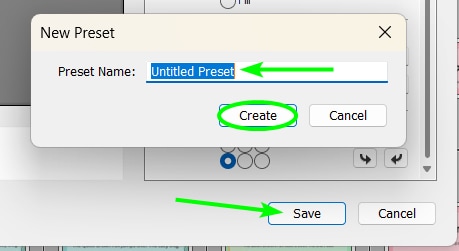
Step 6: Save And Name The Watermark
Once done, click Save. A window will prompt you to title the watermark. Click Create to save the watermark.
How To Add A Graphic Watermark In Lightroom Classic
If creating text-based watermarks isn’t part of your branding, you can use a logo or icon that you’ve created instead.
Step 1: Go to Edit > Edit Watermarks
When Lightroom is open, go to Edit > Edit Watermarks (Win) or Lightroom > Edit Watermarks (Mac).
Step 2: Set the Watermark Style To “Graphic”
All of the same steps apply to creating a text watermark, except this time, you’ll select the Watermark Style: Graphic option. This will automatically bring up a window asking for you to find the graphic file you want to use as a watermark.
Make note that you cannot upload a watermark image file that is larger than 5 MB.
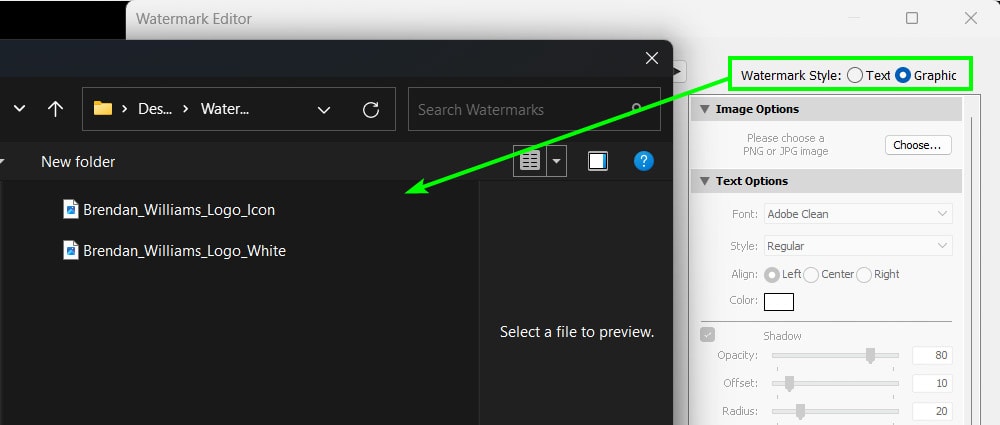
Once the graphic file is chosen, you’ll see it appear in the preview.

Step 3: Adjust The Watermark Effects
In the settings panels, you’ll notice that the Text tab is grayed out. This is because the only adjustments you can make to graphic watermarks are in the Watermark Effects tab. From here, you can go through the same motions as was done for a text watermark.
Step 4: Save And Name The Watermark
Once you have adjusted the settings, click Save at the bottom of the panel. You can then name the watermark and click Create to save it.
How To Apply the Watermark in Lightroom Classic
To use the watermark you’ve created, select the image(s) you want the mark to apply to and select Export.
In the Library module, you will find Export in the lower left-hand corner of the screen.

In the Develop module, right-click on the image and find Export in the pop-up window.

You can also use the keyboard shortcuts Ctrl + Shift + E (Win) or Command + Shift + E (Mac) to bring up the Export settings window for the selected image(s).
In the Export settings window, open up the Watermarking tab. From here, you can select the watermark that you just created above.
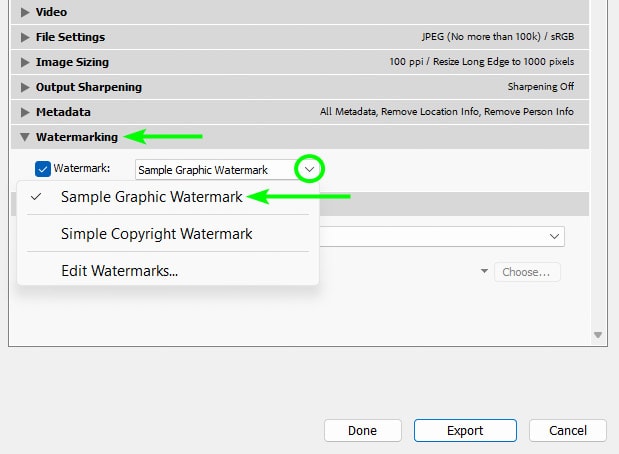
Upon exporting the image(s), the watermark will be applied.

How To Apply A Watermark To Multiple Photos At Once In Lightroom Classic
Batch processing is a staple of the Lightroom program, and adding watermarks to multiple images at once is no exception to the rule.
Remember how we added the watermark to one image using Export? You’ll do the same thing here, except you should have multiple images selected at once.
To select multiple photographs in either your Library module or Develop module, you can either:
Press Control + A (Win) or Command + A (Mac), which will select all of the images displayed on your screen.
Press Control + Click (Win) or Command + Click (Mac) on each image you want to select out of sequence.
Click on one image, hold Shift, and click on another image to select every photo between your first and second click in order to select a short sequence of photos.
Next, follow the same Export steps as you would if you were applying the mark to just one image. Lightroom will do the rest.


Re-Editing And Managing The Watermarks
You can always go back in and re-adjust the watermark(s) you have created and change the settings.
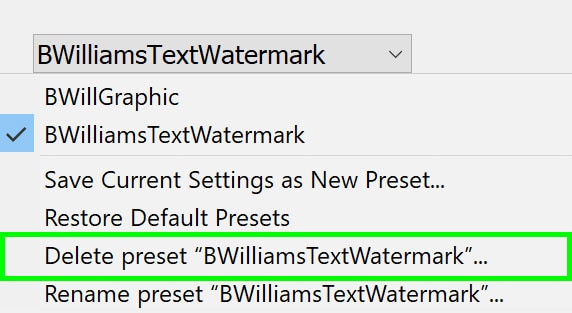
Simply open up the Watermarks Settings window once more (Edit > Edit Watermarks or Lightroom > Edit Watermarks) and look at the dropdown menu in the left-hand corner of the window. From here, you can select any of the watermarks you’ve created and rework their settings. Just remember to click “Save” when you’re done.

If you need to delete a watermark, go back to that same dropdown menu, select the watermark you want to remove, and click Delete Preset.
How To Add Watermarks In Lightroom CC
Adding watermarks in Lightroom CC is a little bit different from Lightroom Classic. But, the benefit to using Lightroom CC for watermarking is the synchronization with Lightroom Mobile — you’ll be able to use the watermark across all of your cell and tablet devices as well.
After selecting a single photo or multiple photographs, click Share > Custom Settings.
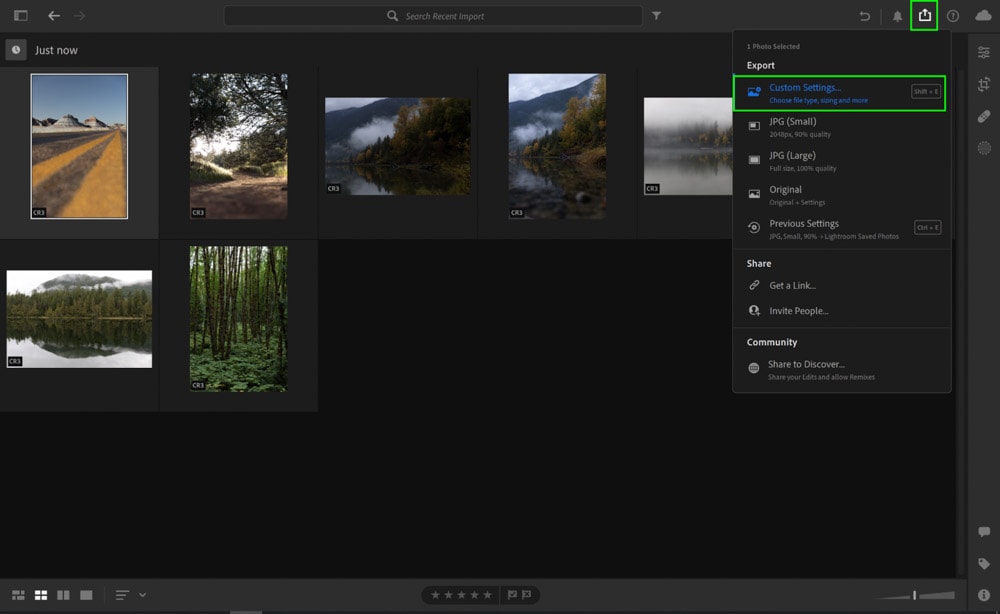
You can also press Shift + E to view Custom Settings. In this window, check the Include Watermark box.
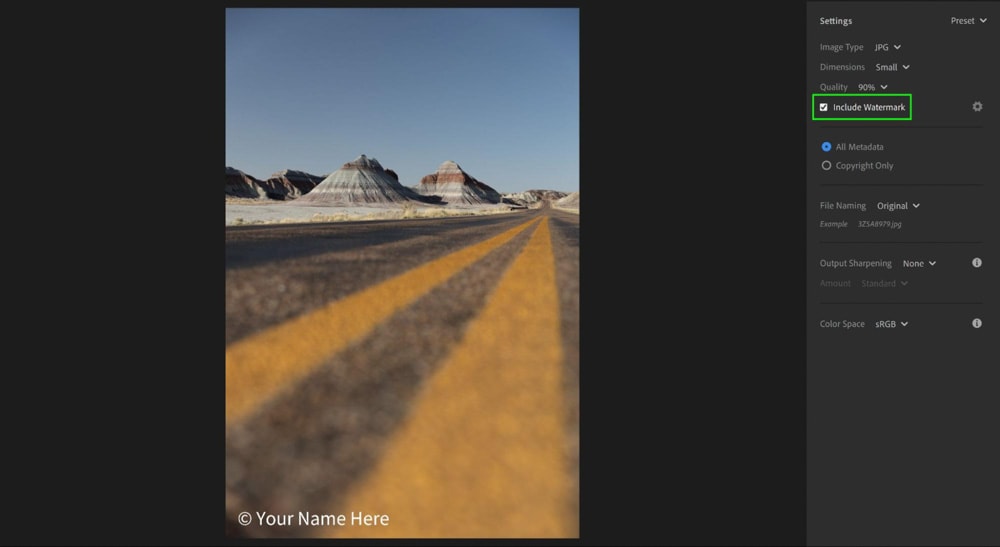
To add or edit your watermark(s), click the gear icon directly to the right of the Watermark text.

In this window, you will see all of the same options as were described in Lightroom Classic. As a reminder, for the graphic watermark, you cannot upload a watermark image file that is larger than 5 MB.
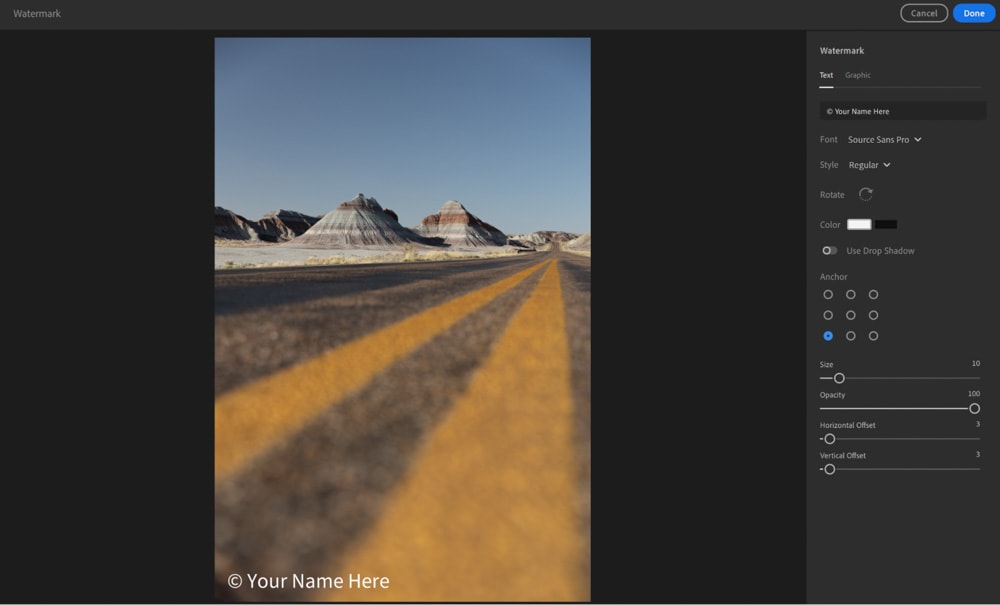
Click Done to add the watermark.
If you don’t see watermarking options, make sure your Lightroom CC is on Version 3.3 (released in 2020) at minimum. The versions prior to this did not have the watermarking ability.
Tips For Watermarking A Photo
The use of watermarks can be a contentious subject in the photography world, primarily because poorly placed watermarks can distract tremendously from a photograph. As such, being mindful of where the watermark goes can make a big difference in your work.
Place The Watermark In A Corner
For both text and graphic watermarks, focus on placing the mark in the corner of the photo rather than through the middle. Although it can be tempting to place the watermark smack dab in the center in order to avoid the image being stolen, the downside is that you will completely distract from the image itself. No one will be able to enjoy looking at the photo.
Be Mindful Of Future Cropping
If you are going to share the photograph on social media, such as Instagram or Facebook, keep in mind that square formats can potentially crop your watermark from the corners. For this purpose, you can place the watermark at the bottom center of the photo.
Lower The Watermark’s Opacity
It’s worthwhile to make the watermark transparent so that it is even less jarring in the photo. Because watermarks tend to be a solid color (white or black is best), the contrast can take away from a photograph’s composition because the viewer’s eye will fall right on the watermark.
The goal is to have someone look at a photo and enjoy the photo first, then find your mark in the corner afterward.
Watermarks And Copyright Law In The USA
Did you know that watermarks actually play a role in the United States copyright and intellectual property laws? That’s right; using a watermark actually has a legal benefit to it.
As written in Section 1202 of the U.S. Copyright Act, anyone who removes your watermark to hide the infringement commits a crime.
(b) Removal or Alteration of Copyright Management Information.—No person shall, without the authority of the copyright owner or the law—
- intentionally remove or alter any copyright management information,
- distribute or import for distribution copyright management information knowing that the copyright management information has been removed or altered without authority of the copyright owner or the law, or
- distribute, import for distribution, or publicly perform works, copies of works, or phonorecords, knowing that copyright management information has been removed or altered without authority of the copyright owner or the law, knowing, or, with respect to civil remedies under section 1203, having reasonable grounds to know, that it will induce, enable, facilitate, or conceal an infringement of any right under this title.
Removing a watermark is additionally considered a breach of the law because of several court decisions that have established this precedent. That’s because the deliberate removal of a watermark shows intent to commit a crime. Offenders can face fines of anywhere from $2,500 to $25,000. This will vary depending on the country you’re in, but it’s worthwhile to take note of your region’s copyright laws, too.
Now, during the exporting process, watermarking is only one of many steps. To ensure you export with the highest possible quality, be sure to read my ultimate guide to exporting photos from Lightroom.


