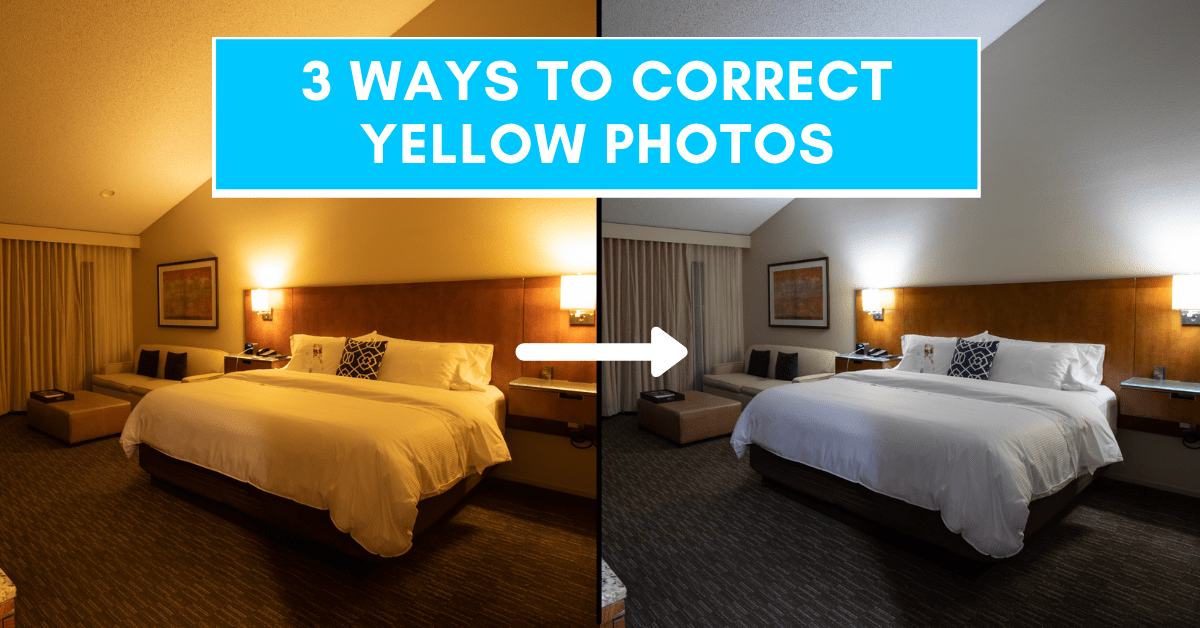

How To Fix Yellow Photos In Lightroom
Sometimes when you take a picture, you end up with an awful yellow hue that you just can’t get rid of. Luckily with the help of Lightroom, you can easily fix yellow photos (and other white balance problems) with a simple slider. There are a few different ways you can correct white balance, and the right one will depend on your photo. In this tutorial, you’ll learn each color cast correction method to make yellow tinted photos a distant memory.
You can quickly fix yellow photos in Lightroom by using the white balance adjustment sliders. By shifting your color temperature to favor a bluer tone, you can effectively cancel out the yellow color cast and make it look white again. With a proper white balance, the colors in your picture will appear more true to real life.
Although the white balance slider is simple to use, there are a few hidden tricks to getting your white balance just right. Let’s dive into 3 useful ways to get more realistic colors, fast.
3 Ways To Correct Your White Balance And Tint
Color cast can come in a variety of different colors. Depending on a variety of factors, your photo may appear too yellow and have a green or purple tint to it.
In Lightroom, there are two sliders to help correct this. The first is called Temperature, while the second is called Tint.
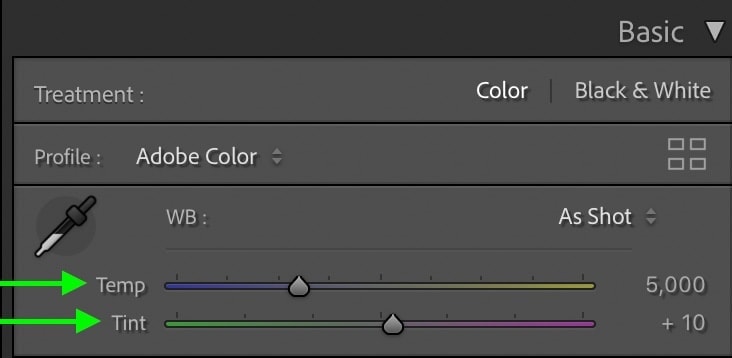
Temperature (or color temperature) is another term for describing white balance. By adjusting the temperature slider, you can make your image appear warmer (more yellow) or cooler (more blue).
Whenever you are working to correct a certain white balance issue, you want to add the opposite color of the color cast.
In this case, since the photo looks too yellow, you can correct it by adding blue. By moving the Temperature slider to the right in Lightroom, this is fixed in seconds.
Beneath the temperature slider is a secondary option called Tint. Rather than controlling the yellow or blue in an image, it alters how much green or magenta appears.

Together, the temperature and tint sliders work together to correct undesirable color cast and make colors appear more natural. The overall adjustments made with these sliders are known as a White Balance adjustment.
Now let’s go through 3 different ways you can correct color cast in Lightroom and fix those yellow photos.
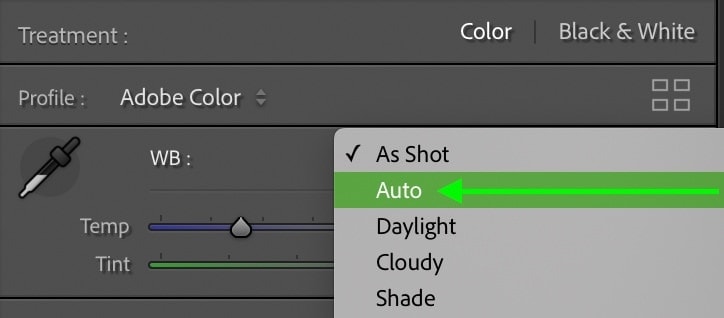
1. Auto White Balance
The easiest way to fix a yellow photo in Lightroom is with an auto white balance adjustment. Rather than having to do any additional steps, auto white balance gets the job done in less time.
To access the auto white balance feature in Lightroom, first, access the develop tab with your desired image selected.

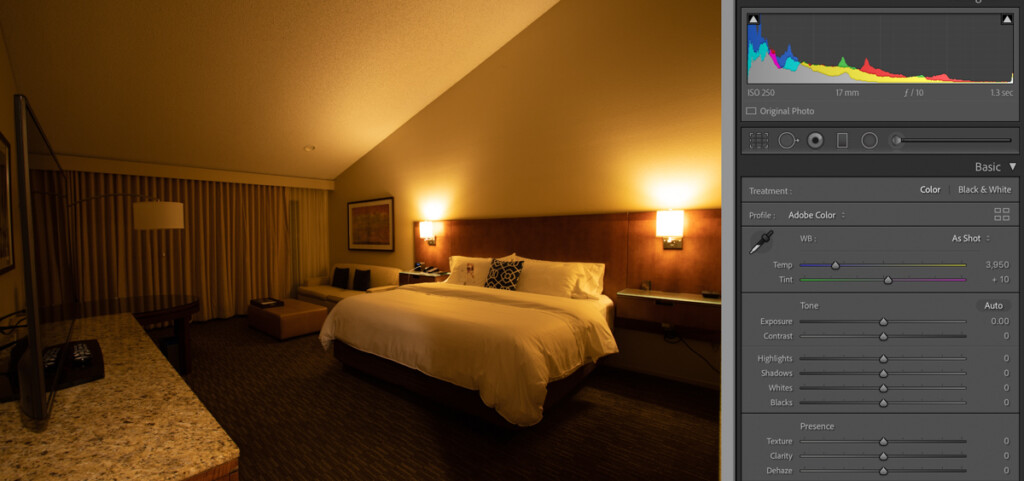
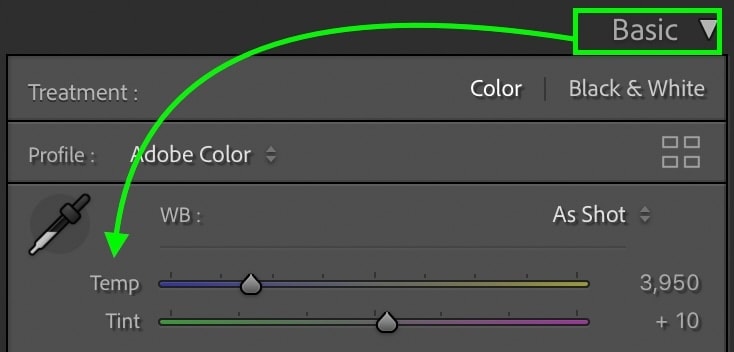
Going to your Basic panel, you’ll see the “Temp” and “Tint” sliders sitting at the top.
By default, the white balance will be set to “As Shot,” meaning it’s matching the white balance setting captured in-camera.
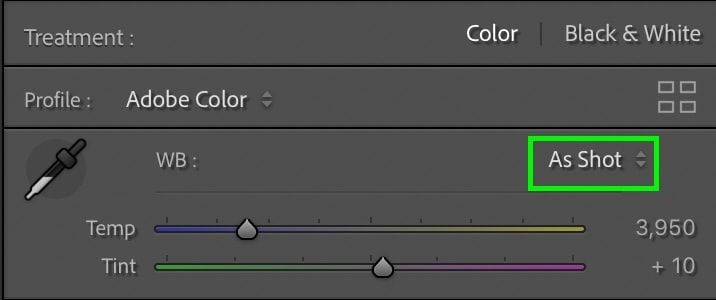
To switch this to auto and correct your white balance, click on “As Shot” and select “Auto” from the pop-up menu.
Now Lightroom will automatically shift the temperature and tint sliders to correct for any unnatural color casts in the image.
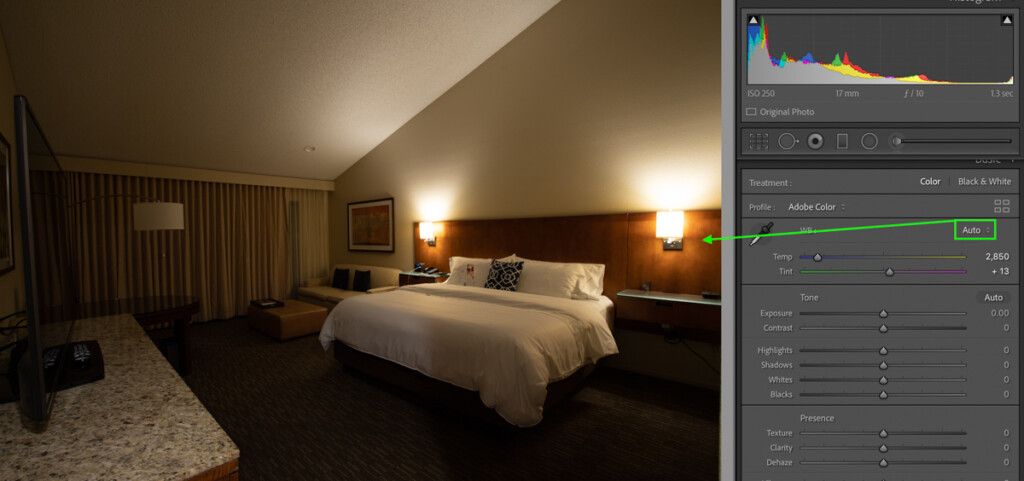
In some cases, auto white balance doesn’t always do the perfect job. You may find that it does make an improvement, but not exactly what you were wanting. Since this method takes an overall sample of your image to choose the white balance, it can be thrown off by extremely harsh color casts.
Luckily, option number 2 is here to save the day.
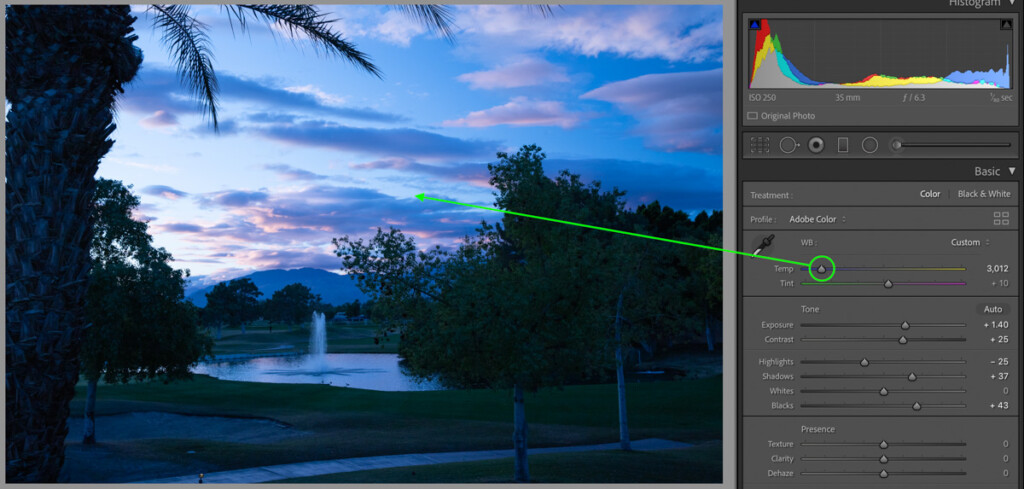
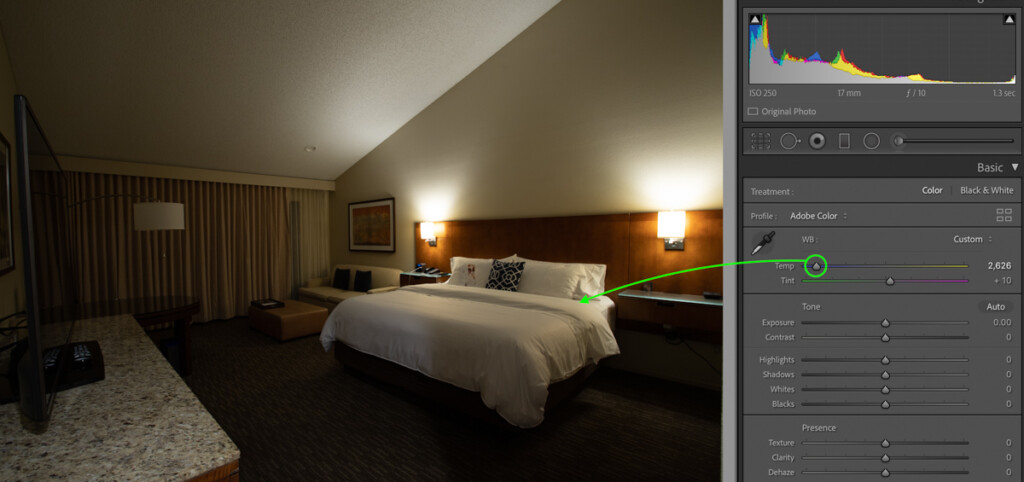
2. The White Balance Selector
The white balance selector in Lightroom lets you sample a specific color in your image to use as your target. Lightroom will then automatically work the temperature and tint sliders around to make your sampled area appear white.
For yellow photos, this means a one-click fix!
Just like before, first start by locating the white balance adjustment at the top of the Basic panel.
Beside the sliders is an eyedropper icon that represents the white balance selector. Clicking on this tool, then choose anywhere in your photo to sample.
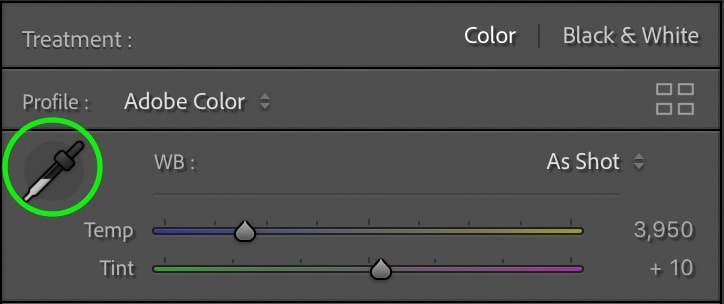
The idea here is to sample an area you want to appear as white.

Some good things to sample would be something like a white shirt, a white wall, or if nothing else is available, the whites of someone’s eyes.
Using your sample, Lightroom automatically shifts the white balance, and your sampled area now appears white. Even though you’re only sampling a small area in your image, it ends up working to correct the entire photo.
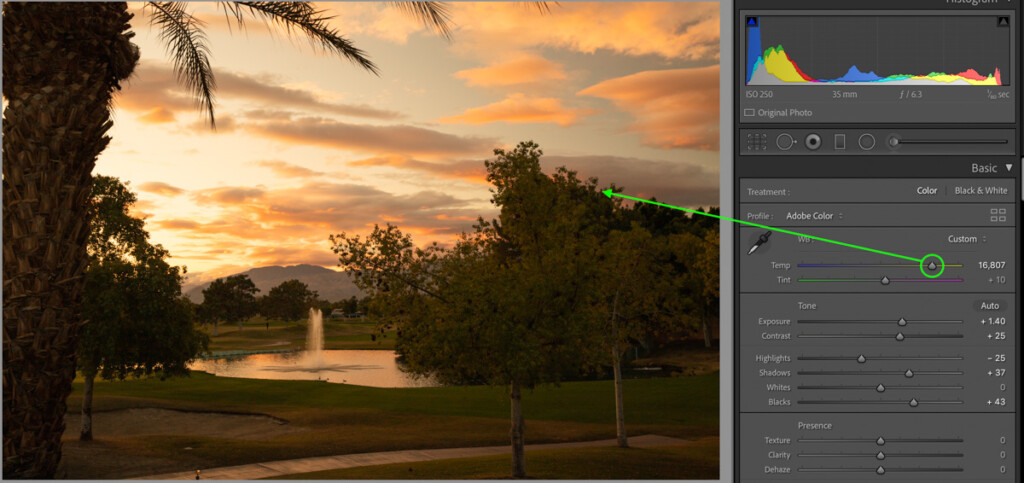
The white balance selector is another fast and effective way of fixing yellow photos or other color casts in Lightroom. Just like with any automatic adjustment, you may find this still doesn’t get the exact look you’re going for. Perhaps it makes things too blue or doesn’t eliminate enough of the original color cast.
In that case, this third option is a surefire fix.
3. Manual White Balance Adjustments
If all the automatic white balance corrections still aren’t doing it for you, then manual adjustments are next on the menu. Rather than hoping Lightroom corrects your photo to match the look you wanted, doing it manually guarantees it.
Simply click and drag on the temperature and tint sliders to begin correcting the white balance and color cast in your photo. At first, you might not know how to adjust these sliders, but just remember to add the opposite color than what you see.
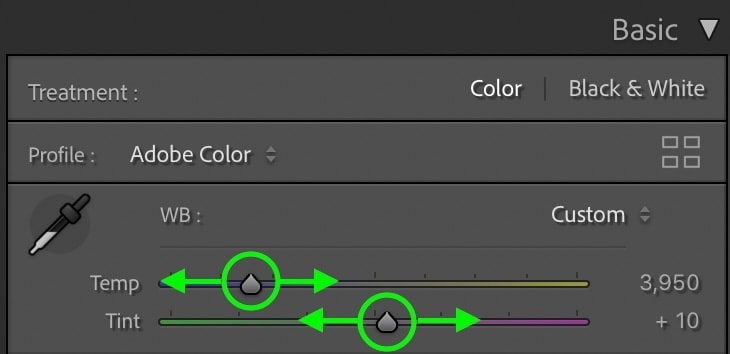
For example, since the photo looks too yellow, I’ll add more blue to cancel out the yellow. If the photo looked too green, I could add more magenta to balance things out once again.
A perfect white balance is a nicely balanced mix of the temperature and tint adjustments. Depending on the lighting conditions, lens filters, or camera settings, the proper white balance can differ in every image.
Using any one of these three techniques, you can quickly fix yellow photos in Lightroom and correct other problems with the color cast!
Why Does My Photo Get Color Cast?
As annoying as the color cast can be, it’s an inevitable part of photography. Color cast is the result of improper lights, wrong internal white balance in your camera, or even the lens filters you use.
Now that you know how to correct the result of some of these problems, let’s break down why these problems occur in the first place. To make it easy, let’s go through some of the most common causes of yellow, green, or magenta tints in your pictures.
– Shooting With The Wrong White Balance
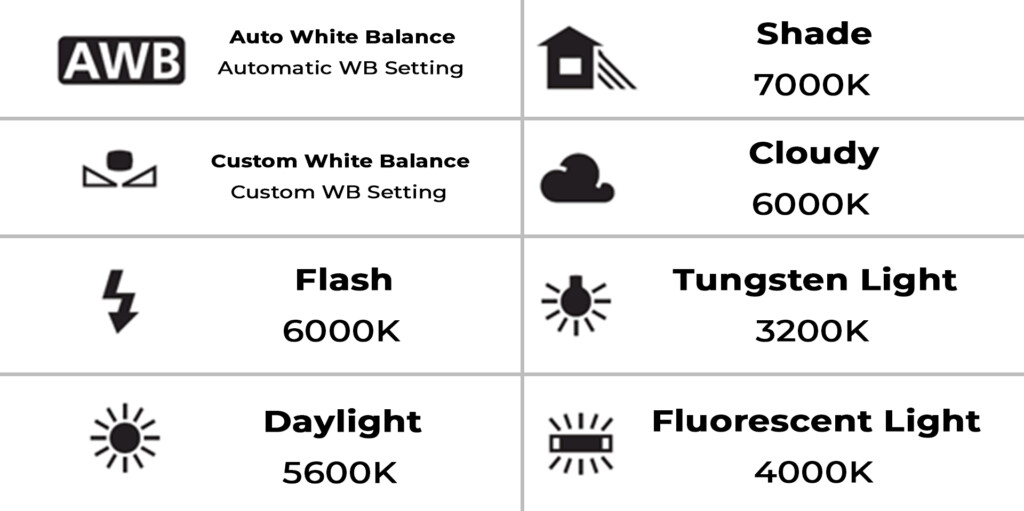
When you’re taking pictures, there are a variety of white balance settings to choose from. With preset options, manual settings, or a fully automatic mode, you can correct the white balance for nearly any situation.
The problem is, if you’re using a preset white balance or a custom one, you may forget to correct it when you change locations. This can end up causing a lot of color casting issues.
For example, you might select a particular white balance to shoot with while outdoors, but then once you move indoors, that white balance no longer works. Since indoor lights usually have a different color temperature than daylight, you can’t use the same white balance settings. If you do, you end up with skewed colors.

If this is the problem, make life easy for yourself and use Auto White Balance (AWB) while shooting. This way, your camera will automatically adjust to changing lighting conditions, and you won’t have to worry about having the wrong white balance.
To learn more about the importance of white balance in photography, check out this post.
– Using Lens Filters

A common cause of color cast is from lens filters such as ND filters or polarizers. These filters not only darken your image but can add a certain hue to your pictures. Similar to how sunglasses make colors appear a little different when you’re wearing them.
Lens filters usually have a green, blue, or magenta color cast depending on the brand and stop density of the filter. This can be quite hard to correct, even with the correct white balance settings while shooting.
Luckily this color cast can be easily solved with the help of Lightroom or other editing programs. What matters most is that you’re aware of the effects of each filter, so you know how to correct it later on!
– Lighting
Lighting can be considered as anything from the lights in a room you’re shooting in, to the flash on your camera. Every light source has a different color temperature, meaning every light source requires a different white balance setting.
The easiest way to think of this is by looking at a lamp in your house, then looking at the sunlight outside. The lamp you’re looking at likely has a more orangey-yellow color to it, while the sunlight outside appears more blue or white.
This difference in color is known as color temperature, and every light source can vary on a scale known as Degrees Kelvin. Kelvin represents the color of a specific light source ranging from red to blue. To help you visualize this, use the cheat sheet below:
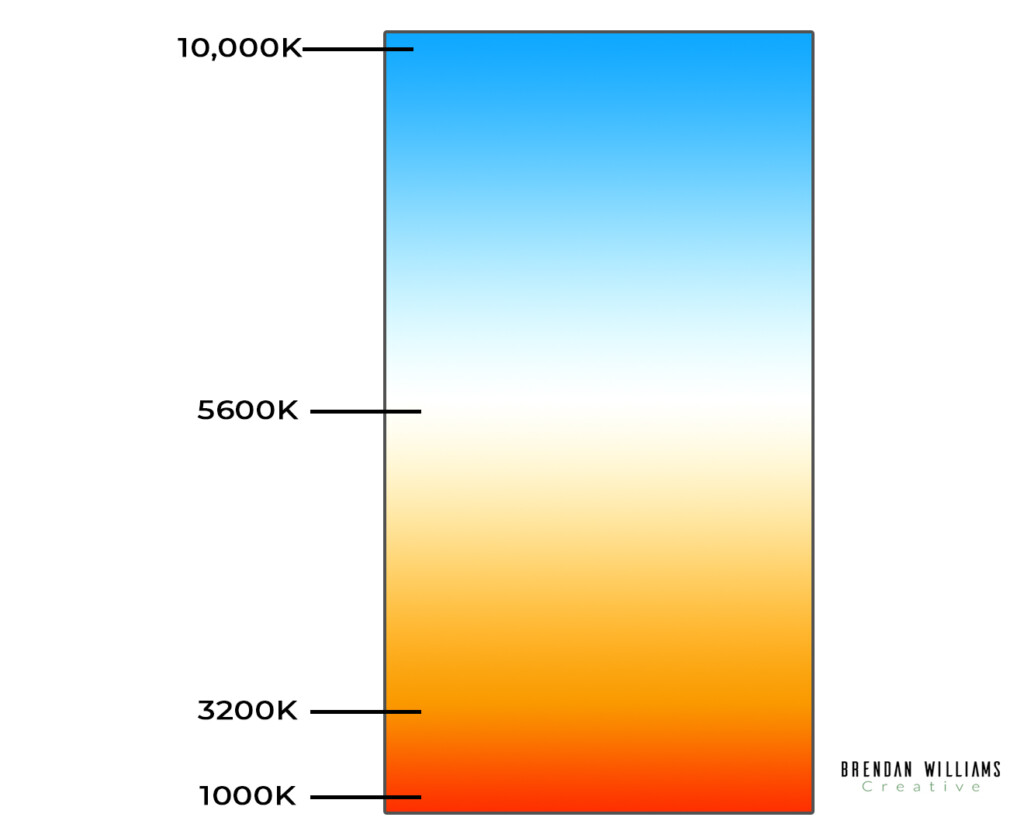
As you can tell, different lighting conditions have vastly different colors. That’s why it’s not uncommon for your photos to appear too yellow, especially when you go from shooting outdoors to indoors.
With all that said, now you know how easy it is to fix yellow photos in Lightroom. With a better understanding of what causes color cast in the first place, you can now improve your odds of getting the correct colors without post-processing.
White balance is not only used to make colors look more true to life but can also be used creatively. To help highlight this idea, check out how to edit sunset photos in Lightroom, where I share how to use white balance settings to enhance (or fake) those beautiful golden hour colors!
Happy Editing!
– Brendan 🙂


