fbpx

How To Create & Export Transparent Backgrounds In Canva


One of the cornerstone stones of graphic design these days is cutting elements out of existing images, in other words, making the background of an image transparent. Old-school graphic designers will remember the painful days of using complex tools in Photoshop to cut out elements and the many hours it would take to make it look right. Luckily, you can make the background of your image transparent with Canva in minutes. 

It’s starting to seem like you can do anything in Canva. Especially when it comes to the essentials of graphic design, this includes creating and exporting images with transparent backgrounds. Today you will learn how to make a background transparent, make any element transparent, and ensure that the background stays transparent when you export the design. 

How To Make An Image Background Transparent In Canva

Remember that this is only possible with the Background Remover, which you can only use if you are a Canva Pro user. 

Also, for demonstration purposes, I’ve added a red background behind each example to make it easier to notice the transparency that I’ll be adjusting.

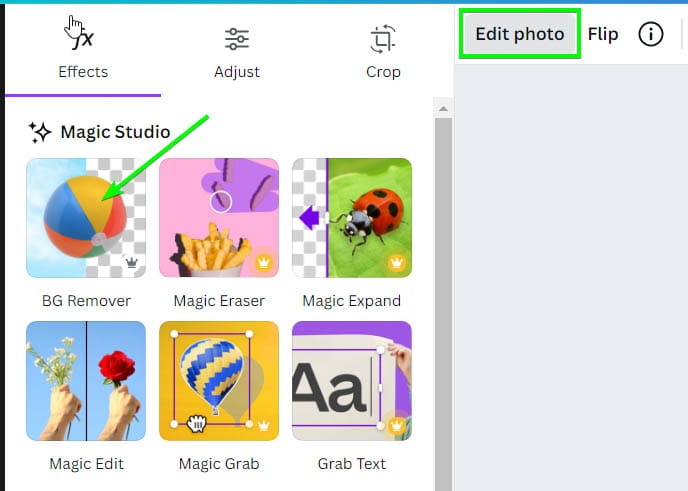
Once your photo or design is ready to go, select it, then click on Edit Image

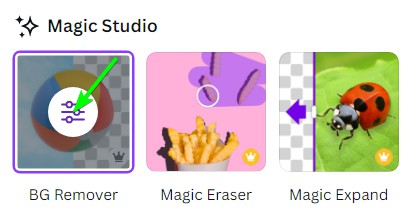
To begin making your background transparent, click on Background Remover

After about 30 seconds or so (based on the computer’s hardware), the background of your image will be completely transparent. Only the elements in the foreground will remain.

There’s a big chance that the result that you get is not going to be perfect. There will be many times when there are missing pixels that you need to restore.  

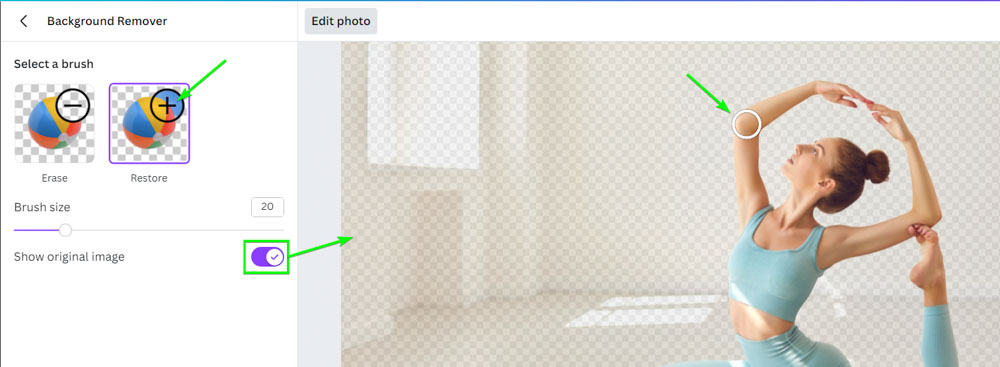
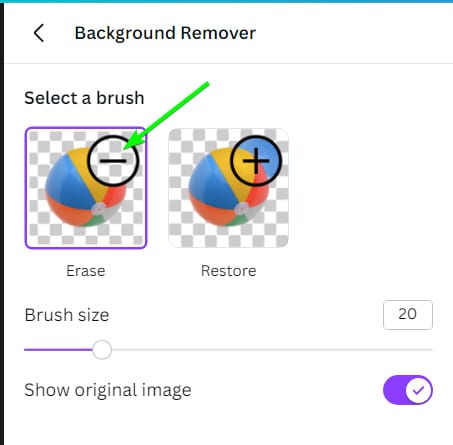
To restore the pixels to complete your element, click on the Restore brush. Anywhere you brush with the restore brush will bring back pixels hidden in the background removal process. 

To make your job easier, click on Show Original Image. This will show a low-opacity version of the original image, making it easier for you to restore the parts of the photo that you want. You can also adjust the brush size up or down with the Brush Size Slider

When you’re done making all of your edits, click Done

This process will be different depending on the design you’re editing. Some images won’t need any restoration after you remove the background. 

Canva’s AI is very good at detecting large areas to delete in a photo, such as a sky. 

There will be times when Canva’s AI will get very confused and delete large areas of your image that you don’t want to be deleted. This is especially true if there’s any blurring in the background. 

In these cases, you will need to do some heavy restoration to get your element where it needs to be. 

Another thing to consider when making the background of your image transparent is how you should handle a picture with a white background. The problem is that if you don’t have a colored background behind your image, the white background of your image will blend into the color of your canvas. 

It will look like this: 

If your image has a white background to start with, make sure to put something behind it so you can see how your element looks after completing the background removal process. Then before you export, remove the colored background by pressing Delete to ensure there is transparency behind your image.

How To Adjust The Transparency Of An Entire Element In Canva

You can adjust the transparency of every element in Canva, whether you’re a free Canva user or a Canva Pro user. 

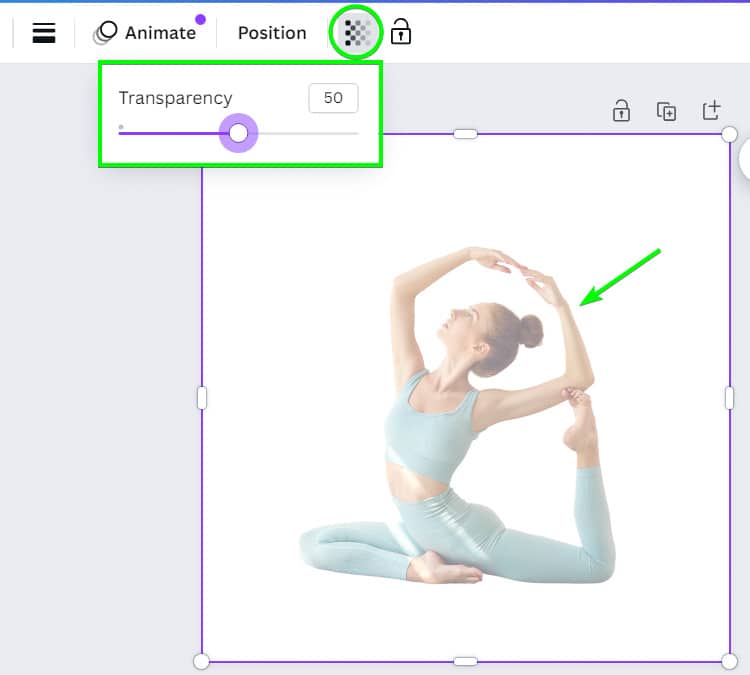
To do this, select your element, click the Transparency Button, and adjust the Transparency Slider

Adjust the slider halfway to get a good feel of what your element will look like with half of its opacity. Drag the slider all the way to the left to bring the opacity of the element to zero. 

You can adjust the opacity of images too.

You can adjust the opacity of graphics as well. 

Or even adjust the opacity of shapes and text with this same method.


How To Export A Canva Design With A Transparent Background

When exporting your design with a transparent background, you must ensure your settings are correct. Otherwise, your design won’t look transparent at all. 

The very first thing you must do is remove any colored backgrounds from your design. By “colored backgrounds,” I mean the colored shape layer you may have added behind your design to check your transparency. 

If you added this shape layer, make sure to select it and delete it before exporting. If you don’t, your final exported image will showcase the element you created and the shape layer.

You will know that your design is ready to export if only the white canvas is showing behind your element. 

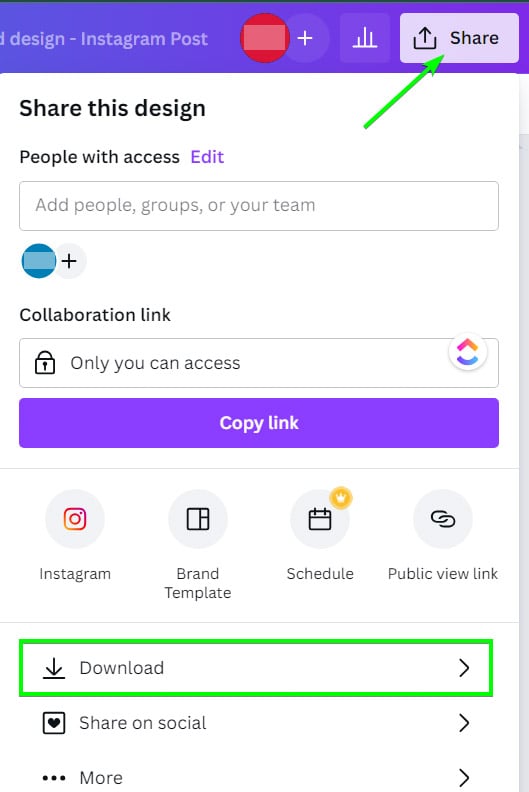
Once you feel your element is ready to export, click on the Share button. Then, click on the Download button

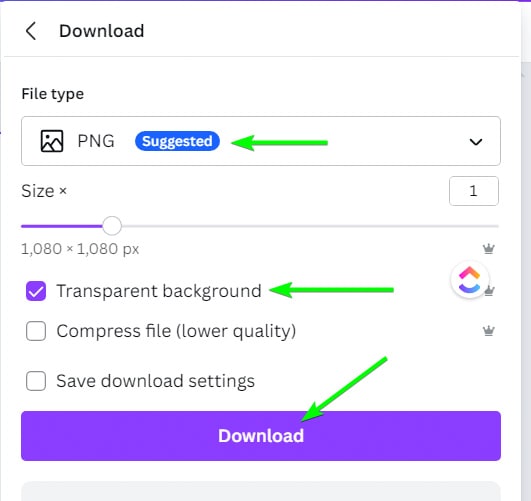
With the download settings open, here is where you need to be the most accurate with your choices. 

  • File Type – Make sure to choose PNG and not any other format. This part is probably the most important, and I’ll explain why in a little bit. 
  • Transparent Background – Check this to ensure the background is see-through in the final export. Otherwise, the background of your element will be a solid color. 
  • Select Pages – Make sure the page with the element you wish to export is selected in the drop-down menu. 

Click on Download when you’re ready. 

If you choose a file format such as JPG, your design will compress, leaving you with a white background with your element, which is visible when added to another background or project.

JPEG export, white background added to cut out.

Choosing PNG is essential if you want your element to have a transparent background so that you can add it to another project or background.

PNG export with transparent background. Red was added to show the image being cut out.

Although you can export graphics with transparent backgrounds in the free version of Canva, you won’t be able to do so with images. If you regularly need a simple way to remove backgrounds from images, upgrading to Canva pro is extremely worthwhile. I share the pros and cons of upgrading to Canva Pro in this guide.


  • 100+ million premium stock photos, videos, audio, and graphics
  • 610,000+ premium and free templates with new designs added daily
  • Up to 100 Brand Kits to establish your brand's identity online
  • Remove image backgrounds instantly with Background Remover
  • Resize designs without quality loss with Magic Resize
  • Schedule social media content to 8 platforms
  • 1TB of cloud storage
  • 24/7 customer support

Article By

Brendan Williams

Hey, I'm Brendan! I'm a professional photographer and photo retoucher who has spent the majority of his career shooting or retouching outdoor lifestyle and social media campaigns for brands like G-Adventures, xoxo Bella, P&G, Fitbit, Chevy, Tourism California, and more. These days I primarily focus my efforts on this site, creating guides and tutorials that I wish I had earlier in my career. Each week I publish new tutorials on Photography, Photoshop, Lightroom, and Canva to help you unlock new skills and bring your creativity to new levels! Everything you learn here is backed by real experience, so you can finally skip the fluff and focus only on what matters.


Continue Reading:

How To Invert Colors In Photoshop

Learn how to quickly invert the colors of an image or a layer mask in Photoshop along with tips to selectively invert your colors instead!

How To Invert A Selection In Photoshop

Learn the importance of learning to invert a selection in Photoshop with the help of simple keyboard shortcuts and several other methods.

How To Use The Gradient Tool In Photoshop

Learn the ins and outs of how to use the gradient tool in Photoshop with useful tips to help make the most of this impressive tool!

Adobe Lightroom System Requirements For Mac & PC

Here's a breakdown of the system requirements for Adobe Lightroom Classic and Lightroom CC to make sure it will run smoothly on your computer.

How To Add A Watermark In Lightroom Classic & CC

Learn how to add a text or graphic watermark to a photo in Lightroom Classic and Lightroom CC to protect your photos from theft.

How To Use Dehaze In Lightroom

Learn how to use dehaze in Lightroom along with five different ways you can use the dehaze tool to improve your images in Lightroom.

35+ Best Fonts For Logos In Canva

Here's a list of the best fonts for logos in Canva to help give you inspiration in your next logo design!

How To Create Curved Text In Canva

Learn how to quickly create curved text in Canva desktop and mobile with just a few clicks to spruce up any design!

35 Best Fonts For Teachers In Canva

Discover the best fonts for teachers in Canva to help with your next worksheet or presentation for your class!

The 9 Best SD Cards For Sony

Discover the best SD cards for Sony to find the most reliable and best valued memory cards for your photo and video needs.

The Best Canon Lens For Low Light (10 Top Picks)

Get a complete view of the best Canon lenses for low light photography and video along with tips to make the right buying decision.

Affinity Photo VS Photoshop – Which Should You Choose?

Let's take a deep look at the similarities and differences between Affinity Photo and Photoshop to see which program you should pick.