
Whether someone was missing from a family photo or you want to put yourself into an image for fun, adding a person into a new photo is relatively easy with Photoshop.
Using these steps, you can paste an image of a person into another photo and realistically blend the two images. This means you can plant yourself on the Great Wall of China, at the top of Mount Everest, or in this example, make yourself look classy in front of a private jet.
Seamlessly combining two images without them looking fake is challenging, but if you follow the steps carefully, you’ll be jetting off in no time, on the screen, of course.
How To Photoshop A Person Into A Photo
To add a person to another photo takes time and requires a lot of steps to accomplish. You must accurately cut and paste the person into the image and add realistic effects to ensure nothing looks fake.
Instead of writing a book-length article on this topic, I will go over each step with enough detail to achieve the end result without overexplaining everything. If you need more information about a brief step, click the linked articles to learn more.
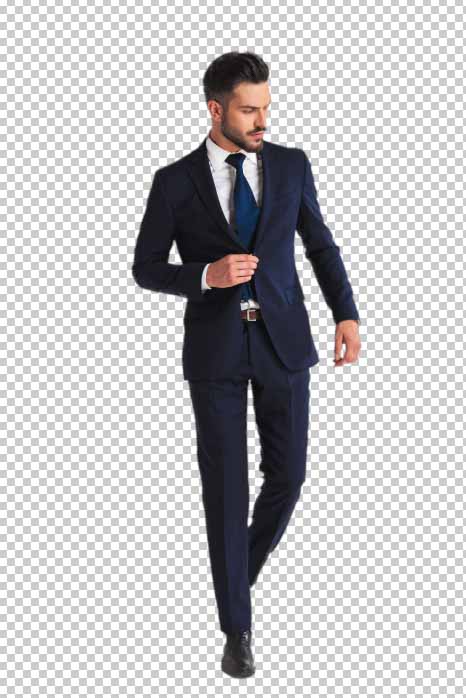
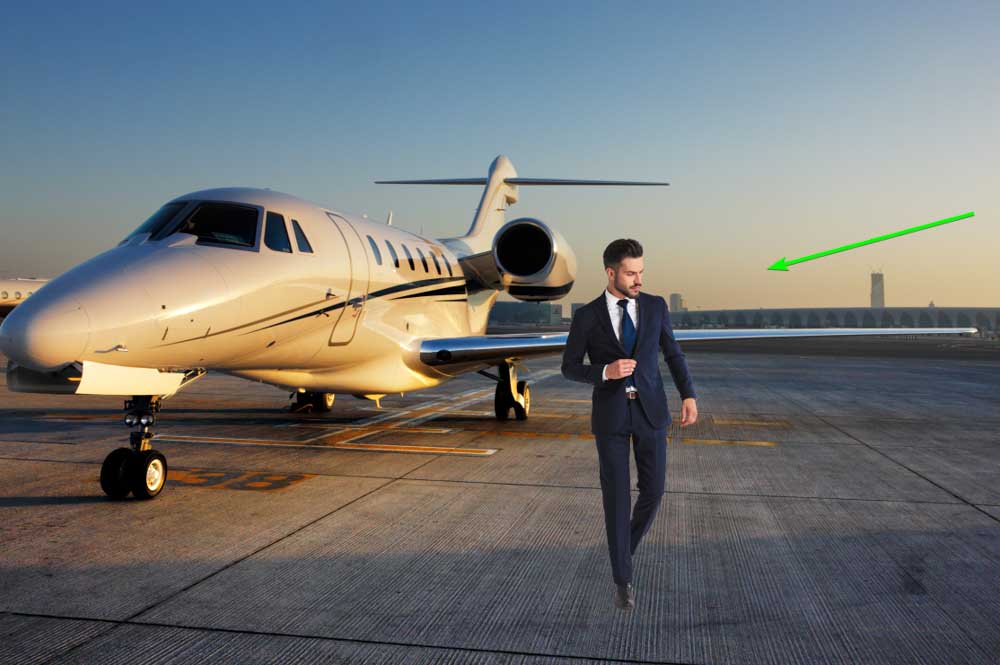
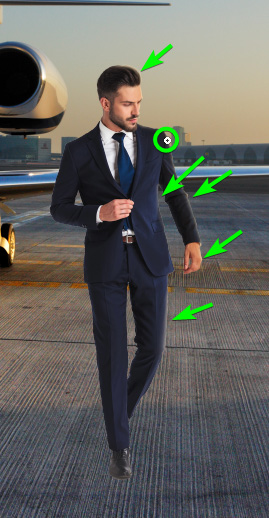
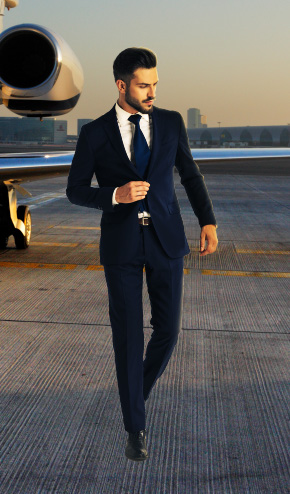
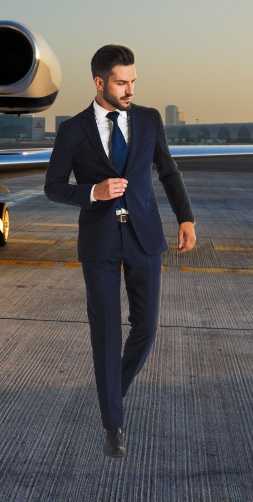
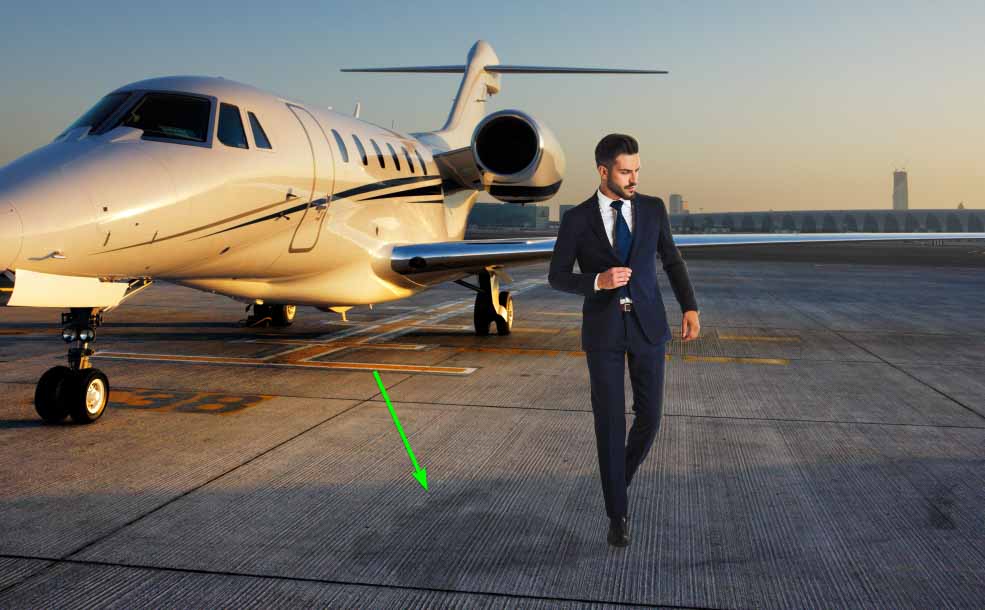
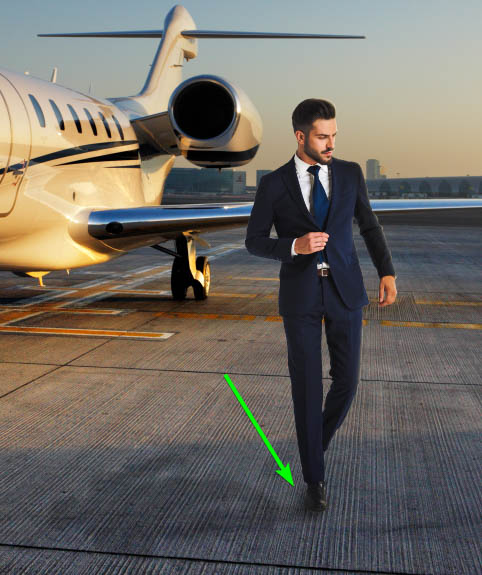
I will add this image of a businessman to the photo of a private jet.


Step 1: Cut Out The Subject From The Original Background
The first step is to remove the background from your first image containing your subject so you can use the second image as the background.
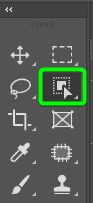
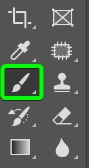
There are various ways to remove the background of an image, but the easiest is using the Select Subject method. To use this method, first, select the Object Selection Tool (W).
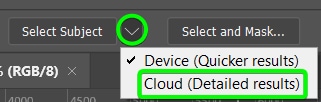
Then, if you have an internet connection, click the arrow next to Select Subject in the Options Bar and click on Cloud (Detailed results).
Next, click Select Subject and give Photoshop a few moments to make the selection.

To refine the selection, you can use this guide for a complete explanation. However, click Select and Mask in the Options Bar to refine the basics.

The main refinement to make when selecting a person is to click Refine Hair in the Options Bar.

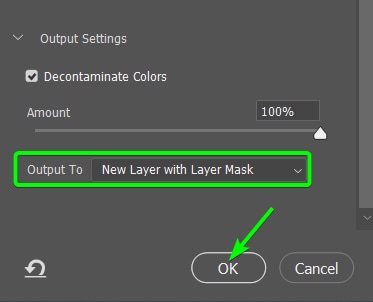
Then, go to the bottom of the right-hand panel and select Decontaminate Colors.
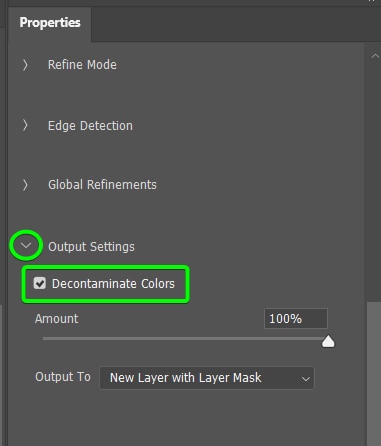
Change the Output to New Layer with Layer Mask and click OK.
Your subject is now on a transparent background as the layer mask hides the original background.
Step 2: Add The Subject To The New Image And Resize It
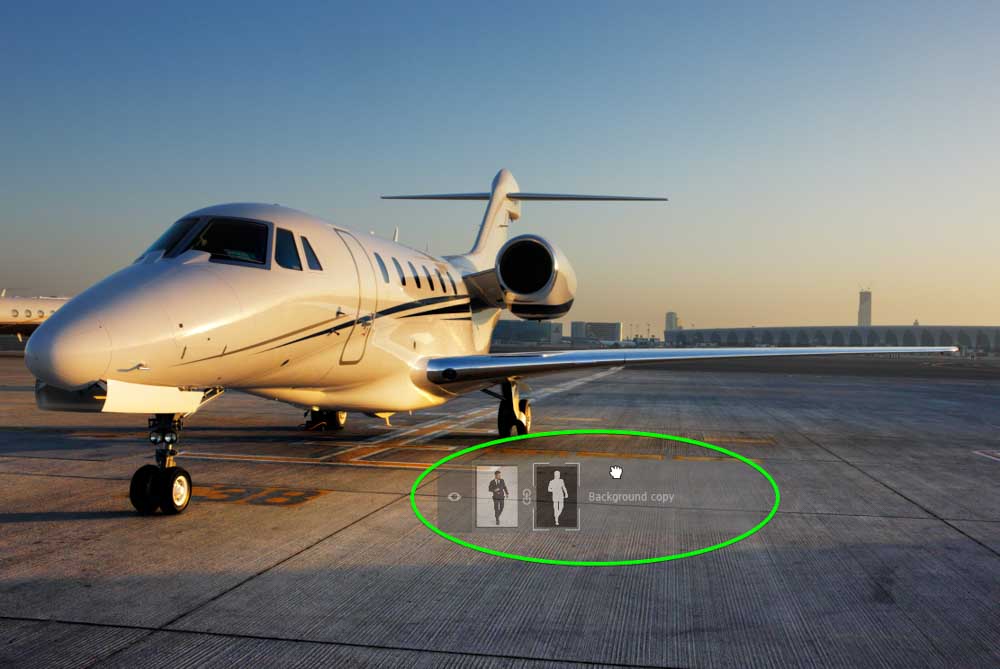
You can now move the subject onto the new image by clicking the layer with the layer mask and dragging it over to the project tab that contains the background photo. When the other project opens, keep dragging until your subject is over the canvas and let go to paste the layer.
The subject will likely be too large compared to the elements in the photo. Once the person is on the image, activate the Transform Tool by pressing Control + T (Win) or Command + T (Mac).
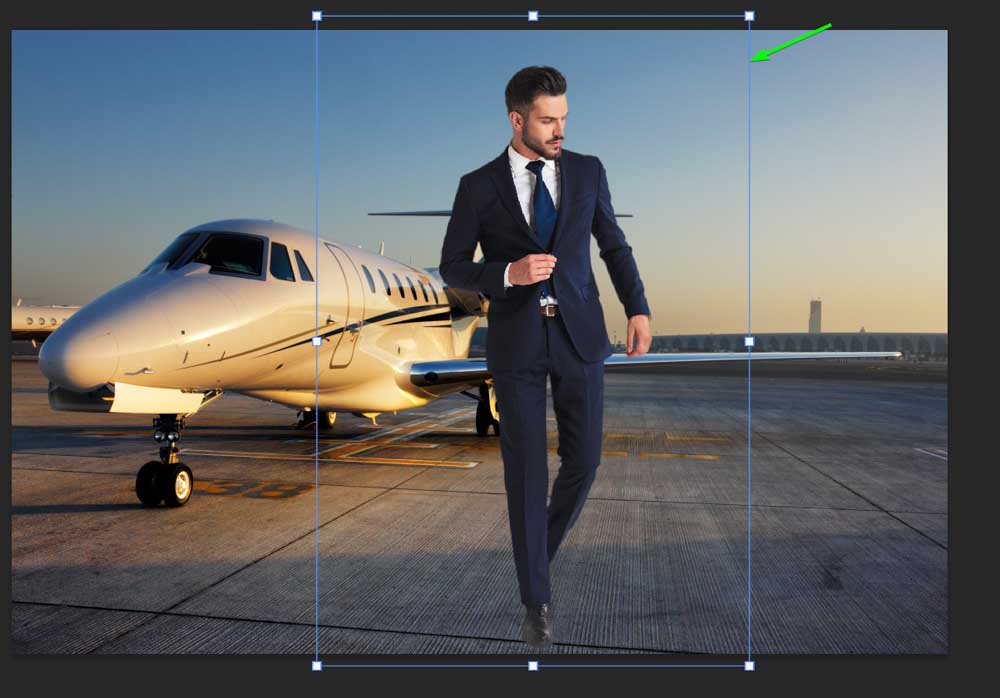
You can then pull one of the handles down to resize the person. Try to line the subject up to the horizon where they were in relation to the original image’s horizon (if there was one).

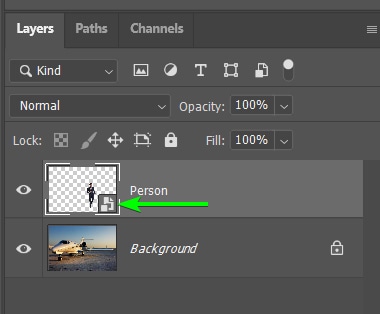
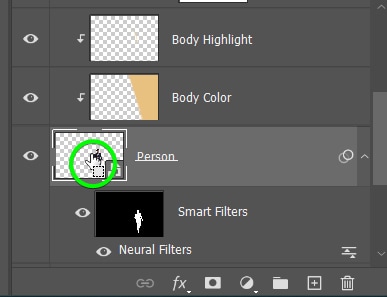
Step 3: Convert The Subject To A Smart Object
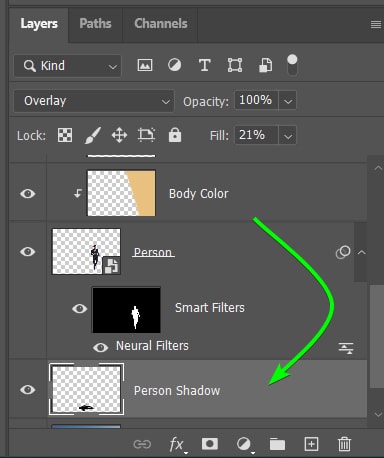
You will now have a masked subject layer above the background layer. You need to convert the subject layer to a smart object, so you can add editable smart filters to the subject and have the capability to edit the subject layer at any time, including refining the mask.
To convert the layer to a smart object, right-click or Control + click on the layer in the layers panel and select Convert to Smart Object.
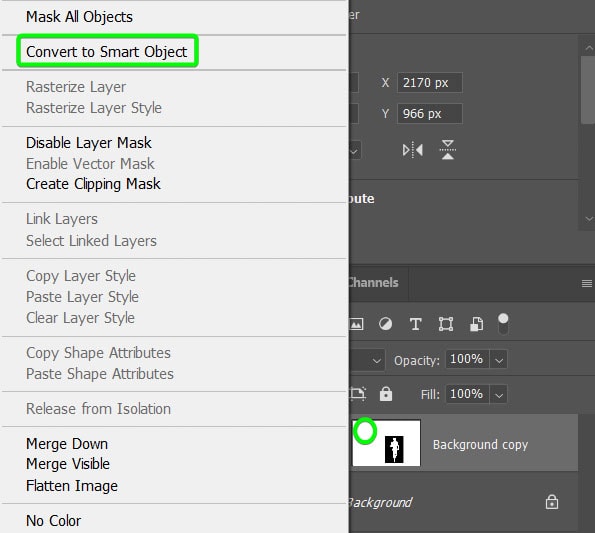
You will know a layer is a smart object by the icon in the layer’s thumbnail, and the layer mask will be moved into the smart object container. You can also start renaming the layers to keep the Layers Panel organized.
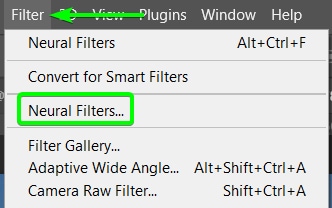
Step 4: Add A Harmonization Neural Filter To The Subject
You can blend the subject’s tones into the background using a Neural filter. These filters are available in the latest versions of Photoshop and work better than the Match Color method.
To access the Harmonization filter, ensure you have the subject layer active and go to Filter > Neural Filters.
Look through the Neural filters in the right-hand panel to find the Harmonization option under the Color section. If you haven’t used it before, download it by clicking on the Cloud icon.

Once the filter is downloaded, click the switch icon to turn the filter on.

You now have various options to adjust in the settings on the right. Firstly, set the background layer as the Reference image by selecting it from the drop-down menu.
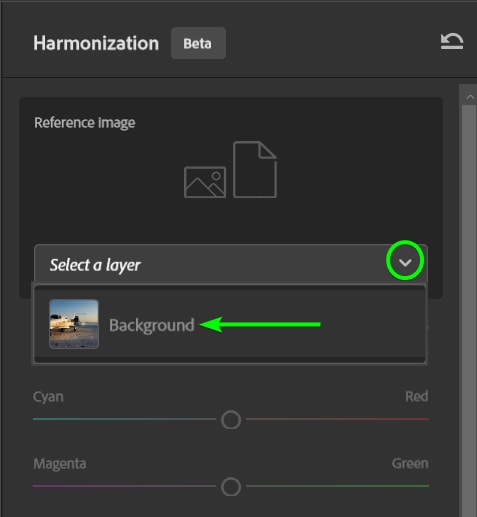
The filter automatically matches the colors to blend the images, but you can further adjust the sliders using the preview on the left-hand side as a reference.
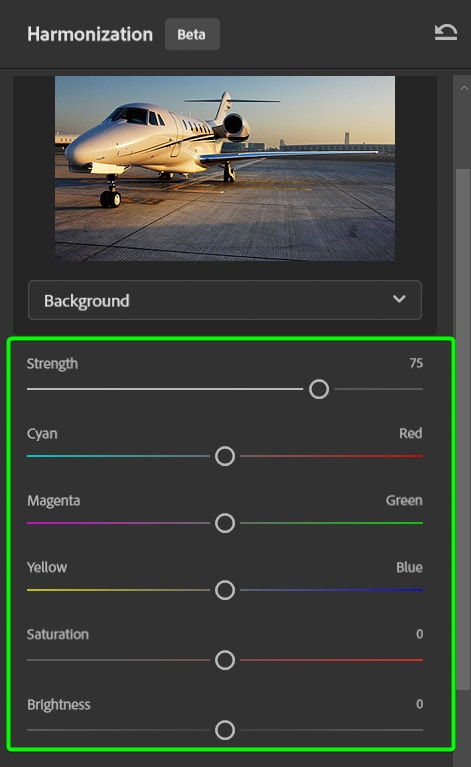
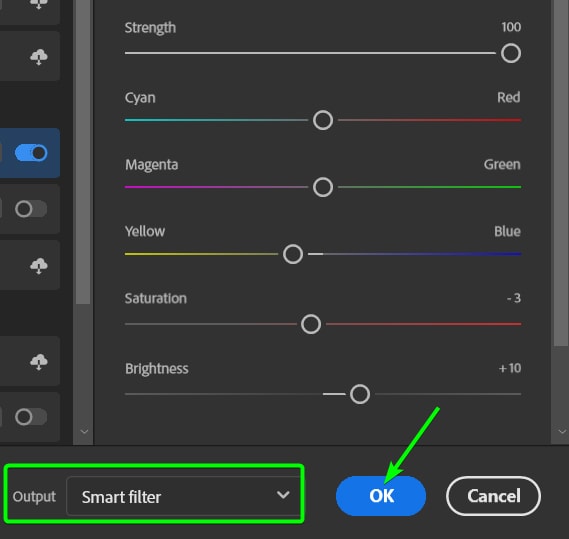
Once you have the settings as you like and the images have the same tones, set the Output to Smart Filter and click OK.
You will see the subject now has the same tones as the background.

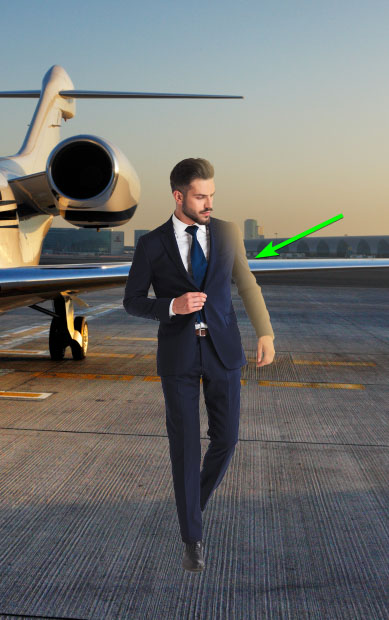
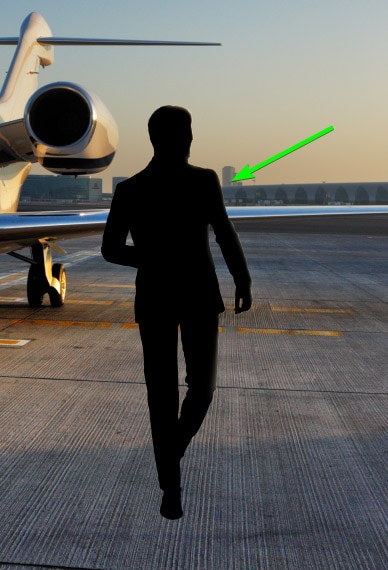
Step 5: Add A Glow From The Main Light Source Onto The Subject
When adding a person to another image, you need to take note of the light source in each photo. When you add a person onto a background, you must ensure the light appears on the person from the same direction as the light source in the background.
If you have a prominent light source on your subject, you can flip the person around to match the light source. Luckily, my images both had the light coming from the right-hand side, which you can see by the shadows in both photos.
However, you will likely need to add more lighting effects to make it realistic, such as, in my case, the golden glow from the sun needs to be visible on the subject. To do this, I can add a gradient layer clipped to my subject with the same golden color found on the jet in the photo.

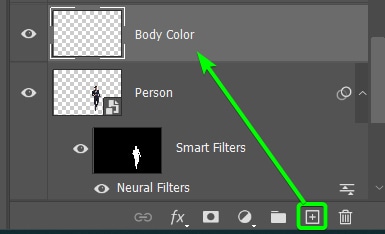
To do this, add a new layer by clicking the Create a new layer icon at the bottom of the Layers Panel. Ensure that this layer sits directly above the subject layer.
Then, activate the Gradient Tool (G) from the Toolbar.
Set the Gradient to Foreground to Transparent using the Gradient editor in the Options Bar.
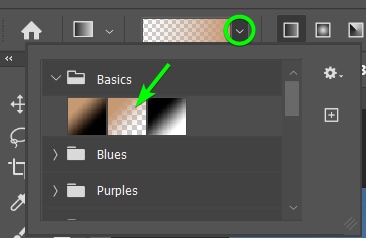
Set the Gradient type to Linear by selecting the first icon next to the gradient editor.

Then ensure that Dither and Transparency are checked in the Options Bar. I also have Reserse checked for this example as well.

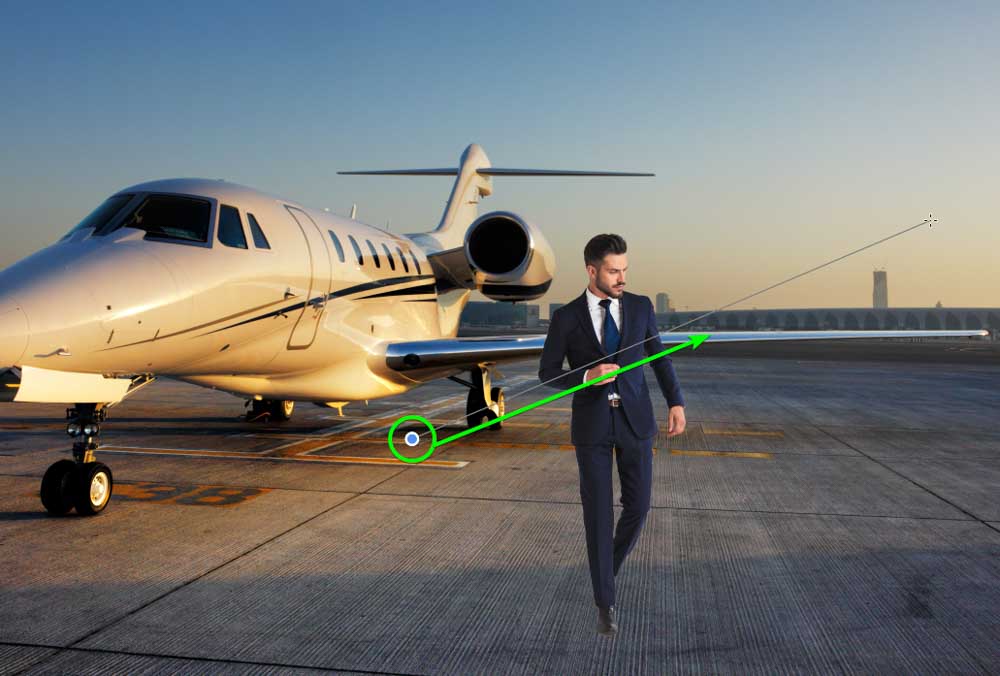
Next, sample the golden color (or your light source’s color) by holding in Alt (Win) or Option (Mac) and clicking where the color is present.

Then, click and drag from the subject toward the primary light source to add the gradient to the new layer you created.
You will notice the gradient is visible on the entire image.

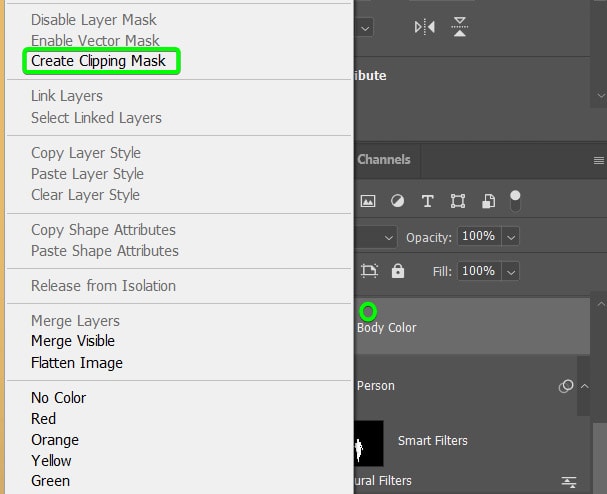
You must right-click or Control + click on the Gradient layer you created and select Create Clipping Mask to only apply the effect to the subject layer directly below it.
Then, to blend the effect better, find the Blend Mode drop-down menu next to Normal in the Layers Panel.
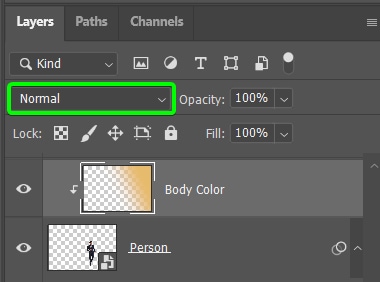
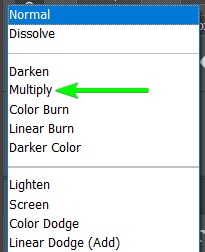
Set the blending mode to Multiply to add a slight yellow hue to the subject.
The person should now have a slight glow that mimics the light source of the background image.
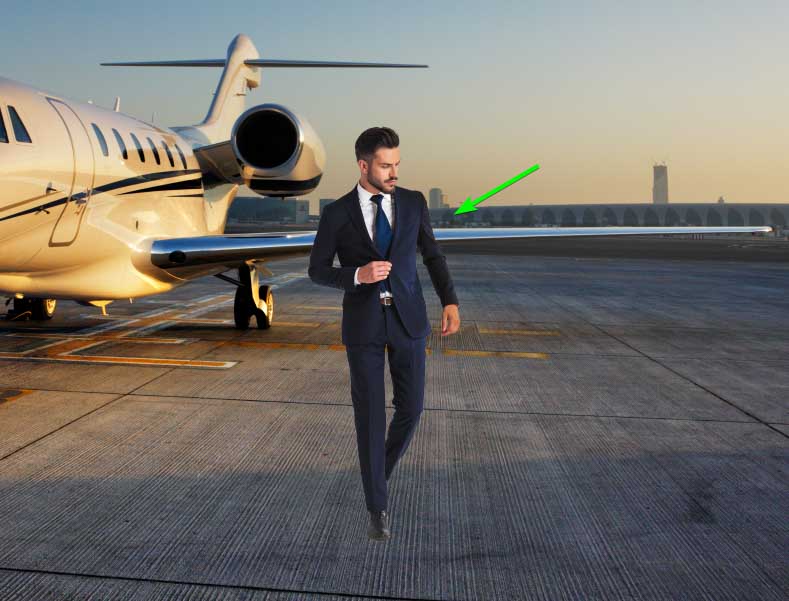
Step 6: Add A Rim Glow Light Around The Subject
Next, you need to add a rim glow around the subject to mimic the light you would typically see around the edge of a subject on the side of the primary light source.
To add the rim glow, add a new blank layer by clicking the Create new layer icon at the bottom of the Layers Panel.
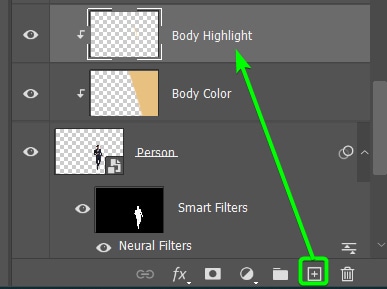
The layer should automatically be clipped to the layer below, which is necessary as you want this layer to also only affect the subject and not the background. If it’s not clipped, right-click or Control + click on the layer and select Create Clipping Mask.

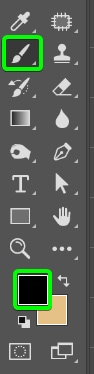
Then, select the Brush Tool (B) from the Toolbar.
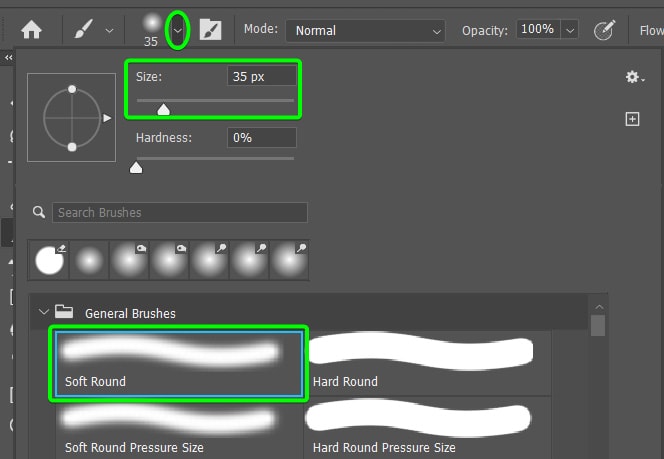
Choose a Soft Round Brush from the Brush preset picker in the Options Bar and set the size to match the edges of your subject.
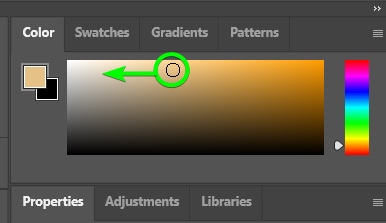
Next, sample a similar color as the main glow by holding in Alt (Win) or Option (Mac) and clicking an area where the color is present.

Then, use the Color Picker in the Color Panel to lighten the sampled color slightly by selecting an area closer to the white side of the selector.
Lower the brush’s Opacity in the Options Bar somewhere between 50% to 70% to let the color blend into the subject better.

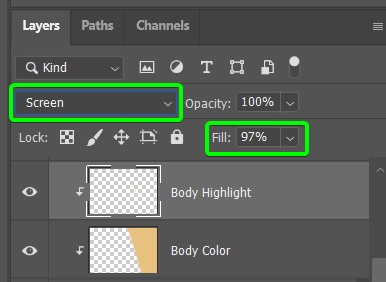
Now, you can brush around the subject’s edges on the side where the primary light source is coming from. Paint the color all around the edges where the light would create a glow around the person.
Lastly, you can change the layer’s Blending Mode to Screen. You can also drop the Fill of the layer slightly if needed to blend the glow in better.
You now have a subtle but realistic glow around the subject that matches the light source of the background image.

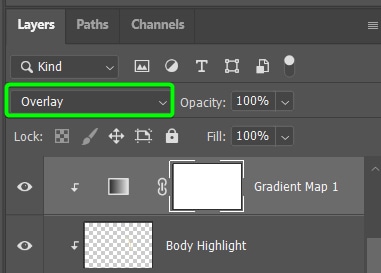
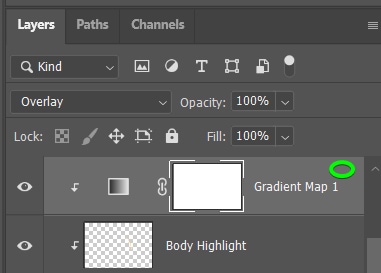
Step 7: Blend The Overall Colors On To The Subject Using A Gradient Map
When combining two images, it’s important to ensure the color tones match across both images. To ensure this happens, you can add a gradient map across the subject with the primary tones found in the background image.
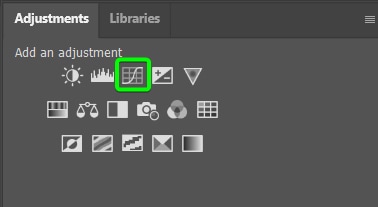
To do this, click on the Gradient Map adjustment layer in the Adjustments Panel.

When you add the adjustment layer above the clipped layer, it should automatically clip to the subject, which is necessary as we only want the effect applied to the person. If it isn’t clipped, right-click or Control + click and select Create Clipping Mask.
In the Properties Panel, click the gradient editor to change the gradient map’s colors. You want these colors to match the primary tones from the background image.
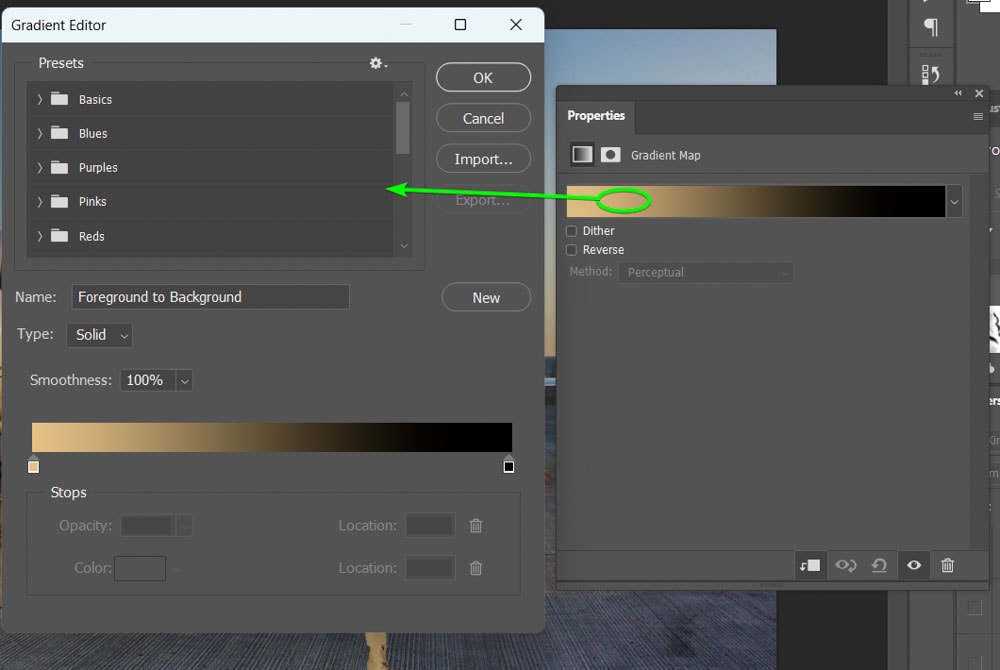
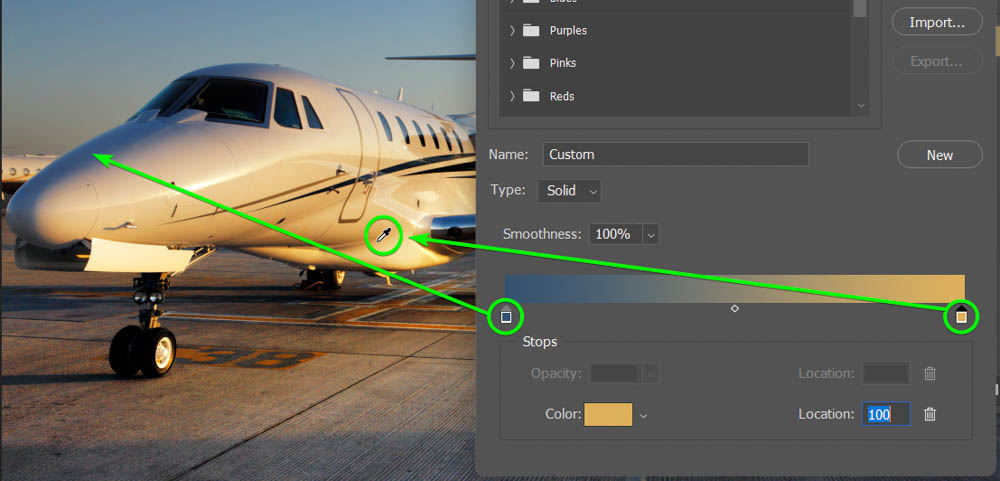
Click on a color stop below the gradient editor line and then use the eyedropper to sample a color from the image. In my case, I will select a dark blue for the one side and an orange tone for the other.
Close the gradient editor, and the gradient map is applied to the subject. Change the layer’s Blend Mode to Overlay to blend the colors into the subject.
The colors will blend into the subject but may still be too harsh.
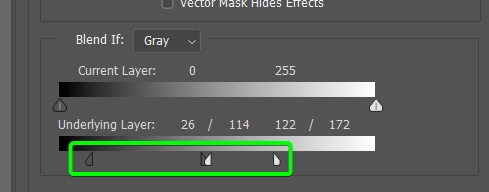
In most cases, you will need to blend the colors more into the subject, and you can do this using the Blend If sliders in the Layer Styles panel. To access the Blend If function, double-click on the layer to open the Layer Styles panel.
Then, at the bottom of the Blending Options tab, you will find the Blend If section. Ensure it is set to gray, then adjust the arrows on the Underlying layer slider.
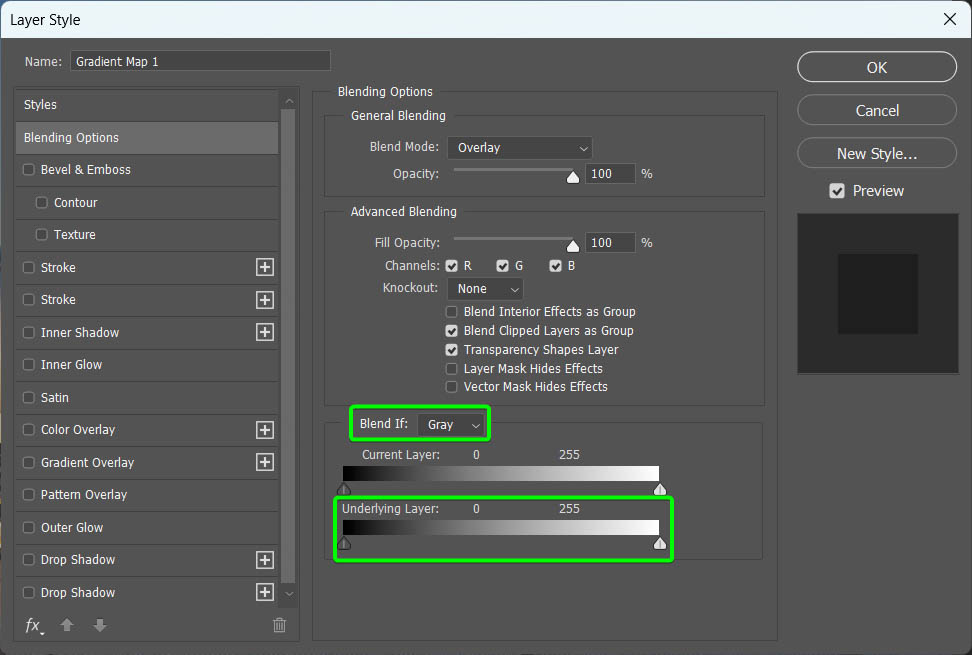
The section between the shadows and highlights arrows will remain visible, while the darker and lighter areas outside the arrows won’t be affected by the effect, which is the gradient map. Drag the arrows inward to reduce the effect.
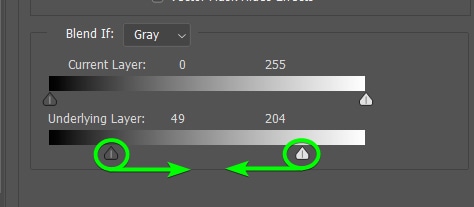
To further blend the effect, hold in Alt (Win) or Option (Mac) to split the arrows into two to create a feathered effect. This allows the visible effect of the gradient map to blend into the unaffected areas.
You will now have realistically added and blended the gradient map into the subject.
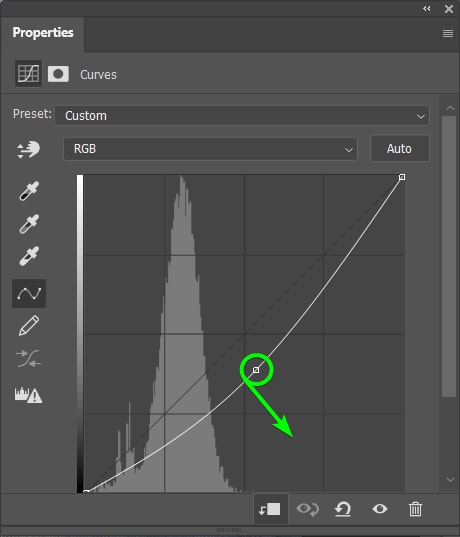
Step 8: Add A Curves Adjustment Layer To Match The Background’s Shadows And Highlights
The next step is to add a Curves adjustment layer to match the background’s highlights and shadows onto the subject.
Add a Curves adjustment layer by clicking on the icon in the Adjustments Panel.
The layer should clip as the rest did. If it hasn’t, right-click or Control + click and select Create Clipping Mask.
In the Properties Panel, you will need to adjust the curve based on your image, but I clicked in the middle of the curve to target the midtones and pulled it down to darken them.
Then, to hide the effect, select the layer mask and press Alt + Backspace (Win) or Option + Backspace (Mac). The layer mask should turn completely black.
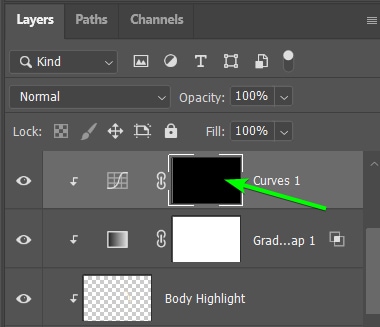
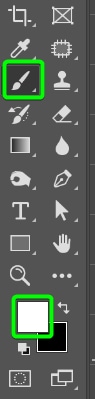
Select the Brush Tool (B) and set the foreground color to white.
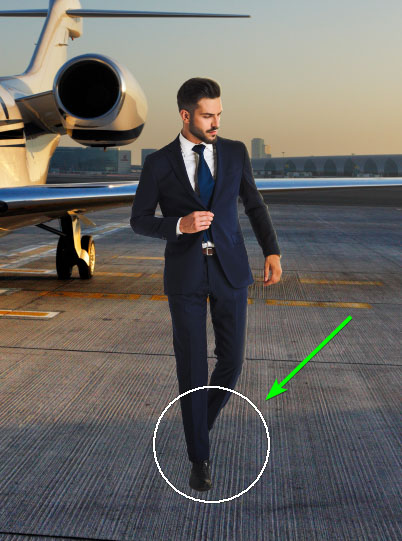
Use the brush on the adjustment layer’s mask to add the Curves effect back into the areas you need. For my example, I only want to darken the man’s shoes and the bottom of his legs to match the shadow, so I used a soft brush to paint the effect back in on those areas. This balances out specific highlights or shadows on the subject to match the background.
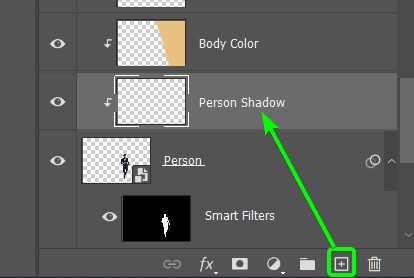
Step 9: Add A Full Shadow To The Subject
The next step is to add a realistic shadow on the ground next to the subject on the opposite side from where the primary light source is coming from. To quickly add a shadow create a selection around your subject by holding Control (Win) or Command (Mac) and clicking on the subject layer’s thumbnail.
Then add a new layer by clicking the Create a new layer icon.
Fill the selection with black on the new layer by ensuring your foreground color is black, then press Alt + Delete (Win) or Option + Delete (Mac). Then press Control + D (Win) or Command + D (Mac) to deselect the area.
Activate the Transform Tool on the shadow layer by pressing Control + T (Win) or Command + T (Mac). Then drag the middle Reference point down to the person’s feet.
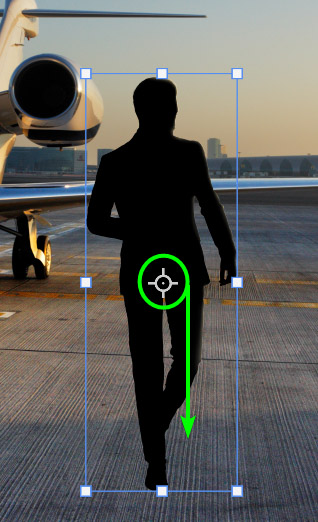
You can move your cursor outside the transform box until you see the curved arrow indicating the rotate icon.
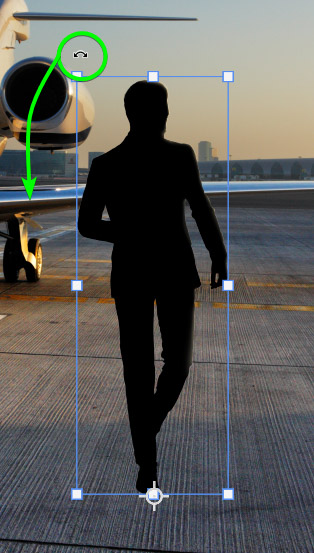
Then rotate the layer downwards so the shadow is sitting on the ground.
Next, squish the shadow inwards while holding Shift to create a realistic distorted shadow on the ground.
You can now move the shadow layer below the subject layer so the shadow sits behind the subject.
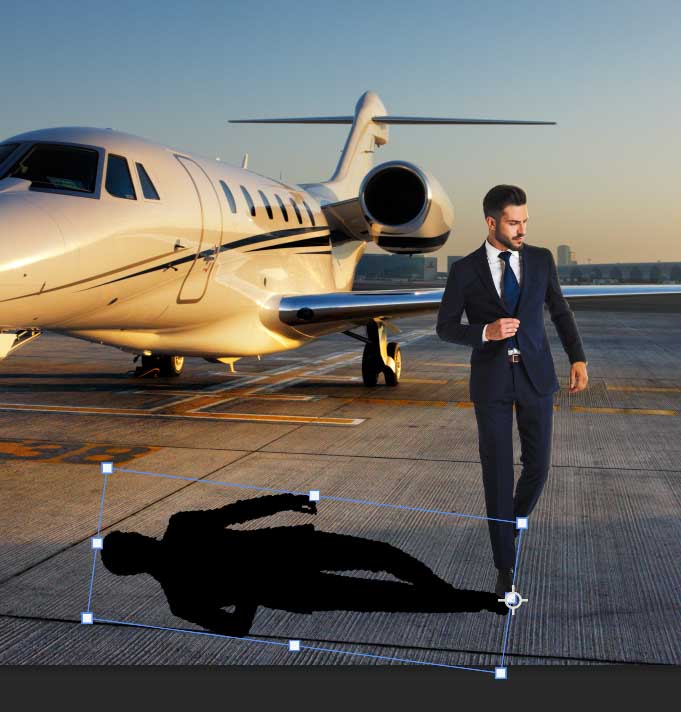
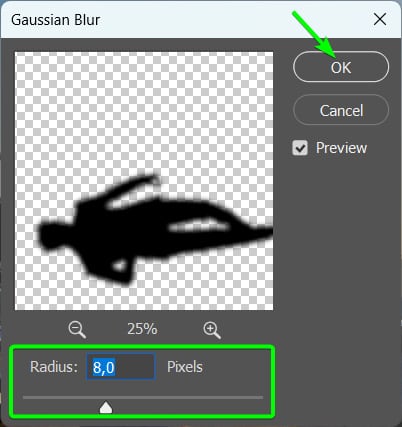
Then, to blend the shadow in, add a blur by going to Filter > Blur > Gaussian Blur.
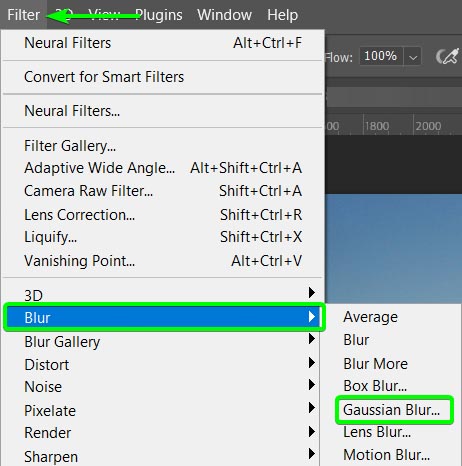
Increase the Radius slider until the shadow is blurry but still resembles a person. Click OK to add the effect.
Set the shadow’s Blend Mode to Overlay and reduce the Fill so the shadow is slightly darker than the shadow in the background image.

You now have a realistic shadow on the ground.
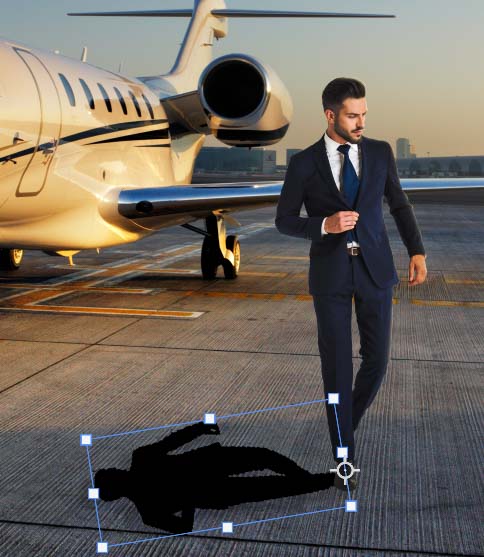
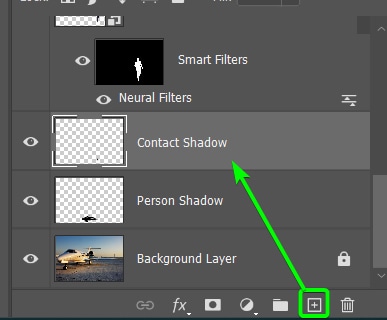
Step 10: Add A Contact Shadow Where The Subject Is Touching The Ground
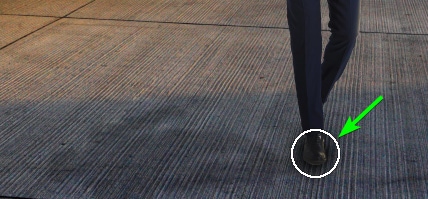
You must also add a contact shadow where the subject touches the ground, which in my case, is by his foot. To add this shadow, create a new layer below the subject layer by clicking the Create a new layer icon.
Then, select the Brush Tool (B) and set the Foreground color to black.
Use a soft round brush to add one brush mark below the person’s foot.
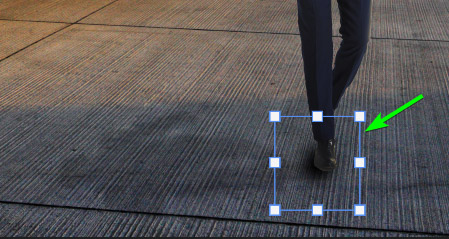
Then, open the Transform Tool using Control + T (Win) or Command + T (Mac) and distort the spot as needed.
Set the layer Blending Mode to Overlay and reduce the Fill.
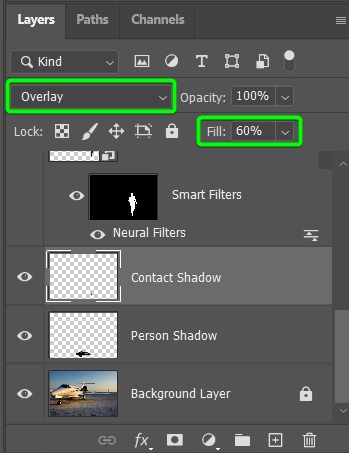
You now have a body and contact shadow added to the image.
Step 11: Add Contrast To The Overall Image
You can now add some final touches to the entire image. These adjustments are added to the subject and background image to ensure the two images blend.
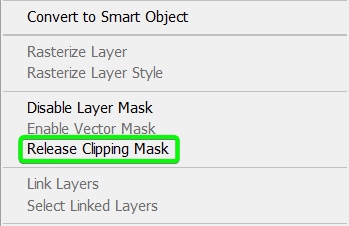
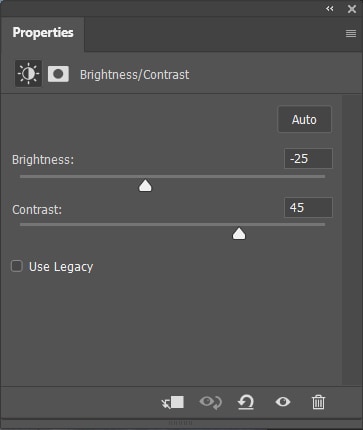
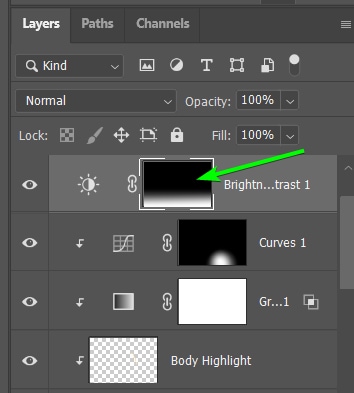
First, you can add more contrast by selecting the Brightness/Contrast adjustment layer from the Adjustments Panel.

This layer should be added to the top of the layers stack and shouldn’t have a clipping mask. If it does, right-click or Control + click on the layer and select Release Clipping Mask.
Adjust the sliders in the Properties Panel to increase the contrast across the entire image.
I then used the Gradient Tool (G) to edit the layer mask so the effect is mainly applied to the bottom of the image.
The effects will apply across the image with a feathered gradient effect, ensuring the contrast is the same on both the subject and the background.

Step 12: Add Color Grading Using The Color Balance Adjustment
You can also add some color grading to ensure the colors are the same across both images. To do this, select the Color Balance Adjustment layer from the Adjustments Panel.
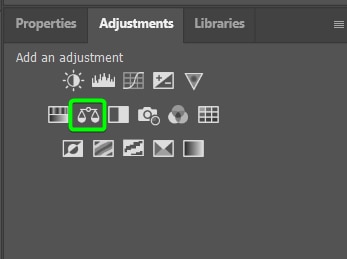
Adjust the sliders in the Properties Panel to adjust the tones in the photo as needed.
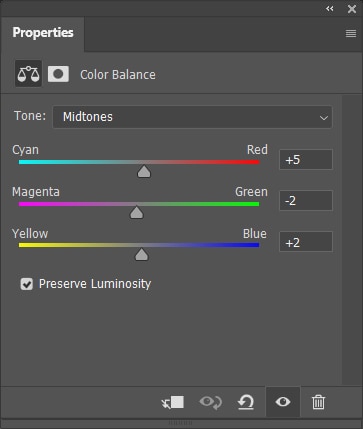
This effect is also applied to the entire image. You have now added a person into a picture and added realistic effects.