
If you’ve dealt with printing images before, you might be familiar with bleed, which is the area outside of a printed image that is left empty so that it can be trimmed off after printing. Learning how to add bleed in Photoshop is a surprisingly quick process.
You won’t have to worry about these for sharing or digital purposes. However, crop marks and bleed are useful to add before an image file is saved and sent to print. Otherwise, you may have some surprises once your images are put on paper.
What Is Bleed For?
Bleed is the area around an image meant to be cut off after the file is printed. It is the white space around the photo once it’s on paper.
Bleed is essential when printing images as most printers won’t be able to print to the edge of the page — and even if they could, this is risky as you could lose part of your image if it doesn’t fit the paper perfectly or if the printer prints the image slightly skewed. If you don’t specify the bleed around an image, you will ultimately have less control over how your picture ends up once printed.
How To Add Bleed In Photoshop
Step 1: Go To Image > Canvas Size
You can still add bleed to the document if you’ve already started a project. Make sure your image on the document is the size you’d like to print, and then head to Image > Canvas Size.

Step 2: Increase The Width And Height By The Bleed Amount You Want
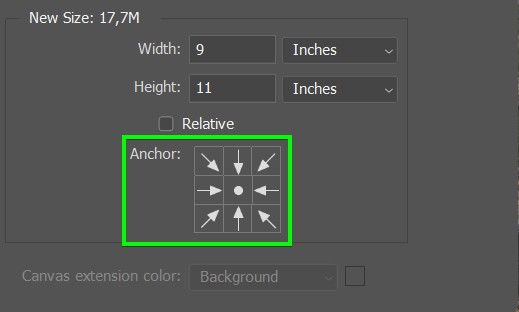
In the Canvas Size window, you can enter a new size for the canvas. Remember that if you want a half-inch bleed on all sides, you’ll have to add one inch to the width and height. For instance, if the image you’re using is set to print at 8×10 inches, and you want a 0.5-inch bleed on all sides, you will increase the canvas size by 1 inch all around to 9×11 inches.

Step 3: Set The Anchor Point To The Center
Since you want the extra space to appear all around your image, set the anchor point to the center so the extra space is added equally around the image. Click OK when you’re done.
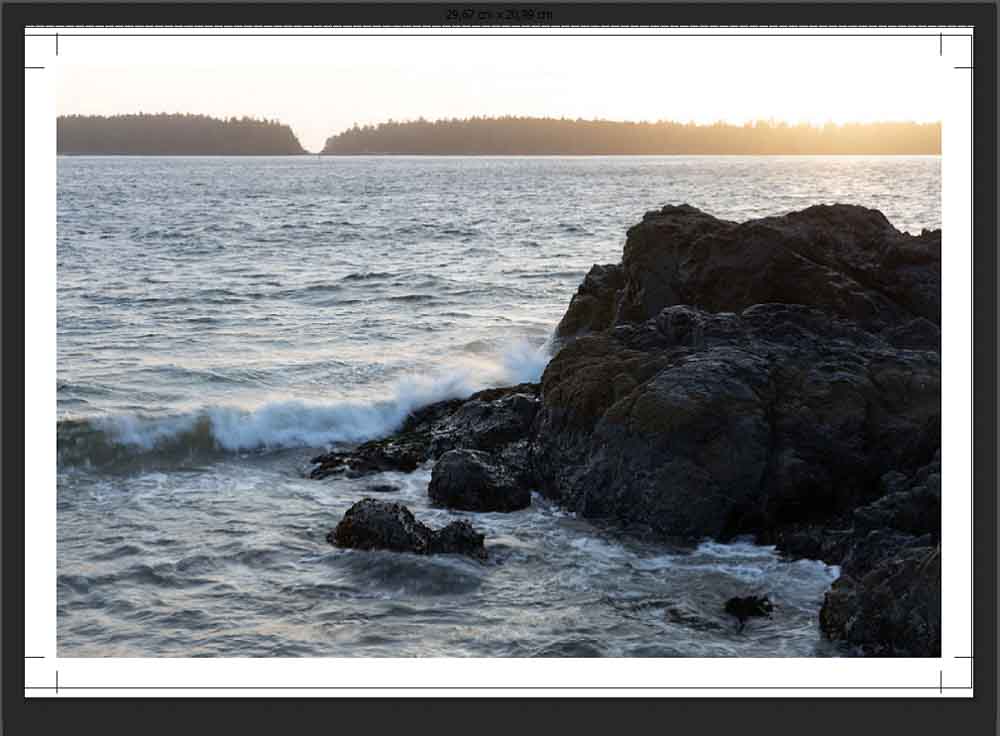
Your image will now be surrounded by a white border of 0.5 inches on each side.

Note: If you are creating a new document, remember to add the bleed amount to the original width and height of the image or document in the New Document Window.
How To Add Crop Marks In Photoshop
Step 1: Go To View > Guides > New Guide Layout
You can add crop marks to your image by adding guides around the image and then stroking the corners of the guides. To do this, add guides to your image by heading to View > Guides > New Guide Layout.


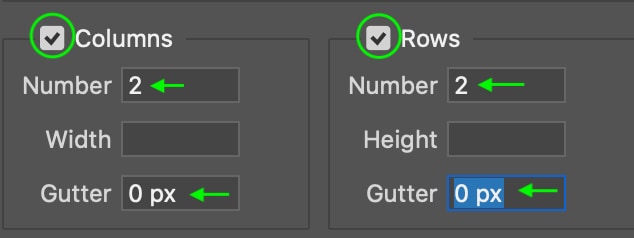
Step 2: Set The Column And Row Numbers To 2 And The Gutters To 0
In the window that appears, ensure both columns and rows are checked and set 2 Columns and 2 Rows. Set the Gutter to 0. Click OK when you’re done.
Step 3: Go To View > Snap
You also want to ensure Snap is enabled for the most accurate placement of the selections by clicking View > Snap. Snap is enabled when there is a checkmark next to it.

Step 4: Move The Guides To The Border Of The Image
Set the guides so that they sit along the border of your image by clicking and dragging them. They will snap in place along the borders of your image.

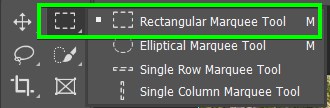
Step 5: Create Rectangular Marquees In Each Corner
Head to the Layers Panel and make sure the image layer is selected. Then, click the Rectangular Marquee Tool (M) and create rectangular selections in each corner within the guides. The selection should snap to the edges of the guides.

Step 6: Go To Edit > Stroke To Add Strokes To The Rectangular Selections
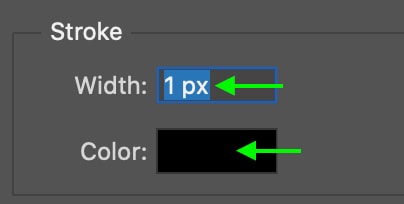
Finally, stroke the selections by heading to Edit > Stroke. In the Stroke Settings window, set the stroke Width to 1px and the Fill Color to black. Click the color swatch and select black to change the fill color.
Delete or move the guides by clicking and dragging them, and you’ll see the crop mark has appeared in the corner.

Repeat this process for the other three corners, and then head to View > Guides > Clear Guides to turn off the guides. Your image will have four crop marks around the corners of the image. You can export the project as it is with the crop marks intact.

Step 7: Add Temporary Crop Marks For Direct Printing (Optional)
First, head to File > Print. The Photoshop Print Settings Window will open. Make sure it is scaled correctly by checking Scale To Fit Media.

Scroll to the bottom until you see the Functions area. Click Bleed.

In the window that appears, you can add the amount of bleed you added to the canvas. This will ensure the crop marks are placed in line with the bleed rather than the edge of the canvas.

Finally, you can set the crop marks in the Printing Marks area. You can check the boxes for Corner Crop Marks and Center Crop Marks, and you’ll see the marks appear in the preview. The Center Crop Marks won’t appear on all images.

Click Print, and the printed image will print with the marks set around the image. Or, you can click Done, and the print settings with the crop marks will save for when you’d like to print the file in the future.
If you run into problems with quality when scaling your image to a certain canvas size, see my guide on resizing images without losing quality here.
Happy Printing!


