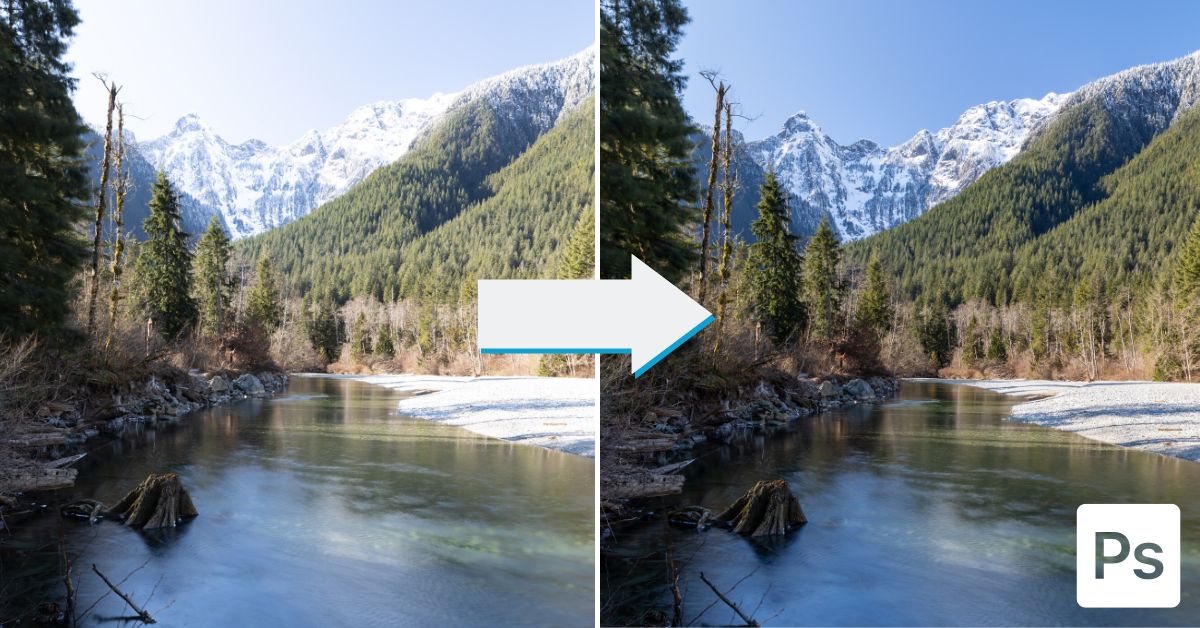

You can create high dynamic range (HDR) images in Photoshop to end up with a more balanced exposure. The HDR technique works on scenes with vastly different exposure ranges, such as a dark foreground and a bright background. If you can’t capture the correct exposure while shooting, you can combine a few images shot at different exposures and make an HDR photo in a few easy steps.
Once you know the basics of merging bracketed images — a set of pictures taken at the same angle with various exposure values — you can make a photo that looks how the human eye would see the scene with a correctly exposed foreground and background. This 9 step process is perfect for high-contrast scenes such as architecture or landscape photography.
How To Make HDR Photos In Photoshop
To make an HDR photo in Photoshop, you need at least two pictures — although I recommend having three to five images — taken at the same angle with different exposure settings. Once you have the images, merge them into an HDR photo using the Automate function in Photoshop and adjust the settings to create the correct exposure.
For the best results, use a tripod when shooting the images to ensure the pictures all line up correctly and contain the same information. I recommend adjusting the exposure by the same stop value for all of your HDR images. 1-Stop bracketed images tend to work best as a baseline.
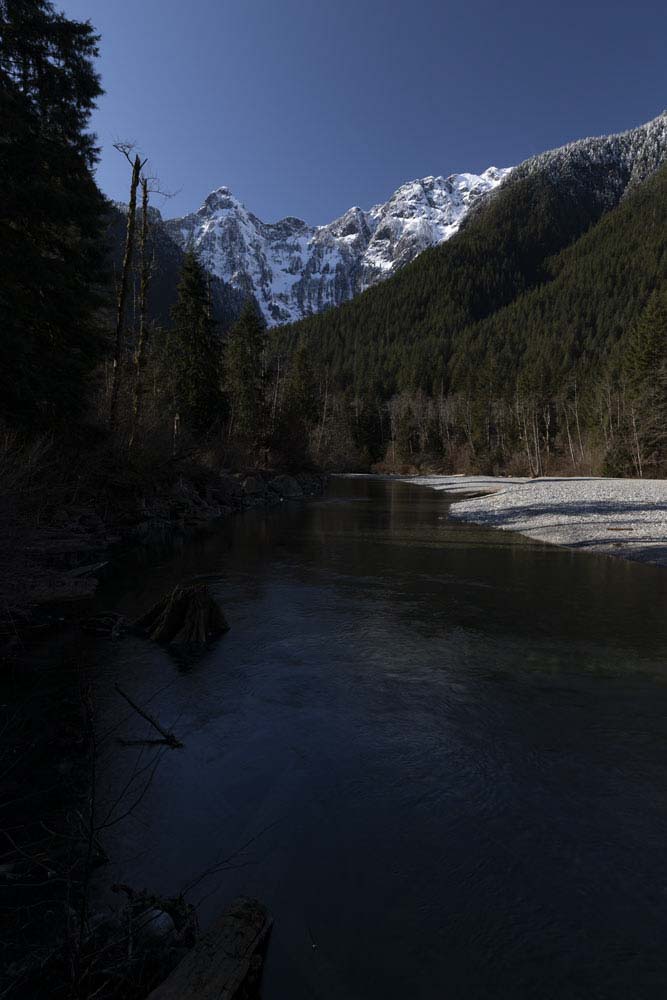
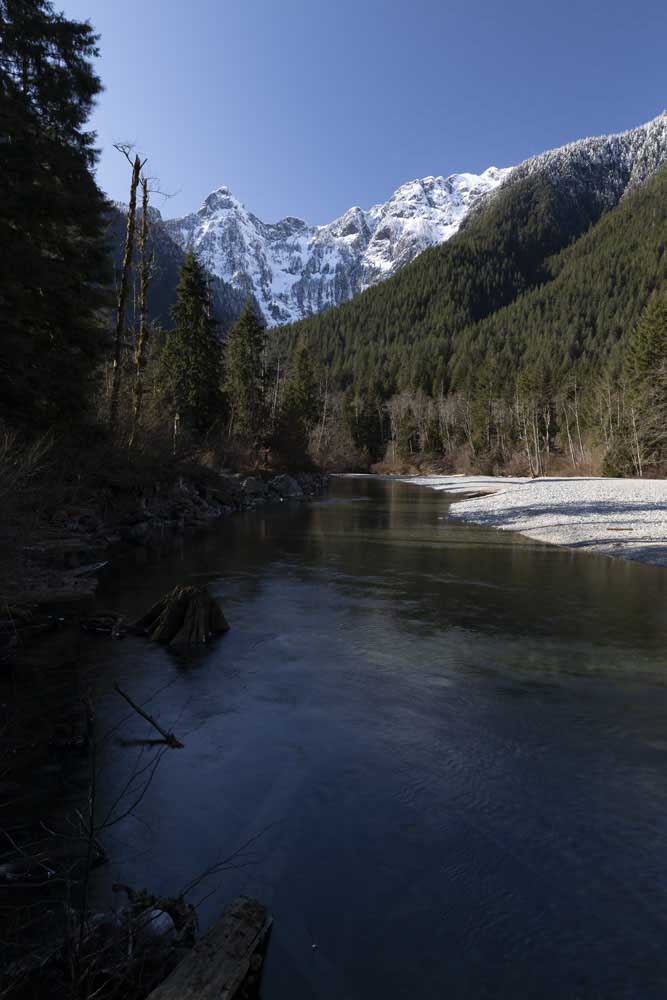
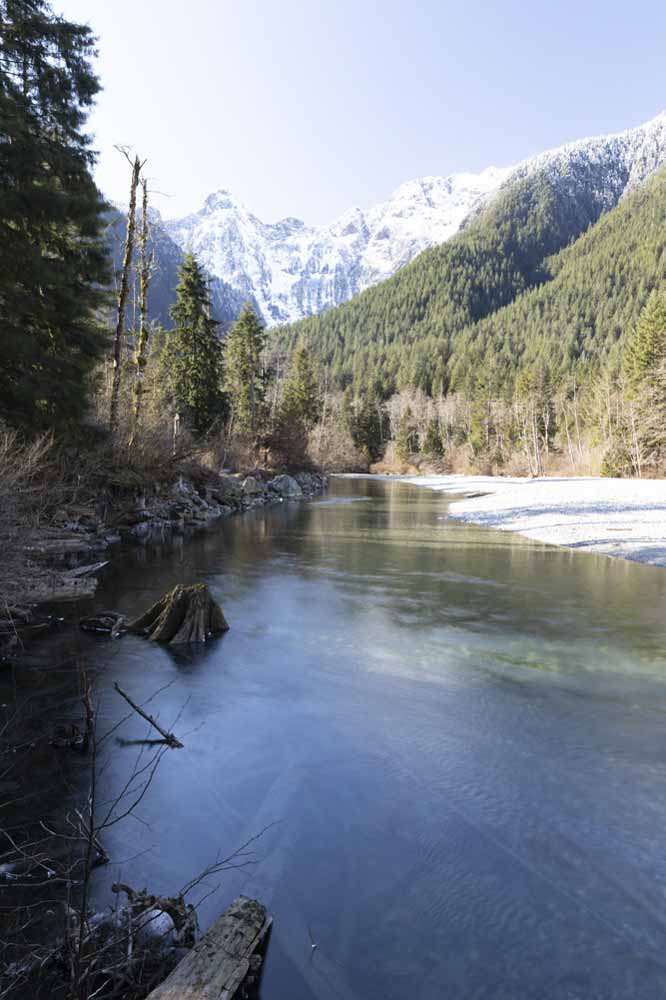
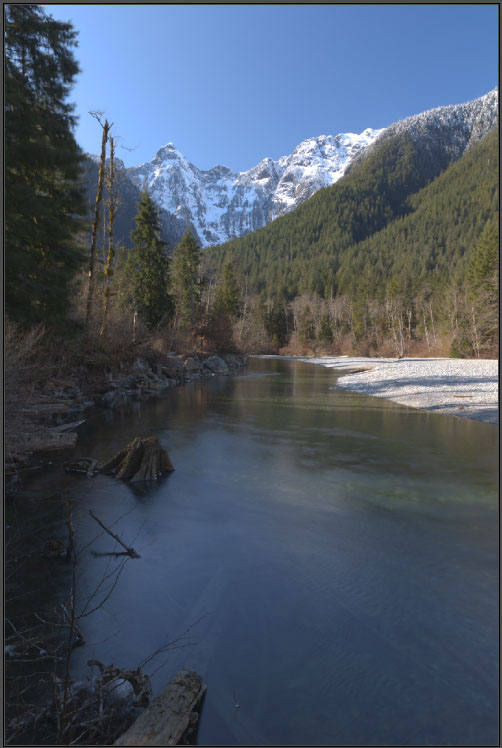
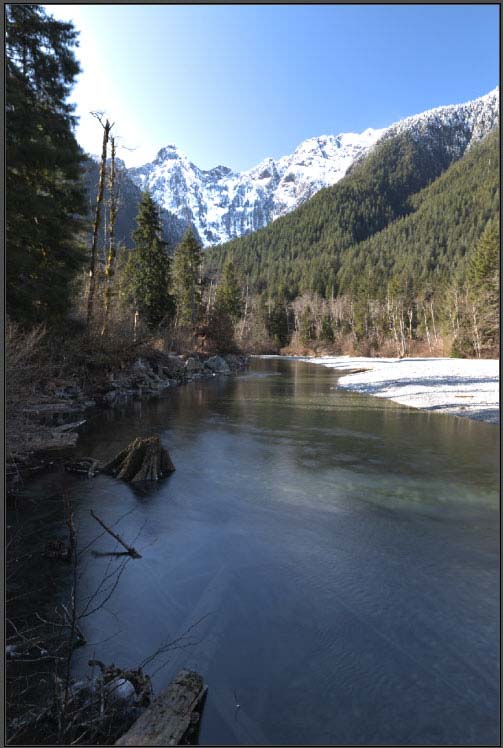
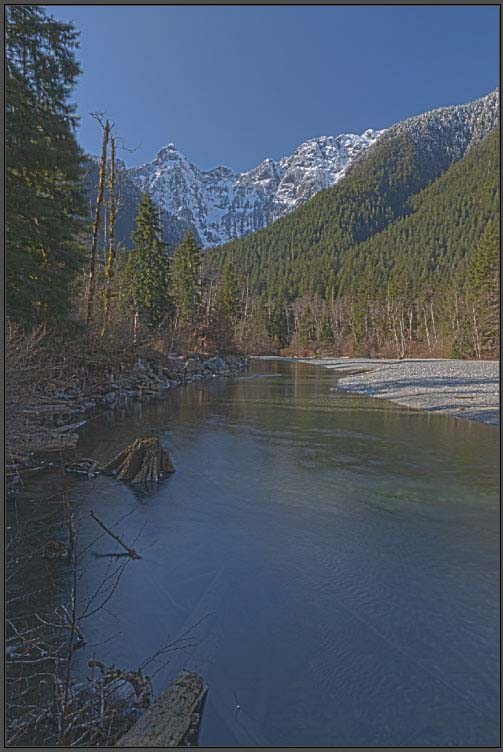
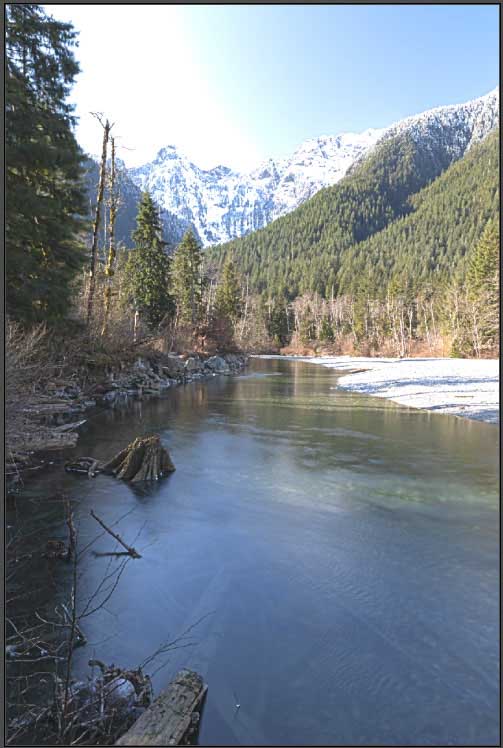
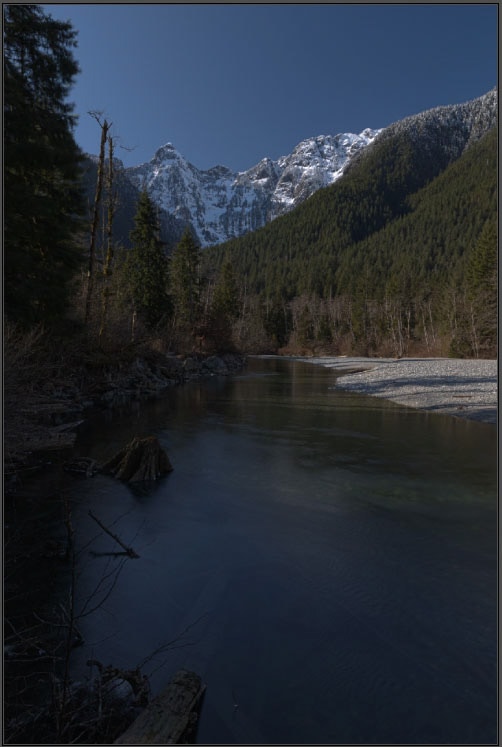
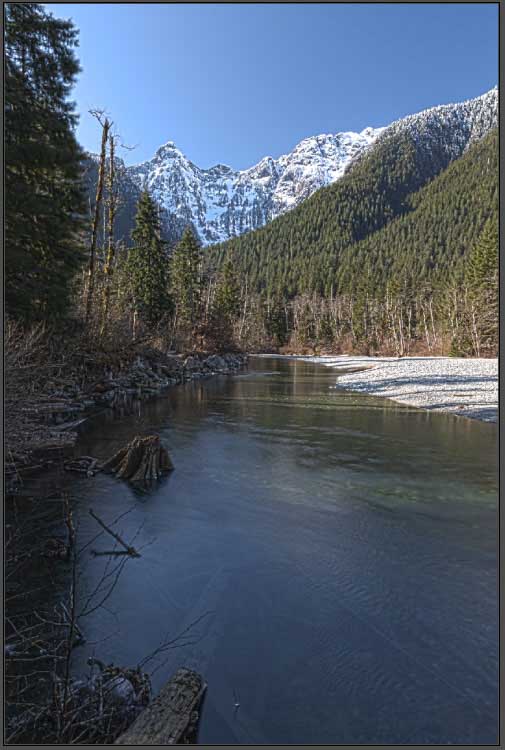
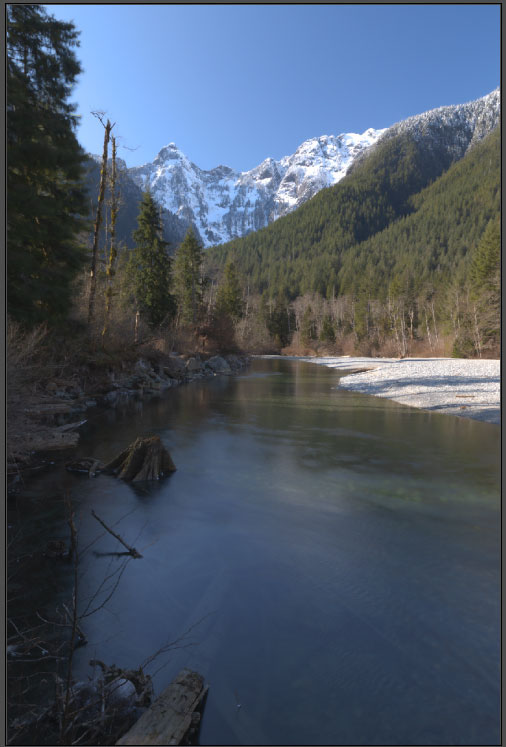
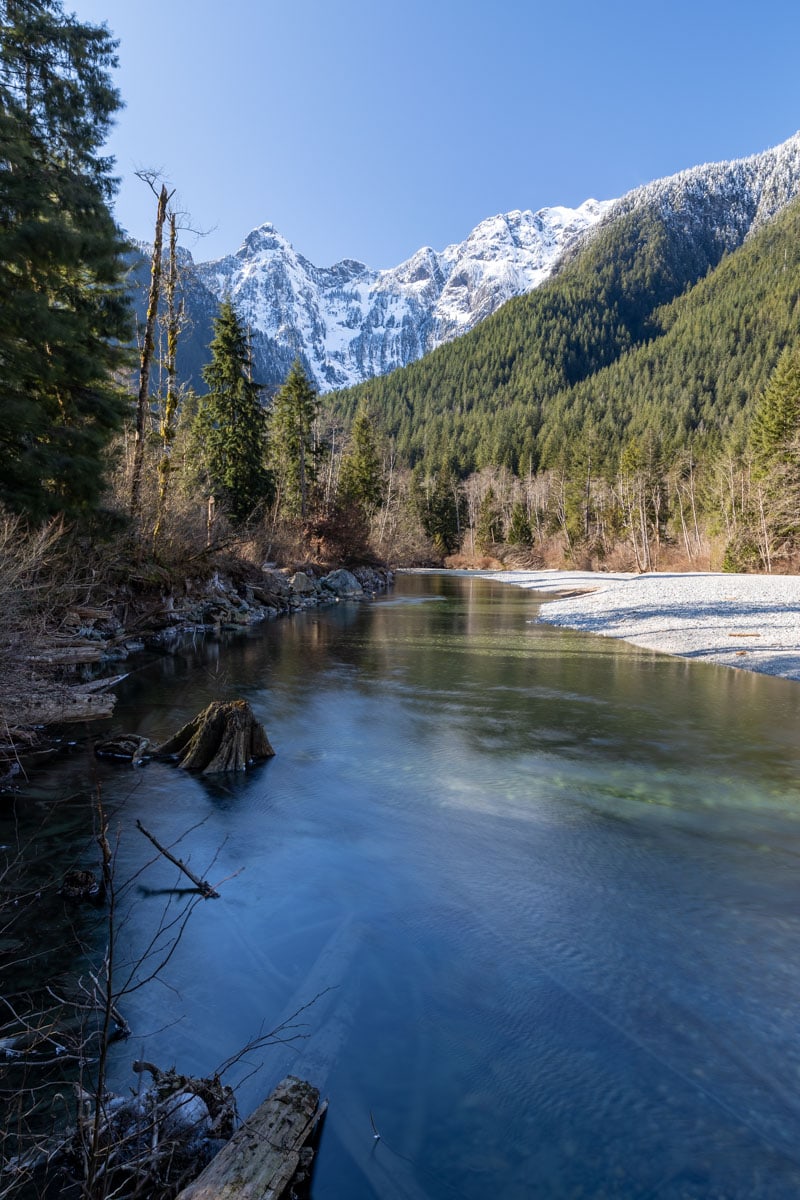
With this, you’ll have one photo underexposed by one stop, another at the “correct” exposure, and the third at one stop overexposed. I will be using the following three images to demonstrate the process.
If necessary, you can increase the stops in camera, but make sure the increments between the photos are the same. Once you have your images, follow these steps to create a single well-exposed HDR photo.
Step 1: Edit Your Images In Camera Raw (Optional)
The first step is optional and is only necessary if you want to make minor corrections on the individual images before moving on to the merging process. Skip this step if you don’t need to edit the photos beforehand and if you didn’t take the pictures in a RAW format.
When you open the RAW images in Photoshop, they will automatically open in the Camera Raw workspace.
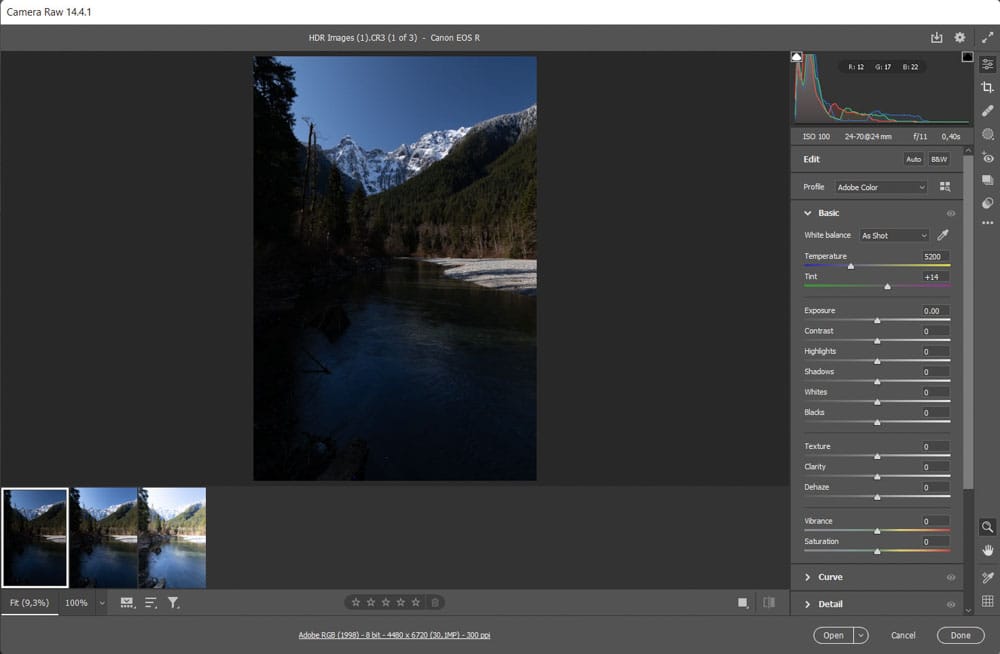
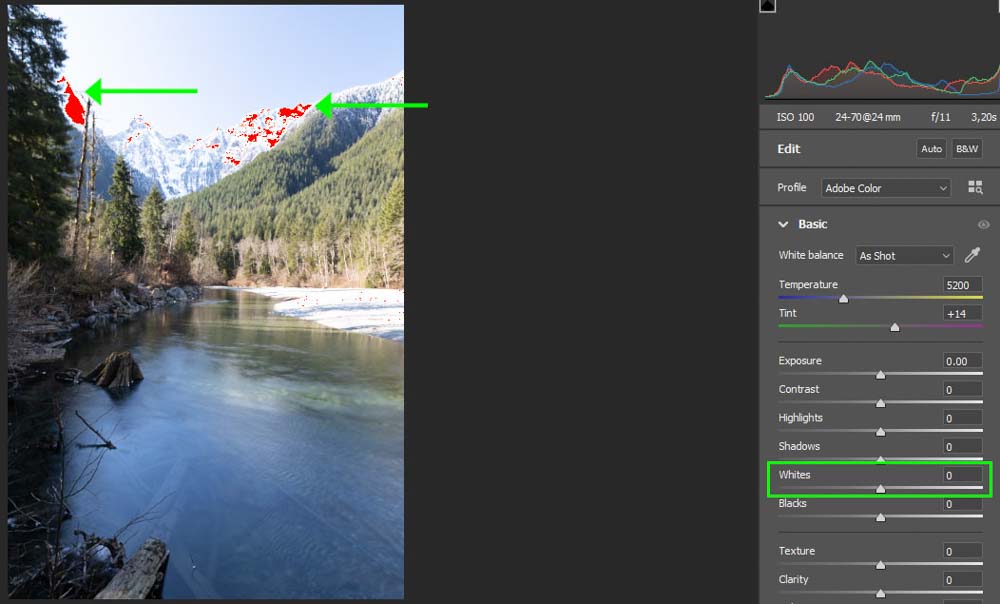
Since you are correcting the exposure using HDR merge, you don’t need to worry about the exposure, highlights, or shadows sliders. However, before moving on, you can correct any blown out or deeply underexposed areas in any image.
For instance, in my overexposed image, I will use the Whites slider to try to recover some of the information around the snow-capped mountains.
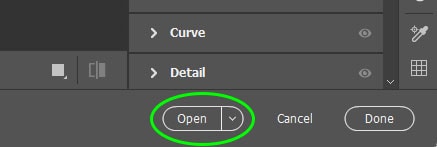
Once you have completed any other necessary edits, such as Temperature and Tint, select all of your images by holding in Control (Win) or Command (Mac) and clicking on each thumbnail. The photos have white and gray borders when they are correctly selected.

When the thumbnails are selected, press Open to transfer the images to the Photoshop workspace.
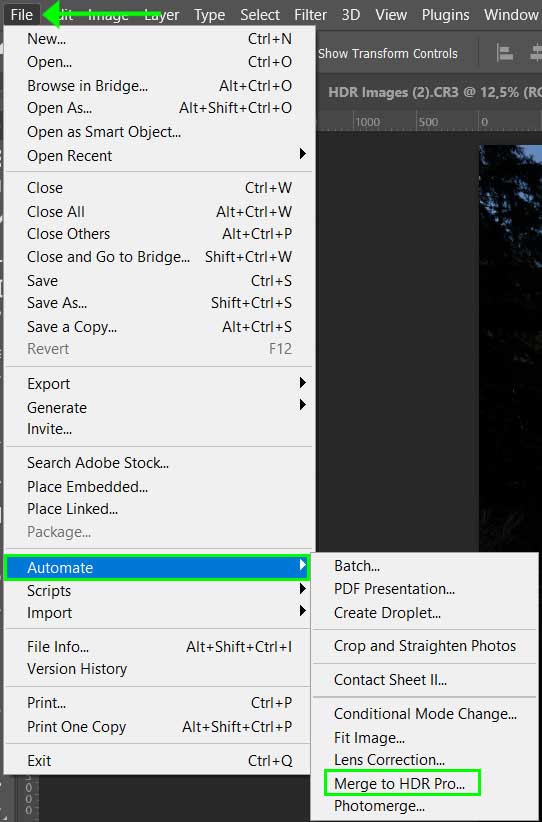
Step 2: Go To File > Automate > Merge To HDR Pro
To open the HDR workspace, you could either open each image in a separate tab in Photoshop first or select the photos from a file on your computer.
You will have three tabs in the workspace if you have followed step 1 or opened your images.

Merge the images by navigating to File > Automate > Merge to HDR Pro.
A dialog box opens to allow you to select the bracketed pictures you want to merge. If you have already opened your images, press Add Open Files to select all the images open in Photoshop.
Alternatively, press Browse to select images from your computer. When you have added the open files or chosen them from your computer, they appear in the box.
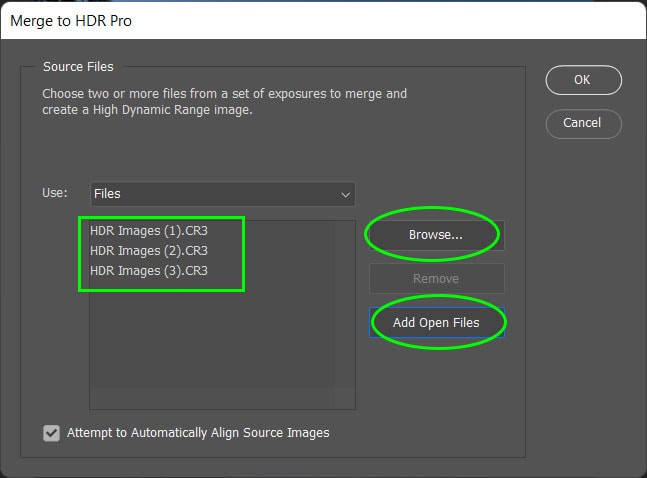
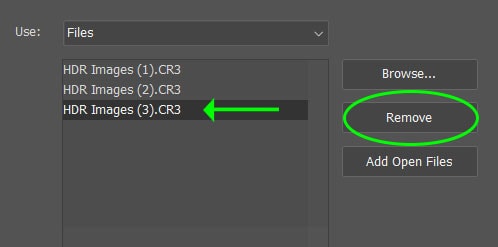
If you had other images open in Photoshop or selected too many, you could remove an image by selecting it and pressing Remove.
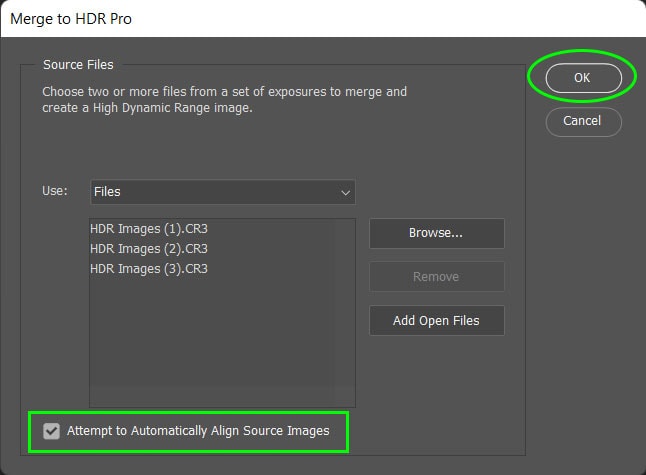
Make sure the bottom box is checked to allow Photoshop to align the images as best as possible — this step is essential if you didn’t use a tripod or if you shifted the angle slightly between shots. Then click OK.
Note: You will be asked to manually enter the exposure values (EV) of the photos if this information isn’t contained in the files.
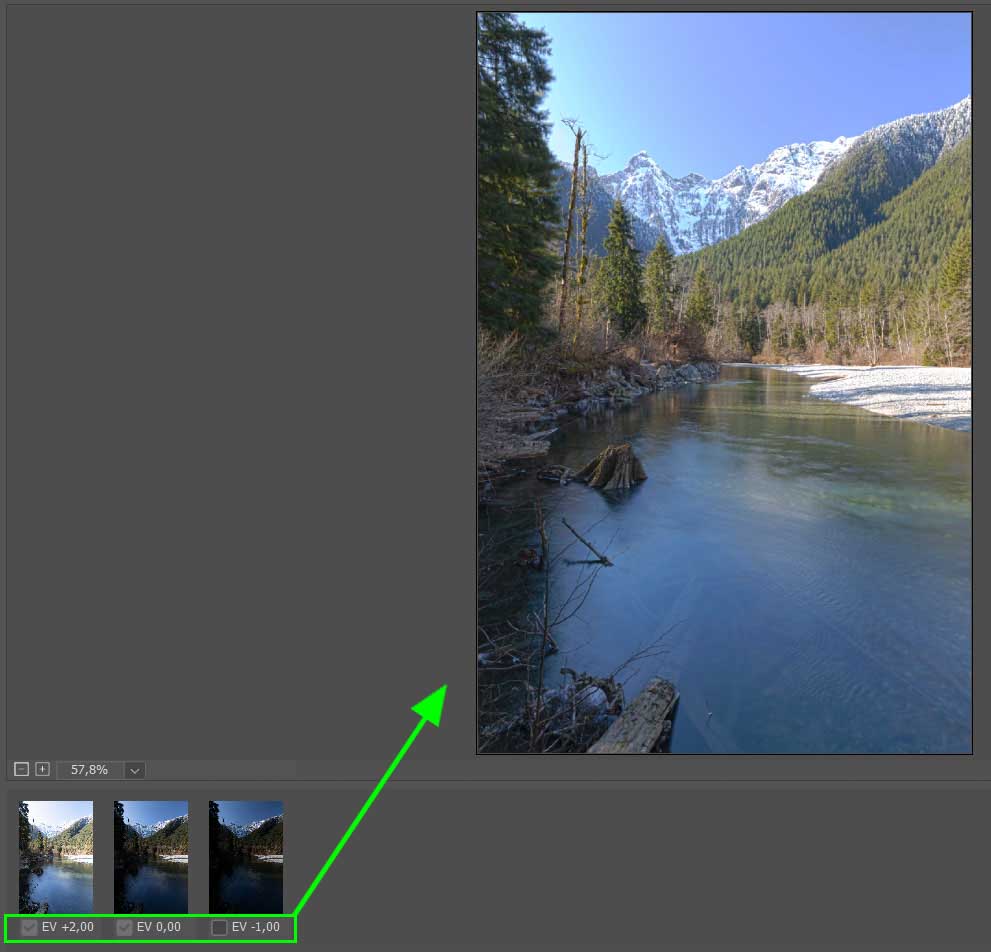
Wait while Photoshop works to collect the information from the pictures. After a few moments (depending on how many images you are using), the Merge to HDR Pro workspace opens. A preview of the merged photo appears in the middle of the workspace.
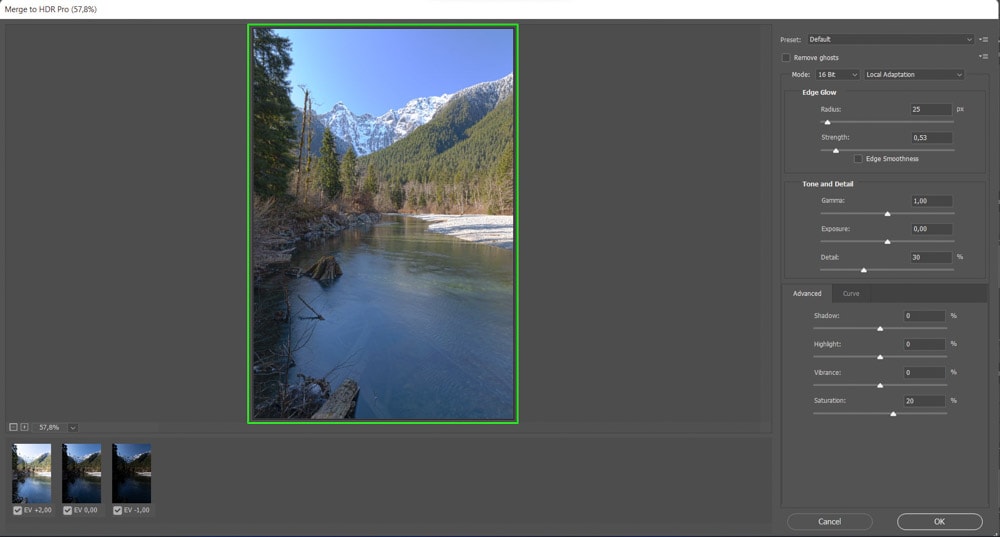
The picture thumbnails appear at the bottom of the workspace; if you don’t like the result, you can try removing some images to see the new developments. Uncheck a photo and watch the result image change to show you how it would look without using that exposure.
You can uncheck as many pictures as you like as long as at least two images are still checked.
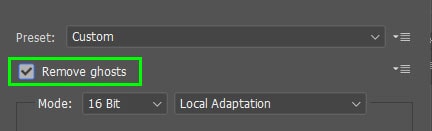
Step 3: Check “Remove Ghosts” And Select A Bit Mode
In the right-hand panel, you have several settings to adjust the merge result. The first two things to work with are removing ghosts and choosing a Bit mode.
You can check the box next to Remove Ghosts to correct any inconsistencies in the image. This setting is useful when the picture has moving elements, such as grass blown by the wind, moving water, or images that aren’t perfectly aligned.
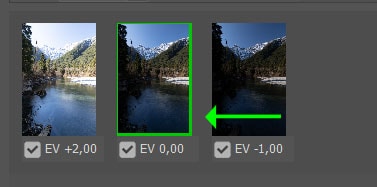
Once Remove Ghosts is checked, you can select which image should be the base image for the merge. Click on one of the image thumbnails to see which one produces the best tonal range while removing the slight movement in the picture.
Note: Remove Ghosts won’t work on images with extreme motion blur or moving objects. Creating HDR photos requires pictures with little or no movement.
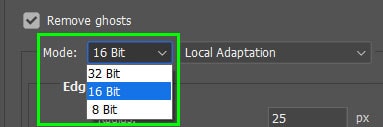
Next, select the Bit mode you would like to use for the picture between 8-bit, 16-bit, and 32-bit. The Bit mode determines how many colors are available in the final image.
Choosing 32-bit is best used for professional editing or if you want to save a copy of the image containing all the exposure information from each shot — because you can change the image to 16- or 8-bit later on. You can also edit the picture further in Photoshop.
If you don’t need the high range of colors, I recommend using 16-bit or 8-bit because these options create smaller file sizes. However, the lower bit-mode options can’t store the luminance values of an HDR image. You need to adjust the settings to make a vibrant HDR photo.
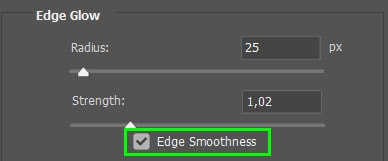
Step 4: Edit The Edge Glow Settings
Once your bit-mode is set, you can move on to edit a few settings to alter the resulting image.
Note: Using 32-bit removes the following settings and allows you to change the white point in the image for preview purposes only.
In the first settings section, you can change the Radius, Strength, and Edge Smoothness of the brightness regions. Use the sliders to remove any halos in the image because incorrectly converted HDR images sometimes create a glow around contrasts in the picture.
Use the Radius slider to adjust the size of the glow effect and the Strength slider to determine how strongly the effect should be applied.
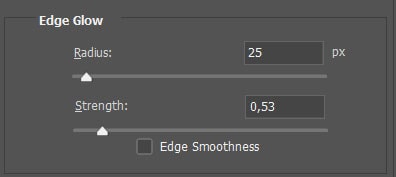
While the Strength slider is set to 2, you will notice the image is quite blurred when the Radius slider is set to 1 pixel.
Compared to the sharpness of the image when the Radius slider is set to 500 pixels.
Checking the box next to Edge Smoothness preserves smoothing while amplifying detail.
Step 5: Edit The Tone And Detail Settings
Next, edit the settings of the tones and details in the image.
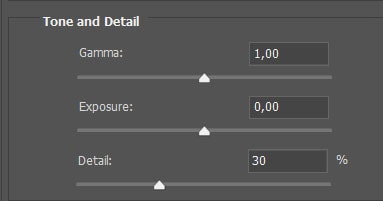
The Gamma slider controls the contrast in the image. Moving the slider to the right creates a washed-out effect, and moving it to the left increases the contrast.
The Exposure slider adjusts the overall brightness of the image. Use this slider if the HDR merge left the entire image slightly under- or over-exposed.
The Details slider softens or sharpens the appearance of the image. Adjust the slider to the right to increase the sharpness or to the left to soften the picture.
Step 6: Edit The Advanced Settings
Next, you can adjust the advanced settings if needed on the image. These settings are only necessary if you feel that your image needs more adjustment.

- Adjust the Shadows slider to lighten or darken the shadows in the image
- Adjust the Highlights slider to lighten or darken the highlights in the image
- Adjust the Vibrance slider to increase the intensity of muted colors without affecting saturated colors
- Adjust the Saturation slider to increase or decrease the intensity of the image’s colors
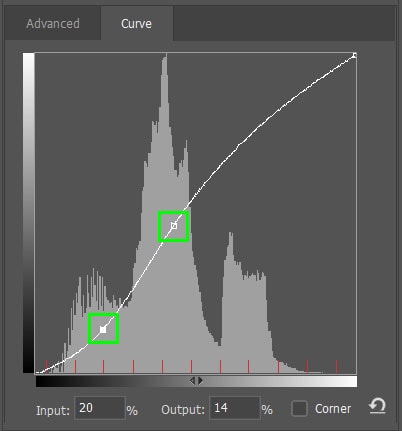
The Curves tab, next to the Advanced settings tab, allows you to adjust the image by adjusting the darks, shadows, mid-tones, and highlights separately.
Add anchor points along the curve and drag the anchor point up to lighten the tones and drag it down to darken them. This setting works in the same manner as the Curves adjustment layer.
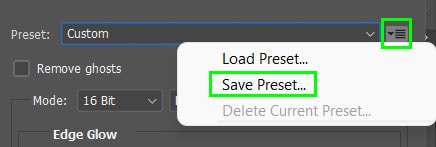
Step 7: Save The Settings As A Preset
If you want to save the settings as a preset to use on other HDR images, you can easily save them as a preset. A preset makes it easier to apply these same settings to other photos you are editing.
Once you have adjusted the settings as you’d like, click on the menu icon at the top of the settings panel and select Save Preset.
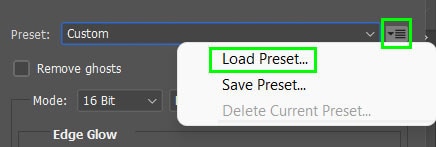
Then save the preset in a folder on your computer to use later by clicking the same menu and selecting Load Preset.
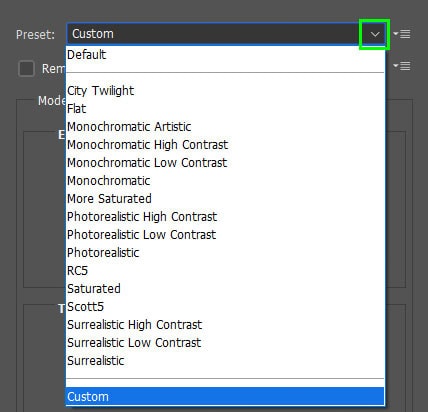
You can also use the drop-down menu to choose one of Photoshop’s default presets to add to your image.
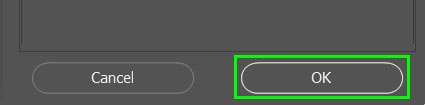
Step 8: Click OK To Create The HDR Image
Once you have tested the various settings and created a well-exposed image with vibrant colors, you can create the HDR picture.
Press OK at the bottom-right of the workspace. Photoshop will take a few moments to make the image based on how many photos you merge and how many settings you change.
Step 9: Add Further Edits To The Image (Optional)
Once the program is done processing, the HDR image opens in the Photoshop editing workspace. You can now use Photoshop tools, adjustment layers, effects, and filters to edit the merged photo further as you wish.
However, the merged HDR photo should be edited enough using the HDR workspace in most cases. Since the image is correctly exposed, showing detail in the light and dark areas of the picture. If you adjusted the advanced settings, the photo should also be vibrant and colorful without looking oversaturated.
If you’re unsure of the different ways you can edit your photos in Photoshop, be sure to check out my 10-step process to editing professional images in Photoshop here.


