Lightroom catalogs store your photo data and allow for non-destructive editing. While your photos aren’t actually stored in the catalog itself, you need to have a Lightroom Catalog in order to access your photos in Lightroom Classic. Catalogs are very easy to create and use in Lightroom.
There are a few differences between Lightroom Classic and Lightroom CC. Layout and storage are big differences, but Lightroom Catalogs are one of the biggest differences. Catalogs are used to store data, which is directly stored in Lightroom CC.
When To Create A New Lightroom Catalog
Catalogs are Lightroom’s place to store information about the photos you upload and edit in Lightroom. A catalog itself is where information lives, and it is connected to your photo by way of holding metadata, edit history, and categorization features tied to each photo.
The catalog doesn’t hold your actual photos, but it can recall the data from the image to use in Lightroom.
You do not usually need to work from multiple catalogs. Your Lightroom system will run smoothly using just one catalog; however, there are some times when it makes sense to create a new catalog.
One reason for using multiple catalogs is to segregate different types of work. If you shoot for many different clients or vastly different genres of photography, using different catalogs may help if you need to store information and photos in different folders.
Another main reason to make a new catalog can be an important one: If you need to share work with someone externally, creating a new catalog for the work means that if it corrupts or something happens to it, only the one catalog will fail and be lost, rather than your entire Lightroom history.
This is only needed if sharing your Lightroom Classic account with another person, like a client, or when moving work around. Since each catalog holds important data for photos, creating a new catalog for sharing purposes can minimize risk to your entire work.
Some photographers may want a new catalog for everything they shoot, but this soon becomes an organizational nightmare. Less is often more in the world of catalogs since you can easily sort images by category or by adding keywords in a specific catalog.
How To Create A New Lightroom Catalog In Lightroom Classic
You can create a new catalog in Lightroom Classic regardless of how many other catalogs you already have. But you do need to consider system storage for where you wish to save the catalog.
If you save locally on your system, it will be much easier to find and open the catalog later, but your system will quickly fill up its storage if you’re processing a lot of work.
Using an external storage system is preferable as it means you won’t face storage issues quickly. However, you’ll always need to keep your external drive connected, otherwise, it won’t work and Lightroom won’t be able to connect to its catalog.
Since you can easily create multiple catalogs, you can always create catalogs in other places, or to be accessible to other people when needed. Here’s how simple it is to create a new catalog in Lightroom Classic.
Step 1: Open Lightroom Classic
Creating a new Catalog in Lightroom Classic is simple and easy to do. Firstly, open Lightroom Classic. If you’ve already been working in Lightroom, then switch to the Library module.
The Library module is the default if you’ve just opened Lightroom Classic. You’ll notice that Library is highlighted to show you’re on the right module.

Step 2: Create New Catalog By Going To File > New Catalog
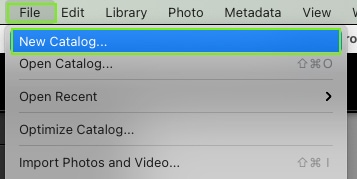
While on the Library module, go to File > New Catalog.
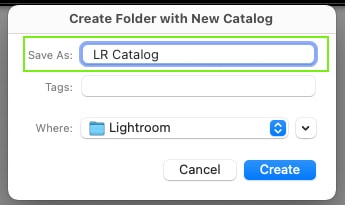
After choosing this option, a dialog box will appear. In the dialog box, name your catalog in the Save As field. This will be the name of the folder for your catalog, so think of the category you wish to associate it with. That could be a year, a client’s name, or a genre that you shoot, like Headshots.
Step 3: Choose A Save Location For Your Catalog
Here is where you need to decide where to save your catalog. Do you want to keep it locally or save it on an external hard drive?
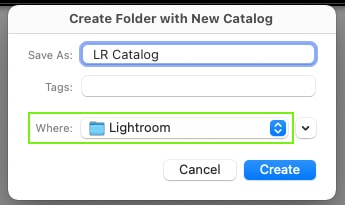
On the dialog box, click the location dropdown to choose where to save.
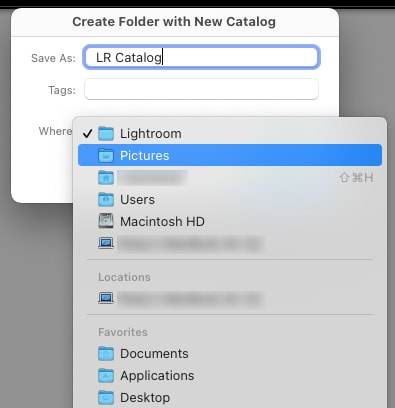
How To Save A Lightroom Catalog Locally
If saving locally, you’ll find a folder for Lightroom under Pictures > Lightroom. However, you don’t need to save it in the Lightroom drive if you don’t want to.
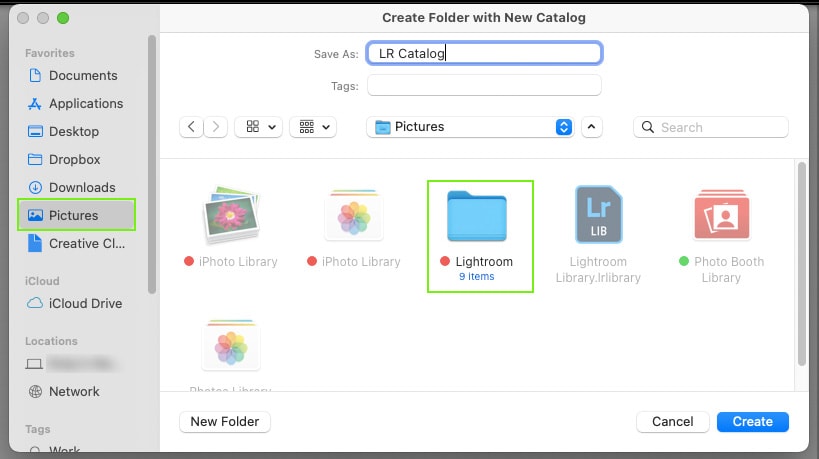
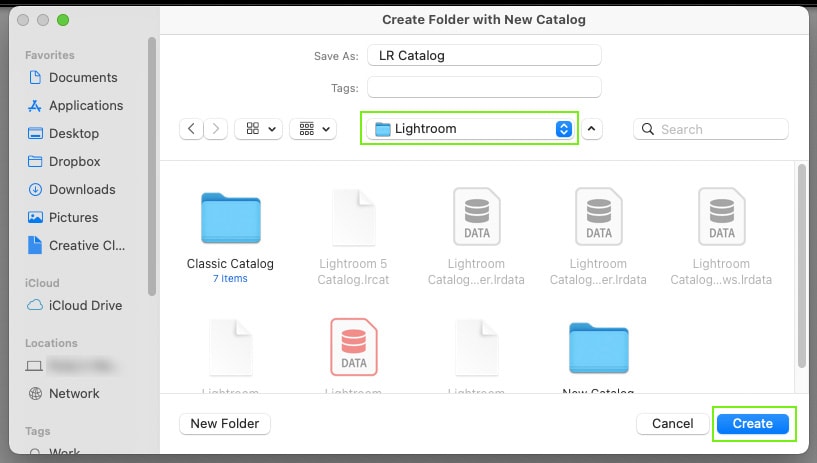
When you’ve decided on a local location, then click Create (Mac) or Save (Windows) to save your new catalog in place.
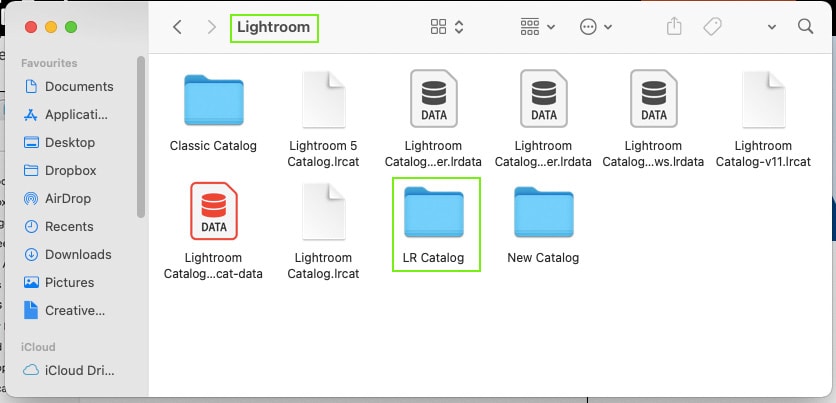
You’ll find the new catalog as a named folder in the drive or folder you saved it in.
How To Save A Lightroom Catalog On An External Drive
You cannot save a Catalog to a Network, but you can save it to an external drive. Using an external hard drive will ensure your system runs more smoothly since it won’t get clogged up from a full catalog on the local drive.
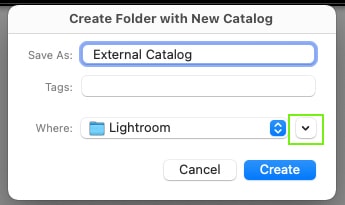
To save your Lightroom catalog on an external drive, first, expand the dialog box to see the drives and folders available. Do this by clicking the downward-facing arrow next to the dropdown.
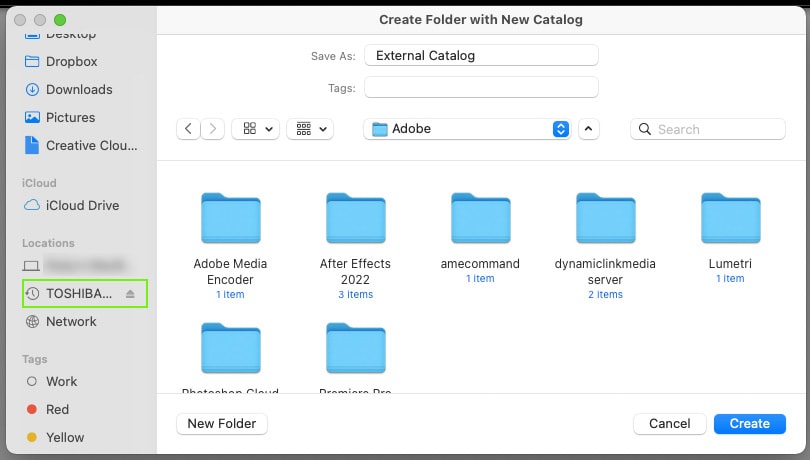
Locate the external drive in the dialog box and open it.
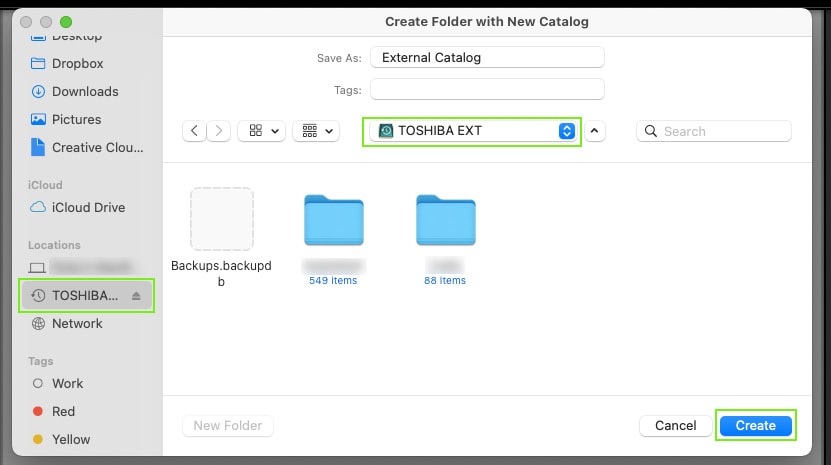
When happy, click Save (Windows) or Create (Mac) to save your catalog on your external drive.
A great reason to use an external drive is if you share the drive with teammates or directly with clients, then it’s easily accessible without having to send via other channels like e-mail.
How To Open A Lightroom Catalog
It’s easy to open a saved catalog in Lightroom Classic. Just remember you need to save what you’re currently working on, otherwise, you may corrupt your file by changing the catalog midway through. You cannot change the catalog of a file by opening a new catalog while working.
If you haven’t recently used any other catalogs then, from the Library module, go to File > Open Catalog.

In the dialog box, find your saved catalog wherever you previously saved it.
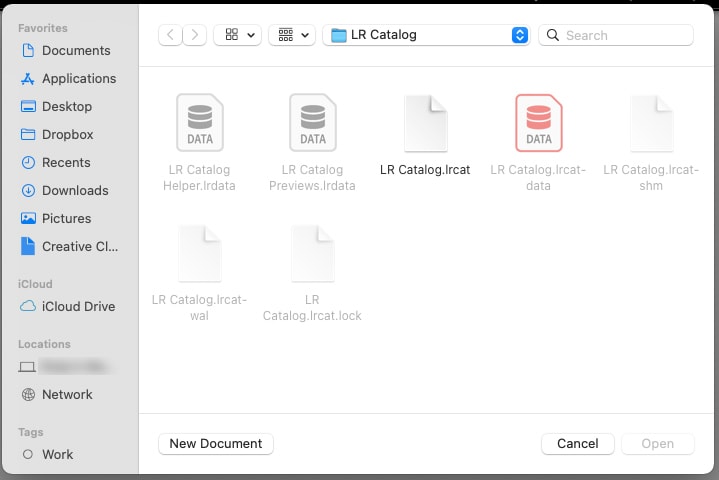
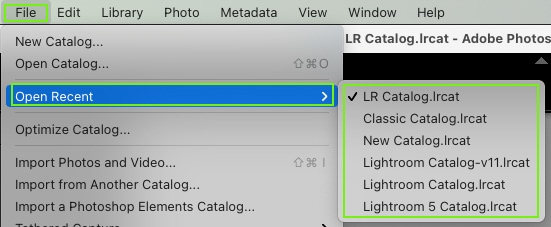
If you’ve recently used the catalog you wish to open, go to File > Open Recent Catalog and pick it from the list.
Can You Create A New Catalog In Lightroom CC?
Unfortunately, Lightroom CC doesn’t offer a Catalog feature; however, Lightroom CC’s cloud service does many things that Lightroom Classic’s catalog feature offers.
Lightroom CC uses cloud storage to hold your photos as well as their data and edit history. This allows you to edit non-destructively as the cloud retains your original photos so you don’t have to duplicate them for fear of losing them. The edit history and file data are what would be held in a Lightroom Catalog in Lightroom Classic.
You can easily categorize your Lightroom CC files in the cloud. Lightroom CC has many internal ways to categorize and store your photos, including flagging and a star rating system. Both options can be found underneath a photo or by right-clicking it.


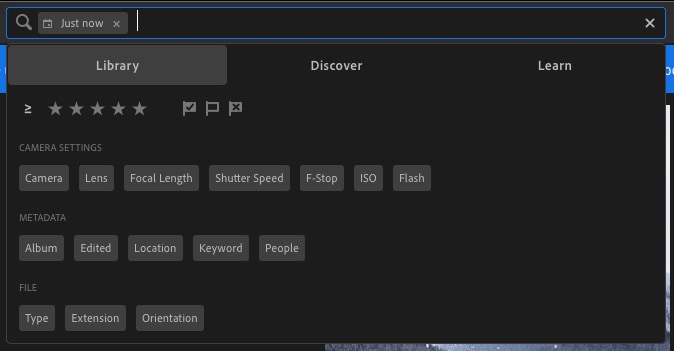
Along with Lightroom CC’s various internal categorizing systems, you can also categorize using keywords or file names, metadata from your camera, and filetype. You can use the search bar to search in a variety of ways or terms.
Sharing your files and photos is much easier with Lightroom CC than it would be using Lightroom Classic’s Catalog feature. Sharing via the cloud minimizes corruption risk and broken links that you may find with Catalogs.
How To Edit Your Lightroom Catalog Settings
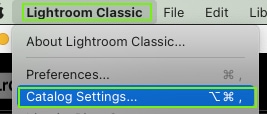
To find the catalog settings, go to Lightroom Classic > Catalog Settings (Mac) or Edit > Catalog Settings (Windows).
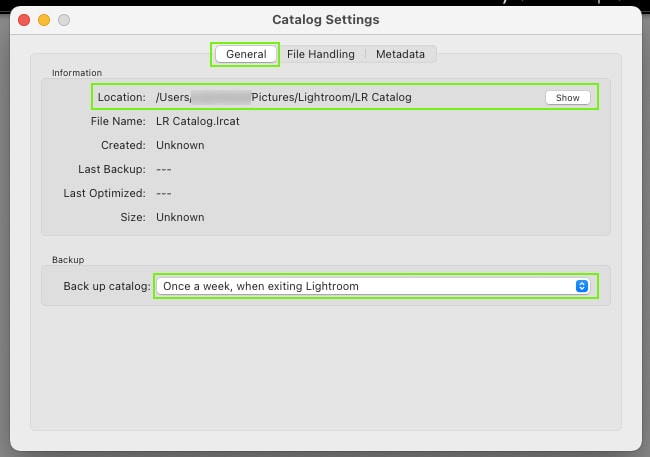
In the dialog box that appears, you’ll find General, File Handling, and Metadata settings for your catalogs.
The General settings will show you where your current catalog is located. If you need to move, copy, edit, or delete a catalog, click Show. From there, you can move files or copy, edit, or delete as needed.
You shouldn’t move catalog files or folders directly from your computer system, otherwise Lightroom Classic won’t be able to find the photo or its data when you try to open something.
In General settings, there is also a dropdown menu for you to decide how often and when your catalog should be backed up.
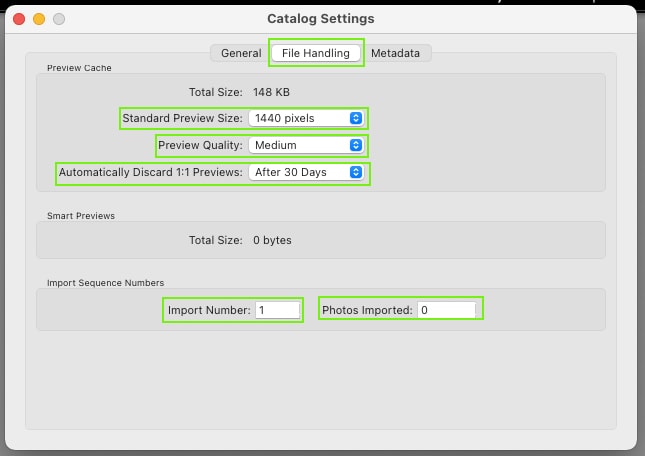
The File Handling settings allow you to set the standard preview size for images, the preview quality, and how long to keep 1:1 previews.
You can also set the numbering sequence of your images under the import number box and how it correlates to the imported photos themselves.
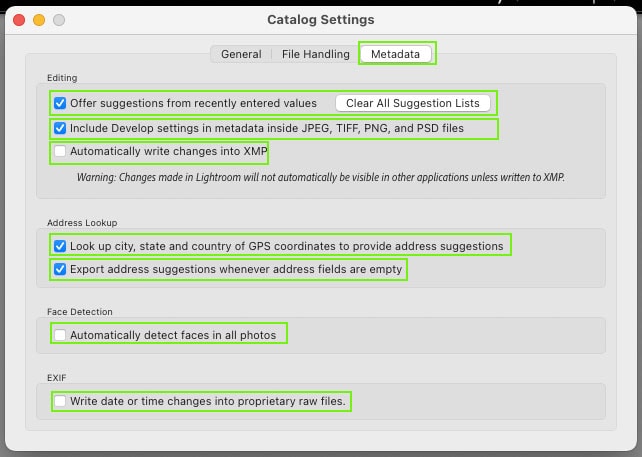
The final catalog settings dialog box is for the Metadata. These settings offer options for suggesting values based on recent previously-edited images, embedding metadata to file formats, write changes into XMP (I suggest not to use this setting), and editing settings.
There are further metadata such as address lookup, allowing you to precisely locate an image’s location data, and automatic face detection, which can be helpful if you need to categorize based on who’s in a photo.
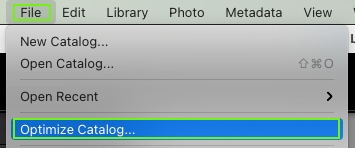
You should optimize your catalog every once in a while to ensure a smooth workflow. To optimize, go to File > Optimize Catalog.
