fbpx

How To Use Lightroom Presets In Photoshop

Last Updated:

Presets have become an important tool for photographers as they allow you to apply a batch of edits – usually made to fit a specific mood, tone, or style – to a photo with just a click. Using presets can save time and effort while editing, especially when you have multiple photos you’d like to edit in a similar way. Many photographers might be familiar with using presets in Lightroom, but did you know you can use them in Photoshop, too? 

To import your Lightroom presets into Photoshop, first open Camera Raw by going to Filter > Camera Raw. Inside Camera Raw, click on the Presets tab, click the “…” icon, and then choose Import Profiles & Presets. Now select your XMP Lightroom preset files to import them to Photoshop.

Having access to presets while working in Photoshop can come in handy when you’d like to take advantage of presets but still need to make the more advanced edits Photoshop allows. Learning how to use presets in Photoshop will streamline your work and prevent you from needing to switch from software to software to achieve the desired result. Let’s take a look at several different ways you can access Lightroom presets in Photoshop.

How To Import Presets From Lightroom To Photoshop
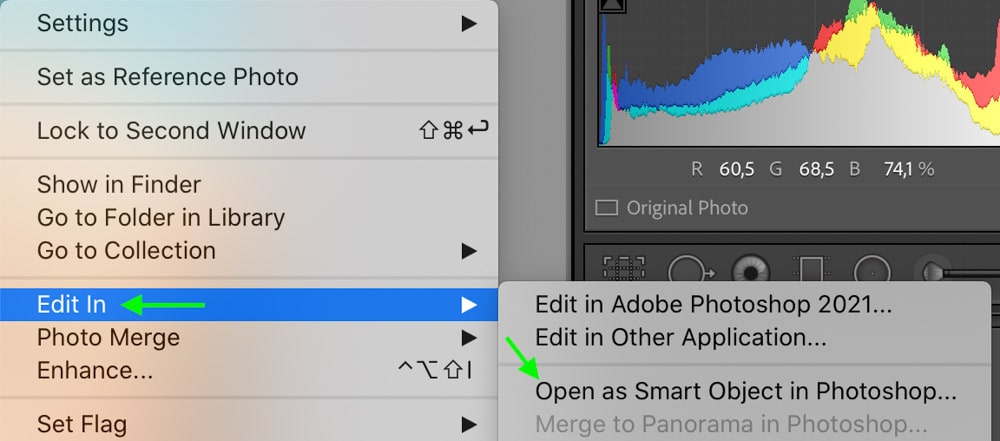
To use your presets in Photoshop, you’ve got to get them over there first. One way to do this is to start in Lightroom. Open your photo in Lightroom and apply the preset you’d like to import to Photoshop. You can do this by clicking the arrow next to the Presets tab on the left within the Develop Module of Lightroom.

Here you’ll see all your presets. To add a new preset, click the arrow on the right and click Import Presets. Select the presets you’d like to add from your files. To apply a preset to your photo, click the preset. Then, right-click or Control-click the photo. Of the options that come up, click Edit In > Open as Smart Object in Photoshop.

If you don’t have any presets to use quite yet, make sure to check out my Lightroom Starter Kit bundle which includes 12 FREE presets with some of the most popular editing styles voted by readers of this blog!

Your photo should open up in Photoshop. From here, head to the Layers panel and double-click the thumbnail preview. Make sure the Smart Object icon is visible in the thumbnail.

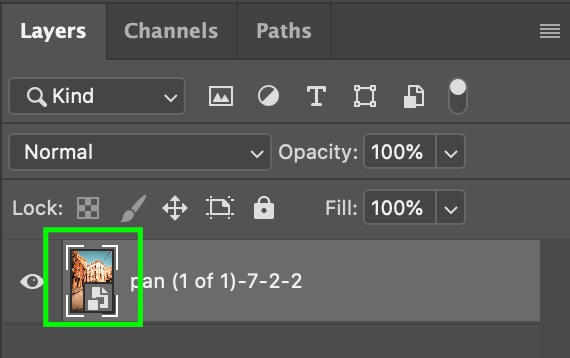
When you double-click your layer thumbnail, the Camera Raw window will open. You’ll notice the adjustments are already set to match those of the preset you applied in Lightroom.
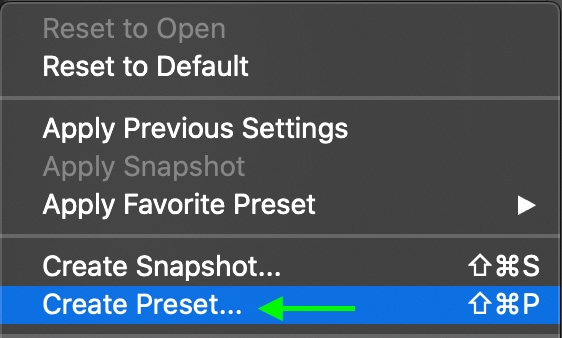
 Now, click the Settings icon at the bottom of the toolbar on the left. Click Create Preset.

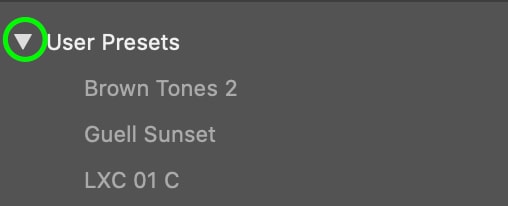
In the window that opens, name your preset. You can Copy & Paste from the name of the preset in Lightroom if you need to. Click OK, and you’ll be able to find your preset by clicking the Preset icon and clicking the arrow next to User Presets.

How To Add New Presets Into Photoshop Directly (XMP Files)

If you’d like to import a preset into Photoshop from Lightroom directly, you should understand it will need to be imported in the form of an .xmp file. This is the standard file type for presets across Adobe software (though it used to be .lrtemplate before Adobe changed it in 2018, so you might still see this file type as well).

To import .xmp files into Photoshop from Lightroom, you must first make sure the presets are saved in the correct place on your computer. If you want to use presets you’ve downloaded yourself, move them to the following folder (Lightroom’s default presets will automatically be there): 

For Mac: Your Name/Macintosh HD/Library/Application Support/Adobe/CameraRaw/Settings/Adobe/Presets.

For Windows: C:\Users\[YOUR_USERNAME]\AppData\Roaming\Adobe\CameraRaw\Settings.
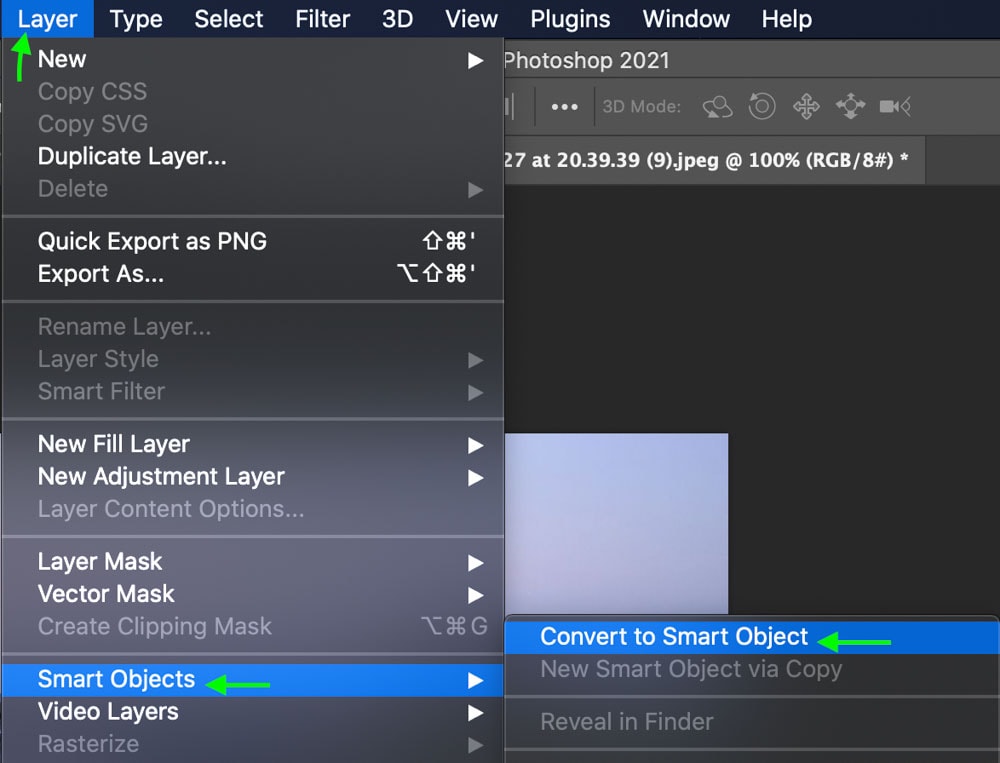
To use your preset in Photoshop, open the photo you’d like to edit. In the top toolbar, click Layer > Smart Objects > Convert to Smart Object.
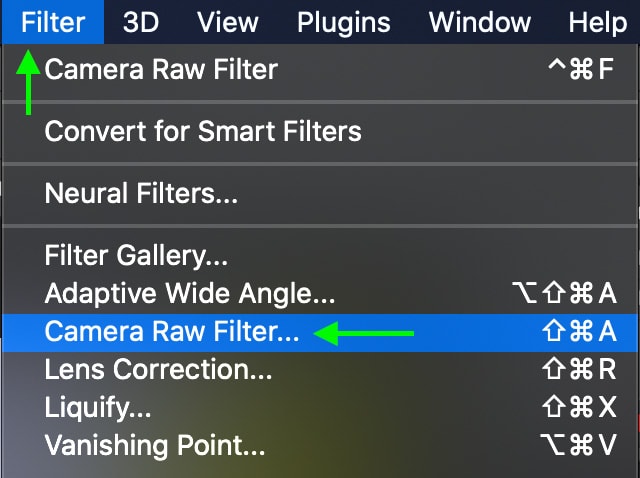
Next, click Filter in the top toolbar and select Camera Raw Filter. 

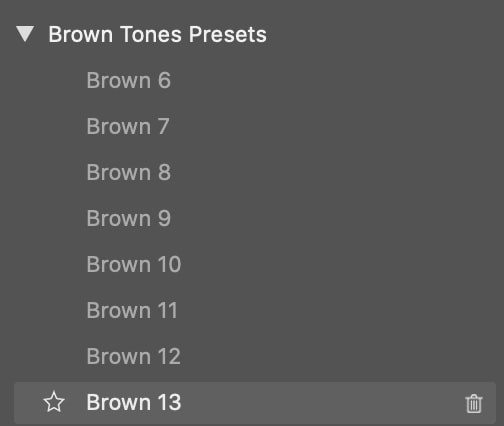
The Camera Raw window will come up. In the toolbar on the right, click the Presets icon.

You should see your presets listed there. In this case, I am using this Caramel Browns Preset Collection.

If you don’t see the preset you downloaded, click on the ellipsis next to the Preset tab to bring up more options, and click Import Profiles & Presets.

Find the preset pack you’d like to import and click OK. To apply presets to your image, simply click the preset you’d like from the list. Click it again to take off the preset. Once you’re satisfied, click OK and you’ll see your photo in Photoshop with the preset applied.

Before:

After:

How To Turn A Lightroom Preset Into A Photoshop Action

There are some cases in which you may need to turn an entire Lightroom preset into a Photoshop action. To do this, make sure you’ve got your preset saved into Camera Raw already.

First open up a new image in Photoshop, one that you haven’t applied a preset to yet. In the Layers tab, make sure the image layer is selected. It should be the only layer if you’ve just opened a new photo, but if you’ve already been working on a photo there might be other layers.

Convert the image to a smart object by heading to Layer > Smart Objects > Convert to Smart Object.

Now, open up the Actions tab (if it isn’t already visible) by heading to Window > Actions. 

Now the Actions tab should be visible. In the Actions tab, click the icon all the way to the right to open up more options.

Click New Action.

In the window that comes up, you can name your action – I suggest naming it the same as the preset for easy reference – and click Record. Remember that any adjustments you make at this point will be recorded as part of the action.

Now, head to the top toolbar and click Filter > Camera Raw Filter… to open the Camera Raw window. Make sure you click the Camera Raw Filter option shown in the screenshot below.

Navigate to the Preset icon, find your preset, and click it to apply. Click OK to exit Camera Raw. 

In the Actions tab, click the square at the bottom of the Actions tab to stop recording the action.

Now you have an action to apply the preset automatically. This is useful if you plan on using the same preset for multiple photos, as you no longer need to open up Camera Raw – you can simply click the action to apply the preset in one step.

Lightroom Presets VS Photoshop Actions

Lightroom Presets and Photoshop Actions do similar things, applying a script of preset adjustments that apply specific looks in a photo. The primary difference, however, is that Lightroom Presets are easier to adjust once applied while Photoshop Actions offer fewer customization options.

Lightroom presets are similar to Photoshop actions in that they both apply a predetermined set of adjustments to a photo, saving time and work. For example, you can find presets or actions that give your photos a vintage appearance by editing the tone, blacks, saturation, and sharpness. Both come with their respective software, but you can also download presets or actions from other photographers to meet specific editing needs beyond the basics that come with Adobe. You can find a collection of awesome editing presets here.

However, the similarities end there. So let’s explore the three main differences between Lightroom presets and Photoshop actions.

Simplicity

Photoshop can be quite overwhelming to learn how to use, and many photographers might not feel their editing needs require such an advanced array of tools. This makes Lightroom presets an attractive option as you’ve got all the necessary adjustments just a click away. Photoshop actions can be useful once you’ve already made and saved the actions you’d like to use, but making the actions does require a few more steps.

Speed

Because of the simplicity of use, Lightroom presets are faster to apply than Photoshop actions. Sure, you have to open Camera Raw, but the presets appear on your photo in seconds and can easily be changed or removed. Photoshop must run a command script through each individual action, which can take a bit more time. The difference in time may not be much, but it adds up when you’ve got tons of photos to edit!

Additional Adjustments

With Lightroom presets, you can easily adjust a specific preset setting without changing the rest of the settings. For instance, if the preset you’ve applied makes your photo appear underexposed, but you like the color tone, you can easily edit the exposure, highlights, and shadows while the rest of the settings stay the same. This is technically possible with Photoshop actions, but it is much more difficult as you have to go through and find which step needs to be adjusted in the action.

Which Should You Use?

Lightroom presets are best to edit multiple photos at once in a similar way. The ease of use and flexibility are great for beginners or those seeking a simple, efficient workflow. Opt for Photoshop actions if you’re working to perfect a specific image. Actions give you a bit more creative control over your images as there are some effects you can learn to create using Photoshop’s many adjustments and tools.

Regardless of your preference, though, it is useful to understand how both preset and actions work. You never know when you may need to use one or the other, and you can never learn too much about the editing software you may encounter as a photographer. Now to help get started with presets, make sure to download my FREE Lightroom Starter Kit Preset Bundle which applies 12 popular editing styles in a single click. Best of all, it’s compatible with Photoshop by using the steps you learned here!

Happy Editing!


Photo of author
I'm a Canadian photographer and photo retoucher turned founder of bwillcreative.com. Around here I help you to decode the mystery of photo editing with no-fluff videos and written guides to help you achieve your creative goals. Outside of shooting photos and my passion for educating, you'll find me mountain biking or on the trails with my dog, Sunny!

Continue Reading:

How To Use The Marquee Tool In Photoshop

Learn how to use the Marquee Tool in Photoshop to crop layers, create basic selections, add selective adjustments, and more with ease.

How To Crop A Layer In Photoshop (3 Simple Methods)

If you're struggling to figure out how to crop a layer in Photoshop, you're not alone. Fortunately, there are a few easy (not so obvious) methods to help you crop a single layer in Photoshop.

How To Fill A Selection In Photoshop (5 Best Ways)

Learn how to fill anything in Photoshop from selections, shapes, and text with solid color, gradients, and even images!

What Are Embedded Previews In Lightroom + How To Use Them

Use this guide to help you understand the use of embedded previews in Lightroom along with tips to help you use them in your workflow.

Adobe Lightroom System Requirements For Mac & PC

Here's a breakdown of the system requirements for Adobe Lightroom Classic and Lightroom CC to make sure it will run smoothly on your computer.

How To Add A Watermark In Lightroom Classic & CC

Learn how to add a text or graphic watermark to a photo in Lightroom Classic and Lightroom CC to protect your photos from theft.

How To Outline An Image In Canva

Learn how to outline anything in Canva from outlining images, shapes, text, designs, and more with a few easy steps.

How To Add A Border In Canva (To Images, Shapes & Text!)

Learn how to easily add a border to your designs, images, shapes, and text in Canva using these step by step techniques.

How To Make A Background Transparent In Canva

Learn how to create and export images with transparent backgrounds in Canva to open up more design options and creative styles.

Subscribe
Notify of
guest
0 Comments
Inline Feedbacks
View all comments