


Learning how to use snapshots in Photoshop so you can always go back to any point in your workflow is key to ensuring a seamless workflow. Once you start to use snapshots in your editing, you’ll be able to make more adjustments without the worry of permanently messing something up.
Let’s get started!
Lesson Summary
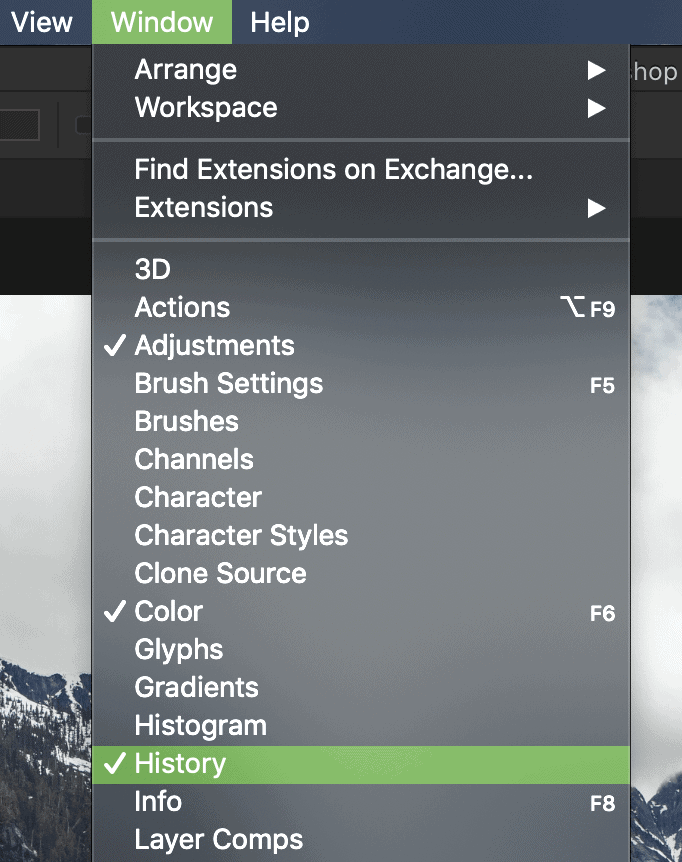
- Step 1: Go To Window > History To Open The History Panel
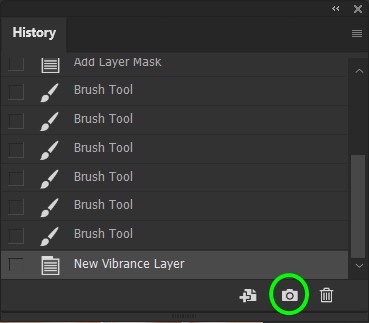
- Step 2: Click The Camera Icon At The Bottom Of The Panel To Create A Snapshot
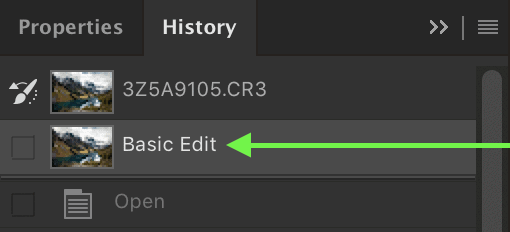
- Step 3: Double-Click The Snapshot To Rename It
What Is A Snapshot In Photoshop
By default, you can only go back 50 history states in Photoshop. That means you can only hit the undo button 50 times until you’ll hit the limit. If the history state you want is outside of this limit, you won’t be able to access it. Rather than increasing the number of history states, you can use a snapshot to keep your computer operating smoothly.
A snapshot in Photoshop is like a checkpoint for your project. Once you create a snapshot, you can go back and restore the previous state of your document. This is perfect when you want to undo a drastic change and step back further than your history states allow.
How To Take A Snapshot In Photoshop
Step 1: Go To Window > History To Access Your History Panel
Open the History Panel in the Docked Panels, or go to Window > History to open it.
Step 2: Click The Camera Icon To Create A Snapshot
To create a new snapshot, click the camera icon at the bottom of your History Panel.
Step 3: Double-Click To Rename Your Snapshot (Optional)
You can find your new snapshot at the top of your history panel. By default, it will be called ‘Snapshot 1’. Double-click on the snapshot name to rename it as something to help you remember what history state it represents.
How To Use Photoshop Snapshots In Your Editing
The truth is, you often don’t know when you’ll need to go back until it’s too late. That’s why it’s good practice to make snapshots at different stages of your project.
For example, you could make a snapshot after you finish color edits, brush adjustments, or client revisions. This would cover all your bases and offer a variety of points to step back to.
How Does A Snapshot Differ From A History State In Photoshop?
A history state represents individual changes to your project, while snapshots represent a previous state of your project. History states are best used to step back through small changes like brush, color, or spot adjustments. Snapshots, on the other hand, can be used to step back to a progress point in your project.
No matter how many adjustments you make, your snapshots will always be there. History states will continue to cycle through up to their preset limit of 50. You can adjust this limit, but you run the risk of slowing down Photoshop with the increased memory demand.
Using a snapshot in Photoshop is a great way to create backups of your project as you edit. Unlike history states, your snapshots will last for your entire project. Even if you’ve made thousands of adjustments, you can still go back to one of your snapshots.
If you enjoyed this article, be sure to subscribe to my weekly newsletter for more photography and photo editing tips!
