
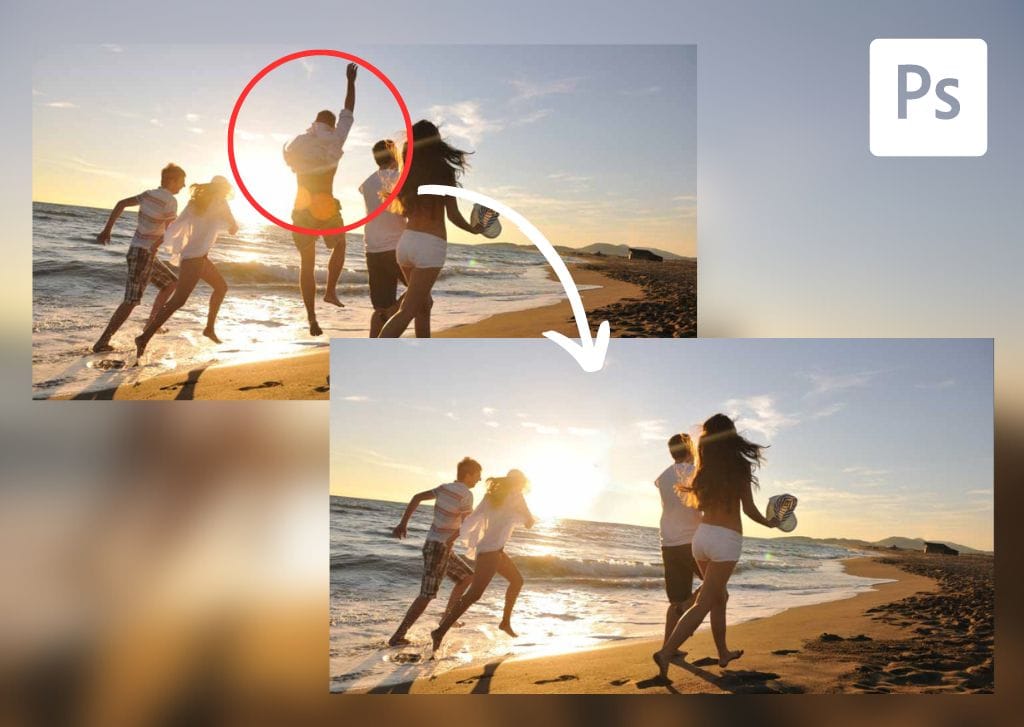

Knowing how to remove a person from a photo in Photoshop is a useful skill. It ensures you can edit your travel shots to show majestic scenes without distracting people in the frame. So, let’s take a look at the easy step-by-step process for removing a person from a photo using beginner-friendly Photoshop tools.


Video Tutorial
How To Remove A Person From An Image In Photoshop
Step 1: Click On The Create New Layer Button In The Layers Panel
Create a new layer by clicking the New Layer button at the bottom of the Layers Panel.
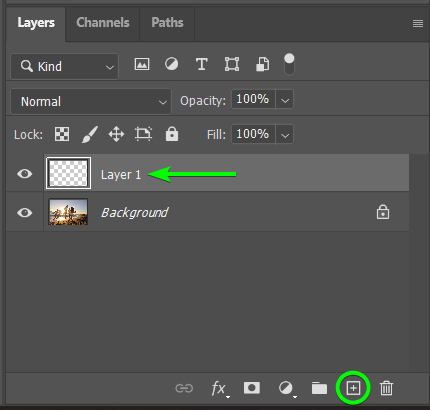
You’ll want to ensure the layer is transparent, with no background color added. You also want to ensure the layer sits at the top of the layer stack, above the background layer.
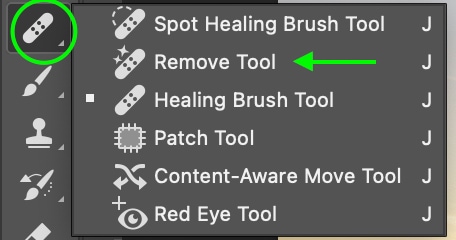
Step 2: Select The Remove Tool And Adjust The Settings
In the Toolbar, click the Remove Tool icon. If you don’t see it in the Toolbar, you can find it by clicking and holding on the Healing Brush Tool icon. You can also press the J key.
Once you’ve activated the Remove Tool, you can adjust the settings in the Options Bar. Set the brush size depending on the image and the area you’d like to remove. Then, enable the box marked Sample All Layers. This will ensure the Remove Tool samples pixels from the image layers rather than only the new transparent layer.
Ensure the Remove After Each Stroke checkbox is enabled.

Step 3: Remove The Person By Brushing Over Them
Carefully brush over the person you want to remove. The edges don’t have to be perfect, but you want to try to keep the brush on only the parts you want removed with a small amount of the background included. Brushed areas feature a pink highlight. The tool will attempt to intelligently fill the area with pixels from the surrounding areas.

You may see a Progress bar appear, mainly if the area is large or contains a variety of colored and textured pixels, but it should only take a few seconds to load. If the effect doesn’t work correctly in an area, you can go over it a few times, and it will eventually match the rest of the background with a natural appearance.


Brush over as much of the area as you’d like until the person is removed. Don’t forget any shadows that are left behind! The resulting image will appear as though the person was never even there—as if they were erased from the original.
Note: Sometimes, the Remove Tool won’t give satisfactory results in certain areas. You can then use the Clone Stamp Tool (S) to fix up any tricky areas.
Limitations Of Removing People From Photos With Photoshop
You’ll want to note how much the person you want to remove overlaps with the areas you want to keep. If there isn’t a lot of overlap or the person is standing alone, Photoshop can easily blend the cloned pixels into the background so the effect appears seamless. But when there is too much overlap, it will be more difficult to maintain the parts you want to keep.
Even when the person doesn’t overlap with others, removing them can be tricky if the background behind them is cluttered or has varying textures. Because the tool is content-aware-based, it may accidentally pick up unwanted parts of the image, so the effect comes out best when the background is relatively simple.
So, at the most basic level, before trying to remove a person from your photo, make sure there are the proper pixels to replace and rebuild whatever is behind them in the photo. If those pixels are not available, you will have a very difficult time getting a good result with any tool in Photoshop.
Happy editing!
