


Photographers who have worked with Lightroom for several years may remember Lightroom Classic as the original version of Lightroom. When Adobe made updates to the program, such as a switch to using the cloud to give the ability to sync across devices, Lightroom CC was born and the original program was renamed Lightroom Classic.
Since then, Adobe has added a third version of Lightroom known as Lightroom Mobile which is used for on-the-go photo editing.
Here is a breakdown of the three Lightroom programs to help you decide which one is right for your needs as a photographer.
Lightroom Classic VS Lightroom CC
The main difference between Lightroom Classic and Lightroom CC is that Lightroom Classic is a desktop-based app, while Lightroom CC is cloud-based. Lightroom CC stores images on the cloud and can be synced with the Lightroom Mobile app. Lightroom Classic can only access images stored on your disk.
Both are available with an Adobe Creative Cloud subscription such as the Photography Plan. As for Lightroom CC and Lightroom Mobile functionality, we’ll touch on that later in this post.
For now, let’s compare and contrast the two desktop programs and see which might be best for different circumstances.
1. Importing & Image Library
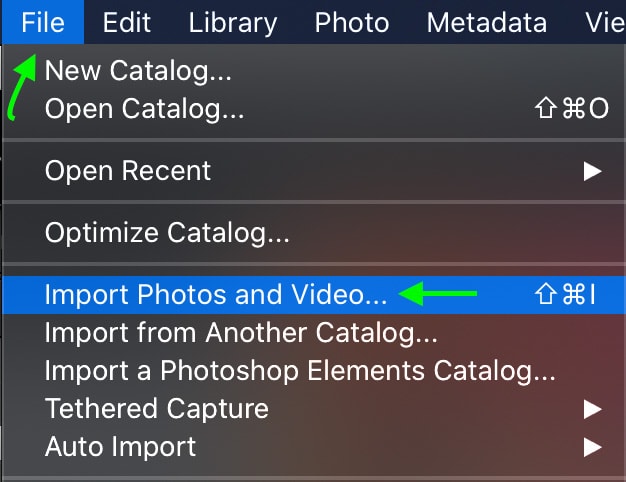
When you open up Lightroom Classic, you can import images by going to File > Import Photos and Video.
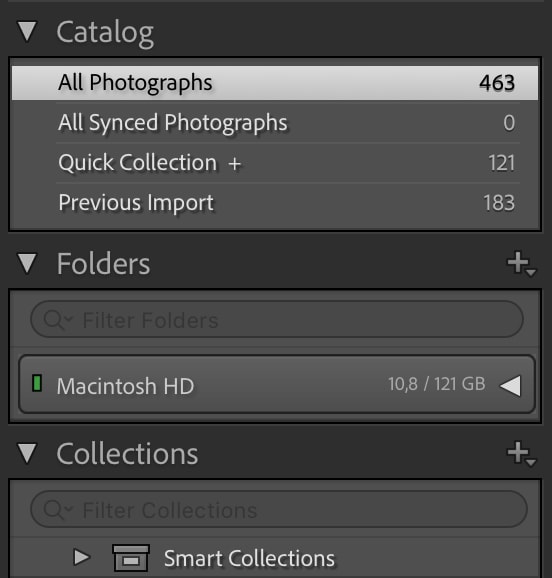
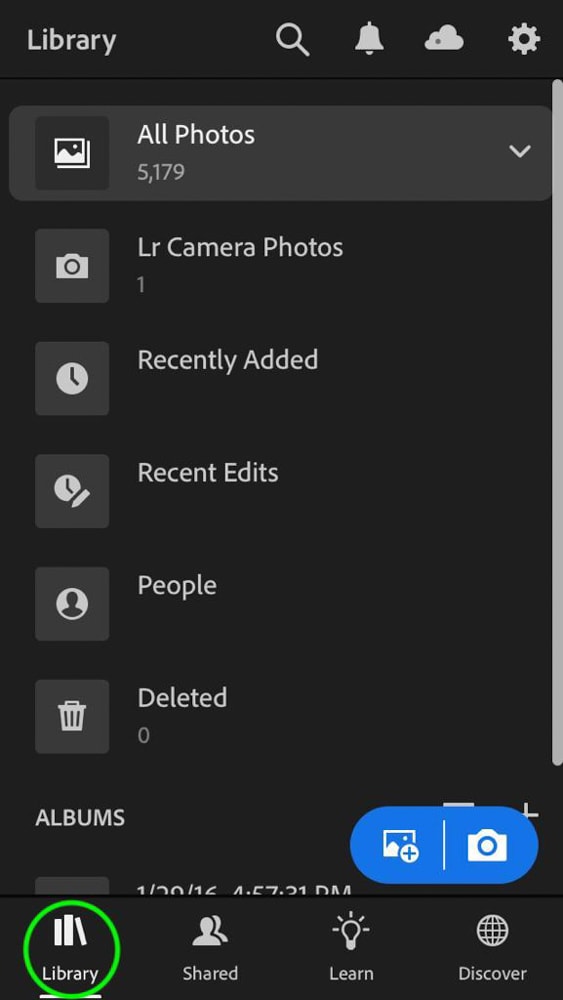
You’ll be able to see your image library by heading to the Library tab at the top.

All the images you import will be automatically placed into the All Photographs catalog. You’ll also be able to see any other catalogs, folders, or collections you have, as well as create new folders and collections by clicking the plus sign (+) to the right of their names.
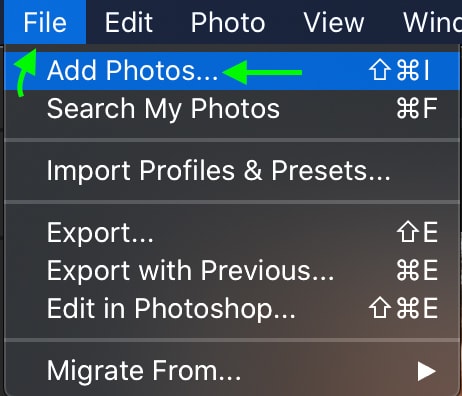
In Lightroom CC, you can open images by heading to File > Add Photos.
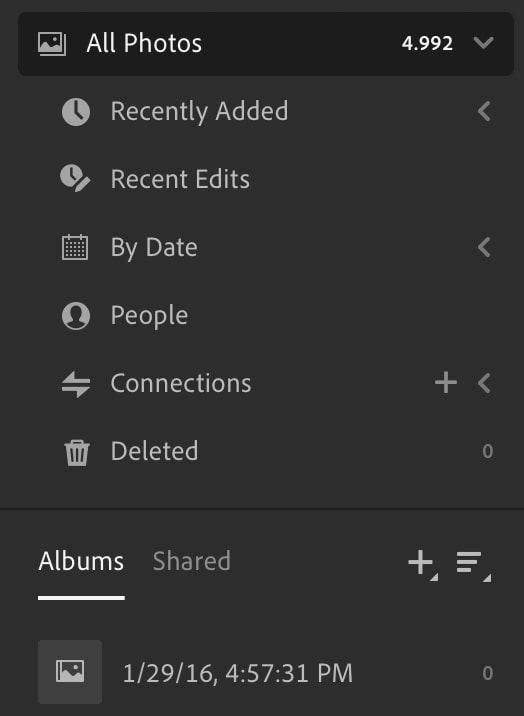
To see your image library in Lightroom CC, head to the Photos Panel by clicking the icon at the top left.

The photos will be a bit more organized than in Lightroom Classic, with additional folders that allow you to view photos by date, people, and recently edited. You can see your albums and shared images below this section, and click the plus sign (+) to create a new album.
A bonus of Lightroom CC is that the program uses artificial intelligence to automatically assign keywords to images based on content. This means if you’re looking for images you’ve taken that contain the sky, you can just search “sky” and any relevant images will appear automatically.

When you upload images on Lightroom CC, they will be automatically synced to the cloud and will be available to view and edit across devices.
On the other hand, Lightroom Classic stores the uploaded images internally on the hard drive(s) of the device you are using, and these images aren’t synced to other devices.
2. Develop Settings
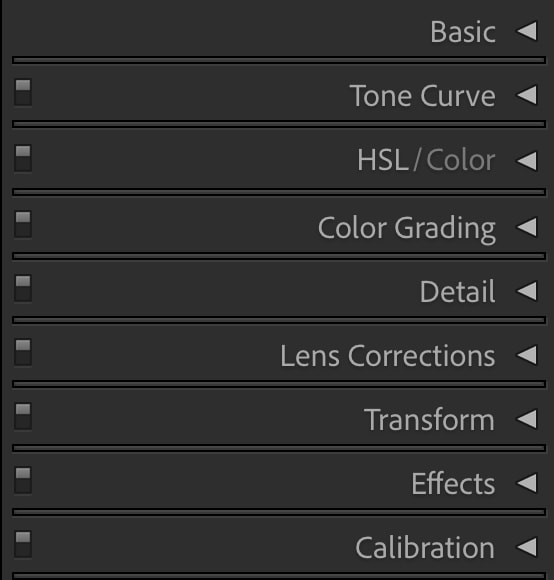
You can find the Develop module in Lightroom Classic by clicking the tab at the top.

When you open the Develop module, you will see the following panels:
- Basic: contains basic adjustments like white balance, tone adjustments like exposure and contrasts, as well as additional effects such as texture, clarity, dehaze, vibrance, and saturation
- Tone Curve: allows you to adjust the color and contrast of an image using a linear curve that divides highlights, shadows, and mid-tones
- HSL/Color: allows you to control the hue, saturation, and luminance of the colors in your image
- Color Grading: allows you to adjust the color tones in your shadows, highlights, and overall image
- Detail: contains detail adjustments like sharpening and noise reduction
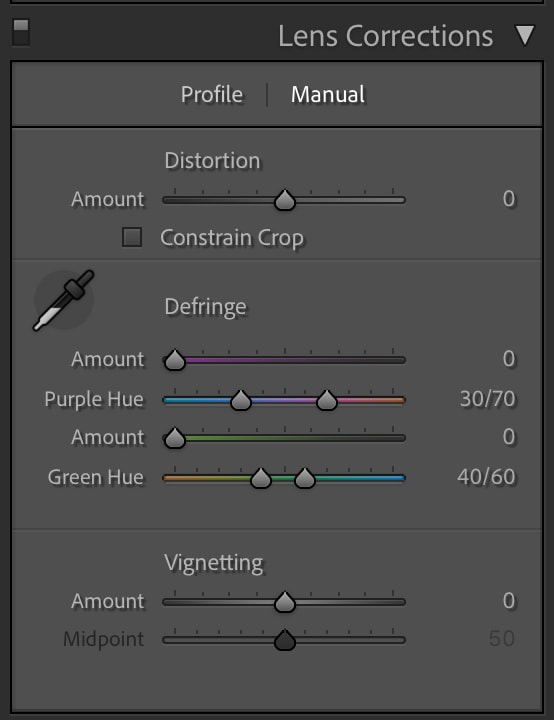
- Lens Corrections: allows you to correct lens distortion, defringing, and vignetting
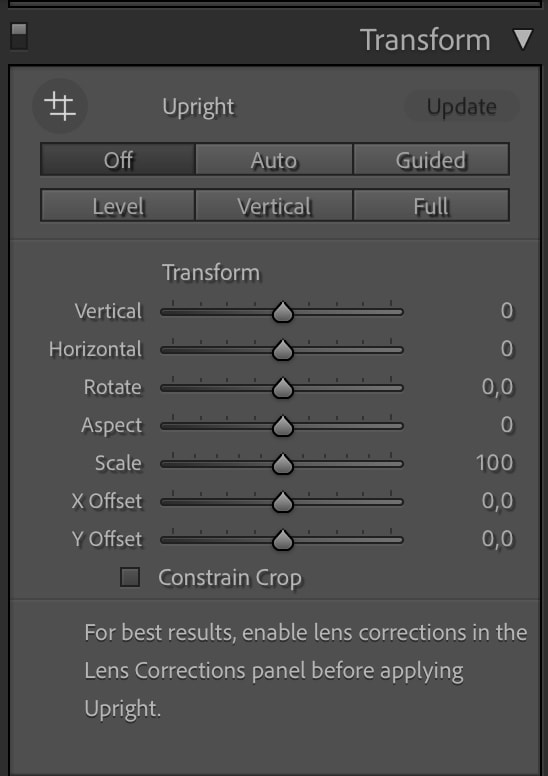
- Transform: contains adjustments to transform the image vertically or horizontally
- Effects: controls post-crop vignetting and grain
- Calibration: allows you to calibrate the color grading and change the value of red, green, and blue in each pixel
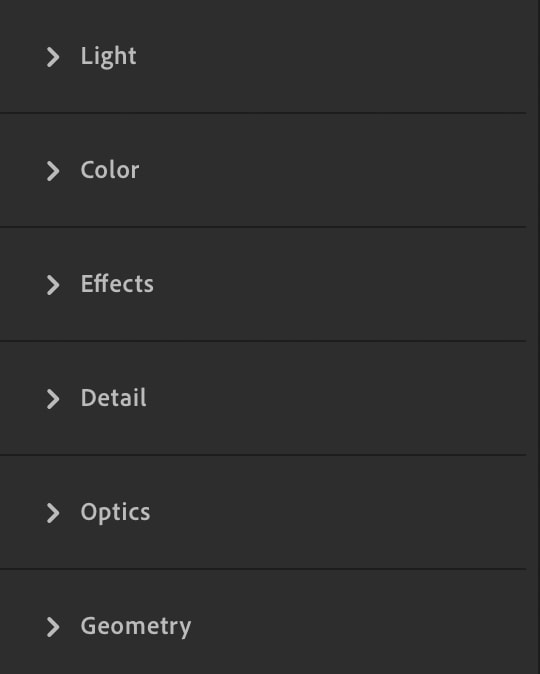
In Lightroom CC, the same adjustments are available but they are organized differently. You can access them by clicking the first icon on the right-hand toolbar.

There are fewer tabs than in Classic, but the same Develop settings are there, just in different places. In Lightroom CC, the available tabs are:
- Light: allows you to edit the amount of light in the image via exposure, and contrast
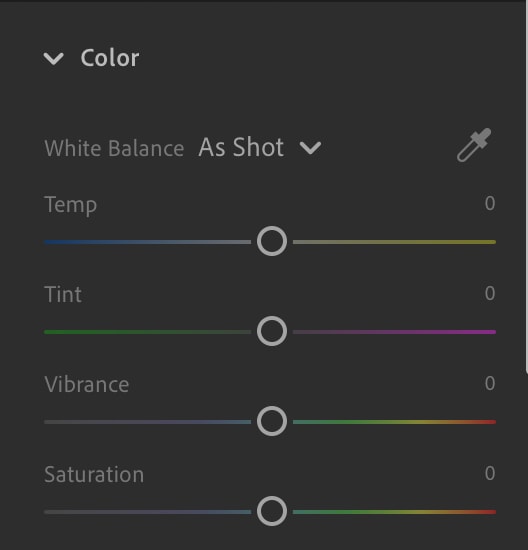
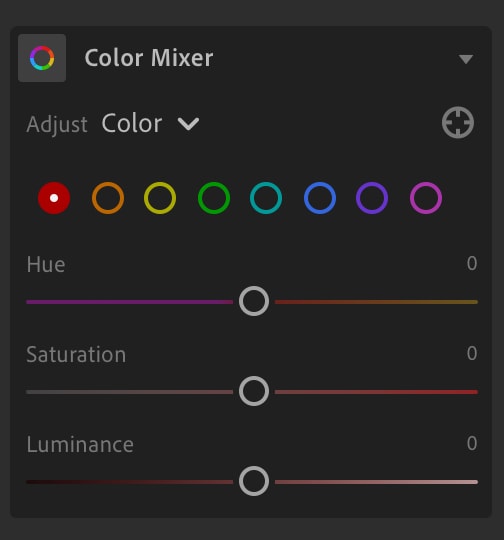
- Color: controls temperature and tint, and also contains vibrance and saturation. The color mixer and color grading can be found here too and controls the hue, saturation, and luminance of each color
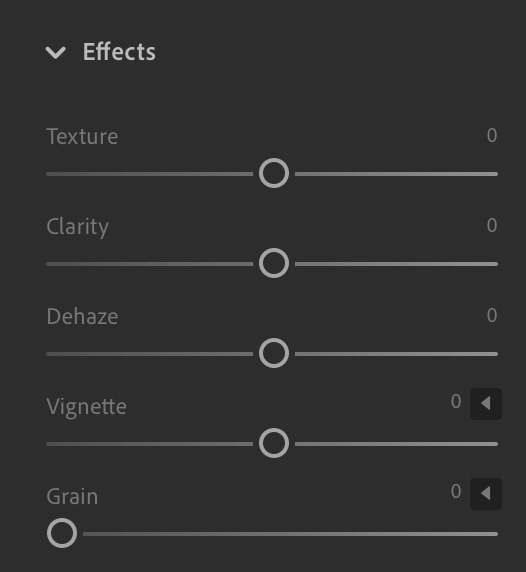
- Effects: effects like texture, clarity, and dehaze are found here, as well as grain and vignette settings
- Details: allows you to adjust sharpening and noise reduction settings
- Optics: allows you to remove chromatic aberration, defringe, and enable lens corrections
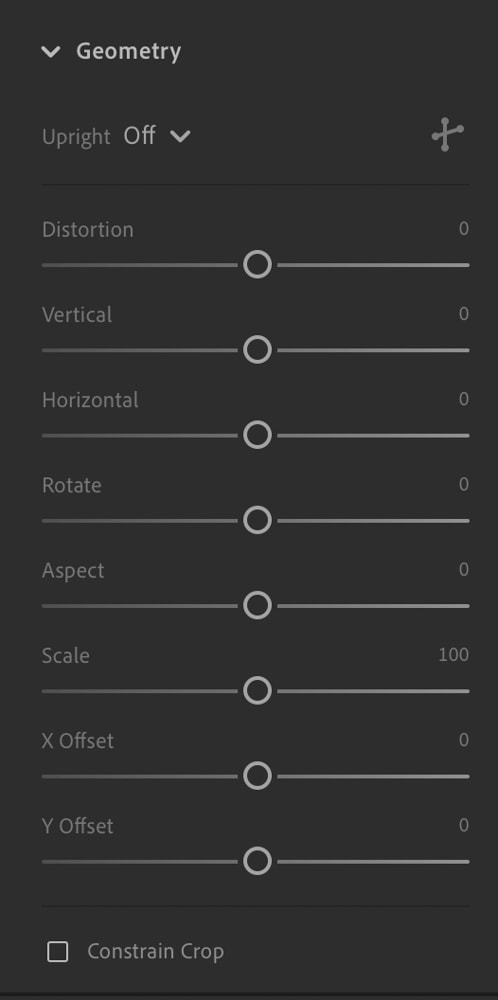
- Geometry: gives options for adjusting or creating distortion in your image
The different names might create some confusion for photographers switching from one program to the other. Don’t worry, all the same tools are there, you just might have to learn the new panel locations.
For instance, in Lightroom Classic you can find many tools in the Basics tab, from effects like Texture, Clarity, and Dehaze to some color tools like Temperature and Tint.

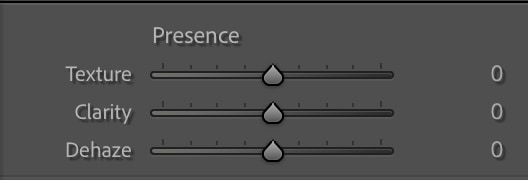
In Lightroom CC, Texture, Clarity, and Dehaze are found in the Effects tab.
Meanwhile, you can find Temperature and Tint, along with Vibrance and Saturation, in the Color tab.
In Lightroom CC, the HSL / Color panel is renamed Color Mixer and also sits in the Color tab.
In Lightroom Classic, Transform tools are found under the Transform tab.
In Lightroom CC, Transform tools can now be found in the Geometry tab.
Lightroom Classic puts Lens Correction in its own tab.
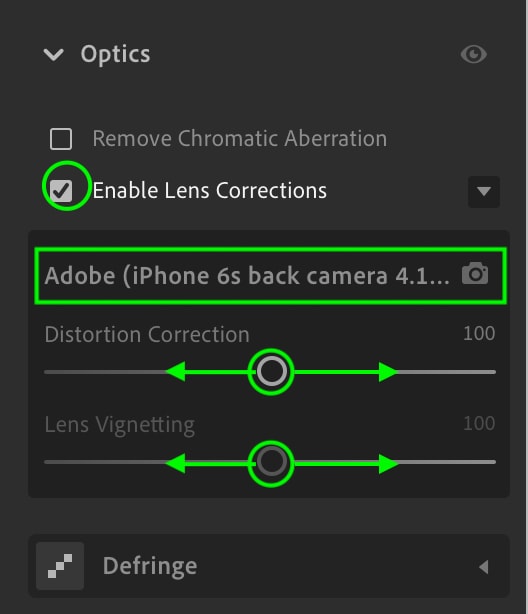
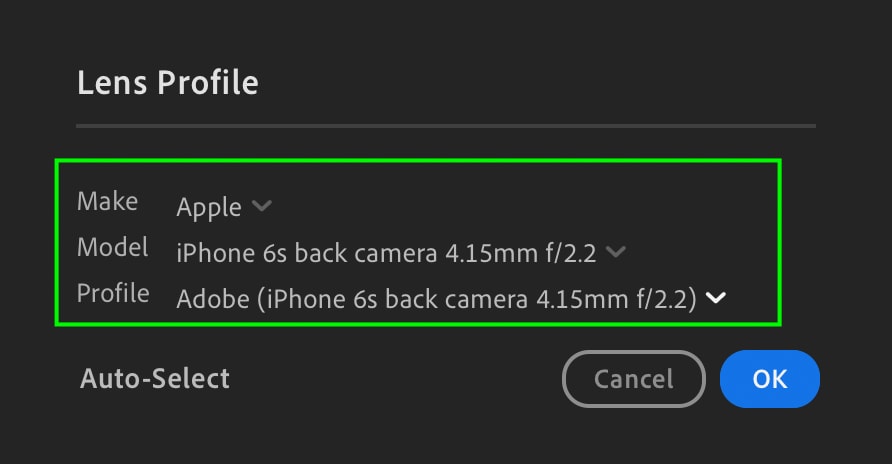
In Lightroom CC, Lens Correction is in the Optics tab. To access the drop-down area that allows you to select the specific camera and lens you’d like to correct, check the Enable Lens Corrections box and click the area which says the camera make and model. You can also adjust Distortion Correction and Lens Vignetting here by dragging the toggles.
Again, by searching around you’ll be able to find all the tools in Lightroom CC that you know from Lightroom Classic, and vice versa, when switching between programs. Comparing adjustment options between these two programs, they offer all the same options.
3. Selective Adjustments
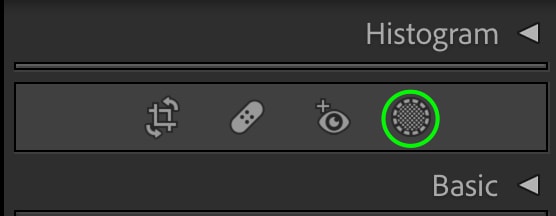
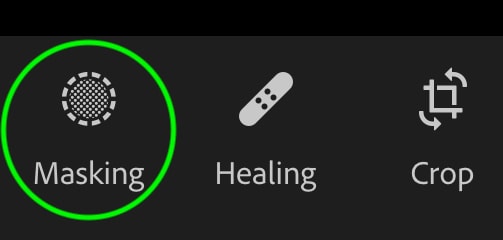
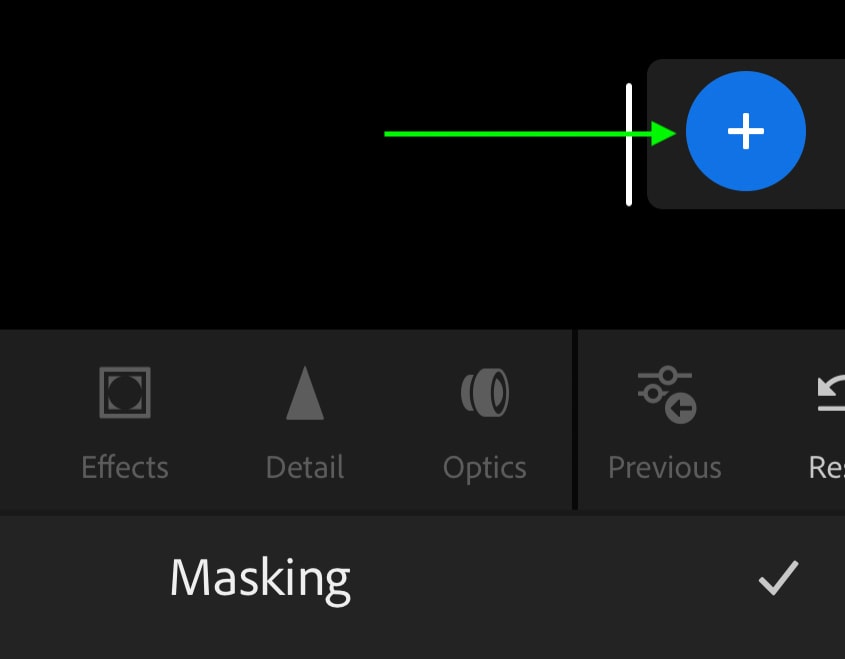
For the most part, Selective Adjustments are the same across both platforms. In Lightroom Classic, the Selective Adjustment toolbar can be found at the top of the adjustment panels in the Develop Module. The Masking icon sits in the toolbar between the Histogram and Basic tabs.
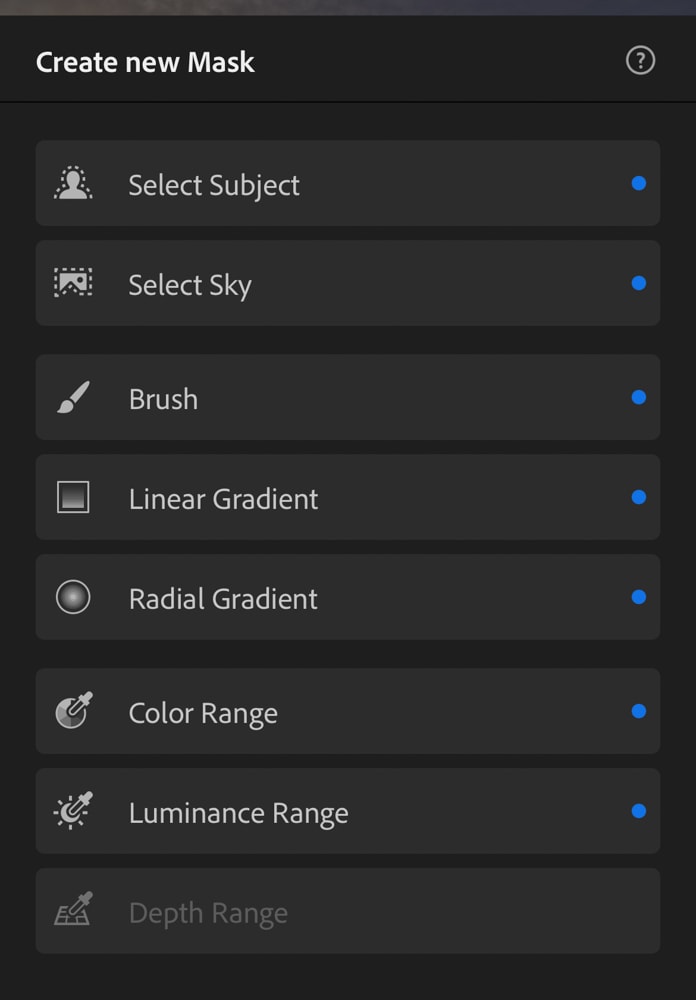
Click this icon, and you’ll see a range of options for different masks you can apply to your image.
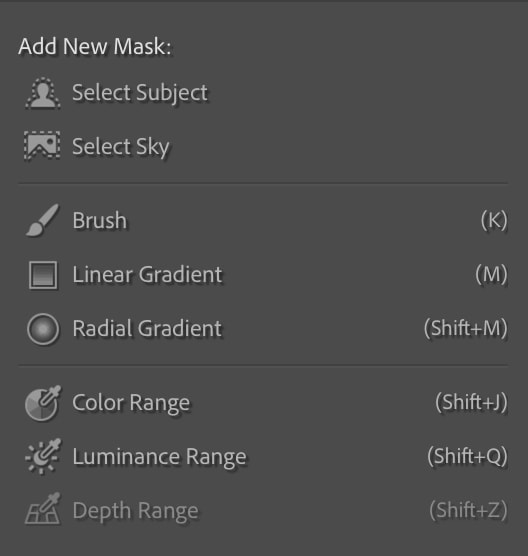
Lightroom CC contains the same masking options. You can find them by clicking the Masking icon.

Here you’ll see the masking options in the panel.
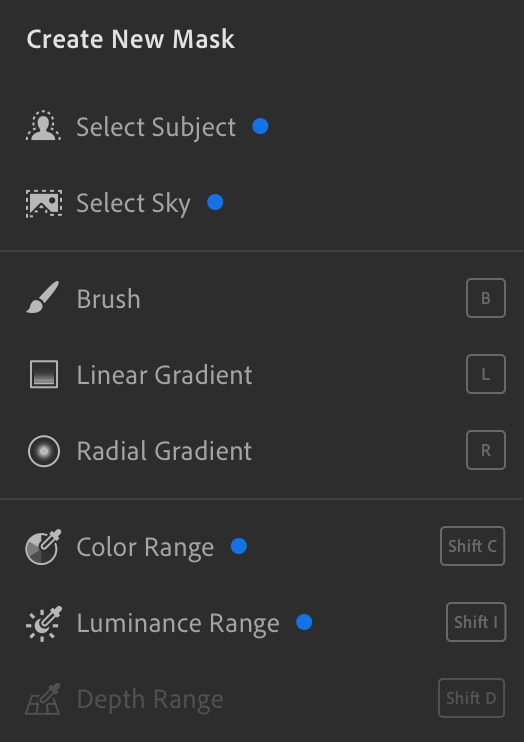
Masking in both Lightroom Classic and Lightroom CC are identical. If you are already confident use masks in one program, your skills will transfer over.
4. Exporting
Once you are done editing in Lightroom Classic, head to File and you’ll see the various export options to export your images.
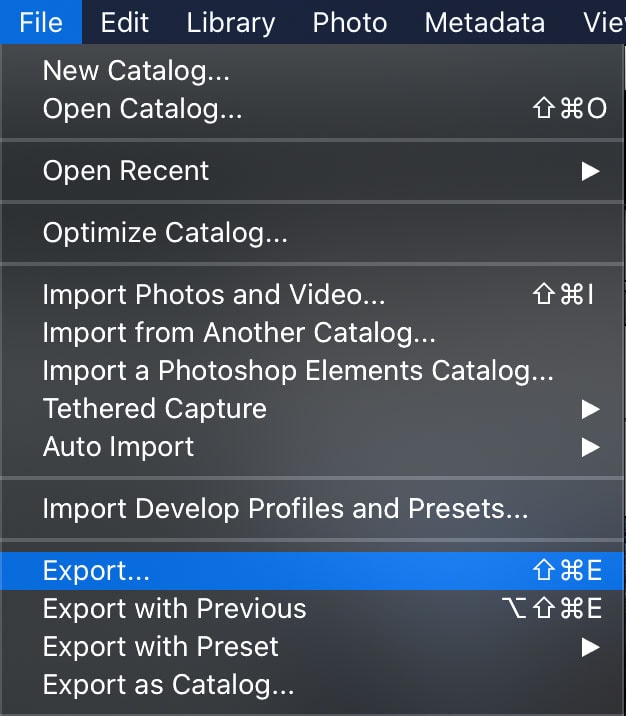
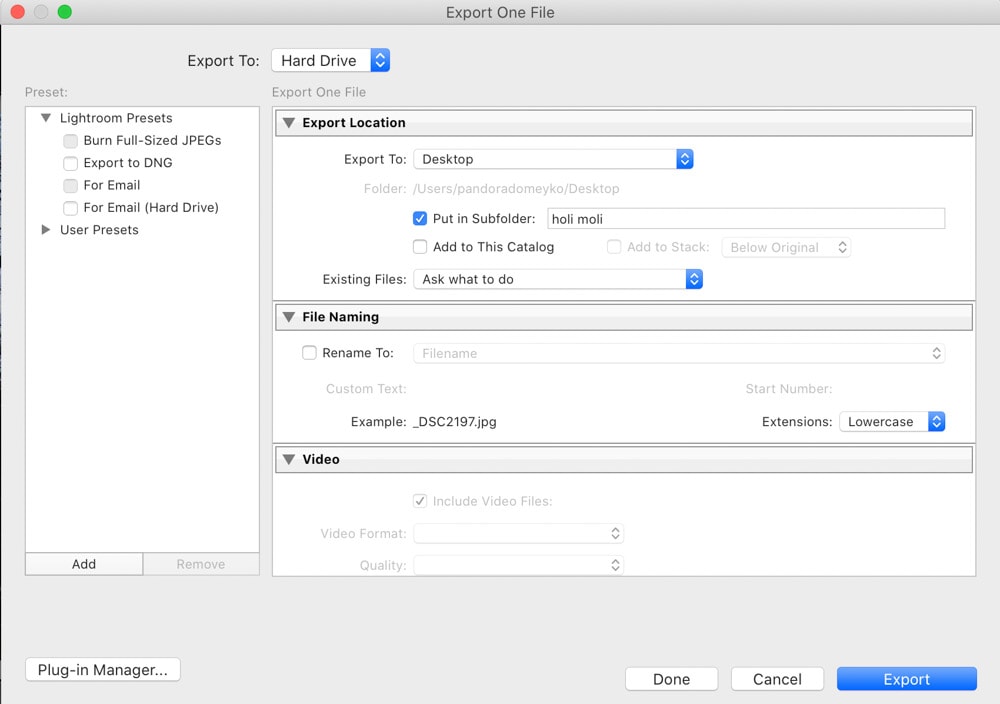
Click Export and you’ll see the export window, where you can adjust export settings such as location, image size, and resolution.
Lightroom CC’s exporting options can be found by heading to the export icon at the top.

Here, you can not only export your image to your desktop, but you can set custom settings or share your image with a link to specific people.
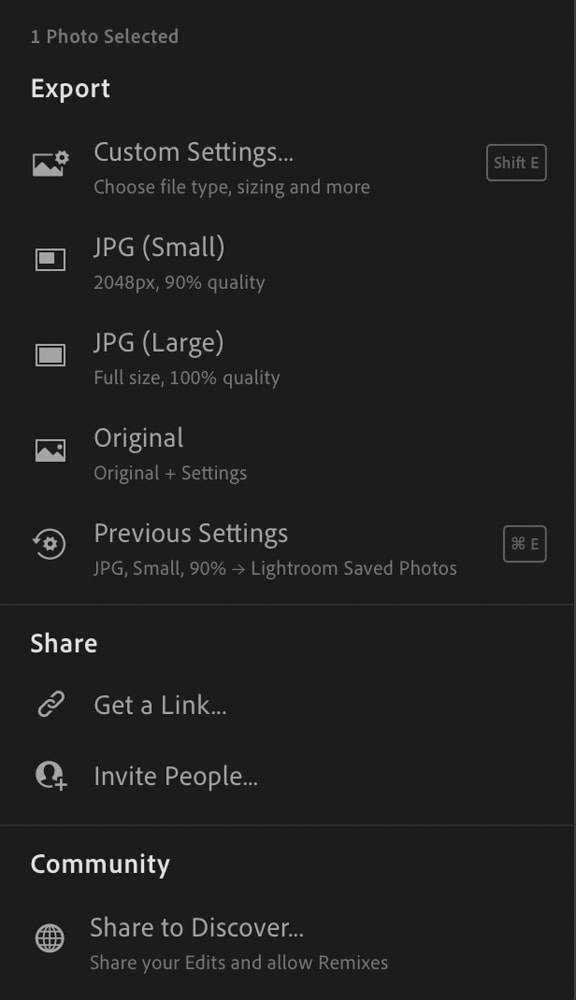
Lightroom Classic has a lot more exporting options for advanced photographers needing specific export settings for clients or print. Lightroom CC has a trimmed-down export process but is easier to understand for beginners and more streamlined.
Besides the functions of either program, it’s important to remember that Lightroom Classic is desktop-based. This means you won’t be able to access your images or the editing software outside of your computer, and the images will be stored in your desktop’s files.
On the other hand, Lightroom CC is cloud-based and integrated with a mobile and web-based version. Lightroom CC will store your images in the cloud, where you can access them on all your devices. This is useful if you’re often on the go or do a lot of editing on a Lightroom mobile app. It also makes sharing images with clients easier, and you never have to worry about a hard drive crashing since everything is on the cloud.
Should You Use Lightroom Classic Or Lightroom CC?
As Lightroom Classic was the original version of Lightroom, many photographers started on Lightroom Classic and thus find the interface comes more naturally to them. Lightroom Classic offers a professional-level workflow and organization. However, it may seem a bit complicated to those who are first starting out using a photo-editing program.
Lightroom CC has a simple and clear organization that newer users may find easier to figure out, and it helps that there is an abundance of tutorials and explanations built into the program.
Since Adobe has moved to the subscription-based price model, both Lightroom Classic and Lightroom CC are included together in most bundles. I would suggest the Photography Plan which gives you access to all versions of Lightroom, plus Photoshop at the cheapest price.
Lightroom CC VS Lightroom Mobile
Lightroom Mobile is the mobile version of Lightroom CC. All of the adjustments and image organization options are the same, with only some differences in export options between the apps. Lightroom CC is the desktop version of the program, using cloud storage to sync your images to Lightroom Mobile.
Let’s compare and contrast the two and learn which is best for different situations.
1. Importing & Image Library
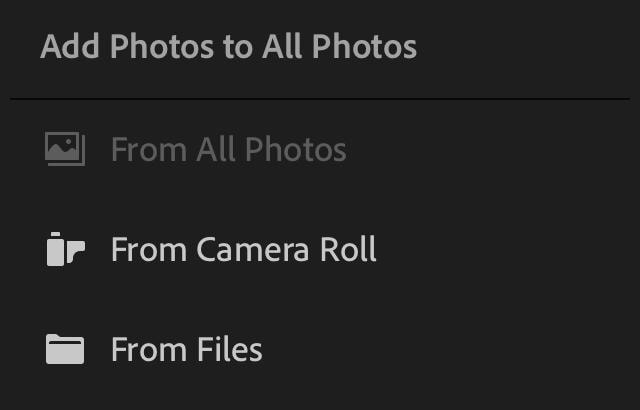
Importing is pretty straightforward in Lightroom CC as you learned previously. In the mobile app, you can import photos straight from your mobile device by clicking the add image icon.

You can then choose where to add photos from.
You can also see the images you’ve imported to Lightroom CC on your computer, as long as you’ve synced the desktop version with the cloud.
In Lightroom Mobile, you can organize your images by heading to the drop-down menu in the upper right corner.
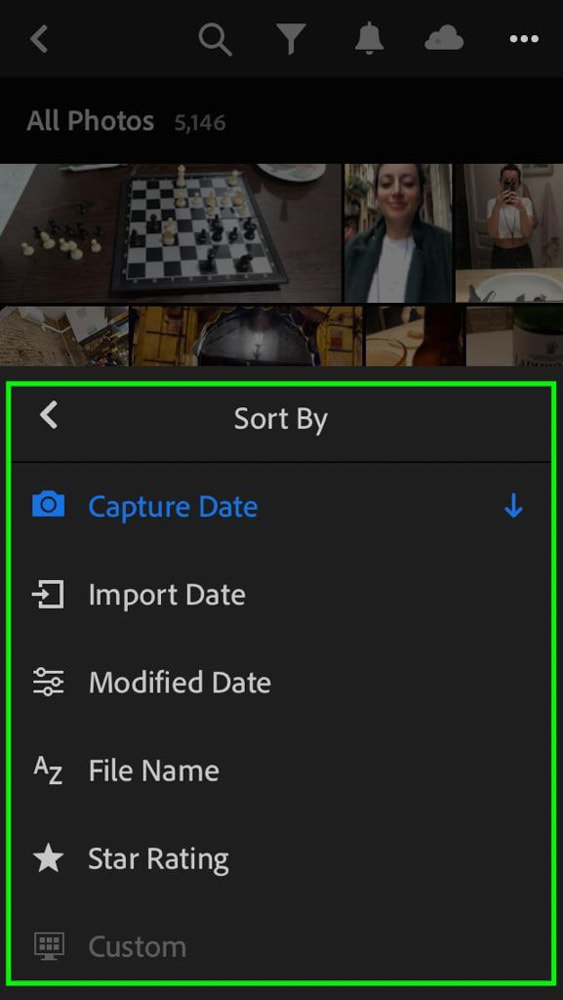
Here, you’ll see a variety of options, including some that can help you sort your images in a variety of ways such as Sort By (underlined, below).
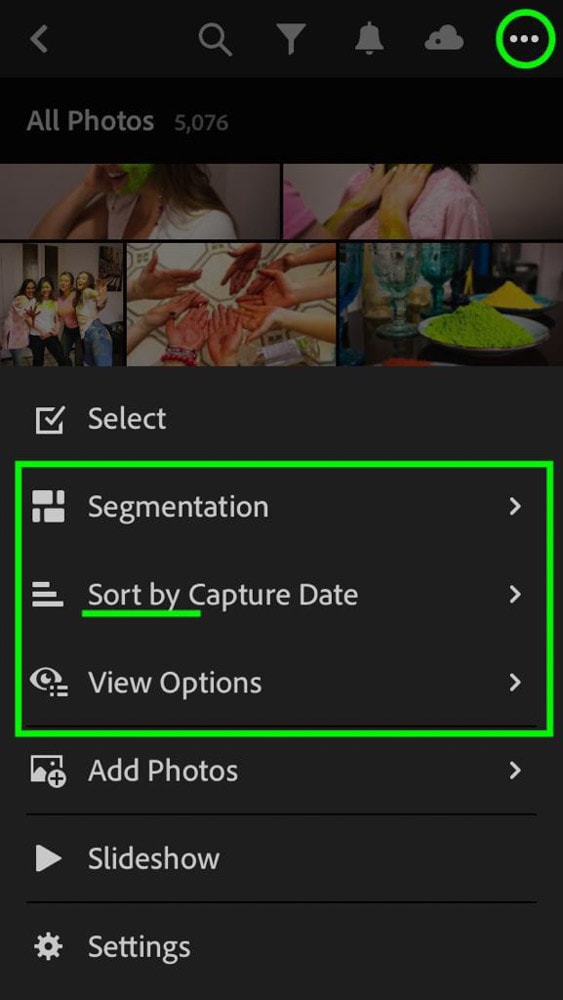
You can access the image library on mobile by clicking the Library icon at the bottom left. There you’ll see your folders and albums, similar to a catalog in Lightroom Classic.
2. Develop Settings
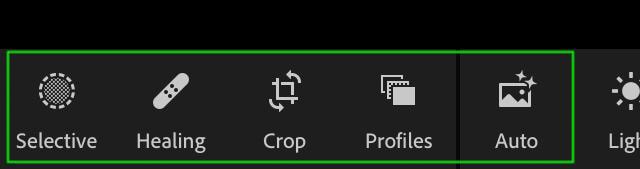
As far as mobile photo editors go, Lightroom Mobile has an impressively wide array of Develop settings and editing tools. You can access the develop settings while editing a photo — it runs along the bottom, and you can scroll to view more. This toolbar contains much of the same tools as the panels in Lightroom CC. The first tools you’ll see are Selective Edits, Healing, Crop, and Profiles, then the Auto tool.
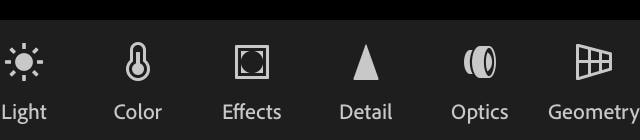
Like in the desktop version, Mobile separates develop settings into Light, Color, Effects, Detail, Optics, and Geometry. You’ll find the same Develop settings available in each panel.
3. Selective Adjustments
In Lightroom Mobile, you can find Selective Adjustments in the toolbar along the bottom. Although the mobile app is free, this feature is only available to paid subscribers of the Creative Cloud.
After clicking the masking adjustment, clicking the blue circle with the plus icon will reveal all of the masking tools available in the app. They are all the same masking features as what you will find in Lightroom CC and Lightroom Classic.
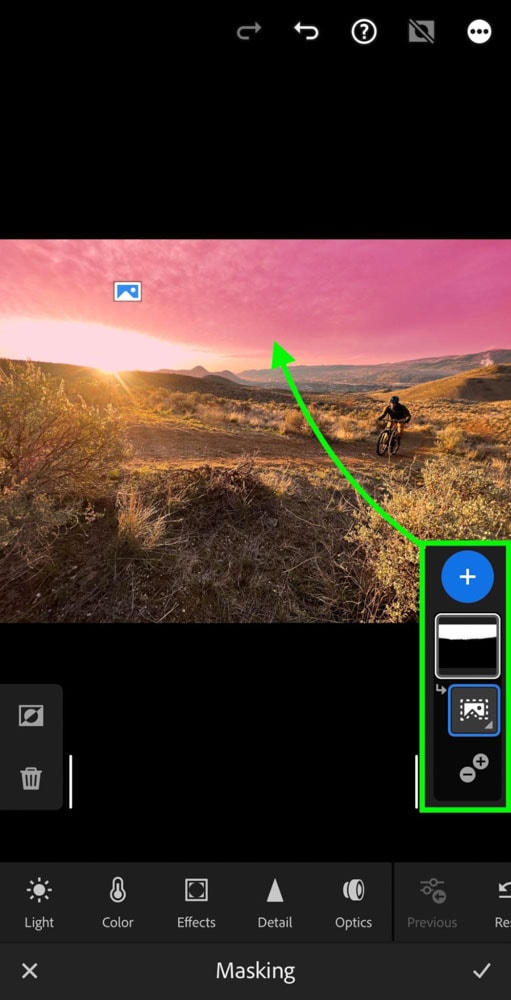
Making selective adjustments that look good can sometimes be difficult with Lightroom Mobile, as it can be hard to get specific areas using your finger and on a smaller screen with less detail.
However, depending on your needs you can likely get the selective edits to do much of what they normally would in Lightroom CC. Especially with the auto masking features like select subject and select sky, masking in Lightroom Mobile can be exceptionally easy.
4. Exporting
Both programs offer similar export options, as they are closely integrated with each other and with social media platforms.
Lightroom CC on desktop allows exporting to desktop, syncing with the cloud, and sharing as a link.
Lightroom Mobile integrates extra sharing options to social media. To access export options on Lightroom Mobile, tap the Share icon at the top-right after editing an image.

You can share directly to any of your other apps, such as Instagram or Whatsapp, by tapping Share To at the top of the list.


To set file type, size, and other export settings, tap Export As, at the bottom of the list.
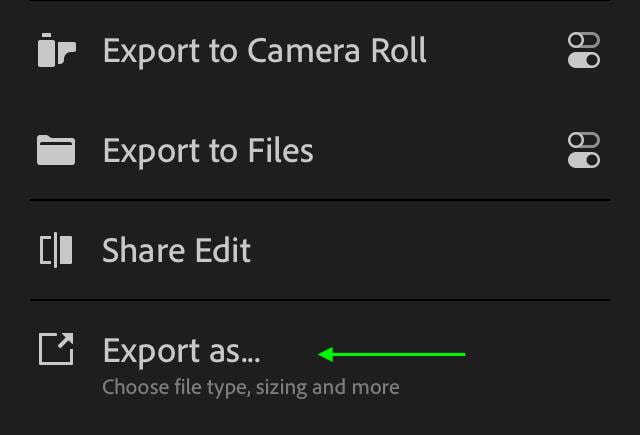

There aren’t quite as many Export options in Lightroom Mobile as in Lightroom CC, but you still have enough to export the image to your Camera Roll or Social Media with great quality.
5. The Lightroom Mobile Camera
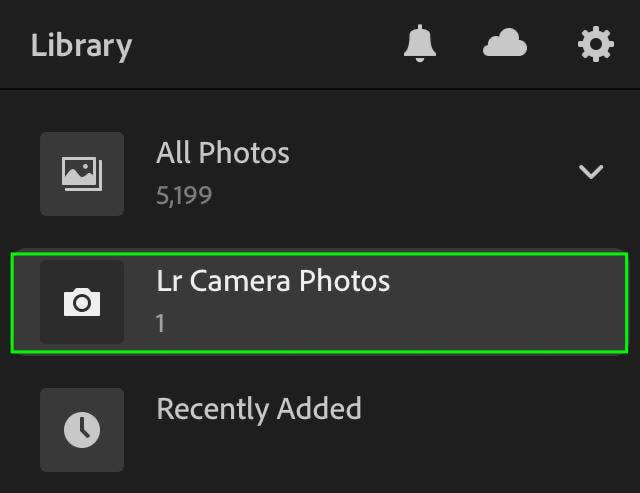
Lightroom Mobile also comes with a Camera you can use to take photos on your phone with a few extra professional settings. To access the Camera, head to the Library tab and tap Lr Camera Photos, then tap the blue Camera icon.

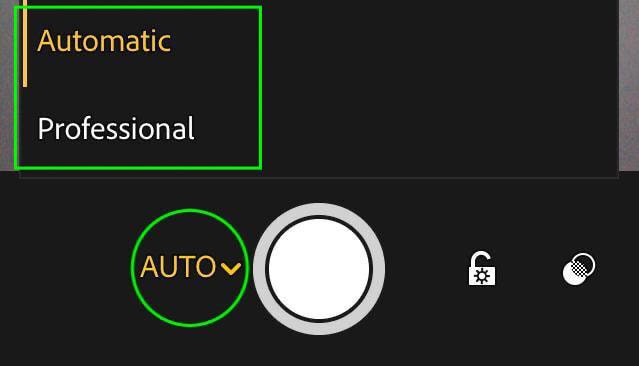
The camera will appear, and you can take images using some of those extra settings. Swipe left and right on the screen to adjust exposure. At the top, you can tap the settings icon (three white dots) to access additional settings such as aspect ratio, timer, and overlays, which will appear in a line to the right of the settings icon.

At the bottom, you can switch from automatic to professional mode, which will give you additional settings such as ISO and white balance.
This is a useful alternative to your mobile camera as it gives you more control over the image you’re taking. It also makes importing to the app easy as it’s automatically added to Lightroom Mobile after the photo is taken. While you’re still getting a mobile-quality image, you can at least adjust the image settings as you take it.
Which Version Of Lightroom Should You Use?
The version of Lightroom you choose to use will likely depend both on your needs and your comfort level. Many photographers have started out using Lightroom Classic and prefer it for professional use because it offers a wider range of technical editing abilities as well as better batch editing options.
The difference in each program’s organization, both in images and the available tools, may lead some photographers to prefer one program’s style over the other.
Lightroom CC is slightly more user-friendly with a simple developing layout and easy access to tutorials and information about how to use each tool, although it is not well-suited for large batch edits.
Lightroom Mobile is less suited to professionals, though it is probably one of the best, if not the best, photo editing app available on a mobile device. It is nearly an exact copy of Lightroom CC, so it is an excellent app to have if you do a lot of editing on the go, such as if you do a lot of social media posting.
In Lightroom Classic, you will have your work offline. As Lightroom Mobile is closely integrated with Lightroom CC, it might benefit some users to do the majority of their work on Lightroom CC to keep the images available whether they’re at their desktop or only on their mobile device.
I personally prefer Lightroom Classic over Lightroom CC because of the more robust image organization features, metadata options, file handling, and export settings. It’s everything you need for a professional workflow and working with images in large quantities.
Luckily you don’t have to choose between one program or the other and you can experiment with all three for yourself. With the Adobe Photography Plan you get access to Lightroom Classic, Lightroom CC, and Photoshop starting at $9.99/month. You can learn more about the Photography Plan and what it offers here.
Happy Editing!
