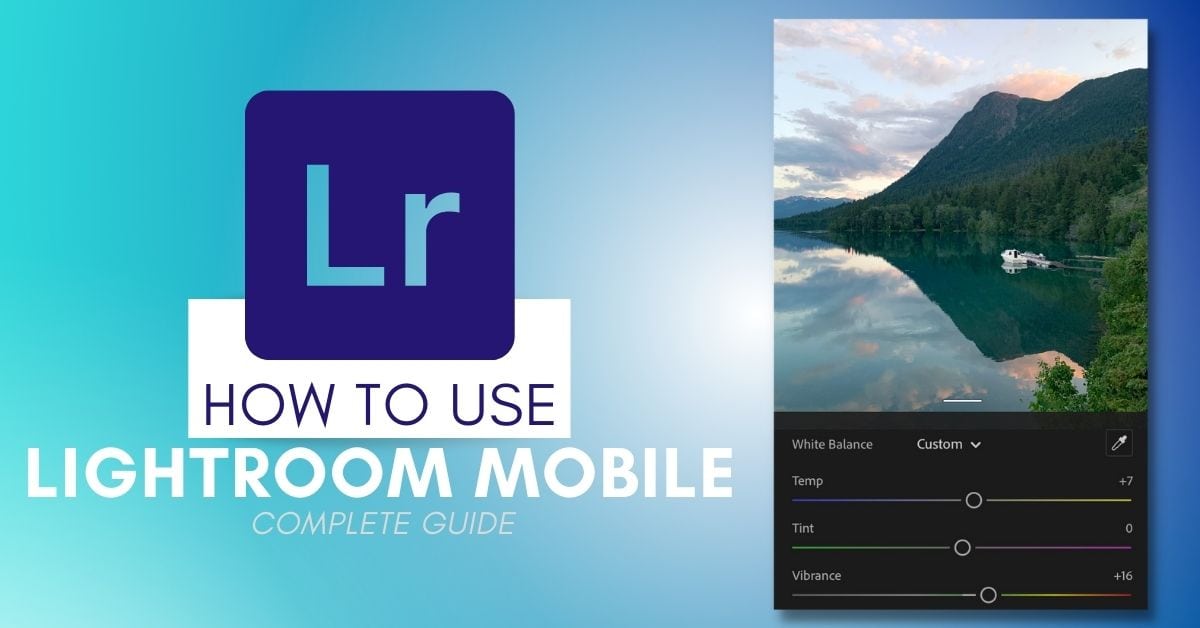

There’s no doubt that Lightroom Mobile is one of the best mobile editing apps around, but knowing how to use it is key to get the most out of your images. Lightroom Mobile is entirely free; however, there are some added perks to those subscribed to the Adobe Creative Cloud. Things like local adjustments, spot healing tools, batch editing abilities, and more. Luckily, there’s a ton of great features this app can provide regardless of being subscribed or not.
In this post, you’ll learn everything you need to get started in Lightroom Mobile. From importing, editing, applying presets, exporting, and more, you’ll be a Lightroom Mobile pro with these tips.
What Is Lightroom Mobile?
Lightroom Mobile is a free mobile photo editing app offering pro-level editing tools while on the go. With the help of sliders and built-in presets, enhancing images is easy. For users subscribed to the Creative Cloud, you’ll unlock added editing perks like local adjustments, spot healing, and more.
This app is available for Android, iPhone, and iPad and can be used to edit both RAW and JPEG files. At first glance, Lightroom Mobile is completely free, and there is a lot you can accomplish with this version. Even in the free version, you have access to cropping tools, exposure and contrast adjustments, color editing tools, and all of the other typical editing adjustments you can imagine.
However, those subscribed to the Adobe Creative Cloud, such as the Photography Plan, will get some added perks while using Lightroom Mobile. Things like:
- Your LR Mobile and LR Desktop Catalogs will sync, allowing for editing across multiple devices.
- Access to the Spot Healing Brush to quickly remove unwanted objects from a photo.
- Spot editing adjustments such as the Gradient Filter, Brush Tool, and Radial Filter.
- You can edit RAW files whether they were shot in the Lightroom Camera, or from a seperate camera.
- You can batch edit images by applying the same look across multiple photos easier.
- Better geometry tools.
So although there are some extra features, you don’t need to pay anything to use the app. Out of the gate, Lightroom Mobile offers a ton of features. However, having a Creative Cloud subscription simply enhances the app for more serious users. Better yet, you’ll then have access to Lightroom Desktop, which is a photographer’s sanctuary for any photo editing needs.
How To Download Lightroom Mobile
You can download Lightroom Mobile via that App Store, similar to any other app on your phone. Once downloaded, you will be prompted to sign in. If you are subscribed to the Adobe Creative Cloud, be sure to sign in with your Adobe account. Otherwise, you will not have access to any paid features and can’t sync data between mobile and desktop.
If you want to use the app for free, choose one of the other sign-in options to create a new account. From there, you can begin importing and editing your mobile images.
How To Import Photos Into Lightroom Mobile
Once an account is created, it’s time for the fun to begin. There are two different ways to import images in Lightroom Mobile. The first is directly from your camera roll, while the second is using the Lightroom Camera.
Option 1: Import Images From Camera Roll
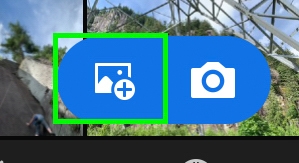
To import images from the camera roll in Lightroom Mobile, click on the add image icon in the bottom corner. In the window that appears, select From Camera Roll. To select multiple images, press the three dots in the upper corner and enable Select Mode. With the images chosen, click Add to import.
Let’s break that down a little more in-depth.
Within the start screen, known as the Library Module, click on the image icon with a plus beside it. This is the add image icon.
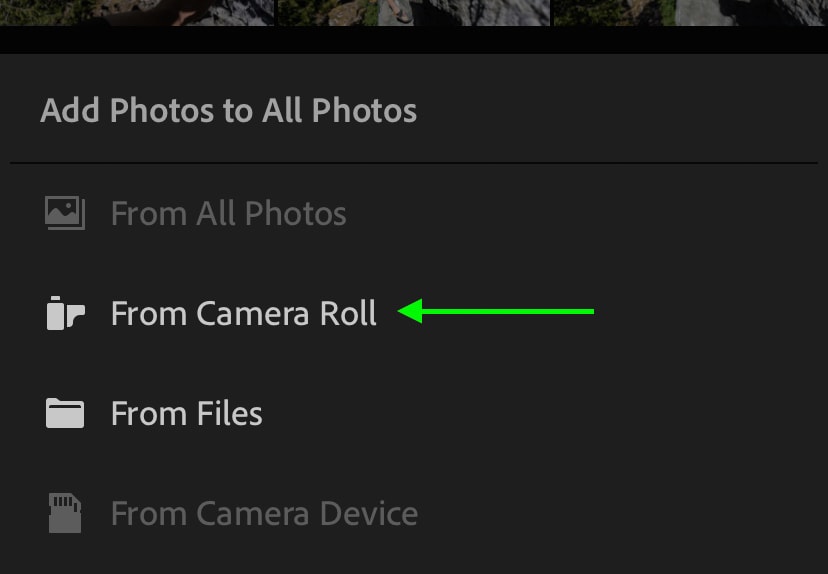
A new window will appear where you can choose to import from the following options:
- From All Photos
- From Camera Roll
- From Files
- From Camera Device (Memory Card)
Since we are importing images from the camera roll in this example, click on “From Camera Roll.” If you have your pictures saved on a cloud storage platform like Google Drive or Dropbox, selecting “From Files” will allow you access to those.
Now your camera roll will open up with all of the images on your device. By default, clicking on one image will automatically bring you into the editing area of the app. This can be slightly frustrating when you want to import a handful of pictures, as going one by one would take forever.
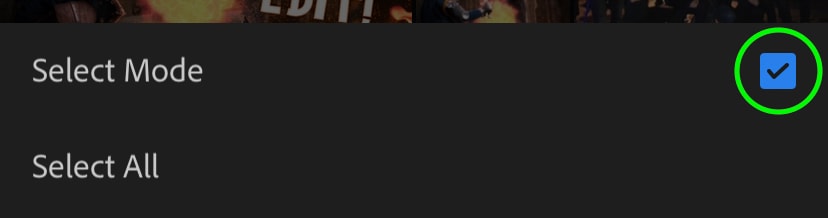
To solve this problem, click on the three dots in the upper corner of the screen.

Then choose “Select Mode.” Now you can click on multiple images at once to import them into Lightroom Mobile.
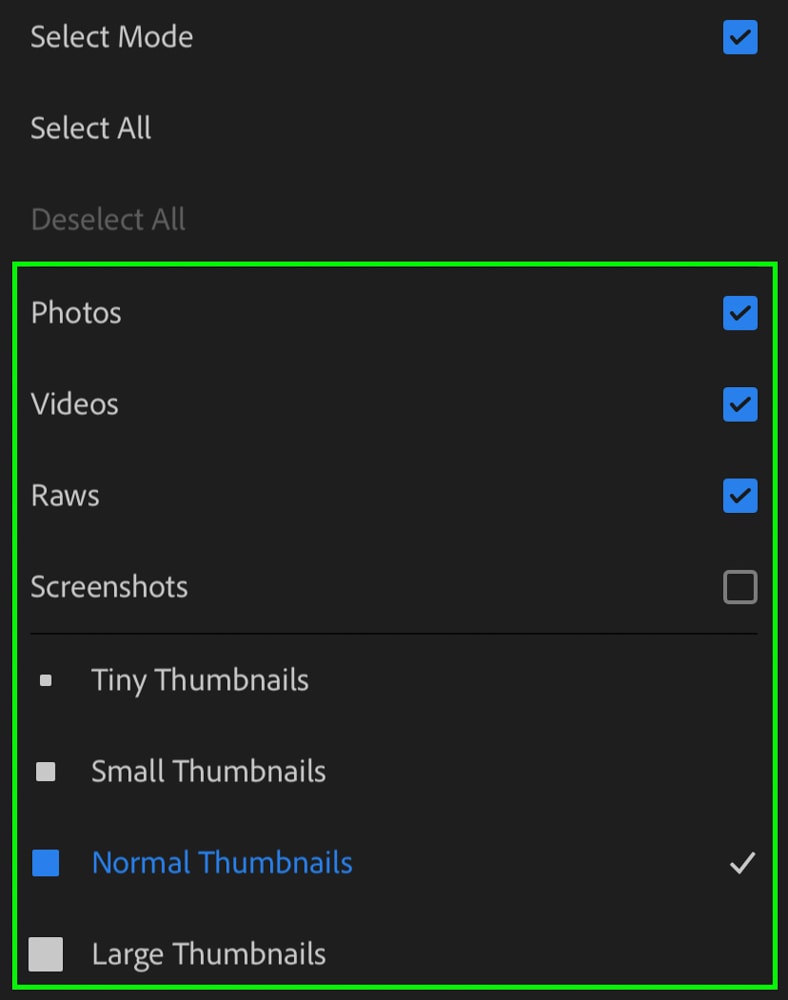
You can further filter your camera roll by clicking on the same three dots once again after enabling Select Mode. Now you will see a few options to filter your search to only photos, videos, raws, or screenshots. You can also change the thumbnail size of each image in the camera roll preview as well.
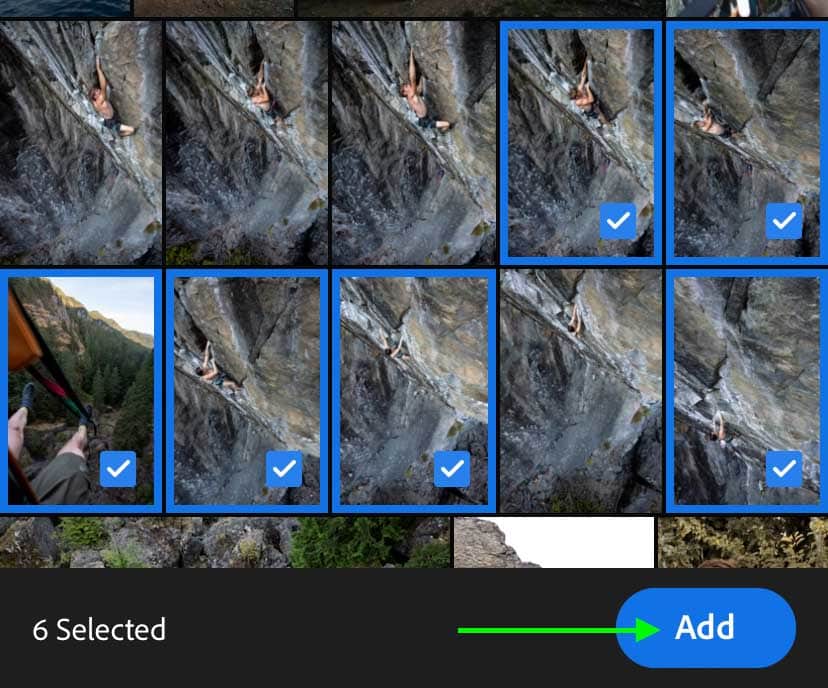
After selecting all of the images you wish to import, click “Add.”
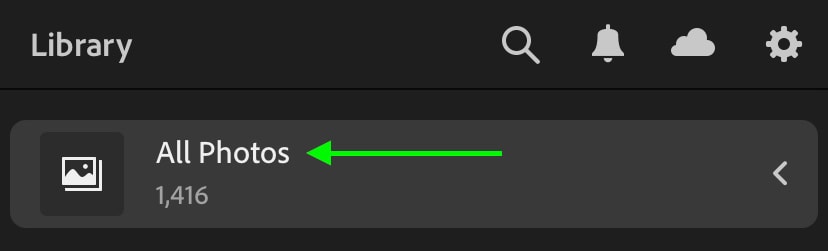
By default, your images will be imported into the “All Photos” group. You can further organize your photos into individual folders, but I’ll touch more on that later. For now, your images are successfully imported into Lightroom Mobile from the camera roll!
Option 2: Importing Images From The Lightroom Camera
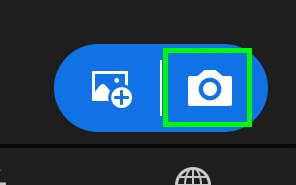
The next way to import photos in Lightroom Mobile is to actually capture them before importing! Beside the add image icon, there is a camera icon representing Lightroom Camera. This handy tool allows you to capture photos on your phone that import directly into Lightroom Mobile afterward. Better yet, it offers some pro-level features to improve your mobile photography.
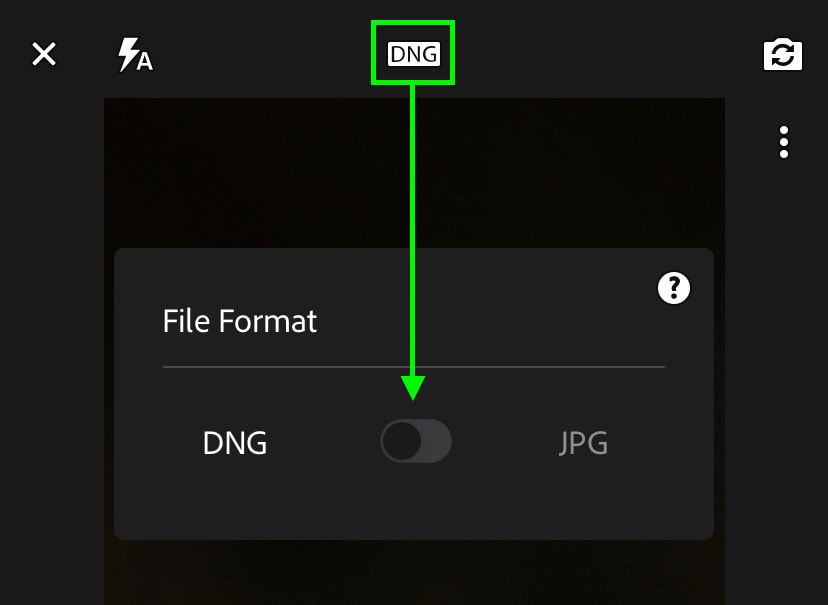
First of all, you can choose between DNG and JPEG file types to capture. A DNG file is uncompressed and has more file information than a JPEG photo. This makes it easier to add more aggressive adjustments to your photo without any quality loss. The only downside to DNG is that the file size is larger, so it will take longer to import after capture and holds more space on your device.
– Camera Mode Options
With a file type chosen, you can choose between three different camera modes known as Automatic, Professional, and HDR.
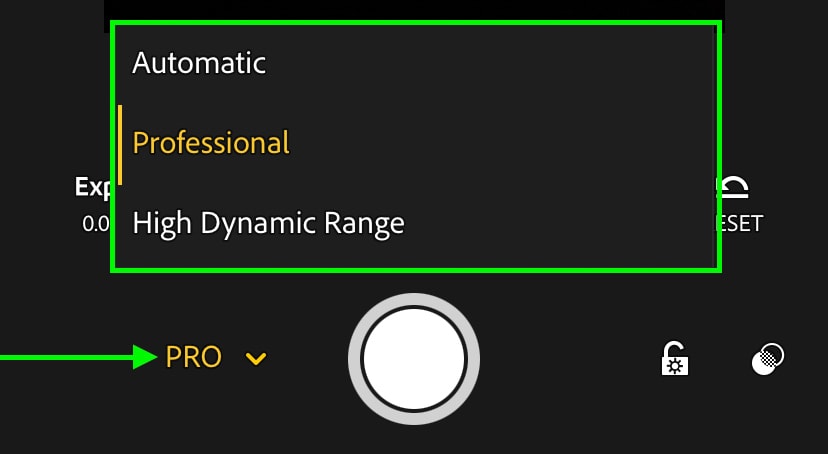
- Automatic: Is similar to using the regular camera on your phone. The device will automatically choose focus and exposure settings for your images.
- Professional: Turns your phone camera into a pro-level DSLR (almost). Here you can manually control the shutter speed, ISO, white balance, focus, and exposure compensation. If you’re unframiliar with what these settings are, this post will help you learn!
- HDR: HDR (High Dynamic Range) mode allows for better exposed images between the highlights and shadows. This mode also offers more manual control of the camera compared to Automatic.
– Additional Camera Settings
Beyond these different camera modes, you can access additional settings that are the same across all three camera modes. By clicking on the three white dots in the upper corner, you can edit the aspect ratio, shutter delay, grid overlay, highlight clipping, and other settings.
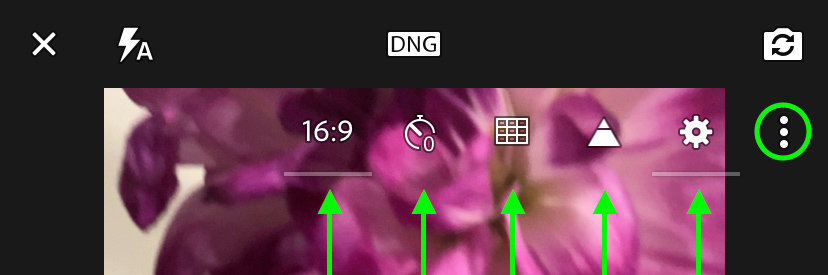
- Aspect Ratio: Controls the ratio between the width and height of your image. The default aspect ratio is 4:3, but you could switch this to something like 16:9 for a more cinematic feel.
- Shutter Delay: Here you can choose between a 2, 5, or 10 second delay between when you press capture, and when the photo is taken.
- Highlight Clipping: Applies a black and white stripe overlay to any blown out highlights. This helps to indicate which parts of your photos may be too bright, making it easier to correct the exposure.
- Settings: Let’s you enable additional options such as max screen brightness while using Lightroom Camera, geotagging images, or saving uncompressed HDR’s.
The final options available are the exposure lock and the preset filter. The exposure lock will lock the brightness settings of your current image, so your camera will not automatically adjust. The preset filter will apply a basic editing preset to your photo before it is captured. This can help save some time once it comes to edit.
Once all of your settings are in order, capture your images as you would usually on your device. All of the images will be saved into the “All Photos” folder in the Lightroom Mobile library. If they don’t appear right away, they are still processing and may take a few moments.
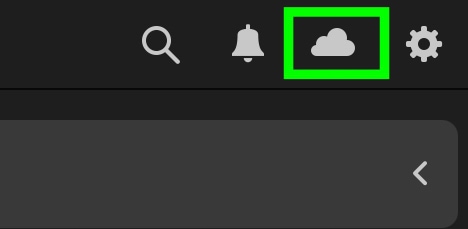
You can double-check this by clicking on the cloud icon where any processing images will be displayed.
How To Organize Photos In Lightroom Mobile
To begin organizing your photos in Lightroom Mobile, follow these steps:
- Select An Image
- Tap the three dots icon and choose “Organize.”
- Click “Add To.”
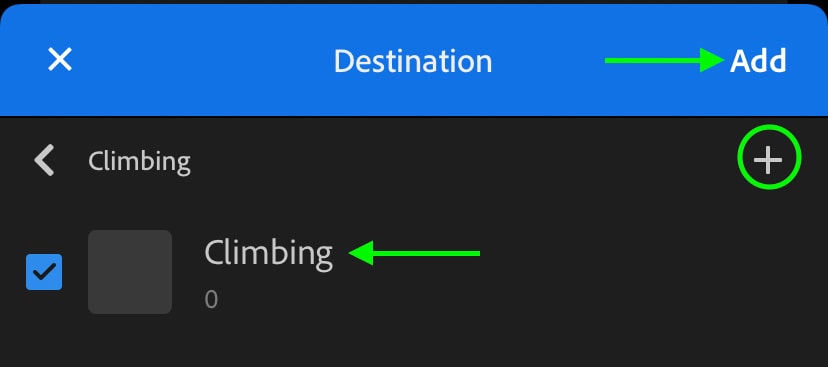
- Select an exisiting album or press + to create a new one.
- Press “Add” to move your image to the new folder or album.
The above method is the most basic way of organizing your photos. By placing your images into different folders, you can quickly sort them by location, theme, or dates. In most cases, you will want to add multiple photos to folders at once rather than doing it one by one. To do this, access the “All Photos” folder and click on the three dots in the upper corner.
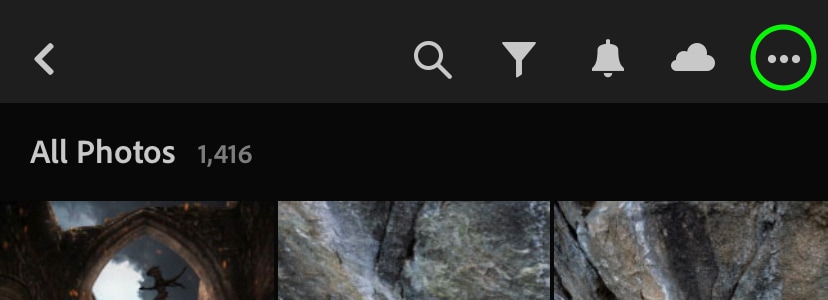
Then click on “Select.”
Now go through and tap on all of the images you want to group into a single folder. Then click the “Add To” option in the bottom bar.
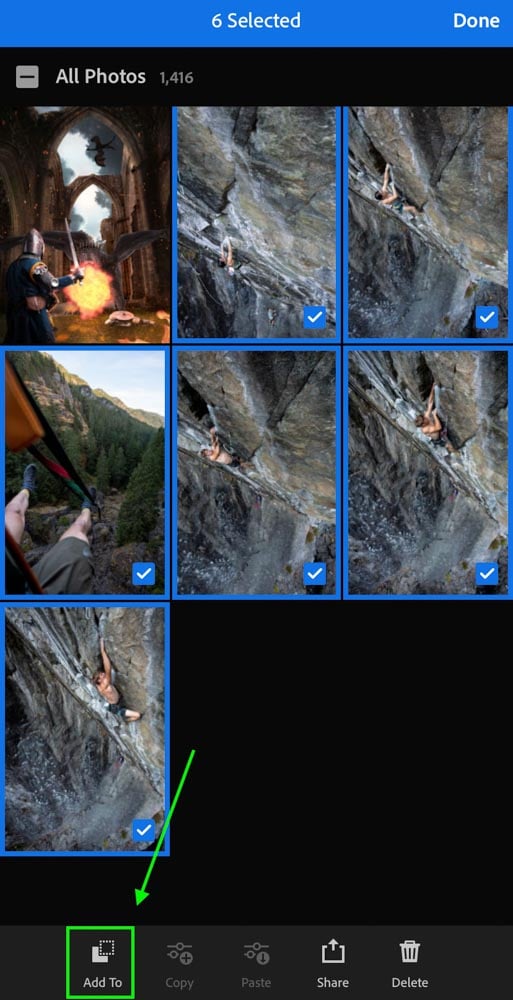
A new window will appear with all of your existing folders. If you already have folders created, you can add your images by selecting the desired folder. To start fresh with a brand new group, click the + icon to create a new album or folder. Albums are for specific things (like dates) within a folder, while folders are for general themes.
Sorting Lightroom Mobile Photos With Flags And Ratings
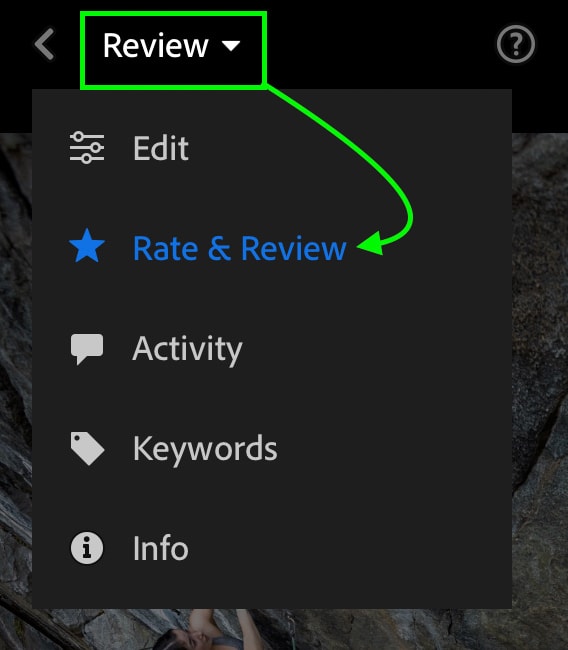
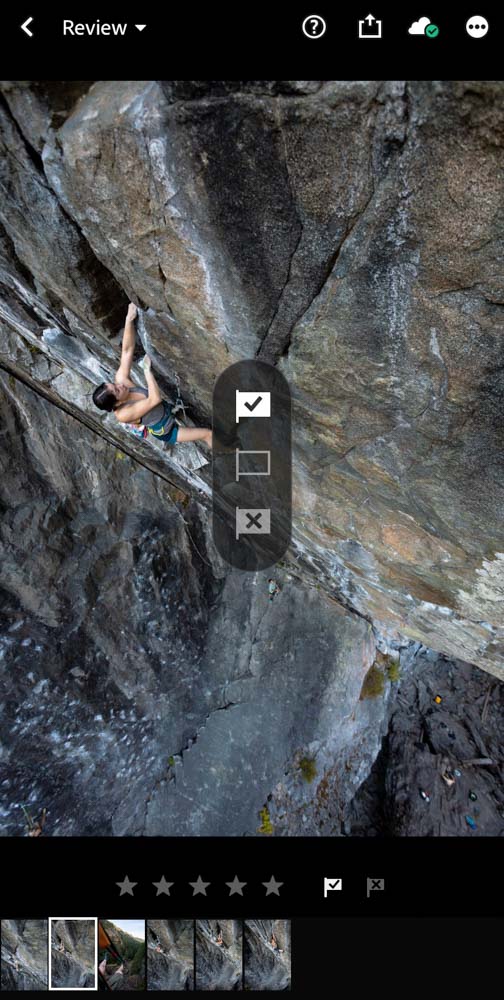
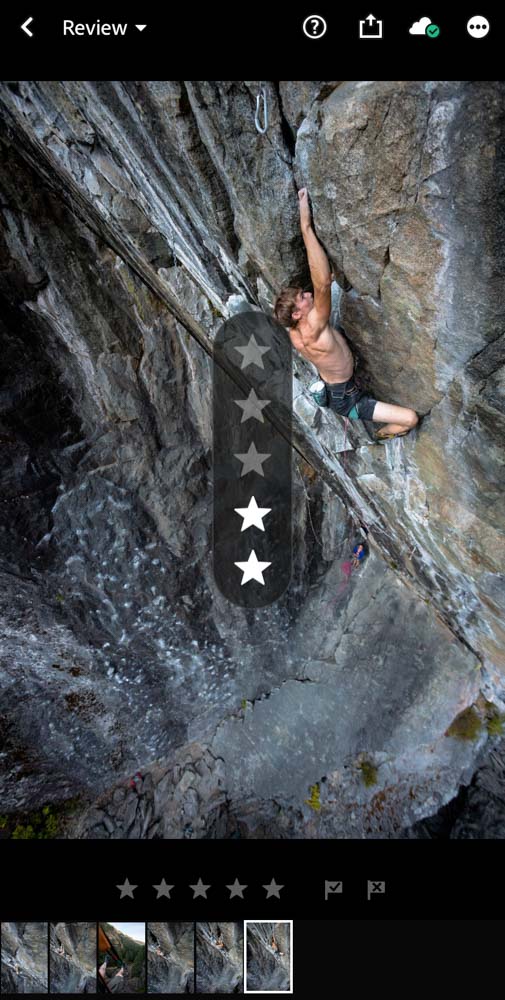
To add flags or ratings in Lightroom Mobile, click on an image and set the mode from “Editing” to “Review.” To add a flag, swipe up in the middle of the image, or press the flag icon at the bottom of the image. To add star ratings, drag up the edge of your screen or select a star rating manually.
Sorting your photos with flags and ratings helps isolate the best images out of a batch for editing. This not only saves a lot of time but helps keep you organized when you come back to an image folder weeks or months in the future.
To get access to these organization options, you must be in the “Review” mode. By clicking on an image, you will be in the “Editing” mode by default. By clicking on “Editing” and choosing “Review,” you’ll now have access to flag and rating options.
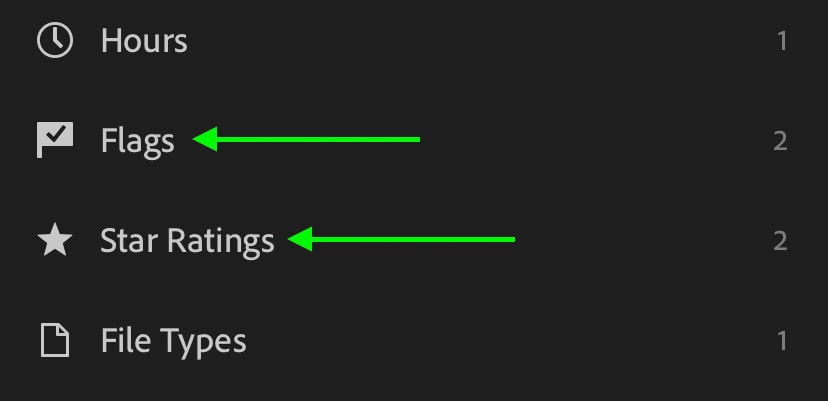
To add a flag, you can manually click on the flag icon with the checkmark inside of it. A good way to use these is to add them to any image that you want to edit. The other type of flag is a reject flag, which is the black flag with an X in it. These can be added to any images you don’t want anymore.

As an extra trick to save time, swipe up in the middle of your image to add a picked flag. Alternatively, you can swipe down to add a reject flag.
When it comes to star ratings, it’s a similar process. You can manually click on any star values at the bottom of the image to apply the rating. You can also drag up on the edge of your screen to add star ratings to an image faster. Star ratings are a good option to further sort pictures after they have been flagged. For example, adding a star rating to any photos, you want to share on Instagram or make prints out of.

Filtering Folders & Albums For Flag And Star Ratings
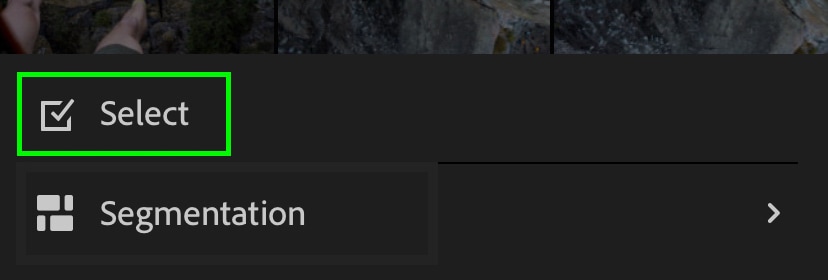
After your flags and ratings have been applied, you can filter your image folder to be broken up into the different flags and ratings. With your image folder or album opened, click on the three dots in the upper corner and choose “Segmentation.”
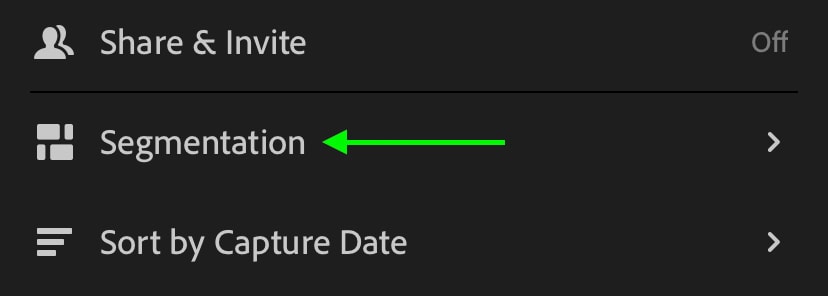
Now choose to filter the images by flags or star ratings.
This will break up all of your images into different groups that you can click on and browse through individually. This helps to narrow down your image search when there are hundreds of photos in a single folder!
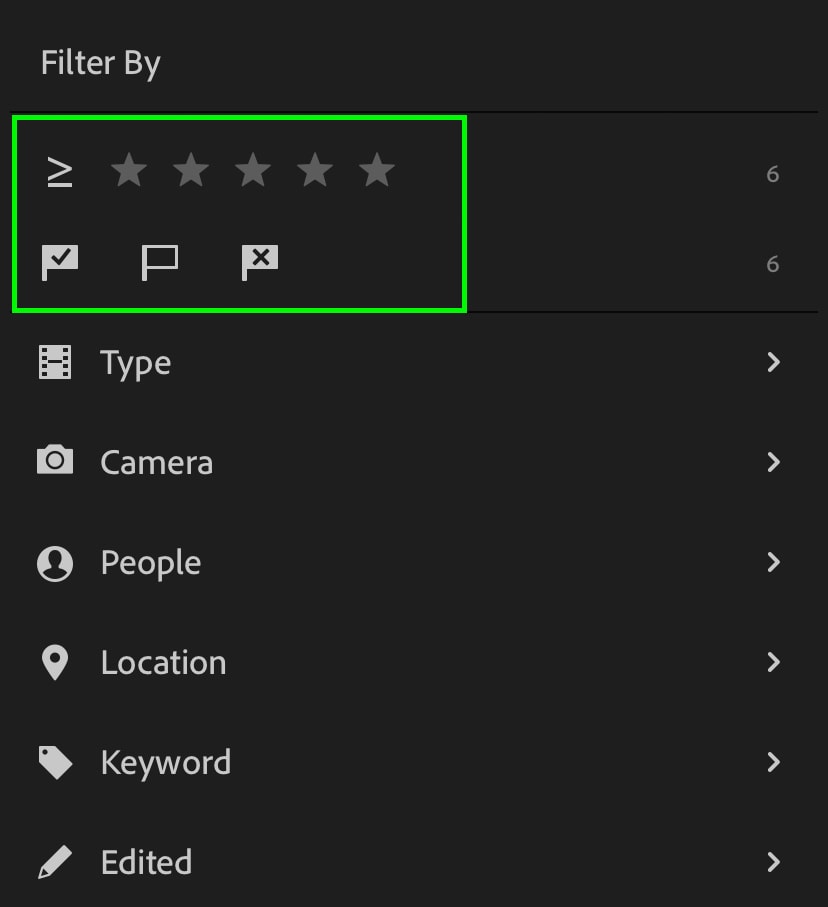
Alternatively, you can press the filter icon to choose which types of images you want to view.

How To Edit Photos In Lightroom Mobile
To edit an image in Lightroom mobile, follow these steps:
- Click on the image you want to edit.
- Click “Crop” to adjust the crop and straightening.
- Select “Light” to correct the exposure and contrast.
- Click “Color” to enhance and adjust the hue and vibrance.
- Select “Detail” and increase the sharpening amount slightly.
- Click “Presets” to select an editing style to finish off your edit.
There are many different editing options in Lightroom Mobile, so following a workflow will help make the process less overwhelming. A workflow is like a recipe for getting your photo from point A to B in your edit. Before you learn about an editing workflow I like using, let’s break down what each editing module does.
– Types Of Editing Tools In Lightroom Mobile

- Selective (Premium Version Only): Here you can apply selective exposure and color adjustments using the adjustment brush, gradient filter, or radial filter. Perfect for making a subject stand out from the background.
- Healing (Premium Version Only): The Healing Tool automatically removes unwanted objects from your images. By click and dragging over an object, Lightroom will find another part of your image to cover it with. This works best with smaller things in your images.
- Crop: Home to all of your cropping and straightening adjustments. This works well to improve your composition, level out a crooked horizon, or change the aspect ratio.
- Presets: Presets are premade editing adjustments that can be applied to an image in one click. Whether you purchased presets or created your own, they will all be stored here. These are useful for getting professional looking edits in less time.
- Auto: As you probably guessed, clicking this option will apply automatic adjustments to your photo. This works well for a general enhancement of your image, but not to create specific editing styles.
- Light: Is home to all of your brightness, contrast, and tone curve adjustments. This is typically the first place you’ll want to go to begin enhancing your photo and correcting the exposure.
- Color: Offers basic color tools such as white balance and saturation, along with advanced tools like HSL and Color Grading. To really make your images pop, these editing tools are some of the best!
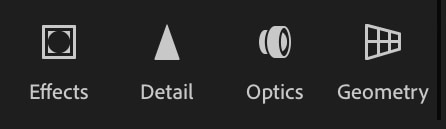
- Effects: Has additional editing options such as texture and clarity enhancements, along with a vignette slider to darken the edges of your photos!
- Detail: Here you can adjust the sharpening and noise reduction in your images. Using these settings can help improve the overall quality of a photo.
- Options: The settings within the Optics tool help to remove chromatic abberation and correct any distortions your lens may create. This is a nice touch to include with any edit you make!
- Geometry: Helps to correct the angle of your image. Perfect for making edges in a room appear perfectly straight and correct for wide angle lens distortion.
Editing A Photo In Lightroom Mobile – Step By Step
Now that you have an idea of the available tools let’s go and put them to use! To start, click on the image you wish to edit and ensure you are in the “Edit” mode.
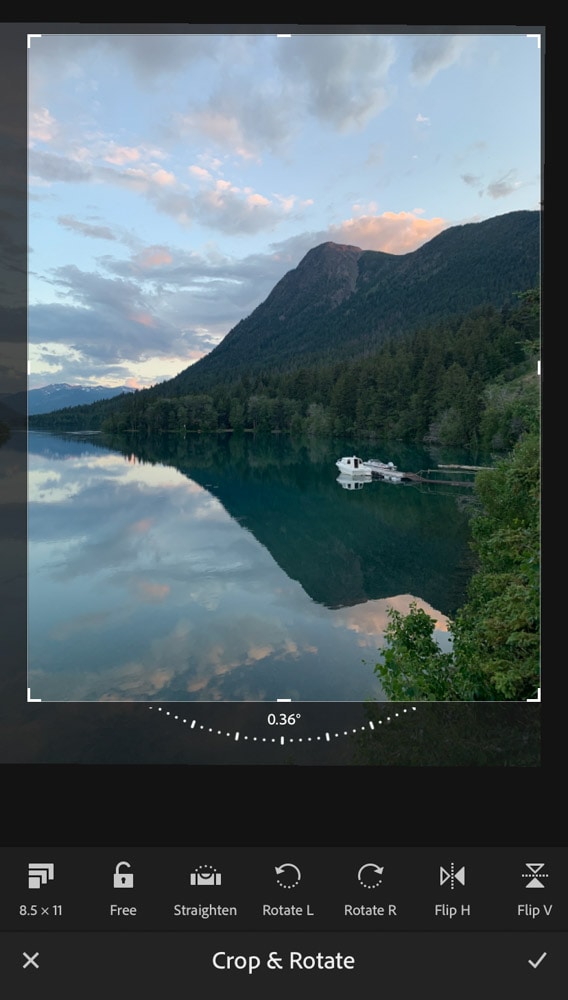
1. Adjust The Crop And Straightening
A great place to begin is the Crop Tool. This isn’t always necessary, but if your photo is slightly crooked or could use a different crop, it makes a big difference in your image. By clicking on the Crop icon, you can work through the provided settings to enhance your composition. Changing the aspect ratio, flipping the image, or simply removing excessive headroom can all be good uses of this tool!
2. Improve The Exposure And Contrast
Once complete, click on the “Light” Tool. Depending on whether your photo is too bright or too dark, the settings you use will vary. However, as a general rule of thumb, use the exposure adjustment for broad brightness adjustments. Then work through the highlights, whites, shadows, and blacks to further refine the exposure. Ideally, your photo will have lots of details visible in every exposure range.
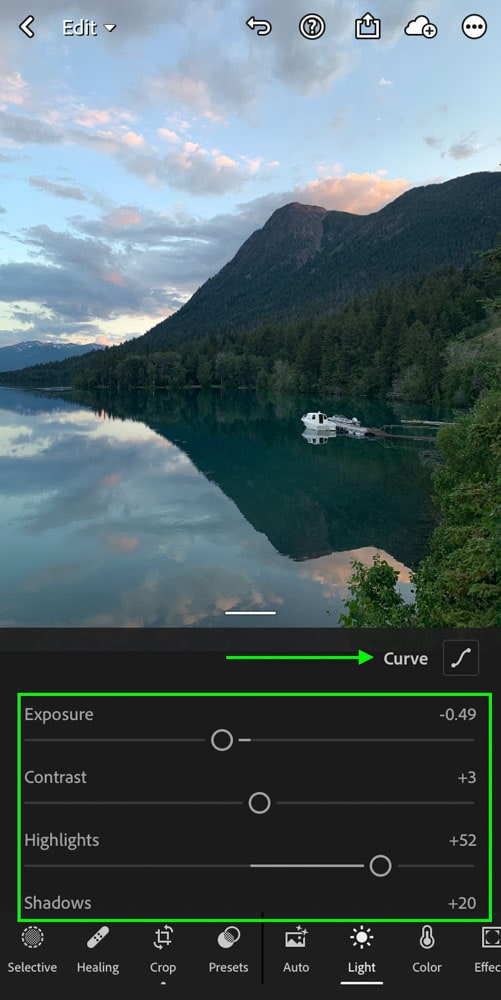
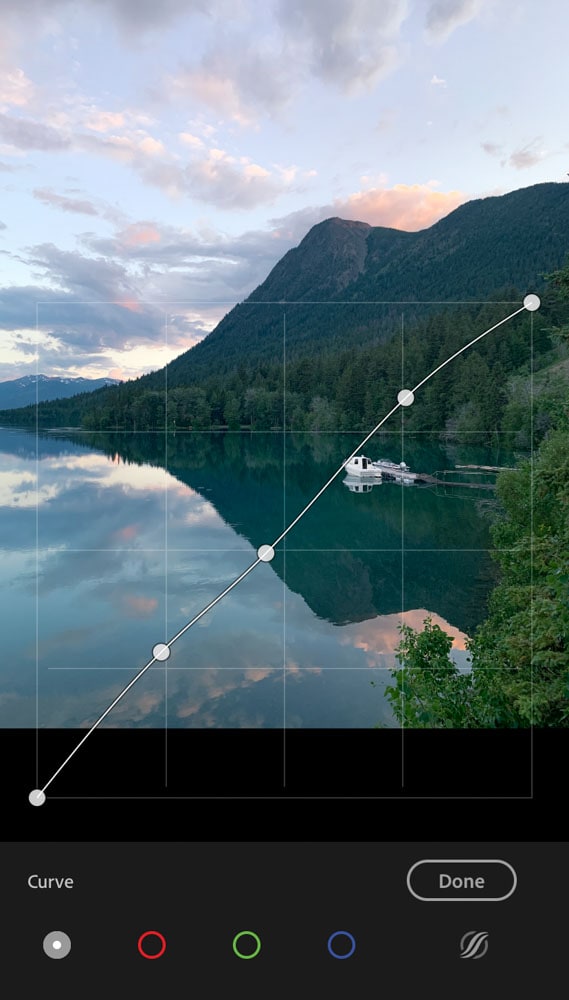
If you are a more advanced editor, the Tone Curve can add more customized exposure and contrast adjustments. You can access that by clicking on the “Curve” option. To learn more about how this tool works in Lightroom, check out this post.
3. Stylize The Colors In Your Photo
With the exposure looking better, let’s dive into the Color Tool. Start by making some basic white balance and saturation adjustments to improve the overall colors in the photo.
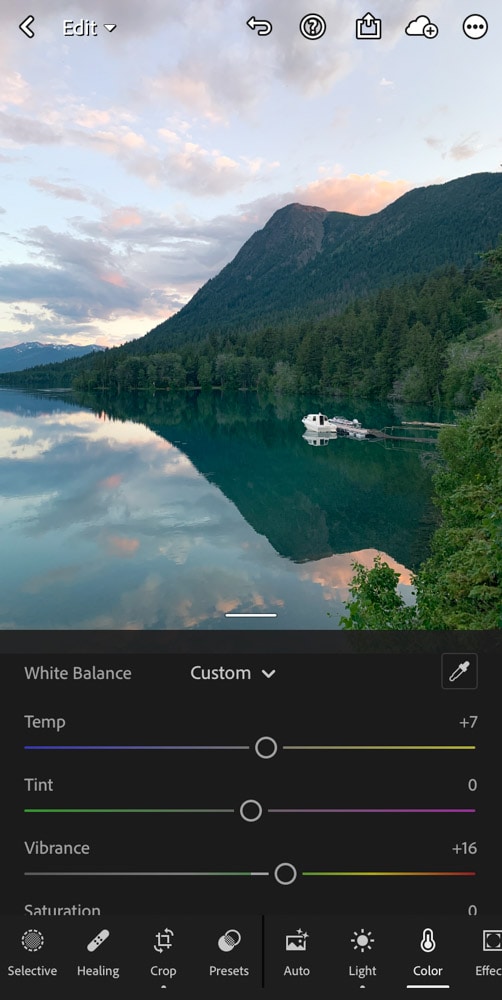
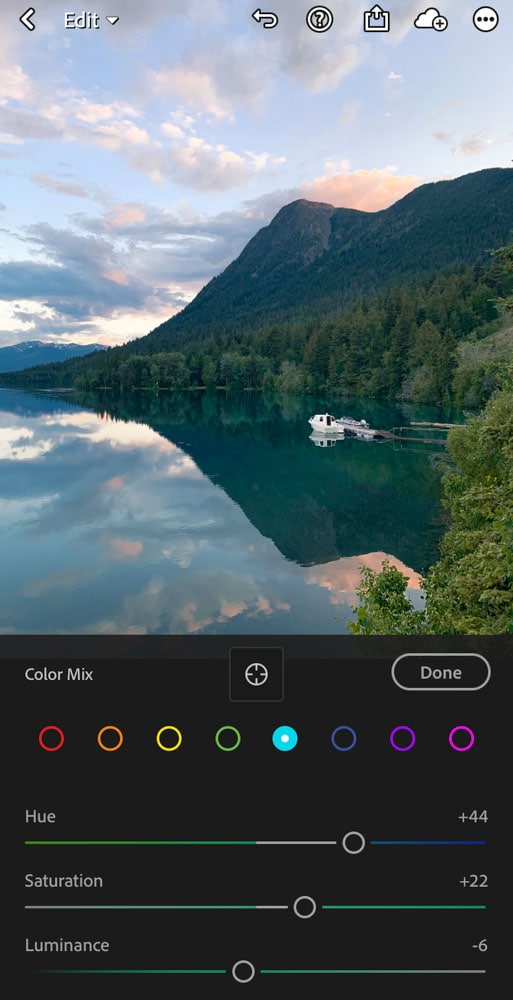
Next, click on “Mix” to open the HSL settings. Here you can control the hue, saturation, and luminance of every color in your photo. This tool is one of the best for stylizing your images and changing colors in your photo!
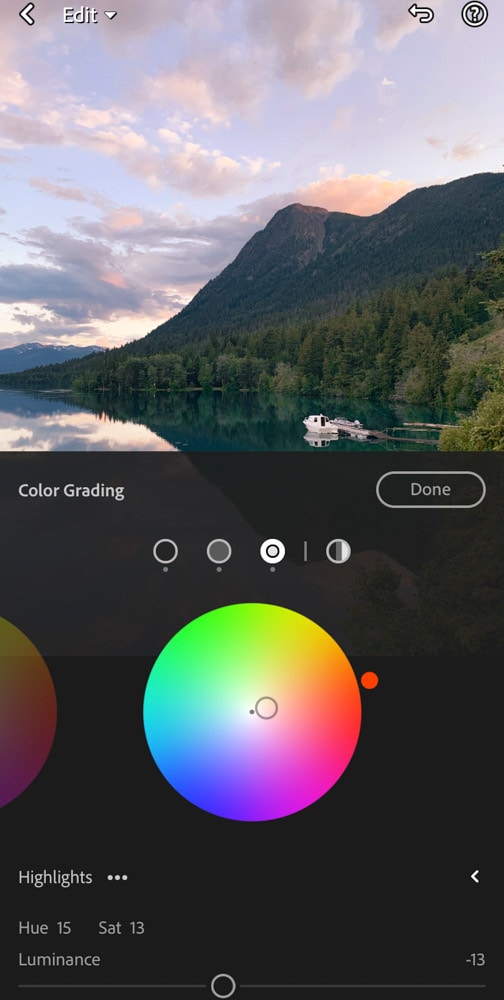
After using the Mix adjustment, click on the “Grading” option. The Grading Tool lets you apply certain color hues to your photo’s highlights, mid-tones, and shadows. It helps to stylize your photo further and allows it to favor a specific look. For editing brown tones or creating a cinematic editing style, this is a crucial tool!
4. Apply Additional Image Improvements
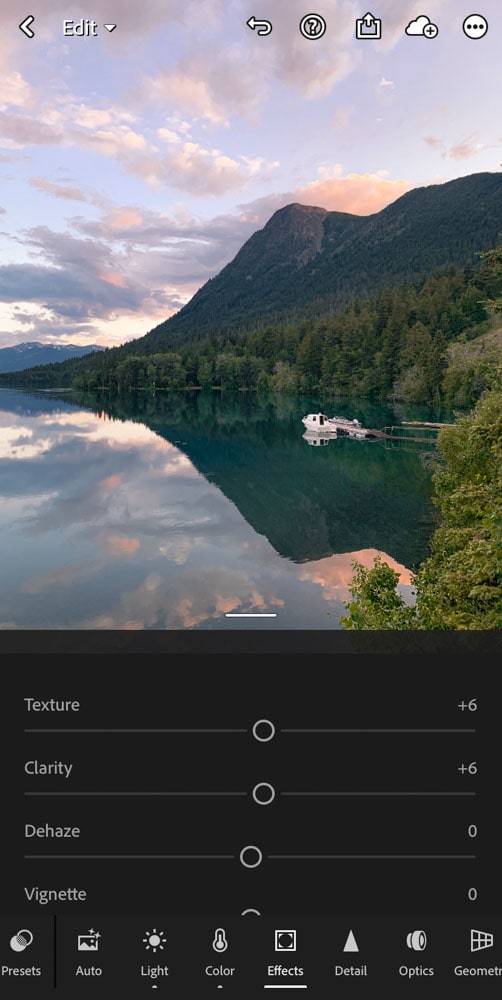
Go to the “Effects” tool and bump up the clarity and texture to finalize all your hard work. This will help make the details in your photo pop a lot more. If, however, you want a softer-looking photo, be sure to decrease this amount instead.
Then go to “Optics” and turn on both Remove Chromatic Abberation and Enable Lens Corrections.
Depending on how your photo looks at this point, you can also try adjusting the Sharpening amount within the “Detail” Tool. Adding more sharpness will make your image appear more crisp, especially if you have a shallow depth of field.
5. Finish Things Off By Experimenting With A Preset
After editing your photo, you can spice it up even further by using a preset. Clicking on the “Preset” Tool, you can choose between various built-in presets to start with. However, the more you use the app and develop an editing style, you’ll likely want to create your own or find some online.
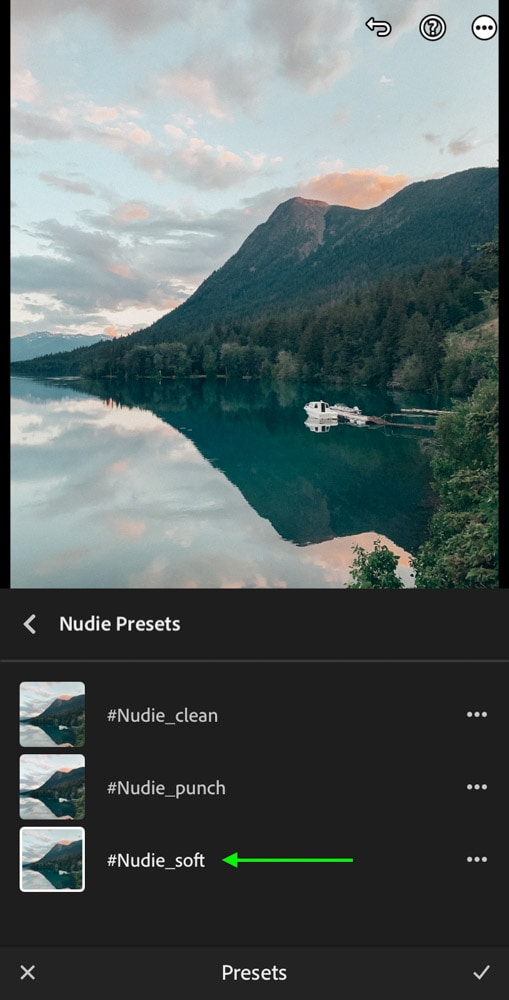
For this edit, I will choose a preset that I got in the Hashtag Presets Master Preset Collection. This is a super handy preset bundle since there are so many presets to choose from (97 to be exact). So if you want to spend less time editing and more time sharing, this is a great place to start!

Before 
After


Now that my edit is complete, it’s time to bask in the glory of all our hard work. Next, let’s export this photo!
How To Export A Photo From Lightroom Mobile
To quickly export a photo to your camera roll from Lightroom Mobile, follow these steps:
- Click the “Share” Icon in the upper corner.
- Click “Export As.”
- Set the file type to JPG.
- Set The Image Quality To 100%.
- Press The Checkmark.
- Select “Save Image” to export to your camera roll.
With this method, you can have more control over the exact export settings your image has. Better yet, you can export it directly to social media as well rather than your camera roll. Let’s break this down a bit more in-depth.
With your image selected, click on the “Share” icon located in the upper corner.
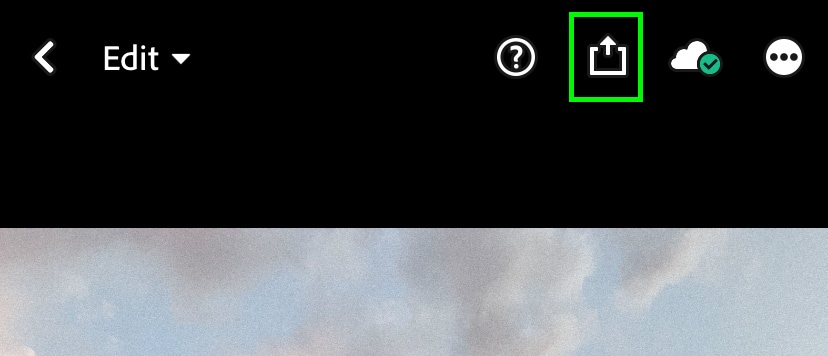
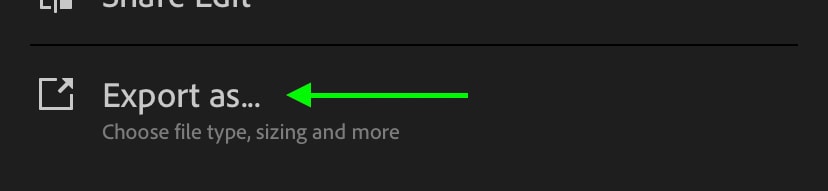
A new window will appear with a variety of sharing options. Go to the bottom and click on “Export As.”
In the file type option, you can choose between Original, JPG, TIFF, and DNG. For general purpose use and social media sharing, I would recommend exporting to JPG.
With JPG selected, you’ll have a variety of file settings to choose from. Make sure the dimensions are set to Largest Available Dimensions, and the image quality is at 100%.
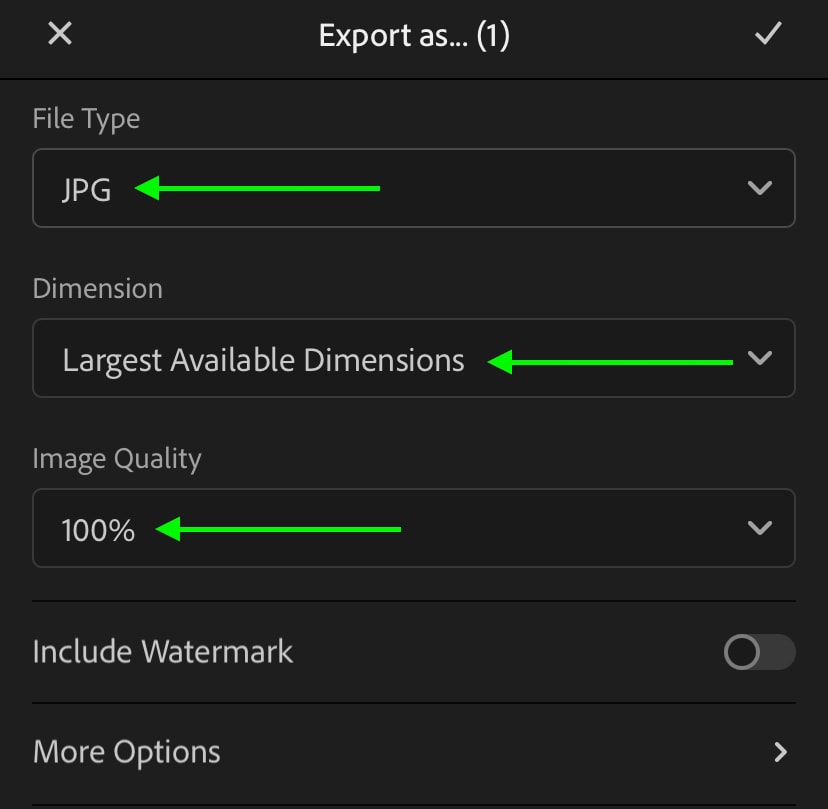
Now click on the checkmark in the upper corner to save your export settings.
To save your image directly to your camera roll, simply click on “Save Image.”

If you want to upload directly to social media, you can do that by clicking on the provided social media icons. You will only see the social media platforms installed on your device, so keep that in mind if you don’t see a particular platform.
And with that, you have successfully exported a single image from Lightroom Mobile! But what if you wanted to export multiple photos at once?
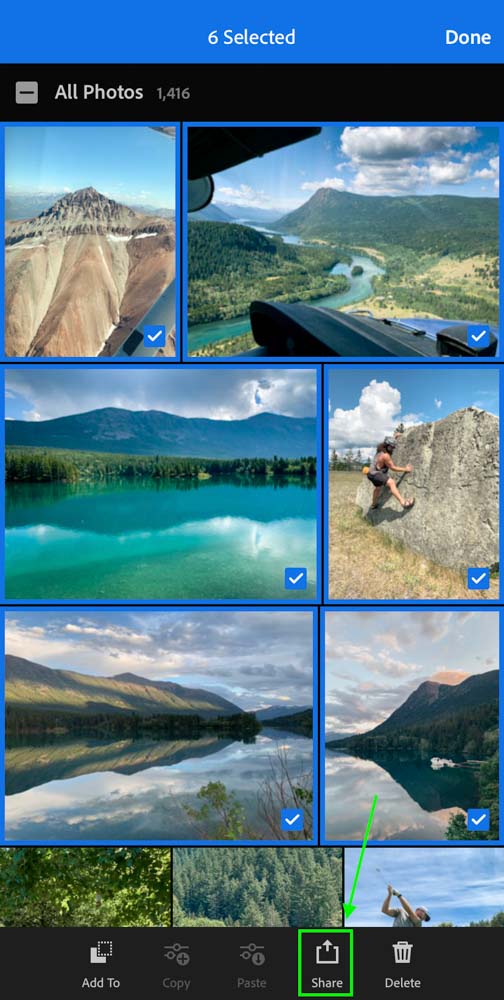
How To Export Multiple Images At Once
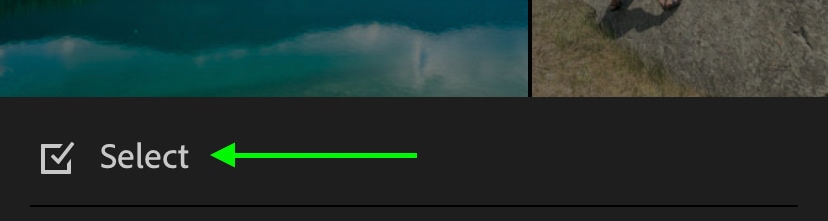
Exporting multiple files at once from Lightroom Mobile follows most of the same steps as before, but with a slight variation. Within your image library, click on the three dots in the upper corner and choose “Select.”
Now you can tap on any of the images you wish to export from Lightroom Mobile. After everything is selected, click on the “Share” option in the bottom bar. From here, click on “Export” and follow the same steps as you learned in the previous section. However, this time your export settings will be applied to all your images at once rather than a single photo!
So now you know how to use Lightroom Mobile like a pro, whether you are a paid Adobe Creative Cloud subscriber or simply using the free version. Regardless of which version you use, presets are by far the best way to make quick use of this app. Once you get some practice, you can create your own presets to use across all your images.
However, the thought of making all your own presets might seem like a bit too much of a challenge. Luckily you can make life easy with these 97 Lightroom Mobile Presets. This bundle has a variety of trendy editing styles that not only save time but seriously improve your photos! You can save yourself 10% off this bundle by using code BWILLCREATIVE at checkout!

Happy Editing!
Brendan 🙂


Thank you for the helpful Lightroom mobile article. It helped me to better understand what and how to use this wonderful application.
I am glad you found it useful! 🙂