The double exposure effect in Photoshop is an excellent technique to elevate your designs and produce creative results. The process involves superimposing two or more images over your base image to create a blended effect.
This technique works well when placing a landscape or city scene over a strong portrait image. Once you understand the basics of making a double exposure, you can get creative and edit your photos uniquely to create awe-inspiring results.
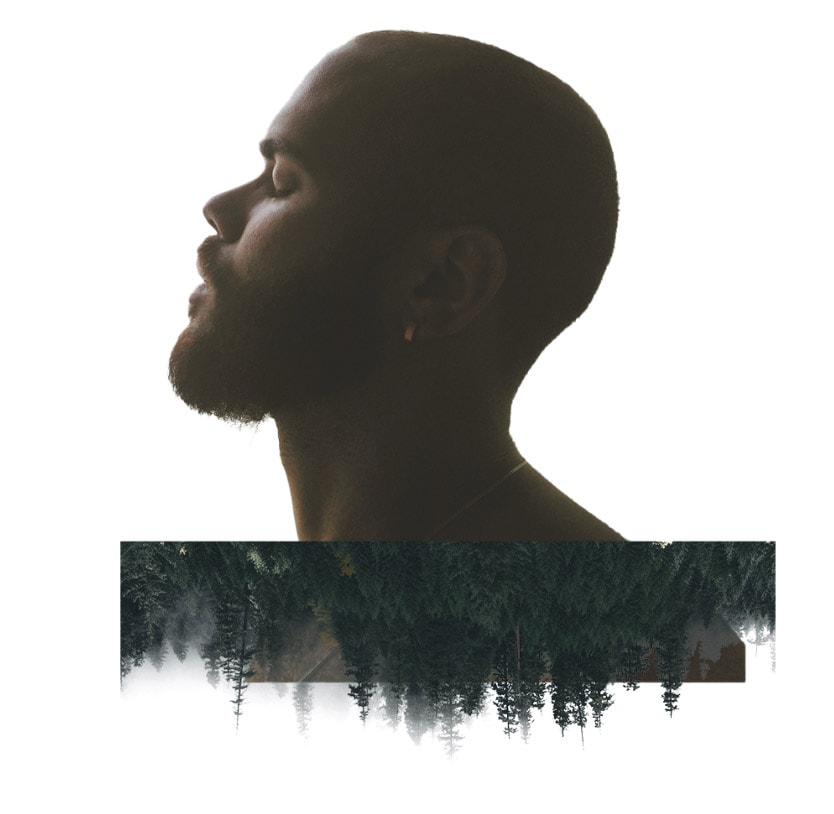
S in this tutorial, you’ll learn an easy step-by-step process to create a double exposure effect in Photoshop, along with example images you can follow along with by clicking here.
Video Tutorial
How To Create A Double Exposure In Photoshop
The following steps will teach you the basics of creating a double exposure in Photoshop. However, you can tweak the process slightly to suit your image and make it unique when superimposing your images onto the base image.
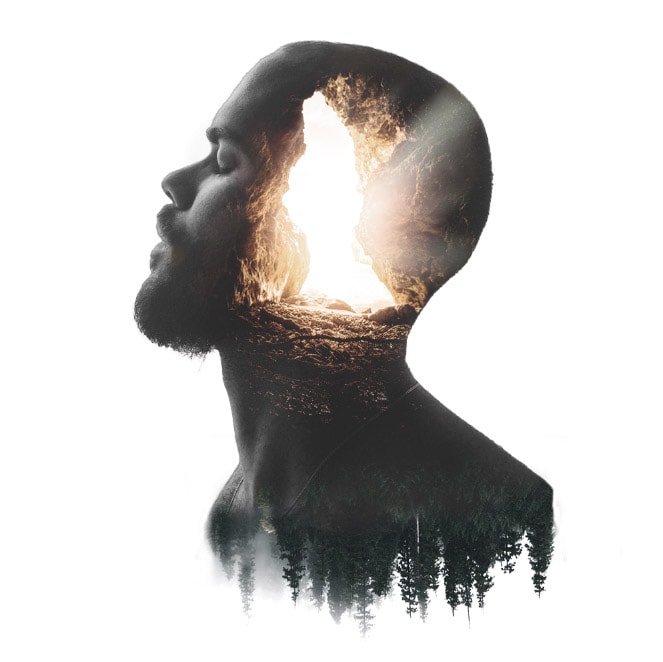
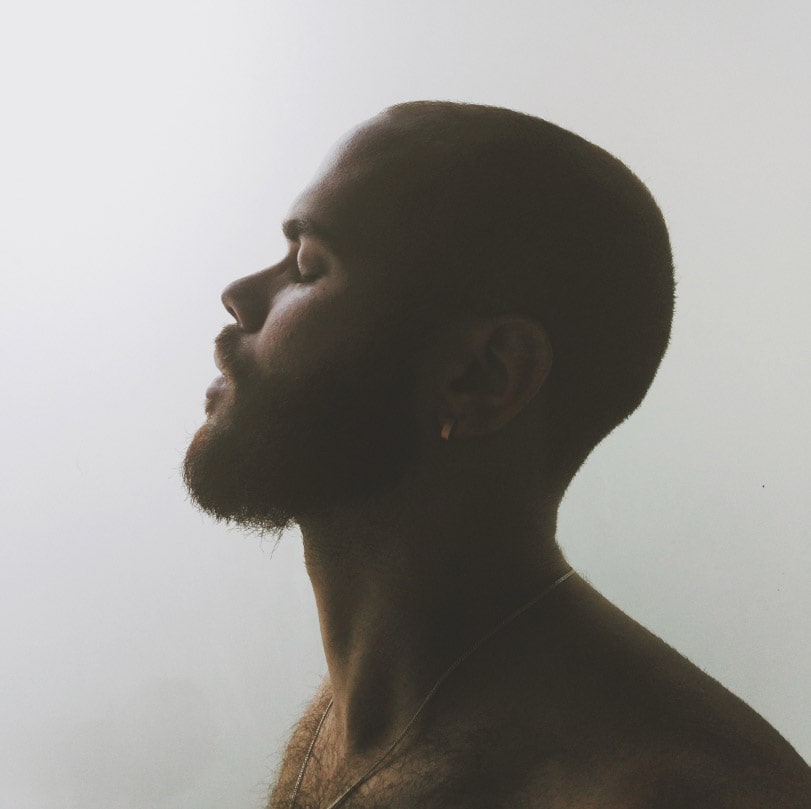
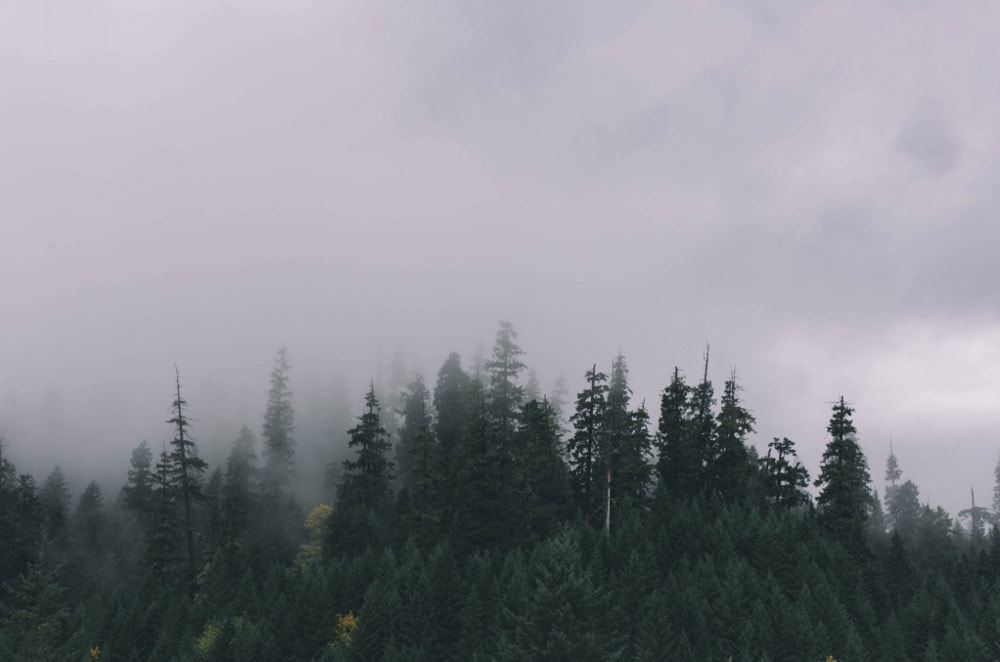
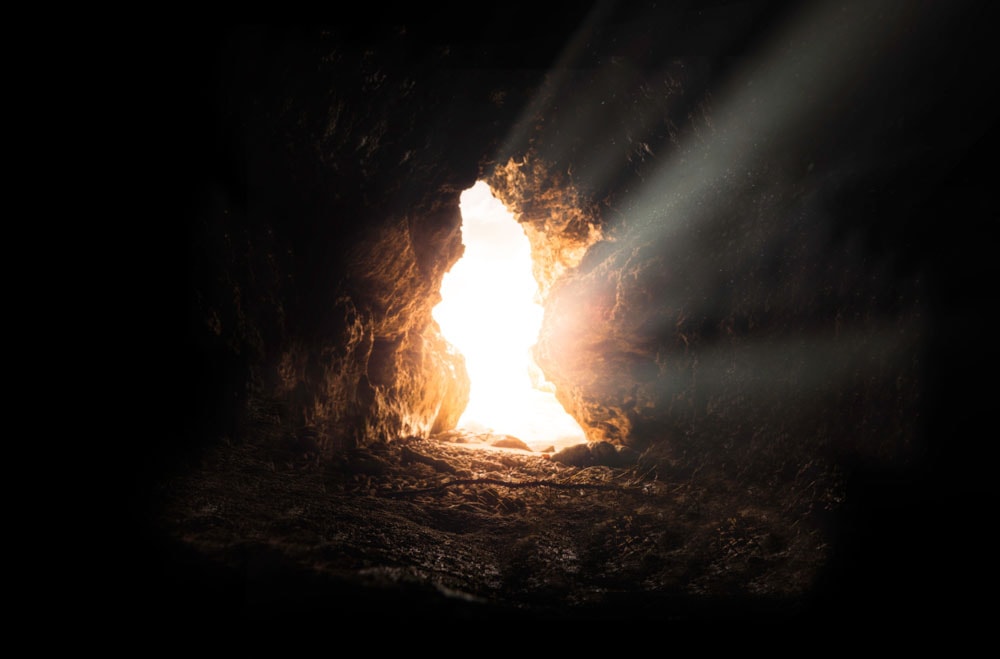
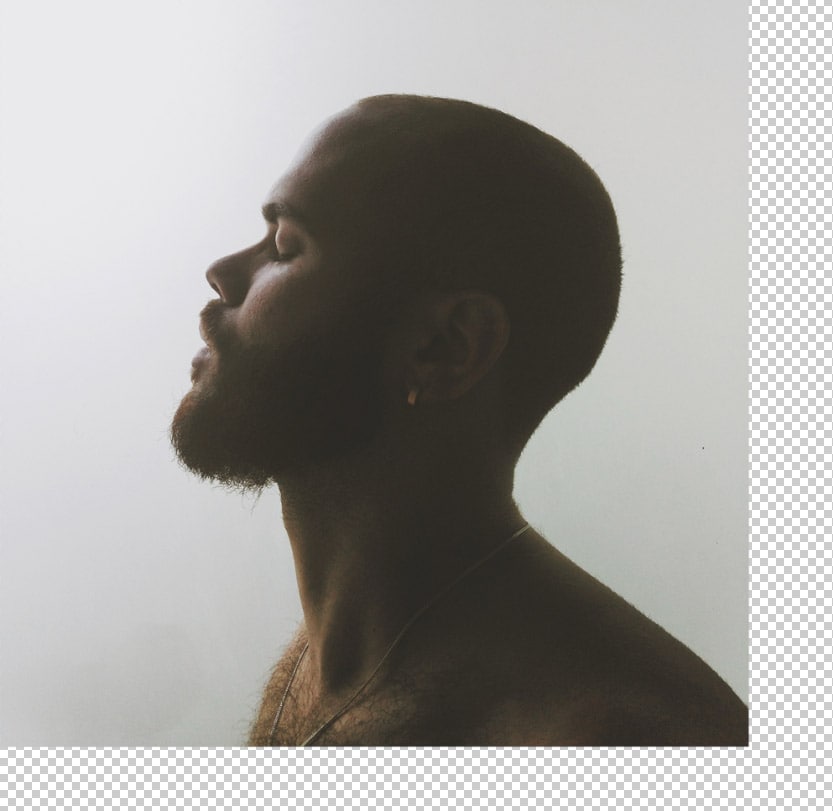
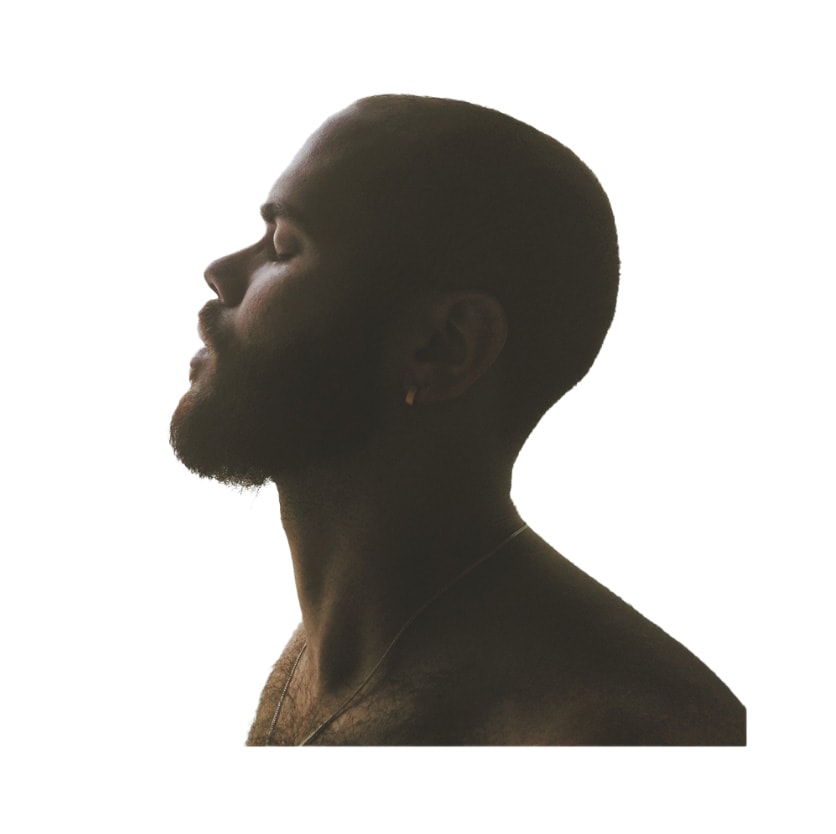
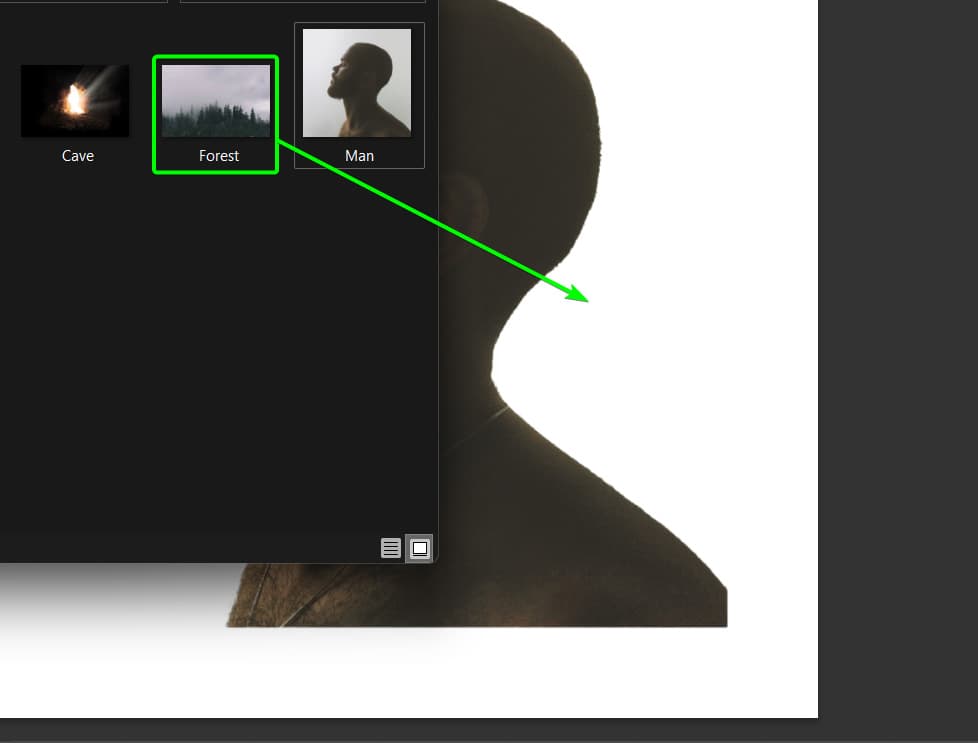
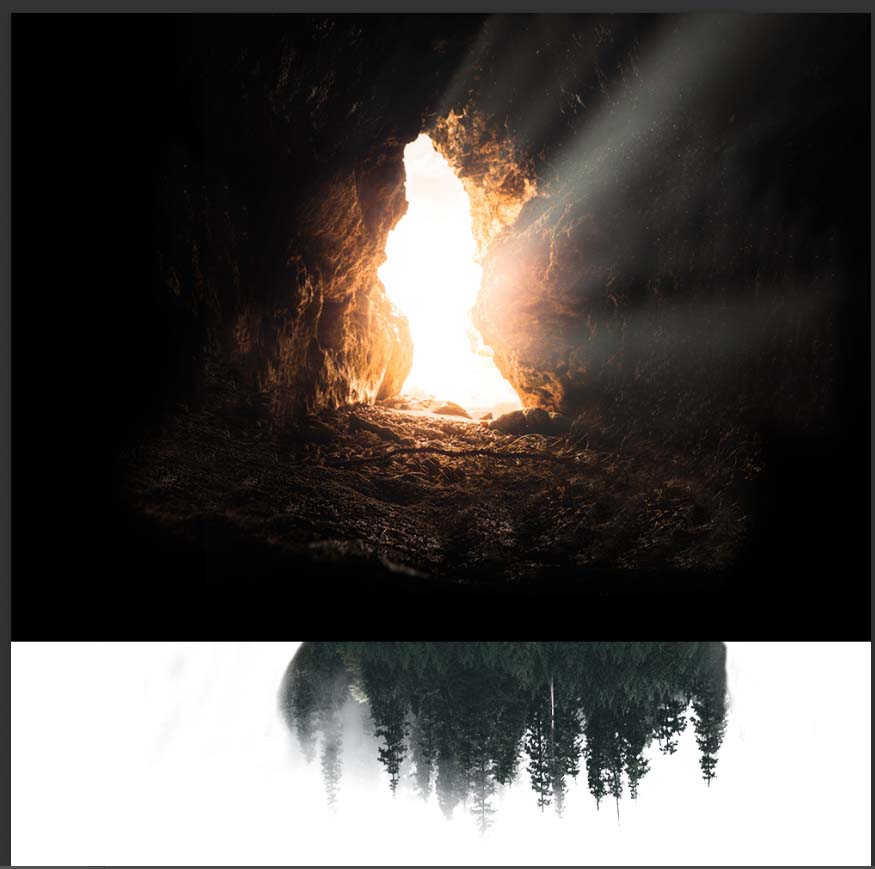
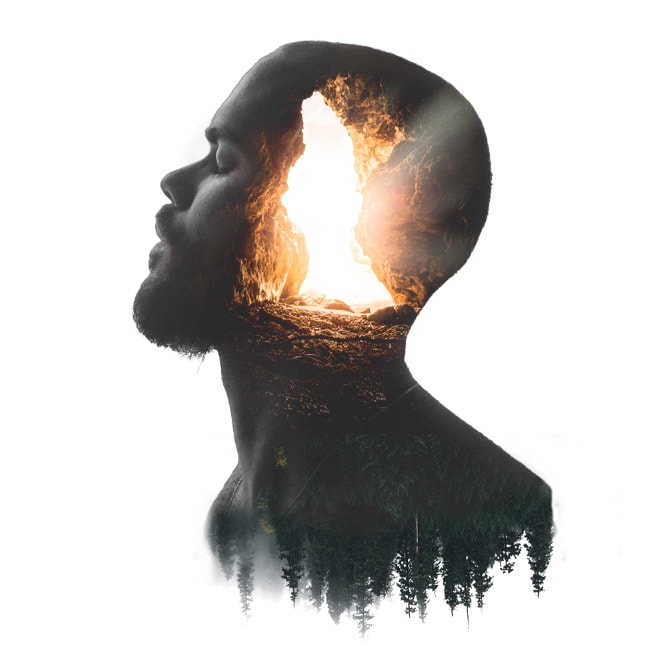
For this example, I will be placing the photos of the trees and the cave over the side portrait of the man to produce the desired effect.
Step 1: Add Your Base Image To A New Document
You can work directly on the base image to start the double exposure. However, if you need extra space around the subject, add the photo to a new document before creating the effect.
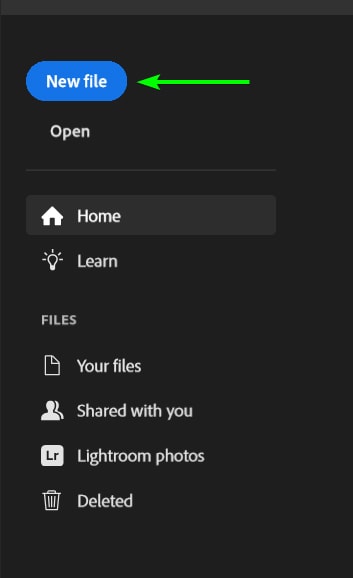
To create a new document, click New File on Photoshop’s home screen or go to File > New. You can also use the shortcut Control + N (Win) or Command + N (Mac).
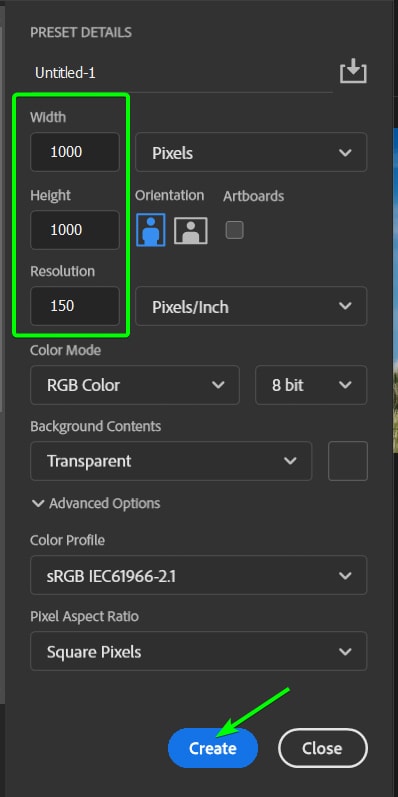
Set the Width, Height, and Resolution you want for your new document. For this example, I also have the Background Contents set to Transparent. Once complete, click Create after inputting the settings.
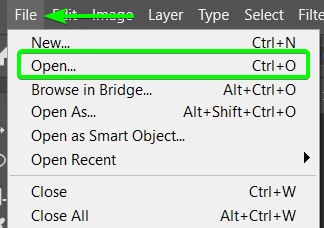
You should then open your base image in a separate tab by going to File > Open or pressing Control + O (Win) or Command + O (Mac).
Once you’ve selected the picture from your files, drag the background layer from its tab over the new document tab you created and then drop the image onto the empty canvas.
You can place the base image anywhere on the document that works for your project.
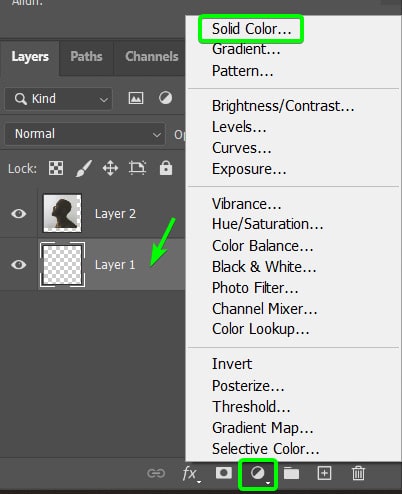
To add a background to the document, select the bottom layer in the Layers Panel, click on the Create New Fill or Adjustment Layer icon at the bottom, and select Solid Color.
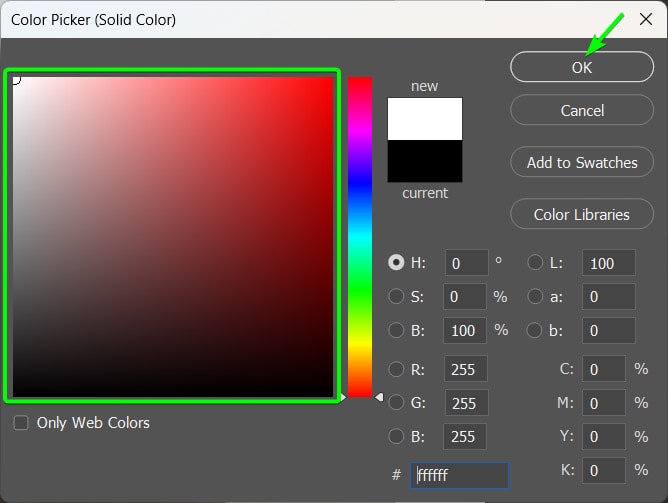
Select a color from the Color Picker and click OK.
You can change the background color anytime or create a gradient fill layer for a more dynamic background.
Step 2: Remove The Background From The Subject
When you have your image on the new document with your background, you must remove the original background from the photo. This is necessary so you can isolate the subject later on.
Note: If you want to keep the subject on the original background, duplicate the image layer before following this step.
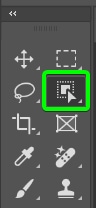
There are various ways to remove the background of an image. However, the fastest is to use the Select Subject method. To do this, select the Object Selection Tool (W) from the Toolbar.
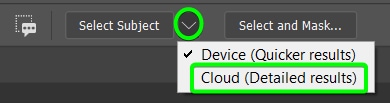
Then, use the drop-down menu next to Select Subject in the Options Bar and select Cloud (Detailed results).
Click the Select Subject button and give Photoshop a few moments to select the subject.

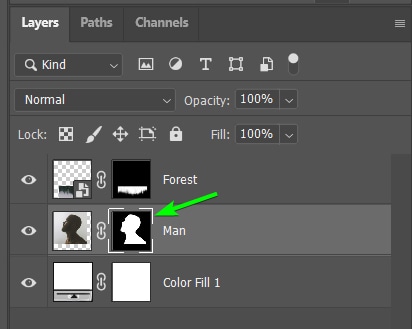
To hide the background, click the Add Layer mask icon at the bottom of the Layers Panel. A mask thumbnail will be added to the layer.
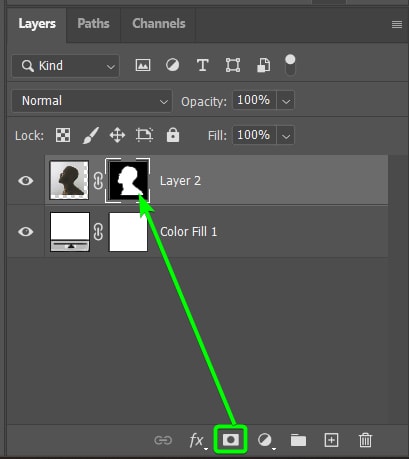
The image’s original background will be hidden on the document.
Step 3: Add The First Top Image Into The Document
You can now start adding the top images to the document. First, if you want to add an image that sticks out of the subject on an edge, you can use this method.
To add an image, you can open it in your File Explorer or Finder and drag it into the Photoshop document.
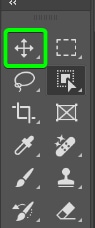
To place the image, activate the Move Tool (V).
You can drag the image to place it. Then, to resize and rotate the picture, you need to activate the Transform Tool by pressing Control + T (Win) or Command + T (Mac). You can then drag a corner handle to resize the image.

To rotate the image, right-click or Control + click on the image and select a rotation or flip option.
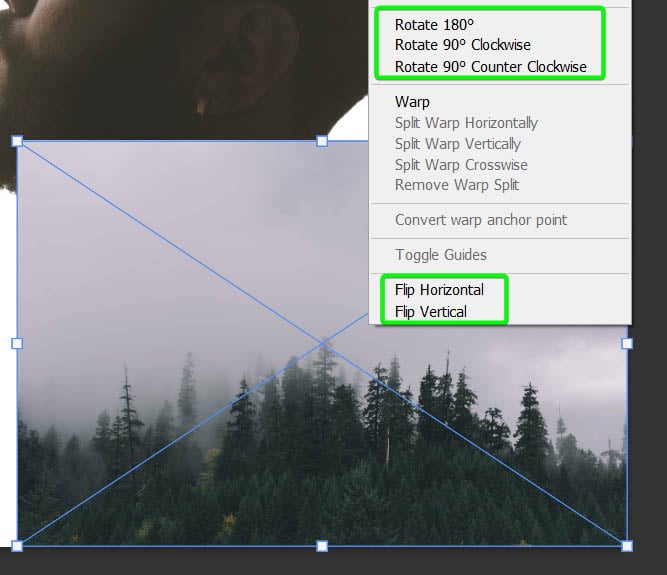
Keep moving and resizing until you are happy with the placement.
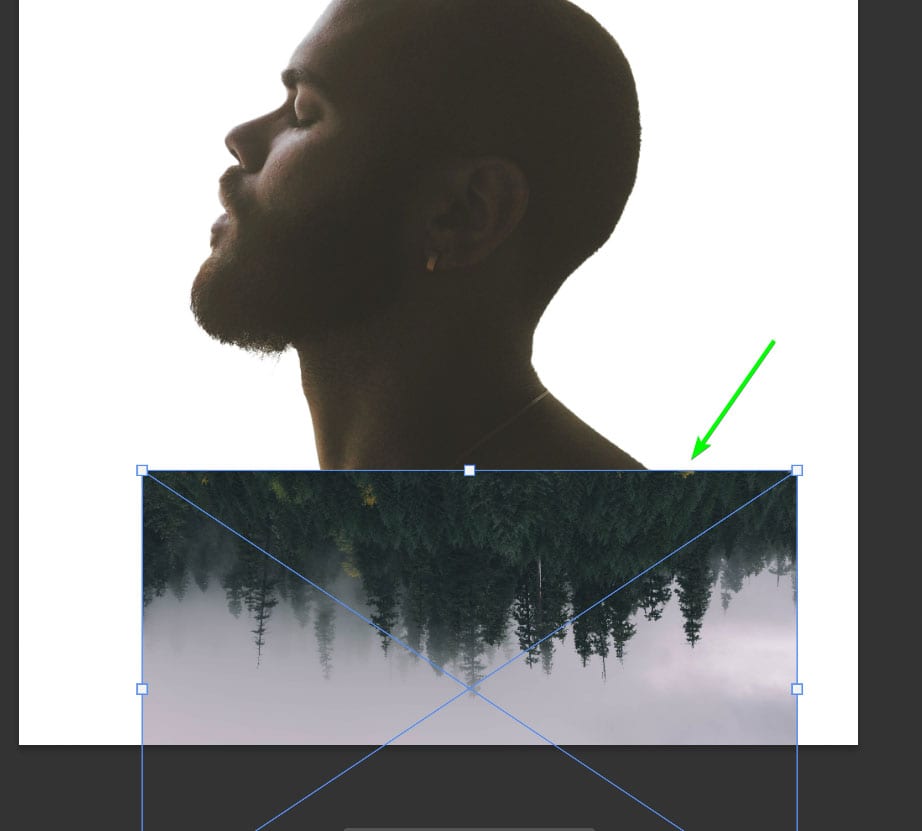
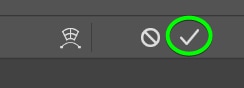
Click the Checkmark icon in the Options Bar to accept the changes.
Step 4: Remove The Background From The Image
If you want to create the illusion that the objects in the top image are sticking out of the subject from the base image, you must remove the background. When you have a complex image like the trees in my forest photo, the best method is to use channels to remove the background.
You can find more detailed information in the linked article above, but here are the basics of this method.
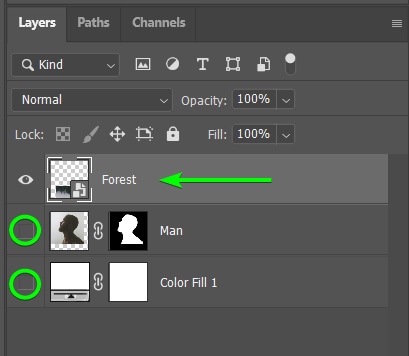
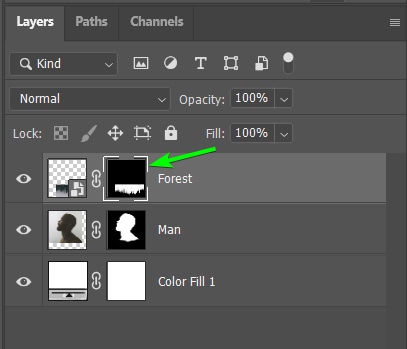
First, hide the other layers in the document and select the forest image layer.
Next, open the Channels Panel. This is usually a tab next to the Layers Panel, but if you can’t see it, go to Window > Channels.
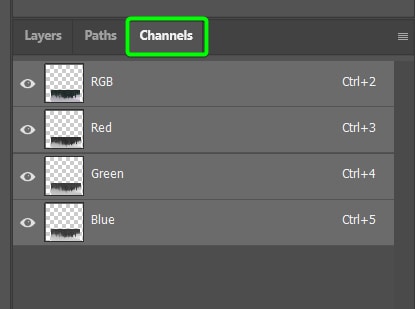
You will see four channels on an RGB image in the Channels Panel. The RGB channel is all the colors. Then you have separate channels of Red, Green, and Blue. Click on each channel, and the image on the document will change. Find the channel that has the highest contrast for your picture.
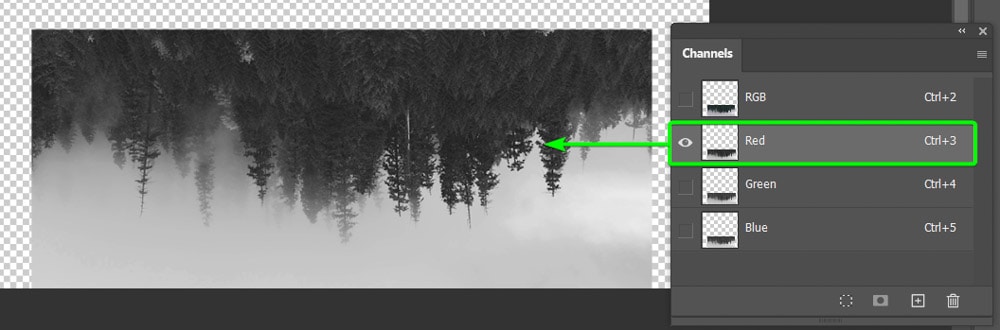
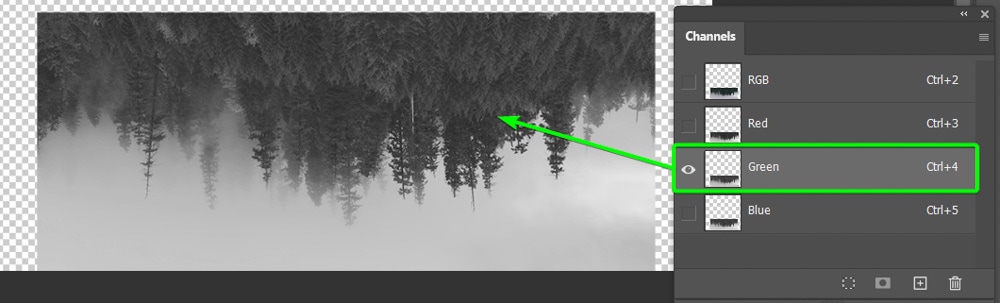
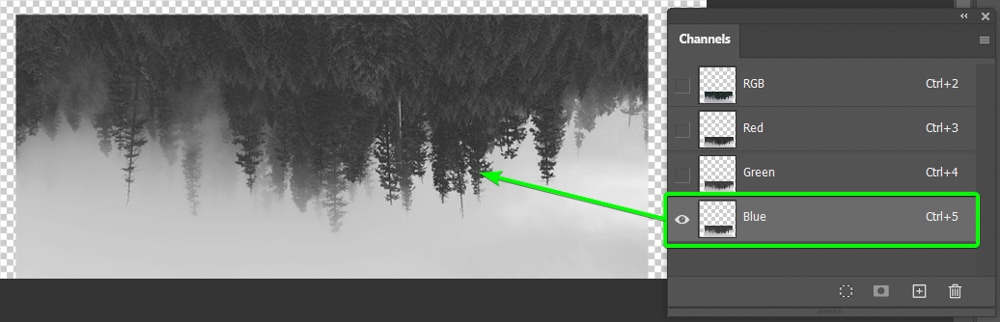
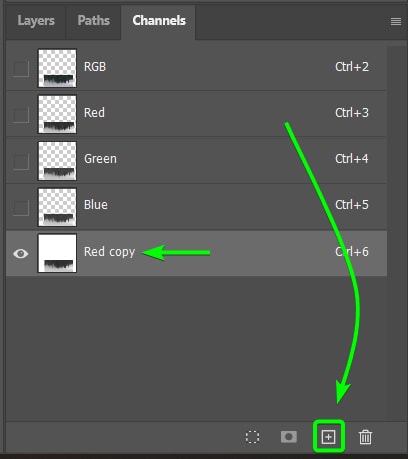
In my case, the channel with the highest contrast is the Red channel. Duplicate the channel that works best for you by dragging the channel layer down to the Create new channel button.
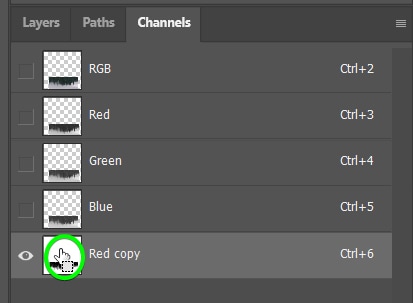
Ensure the duplicated channel is selected and use the shortcut Control + L (Win) or Command + L (Mac) to open the Levels window.

You need to make the dark areas as close to black as possible and the light areas as close to white as possible.
You can do this by moving the highlights and shadows sliders inward on the graph. Push these toggles as far as possible without creating halos and unwanted artifacts. Click OK to accept the changes.

You can now make an accurate selection of the trees by holding in Control (Win) or Command (Mac) and clicking on the duplicated channel’s thumbnail.
The selection will surround the outside of the trees, including the background.
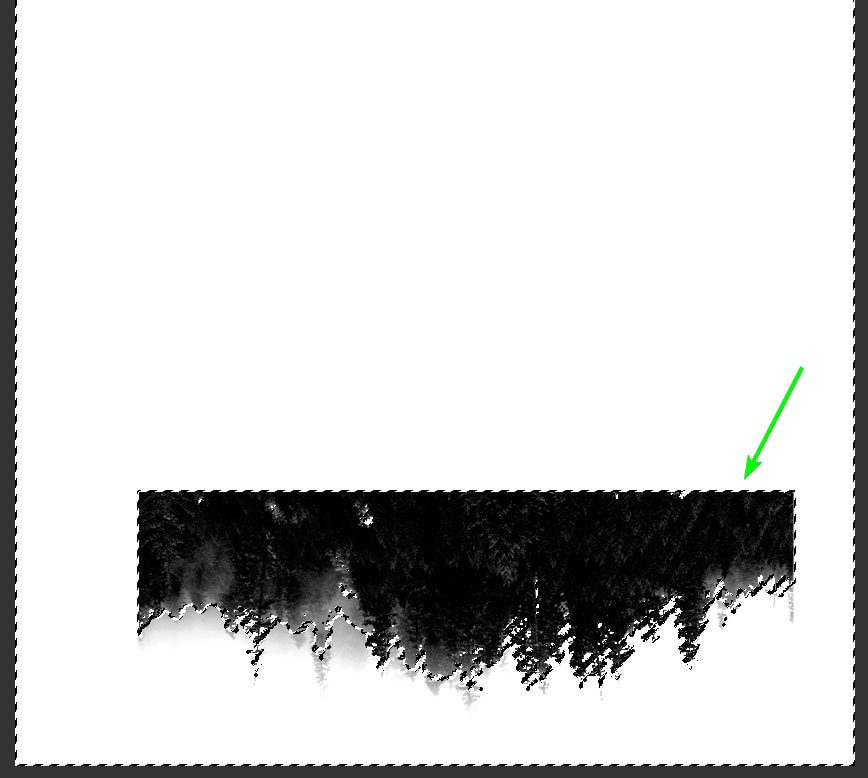
You must invert the selection to remove the background, not the trees. To invert the selection, press Shift + Control + I (Win) or Shift + Command + I (Mac). The selection will now only surround the trees.
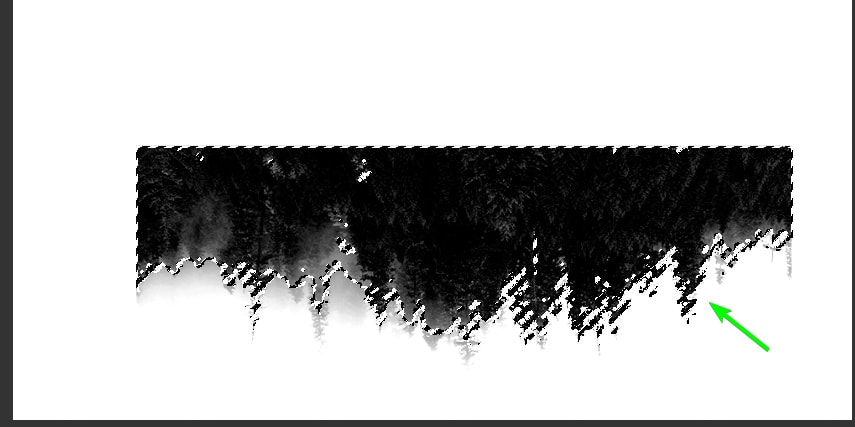
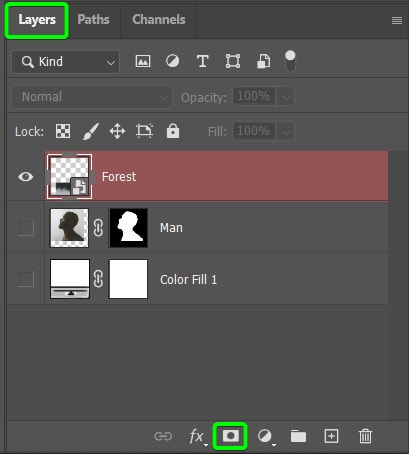
You can now remove the background by adding a layer mask. To do this, open the Layers Panel and click the Add layer mask icon at the bottom.
The background will be removed, and only the trees will remain.
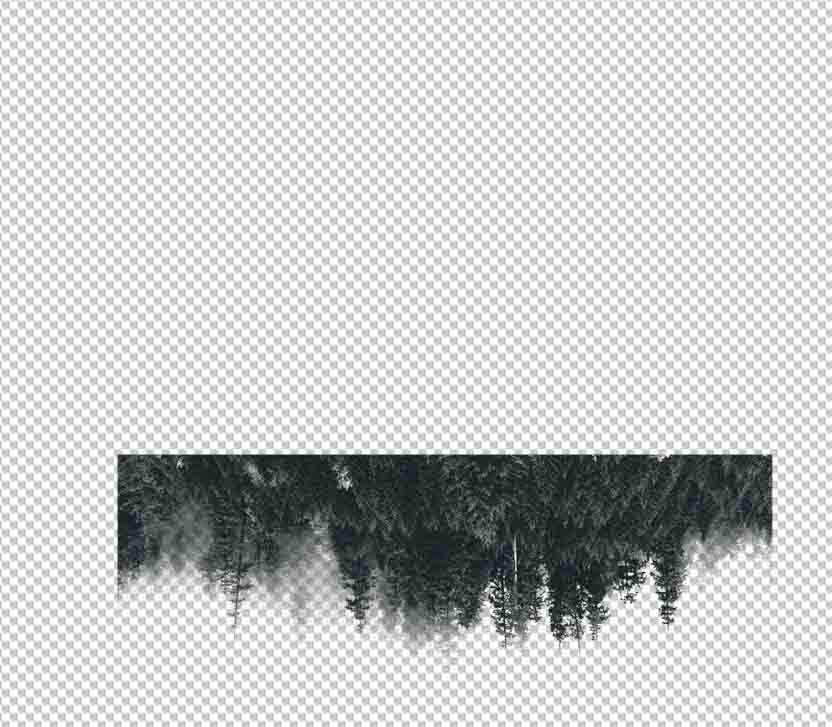
You can turn on the other layers again to show all the elements on the canvas.
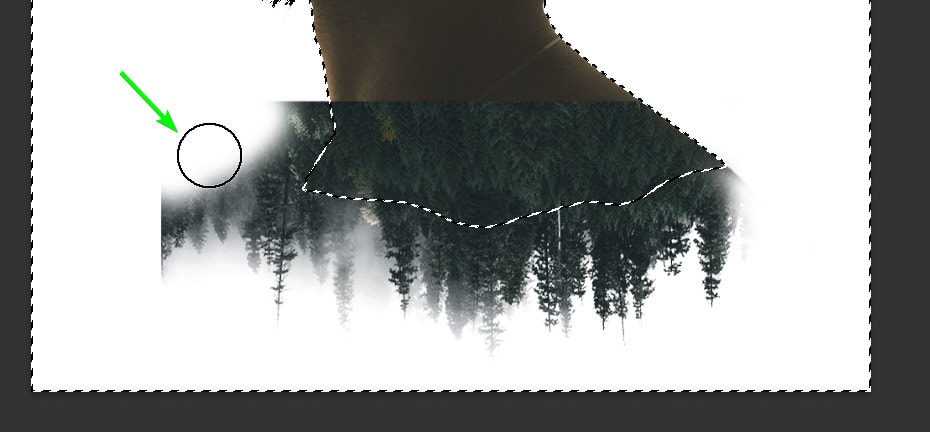
Step 5: Remove Excess Areas From Both Images
You can now see that the base and forest images have excess areas that need to be removed. You can easily remove these areas since you’re working with layer masks. You can resize and reposition your top image before you remove any excess.
First, remove the excess areas of the base image. To do this, select the layer mask of the base image. The white border indicates that the mask is selected.
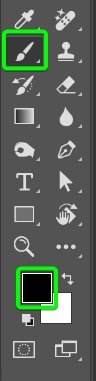
Next, select the Brush Tool (B) and set the foreground color to black in the Toolbar.
Adjust the Brush size using [ to decrease and ] to increase. Then paint over the base image where you want to remove excess. I will paint over the bottom where the base image is showing through the trees.
Keep painting over until you are happy there are no excess areas of the base image sticking through.

Now, you can remove the excess areas of the tree image while using the base subject as a guide. To do this, create a selection around the subject by holding in Control (Win) or Command (Mac) and clicking on the image’s layer mask thumbnail.
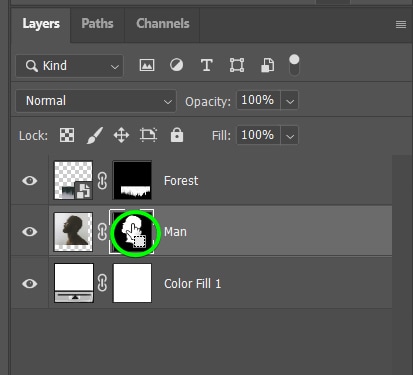
The selection will cover the base subject.
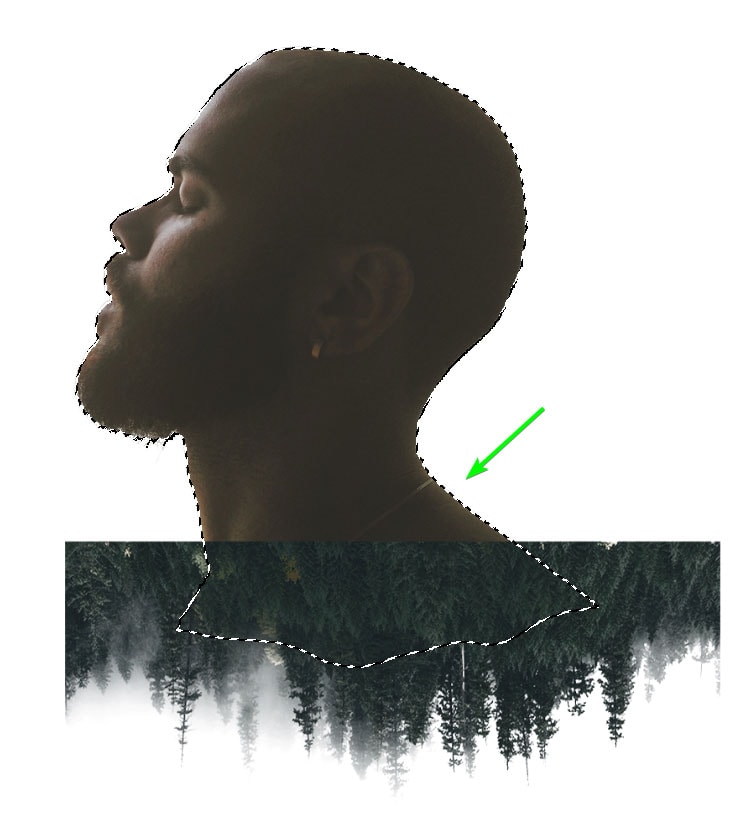
You need to invert the selection to ensure the outside of the subject is selected. To do this, use the shortcut Shift + Control + I (Win) or Shift + Command + I (Mac).
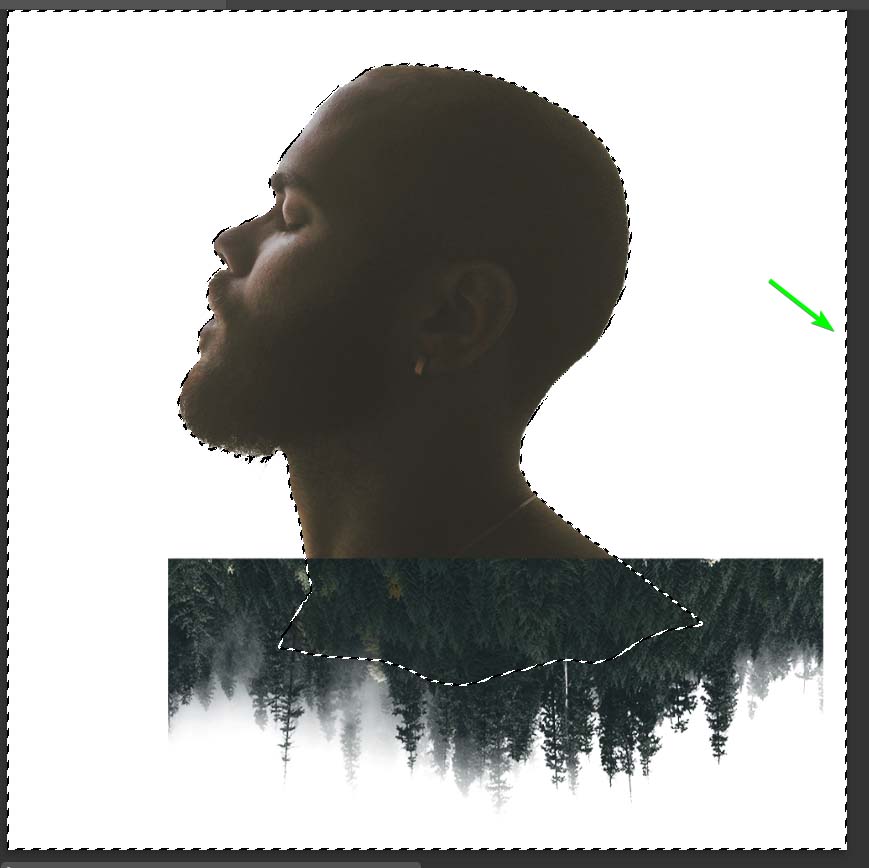
Now, activate the Brush Tool (B) and set the foreground color to black.
Then, ensure the forest layer’s layer mask is selected.
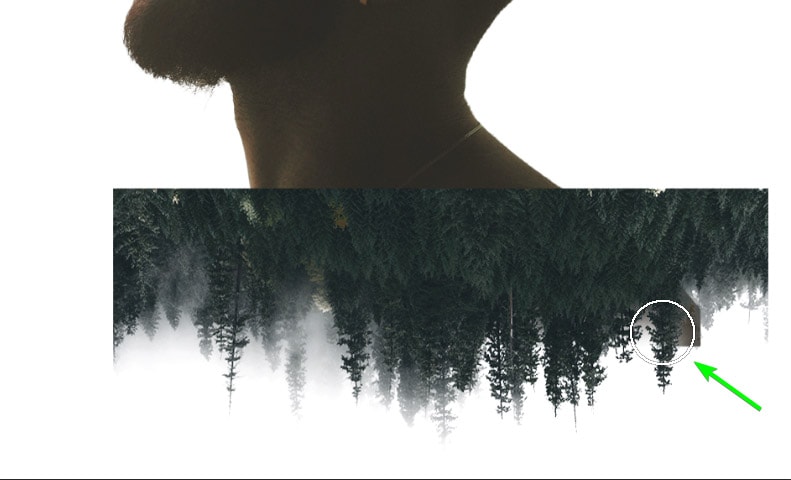
Now, you can use the same technique as before to paint out the excess trees around the subject. Be careful to keep the trees at the bottom sticking out.
Keep painting until you have removed all the excess you want to. Then press Control + D (Win) or Command + D (Mac) to deselect the area.
Step 6: Add And Resize The Second Top Image
Next, you can add the second image for the double exposure. This method works when you don’t need to remove the image’s background and only need to confine it to the subject.
Add another image by locating it in your files and dragging it into the program.
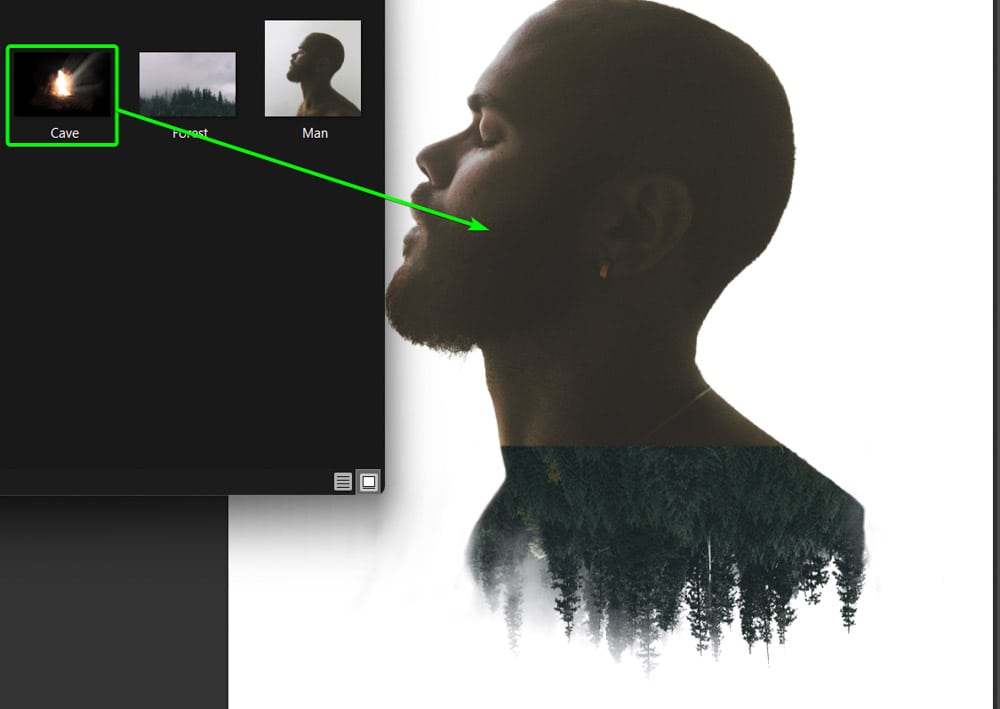
Once you’ve placed the image in the document, you can use the same process as you did for the first image to position and resize the image to the area you want on the base image.
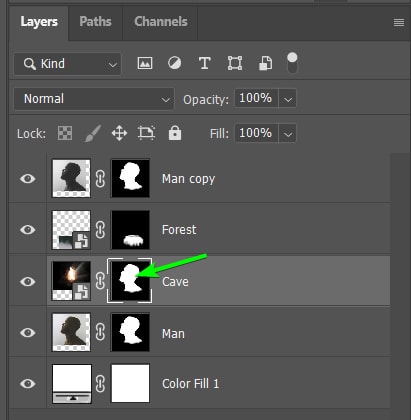
Step 7: Add A Layer Mask To Clip The Image To The Subject
To ensure the image only shows inside the subject, you can create a layer mask that confines the image to the subject. To do this, make a selection around the subject again by holding in Control (Win) or Command (Mac) and clicking on the layer mask of the base image.
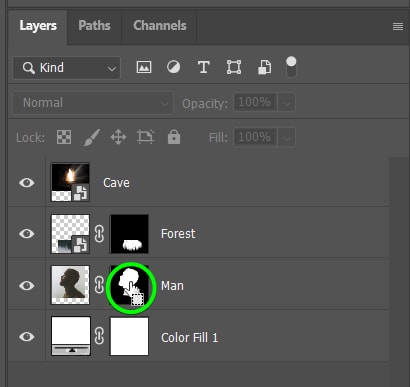
Next, select the Cave layer and then click on the Add layer mask icon at the bottom of the Layers Panel to add a layer mask.
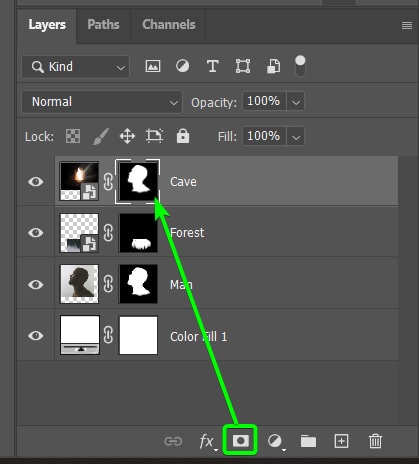
The top image will now only cover the inside of the subject.
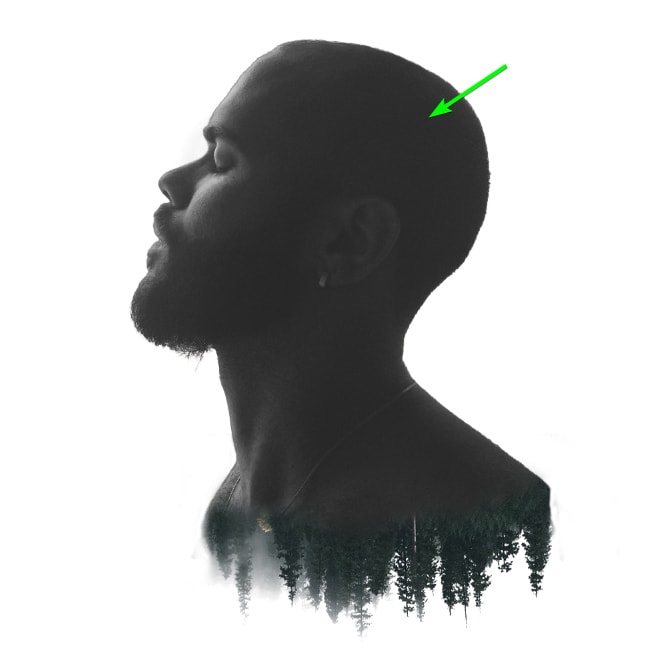
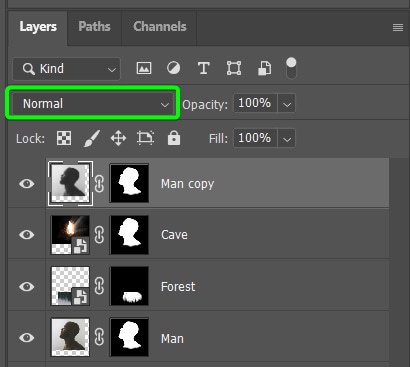
Step 8: Duplicate The Subject Layer And Change The Blend Mode
At this stage, you have lost all the details from the base image and only have the outline. You can now bring back the details to complete the double exposure effect. To bring back details, duplicate the original base image layer and place it at the top of the layers stack.
To duplicate the base image layer, select it and press Control + J (Win) or Command + J (Mac).
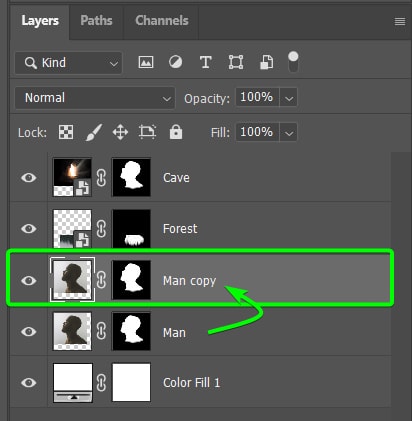
Then, click and drag the duplicated layer to the top of the layers stack.
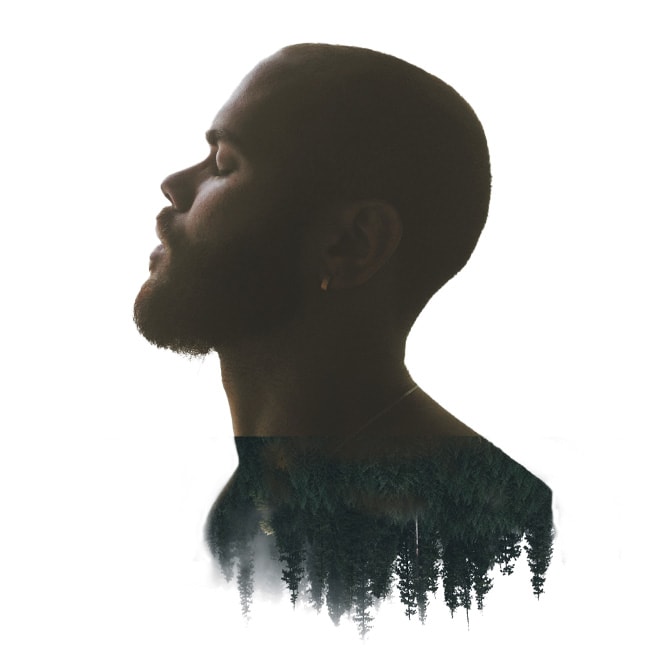
The man will cover the entire composition in the document, except for the forest sticking out.
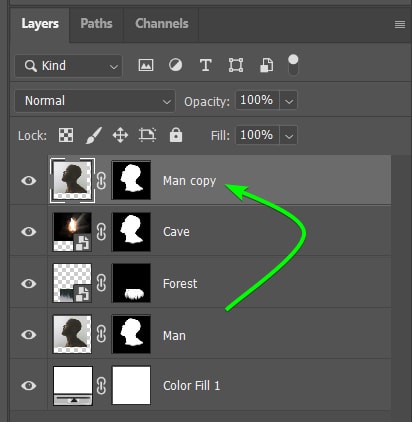
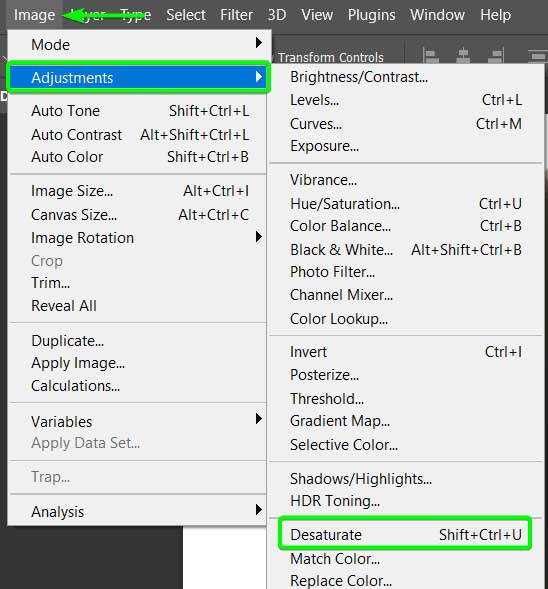
Now, desaturate the duplicated base layer to remove the colors. To desaturate the layer, select it and go to Image > Adjustments > Desaturate or press Shift + Control + U (Win) or Shift + Command + U (Mac).
The color from your base subject will be removed.
You can blend the base subject into the rest of the layers by changing the Blend Mode. First, locate the drop-down menu next to Normal in the Layers Panel.
Open the menu and select Lighten from the options.
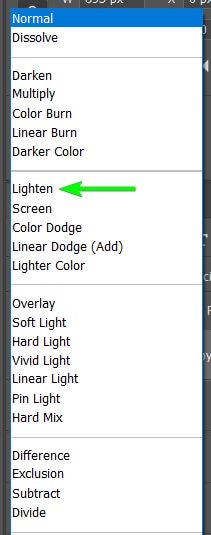
You will now see the two images blended in with the base image. Your double exposure is almost complete but needs a bit of cleaning up.
Step 9: Clean Up The Effect
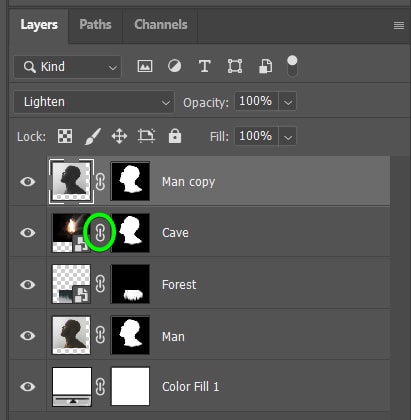
You can now start fine-tuning the effect to clean up any hard edges or placement issues. Firstly, if you want to move any top images, you will notice the entire layer mask moves with it.
To only move one of the images inside the subject, you need to unlink it from the layer mask. You can unlink any of the images by clicking on the link icon between the two thumbnails in the Layers Panel. Then, when you move or resize the picture, it will move independently of the layer mask.
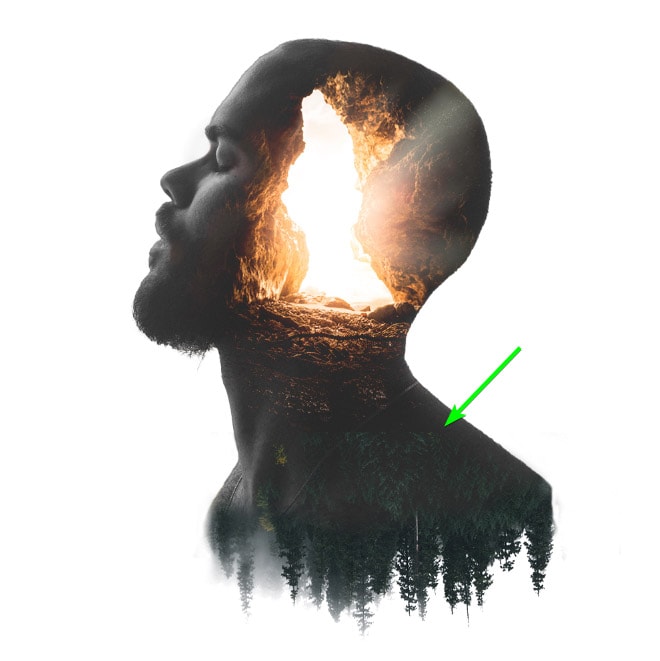
Another thing to consider is any hard edges that remain in the two added images. For example, you can see the forest image’s hard edges that need to be blended.
To fix up the hard edges, you will use the same technique of painting on the layer mask, with one difference. First, select the layer mask of the image you want to fix up.
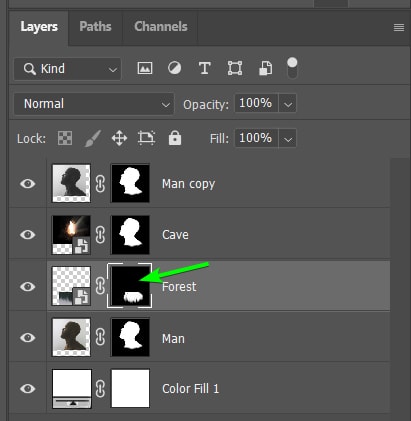
Then, activate the Brush Tool (B) and set the foreground color to black.
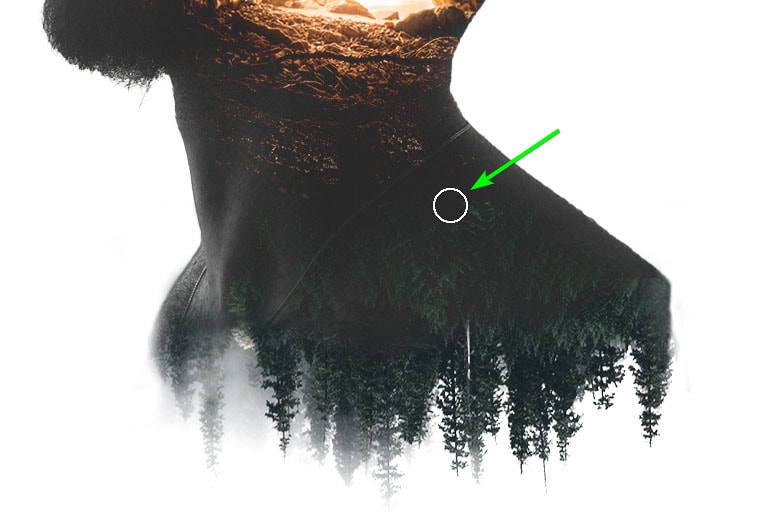
Since you don’t want to completely remove the forest areas and instead blend them in, you need to reduce the opacity of the brush. Use the Opacity slider in the Options Bar to decrease the brush opacity. The amount will depend on your image.

Use the brush to paint over the hard edges and blend it into the base image. Adjust the brush size and opacity as you go to create a seamless blend.
If you need to fix any areas on the other image, select the layer mask and use the same settings with the brush.
You can then adjust the brush size and opacity as needed to blend the areas into the base subject. For instance, when using a person as the subject, you want to ensure that the main features, including the eyes, nose, and mouth, are clearly visible.
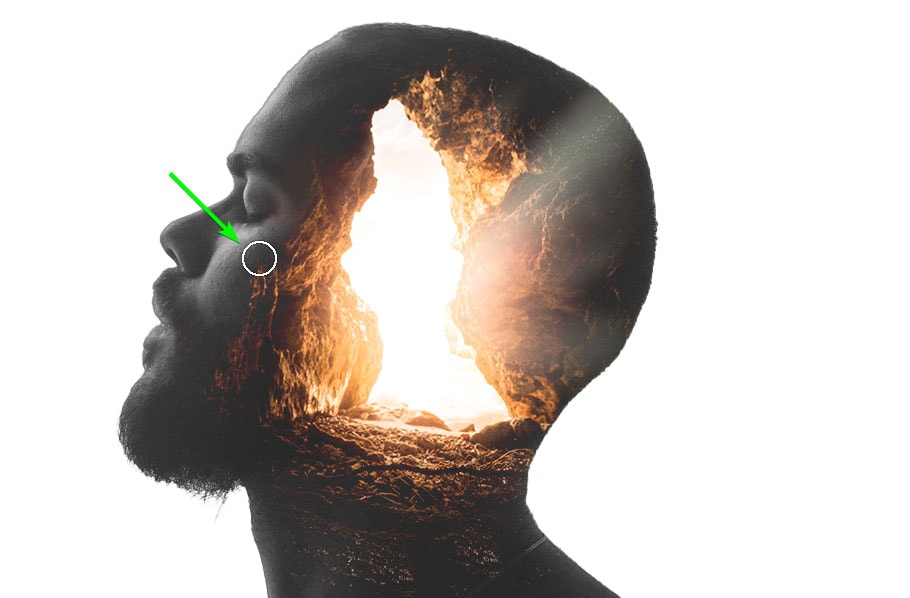
You can continue painting over the different layer masks to hide areas of the two additional images to bring back some features of the base subject. Keep adjusting until you are happy with the result.
Step 10: Add Adjustments To The Entire Composition
The final step is adding global adjustments to the composition to ensure the images blend well. The adjustments you add will depend entirely on your photos and the feel you are going for. However, here are a few examples you can try on your composition.
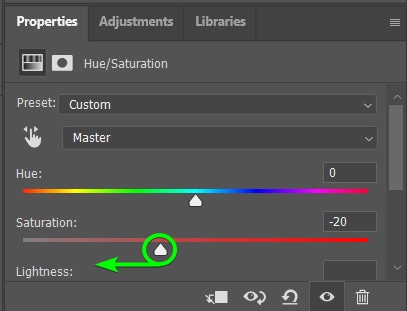
Reduce the saturation to blend the top image into the base image. To do this, add a Hue/Saturation adjustment layer by selecting it from the Adjustments Panel.
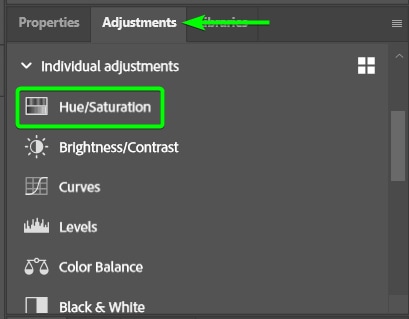
Then, drag the Saturation slider to the left in the Properties Panel to reduce the saturation slightly.
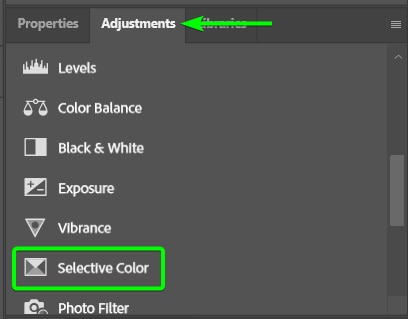
Another adjustment you can make is to add a Selective Color adjustment by selecting it from the Adjustments Panel.
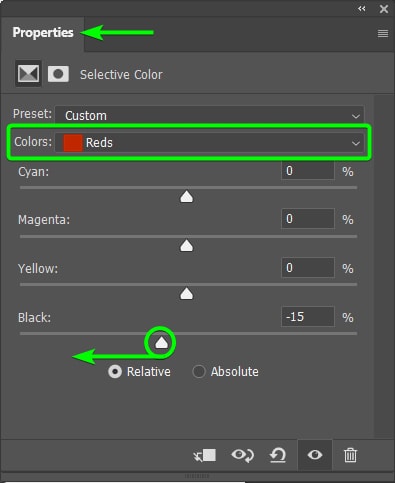
Then, adjust the necessary slider in the Properties Panel. I moved the Black slider for the Red Colors to the left to lighten the red in the cave image.
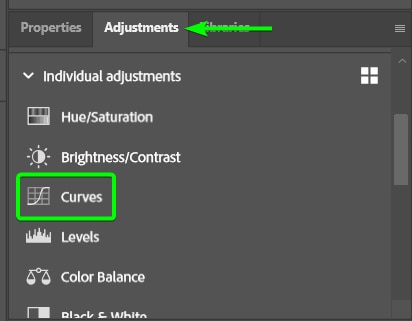
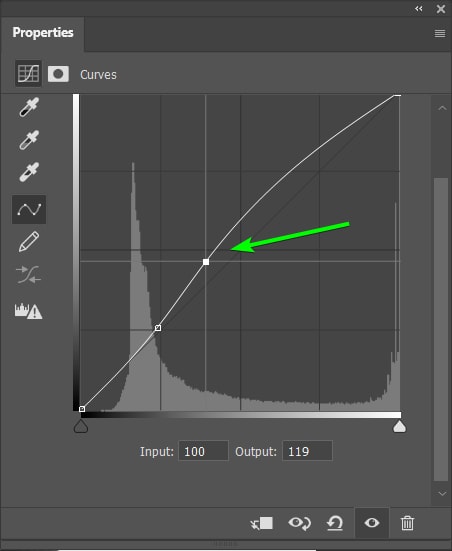
You can also adjust the contrast using the Curves adjustment layer. To do this, select the Curves Adjustment from the Adjustments Panel.
Then, adjust the Curve graph in the Properties Panel to increase or decrease the contrast based on your image.
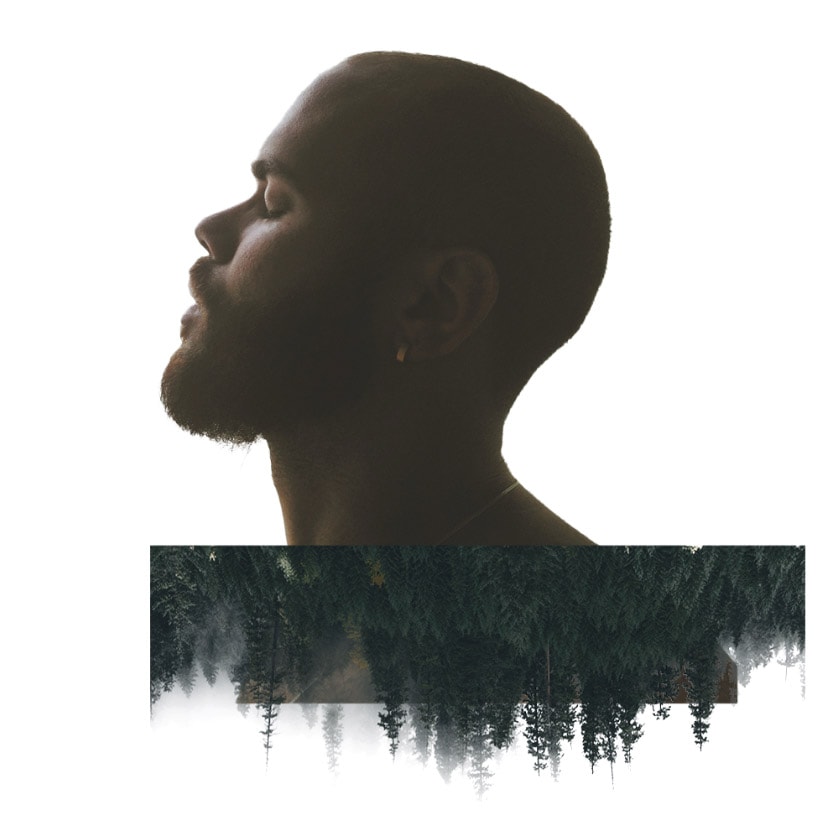
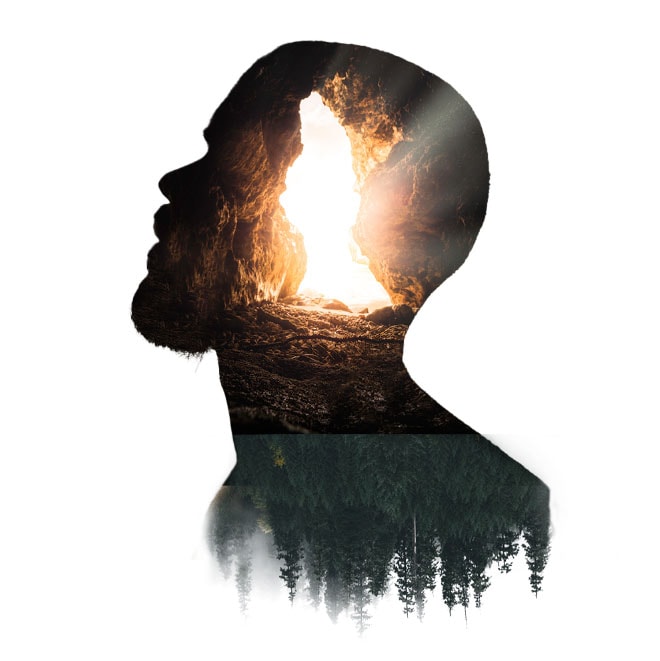
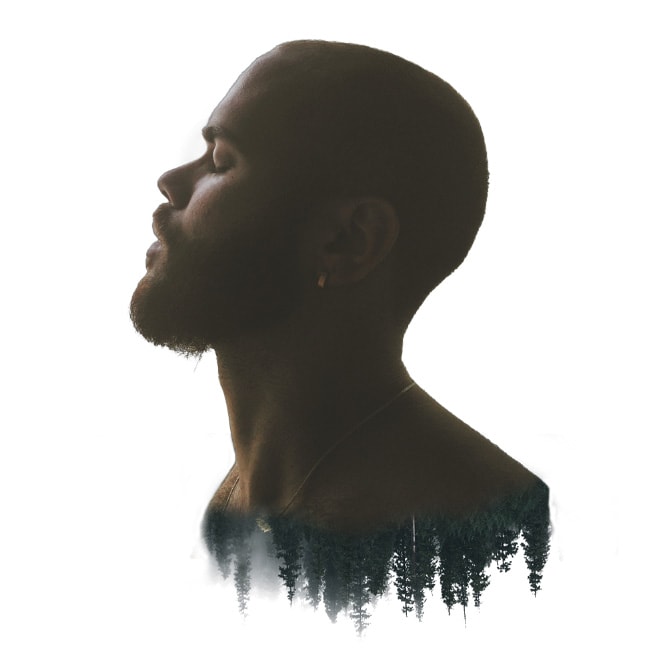
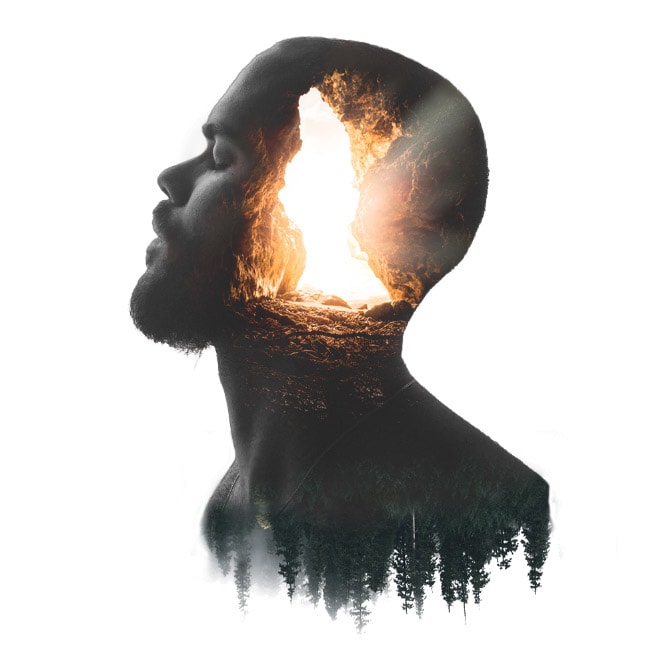
You can add as many adjustments as you like to edit your image how you want to and to create a unique double exposure effect with your photos. Here is how my image turned out after all my adjustments.