fbpx

How To Tie A Camera Strap (The Right Way)

good and bad camera strap tie

How To Tie A Camera Strap The Right Way

When you bought your camera there likely weren’t any clear instructions on how to tie your camera strap to your camera. Maybe you figured it out after a bit of finagling or just gave up altogether. Either way, you probably aren’t satisfied with how it was done, judging by the fact you are reading this post.

This post will teach you the best way to tie a camera strap so you can rest easy knowing that your camera is safe and secured. Best of all, this method tucks away any loose ends that can constantly poke you when taking photos. Let’s get tying!

Step 1: Make sure your camera strap is perfectly flat

how-to-tie-camera-strap

It’s important to make sure your camera strap is totally flat so there won’t be any awkward twists when you’re done. Either run the camera strap through your hands or lay it flat on a table to make sure. I’m using a Tarion Camera Strap that’s super affordable, comfortable and works the exact same as all manufacturer straps!

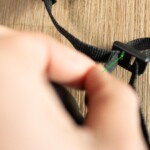
Step 2: Thread from the outside in

how-to-tie-camera-strap-2

Make sure to thread the camera strap from the outside of your camera’s tie point. This will help to keep a lower profile later.

Step 3: Thread the end through the upper part of the buckle

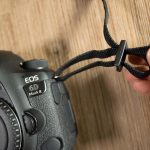
There are two slots on the buckle that your strap will run through. Push a bit through to give yourself room to work and thread the end through the upper slot. This will help to hide the loose ends later on.

Step 4: Thread the end through the bottom part of the buckle

how-to-tie-camera-strap-5

After you’ve threaded through the upper part, it’s time to finish the job. Tuck the end back down and through the bottom slow of your straps buckle.

Step 5: Pull through and adjust

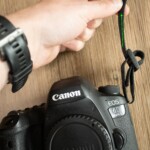
Pull the end of your strap through and adjust the length as necessary. It’s important to keep around an inch of tail at a minimum to make sure it doesn’t slowly come undone as your camera strap is weighted.

The Result

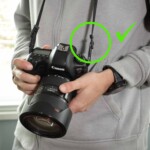
Using this method, you tuck away the loose ends and prevent them from poking you while you’re taking photos. By keeping around an inch of extra length through the buckle it gives more wiggle room if something slides loose over time. Once you’ve gone through these steps, of course, repeat the same on the other side.

If you enjoyed this easy photography tip then make sure to subscribe to my weekly newsletter for more photography tips and tutorials delivered straight to your inbox!


Article By

Brendan Williams

Hey, I'm Brendan! I'm a professional photographer and photo retoucher who has spent the majority of his career shooting or retouching outdoor lifestyle and social media campaigns for brands like G-Adventures, xoxo Bella, P&G, Fitbit, Chevy, Tourism California, and more. You can view my photography portfolio here.

These days I primarily focus my efforts on this site, creating guides and tutorials that I wish I had earlier in my career. Each week I publish new tutorials on Photography, Photoshop, Lightroom, and Canva to help you unlock new skills and bring your creativity to new levels! Everything you learn here is backed by real experience, so you can finally skip the fluff and focus only on what matters.

0 0 votes
Article Rating
Subscribe
Notify of
guest
0 Comments
Inline Feedbacks
View all comments

Continue Reading:

How To Whiten Teeth In Photoshop (2 Easy Ways)

Discover two surprisingly easy ways to whiten teeth in Photoshop with the help of a few beginner-friendly sliders.

How To Use Gradient Maps In Photoshop

Learn the ins and outs of how to use gradient maps in Photoshop to color grade your photos and transform your images for the better.

How To Make A Silhouette In Photoshop (2 Best Ways)

Here are two easy ways to make a silhouette in Photoshop. The first method creates a silhouette graphic, while the second in more realistic.

Adobe Lightroom System Requirements For Mac & PC

Here's a breakdown of the system requirements for Adobe Lightroom Classic and Lightroom CC to make sure it will run smoothly on your computer.

How To Add A Watermark In Lightroom Classic & CC

Learn how to add a text or graphic watermark to a photo in Lightroom Classic and Lightroom CC to protect your photos from theft.

How To Use Dehaze In Lightroom

Learn how to use dehaze in Lightroom along with five different ways you can use the dehaze tool to improve your images in Lightroom.

35+ Best Fonts For Logos In Canva

Here's a list of the best fonts for logos in Canva to help give you inspiration in your next logo design!

How To Create Curved Text In Canva

Learn how to quickly create curved text in Canva desktop and mobile with just a few clicks to spruce up any design!

35 Best Fonts For Teachers In Canva

Discover the best fonts for teachers in Canva to help with your next worksheet or presentation for your class!

The 9 Best SD Cards For Sony

Discover the best SD cards for Sony to find the most reliable and best valued memory cards for your photo and video needs.

The Best Canon Lens For Low Light (10 Top Picks)

Get a complete view of the best Canon lenses for low light photography and video along with tips to make the right buying decision.

Affinity Photo VS Photoshop – Which Should You Choose?

Let's take a deep look at the similarities and differences between Affinity Photo and Photoshop to see which program you should pick.