When Lightroom starts to run slower than it should, the lag can be incredibly frustrating. One of the solutions to remedying this issue is to clear your Lightroom cache.
The cache holds the previews and data for the images you load into Lightroom so that these can render faster the next time you open the software. However, this data can take up a lot of space and cause the reverse to happen – bogging Lightroom down! Luckily, clearing the cache is pretty easy.
Types Of Caches In Lightroom
Lightroom stores three distinct types of caches within its software: one that is associated with RAW images, the other one with video files, and the last associated with image previews.
Camera Raw Cache
Most photographers utilize RAW files, the original uncompressed version of a photograph. These photos are rather large in size, and rendering their preview will take a bit of time when first loaded into the program.
Once the preview is made, the data is stored in the Camera RAW Cache so that the next time the file is opened in the software, it’ll open efficiently. However, if hundreds upon hundreds of files are loaded into Lightroom, this cache will grow in size very quickly.
Video Cache
Although Lightroom is intended for photo editing, if a video file finds its way imported into the program, a Video Cache will form. This simply helps a video file play quickly in the program.
Preview Cache
Although this cache does the same thing fundamentally, the Preview Cache is different from the Camera RAW Cache because this cache stores previews for all of Lightroom’s image views (such as the grid view in the Library module, film strip in the Develop module, and more).
In the Preview Cache, you’ll find data for every kind of preview Lightroom produces, such as Smart Previews, regular Previews, 1:1 Previews, and more. The preview cache also stores previews for all photo file extensions, not just the RAW ones.
How To Clear The Cache In Lightroom
Lightroom makes clearing the cache just a matter of a few button clicks.
– Clearing The Camera RAW Cache
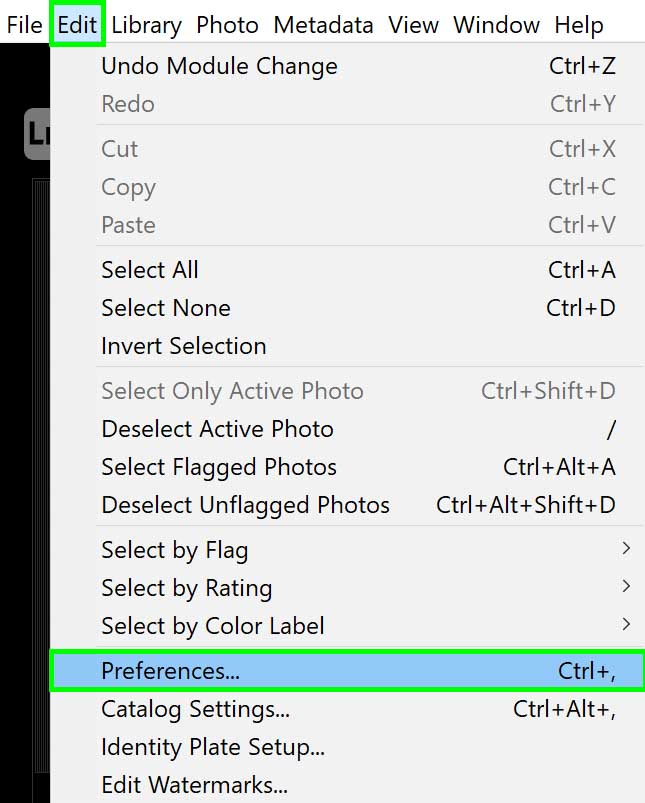
Step 1: Go To Edit > Preferences
After opening Lightroom, at the top of your screen, go to the Edit menu (for Windows) or Lightroom menu (for Mac). Scroll down the menu to Preferences.
You can also access Preferences by pressing Control + Plus (+) (Windows) or Command + Plus (+) (Mac).
Step 2: Open The Performance Tab
After pressing Preferences, in the new window that appears, press the Performance tab.
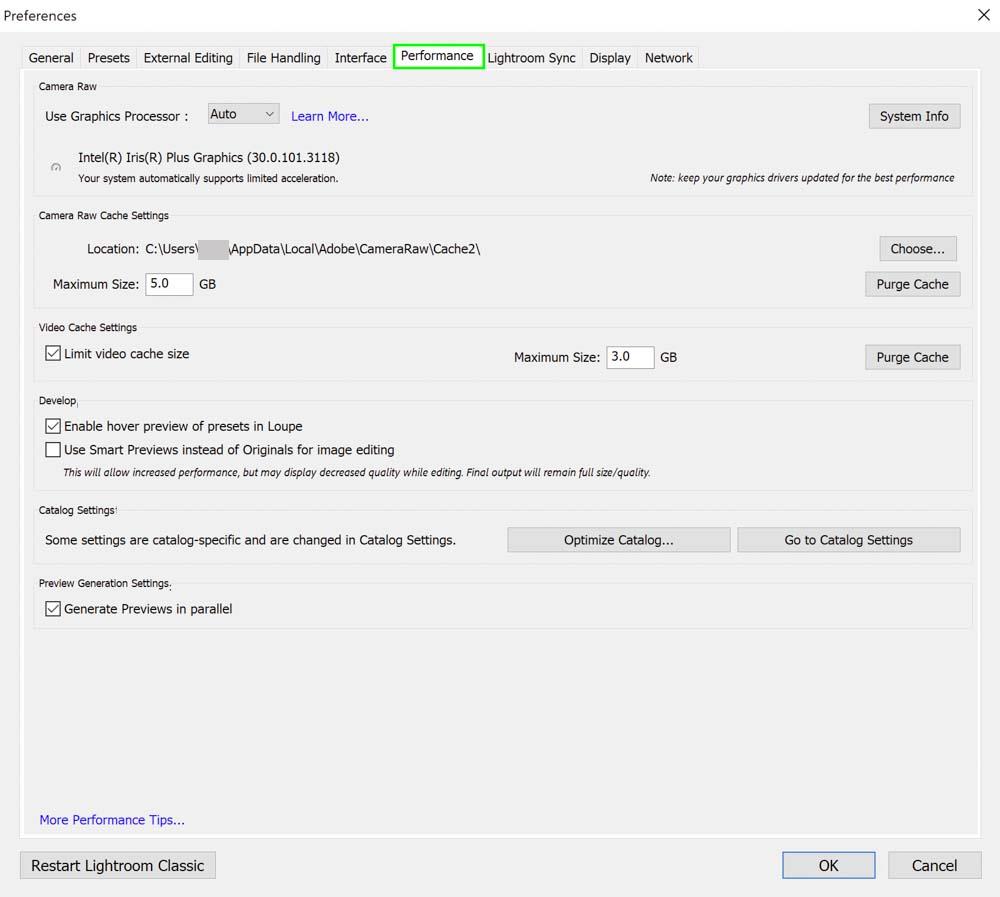
In this tab, you’ll find all of the settings responsible for your cache.
Step 3: Click Purge Cache
In the Performance tab, go to the Camera RAW Cache Settings section. From here, just press the Purge Cache button, and that’s it!
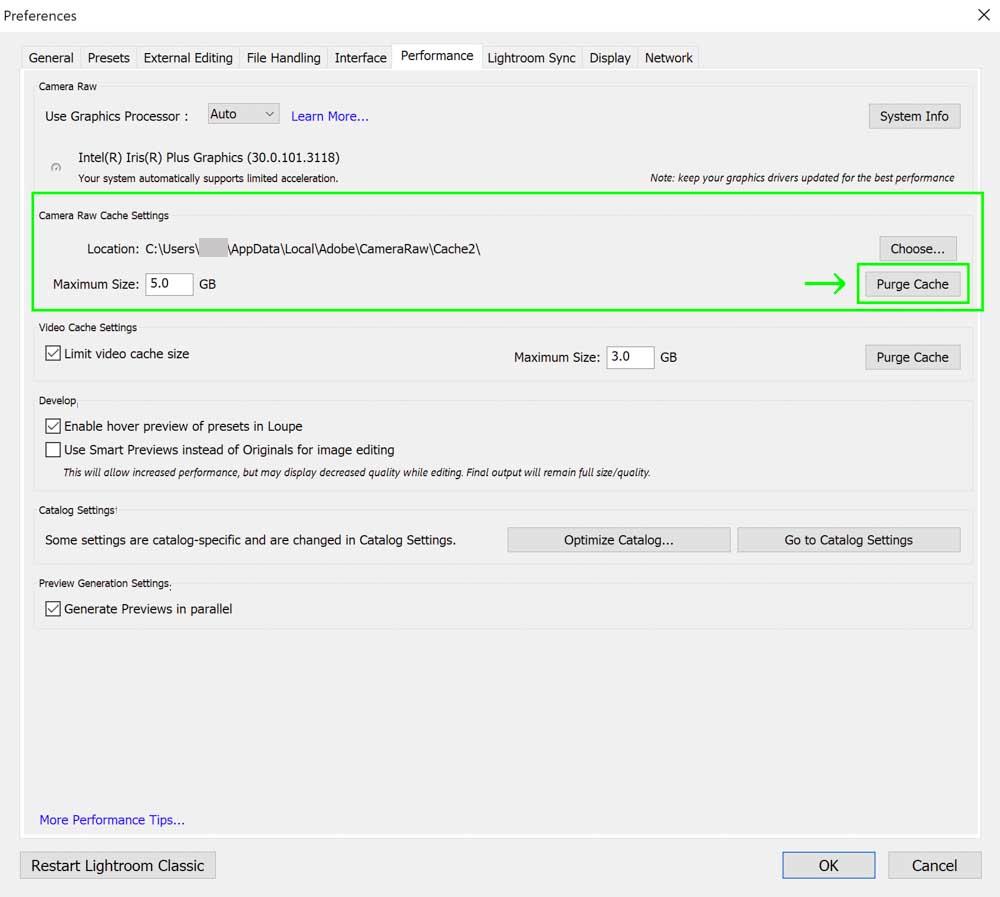
It’s also a good idea to check what your Maximum Size setting is at as well, to make sure you aren’t overloading your system. You can decrease this size if you need to. By default, it stays at 5 GB.
– Clearing The Video Cache
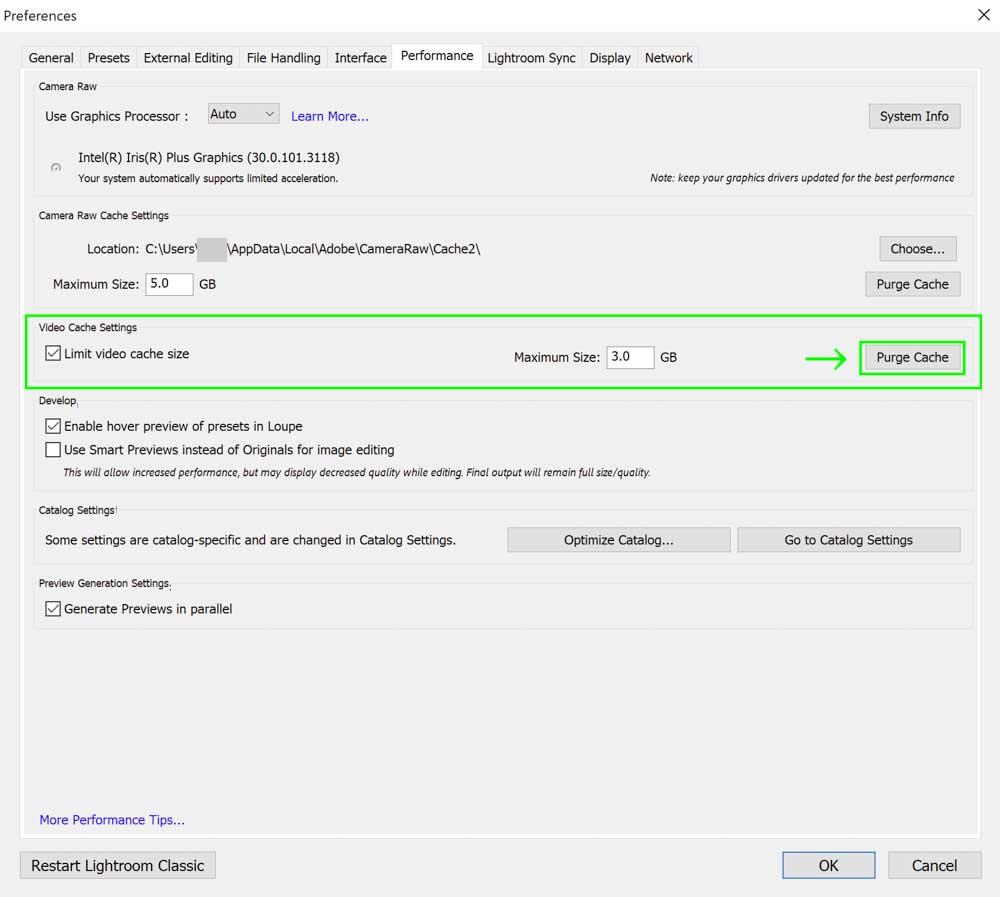
Clearing the video cache is the same as clearing the Camera RAW cache. After opening the Performance tab, go to the Video Cache Settings instead of the Camera RAW Cache Settings and press Purge Cache. There you go!
– Clearing The Preview Cache
For the Preview cache, it is important to note that clearing this cache while the program is open could cause your Lightroom program to crash, close itself, or restart. As such, make sure Lightroom is not open when clearing the Preview Cache.
That is because all of the image thumbnails you see in the program are dependent upon the preview cache. Every time you open Lightroom, a Preview Cache is created. When deleting the old one, you are essentially resetting the Preview Cache.
Step 1: Find The Preview Cache On Your Computer
The Preview Cache is not something you can delete in the program itself. Lightroom keeps the cache for Previews and Smart Previews as physical files on your computer. Caches for Smart previews are kept in a file called [Catalog name] Smart Previews.lrdata, and those for Lightroom’s previews are kept in [Catalog name] Previews.lrdata.
If you are a Windows user, you can find the above files here:
- C:\Users\[user name]\Pictures\Lightroom\Lightroom Catalog Previews.lrdata
- C:\Users\[user name]\Pictures\Lightroom\Lightroom Catalog Smart Previews.lrdata
For Mac users, the location is here:
- /Users/[username]/Pictures/Lightroom/Lightroom Catalog Previews.lrdata
- /Users/[user name]/Pictures/Lightroom/Lightroom Catalog Smart Previews.lrdata
Step 2: Delete The File(s)
Once the file(s) are found, just delete them. You can delete by pressing the Delete button on your keyboard or dragging the file(s) to the trash bin on your computer.
When To Clear Your Cache In Lightroom
For most Lightroom users, it isn’t standard practice to frequently clear the Lightroom cache. This is because the usage of a cache by programs is intended to boost the software’s performance… but sometimes, caches cause the opposite to happen.
Lightroom caches can take up a lot of space on your computer, especially if you never played around with the cache settings. If you are finding that Lightroom is moving along as slowly as a snail, you should clear your Lightroom cache. This is especially important for computers that are already low on space or for systems that aren’t very powerful.
Sometimes, the cache can cause bugs to appear that aren’t necessarily related to the speed of the program. If your Lightroom starts acting funky (such as the screen flickering, images not opening, or commands sticking), it’s a good idea to clear the cache and see if that was the cause of the glitches.
Bottom line: if Lightroom acts weird, it’s time to clear the cache! Clearing the cache is safe to do, as this won’t erase any of your settings, presets, or images currently in the program.
