


If you’re looking for a new aesthetic for your text-based design, the mirrored text effect is definitely one to try in Canva. Plus, you can create this effect without mastering complicated design software like Photoshop.
Although creating mirrored text is possible in Canva, it’s not as simple as in Photoshop. Creating this text effect is unnecessarily complicated in Canva’s current state, but as long as you follow each step below, you won’t have any issues. Plus, there are a few optional steps included that can help improve the mirrored effect.
How To Quickly Mirror Text In Canva
First off, there is no “mirror” option available in Canva, so you’ll need to apply the workaround detailed below. Also, you’ll need to have a Canva Pro account to complete this workaround.
Step 1: Add Some Text
The first step to mirroring text is to add some original text to your Canvas.

In the Side Panel, open the Text tab, click Add a Text Box (T) or choose one of the different sizes under Default Text Styles.
This will add a text block to your canvas.

Double-click the text block to add your message.


Step 2: Customize Text and Add Effects
Once you start the mirroring process, you won’t be able to adjust the mirrored text later (this will make sense later). So, you must adjust your original text exactly how you need it now rather than trying to do so later.
First, you can change the color of your text by first selecting it, then clicking the Text Color button in the options bar. This will open the Side Panel, where you can choose the color of your text.

To change the font, select your text and click the Font drop-down menu. In the Side Menu, choose the font that best matches your project.


Now is also the time to add any effects you need to as well.
First, select your text, then click the Effects button in the options bar.

In the Side Panel, choose the effect that works for you. For mirrored text, the Glow and Shadow effects work great, as they help your text stand out against the background.
You can also find the settings for each effect after clicking on them.


Step 3: Download Your Image As A PNG
In order to create the illusion of mirrored text, you first need to download your current text as a PNG.
But first, to make this process easier, make a copy of your canvas by clicking the Duplicate Page button. This will make an exact copy of your canvas below it.


Next, delete all the other elements on the page except for the text, including the background. You should only have the text you want to mirror visible on the page.

Once you’re ready, click the Share button in the top right corner of the Canva interface. Then, select Download.

In the Download Options Menu:
- Choose PNG under File Type. PNG is the only option that provides transparency when exported.
- Make sure Transparent Background is checked on.
- Under Select Pages, ensure that the correct page is selected.
Once the settings are correct, click Download.

Step 4: Import PNG Back Into Canva
Now that your duplicated text has been downloaded to your computer, it’s time to upload it to Canva.
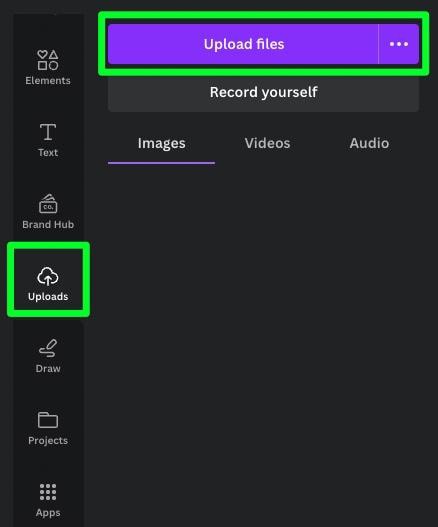
To do this, click Uploads in the Side Panel, then select Upload Files.
You’ll be prompted to locate the file on your hard drive, and once you do, you’ll find it in the Uploads section.

Click on the image, or drag it to the canvas.
Step 5: Resize And Flip The PNG
Now that the duplicated image is on your canvas, you must resize and flip it to complete the desired mirrored effect.
Canva makes resizing your PNG easy. First, move the image to one of the corners of the canvas, then use the opposite corner handle to stretch the image across the entire canvas.
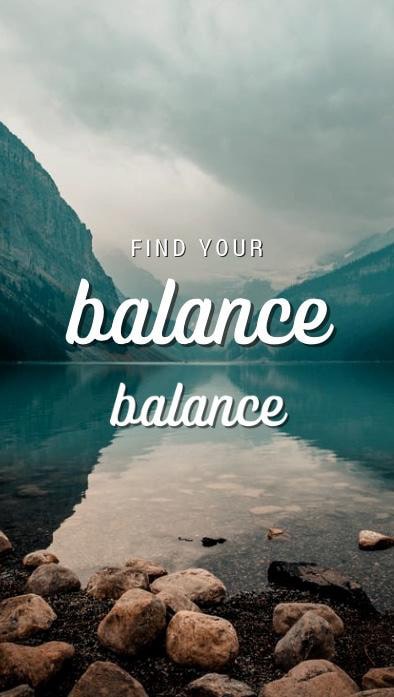
You’ll know when you’ve successfully done this when the purple bounding box covers the entire perimeter of the canvas and your duplicated text covers the original text completely.


With the duplicated image resized, you can now drag it to where you need it on your canvas. Hold Shift while you drag if you want to keep the duplicated copy parallel to the original.

Once your duplicated text is lined up, click Flip, then choose either Flip Horizontal or Flip Vertical.
The flipped image will most likely be out of place once you flip it, so you’ll have to drag it back into place.


Step 6: Adjust The Opacity (Optional)
If you need your mirrored text to blend into your background to create a more subtle feel, you can do so by lowering the image’s transparency.
To do this, select the image, then click the Transparency button in the options bar. Use the Transparency Slider until the duplicated image is blended how you need it.


Step 7: Add A Blur Effect (Optional)
In some cases, adding a blur effect to the duplicated image will help sell the effect you’re going for.
To add a blur effect to your duplicated text, select it, then click Edit Image.

In the Side Panel, click See All in the Adjust section.

Use the Blur Slider to apply the effect. The main thing to remember with this slider is that you don’t have to increase it that much. Increasing the slider between 2 – 5 is usually enough for a subtle effect.


Step 8: Export Your Final Image
Once your image is finished, you just need to export it. This process is similar to an early step, but there’s one setting that’s different that you must pay attention to.
First, click the Share button in the top right corner of the Canva interface, then select Download in the menu that drops down.


In the Download options menu:
To get the best quality out of the final exported image, choose PNG in the File Type drop-down menu. You can also select JPG if you need to save space.
Make sure Transparent Background is ticked off so that the background remains.
Select the correct page under Select Pages.
Click Download to export your final image to your computer.

