
Photoshop is a fully customizable software filled with preferences you can adjust to your liking. As such, knowing how to reset, backup, and restore your Photoshop preferences can become a pretty important knowledge set, especially after spending a significant amount of time tweaking your workflow.
The easiest way to reset your Photoshop preferences is to press Control + Alt + Shift (Win) or Command + Option + Shift (Mac) while opening Photoshop. A prompt will appear asking to delete the Photoshop Settings File. Click Yes, and your preferences will be reset.
Unlike many editing software, the preferences you set in Photoshop manifest themselves as an actual file folder in the program files. The changes you make to preferences are automatically saved into this folder every time you close the program. As such, you are working on an actual file when resetting, backing up, and restoring your Photoshop Preferences.
3 Ways To Reset Photoshop Preferences
There are many reasons why you may need to reset your preferences. If something isn’t correctly working in your program, resetting the preferences and starting over is a great option. Or, sometimes, you messed around with the options so much that you can’t quite find a way back. Luckily, you have three different ways of doing that.
Option 1: Using A Keyboard Shortcut On Open
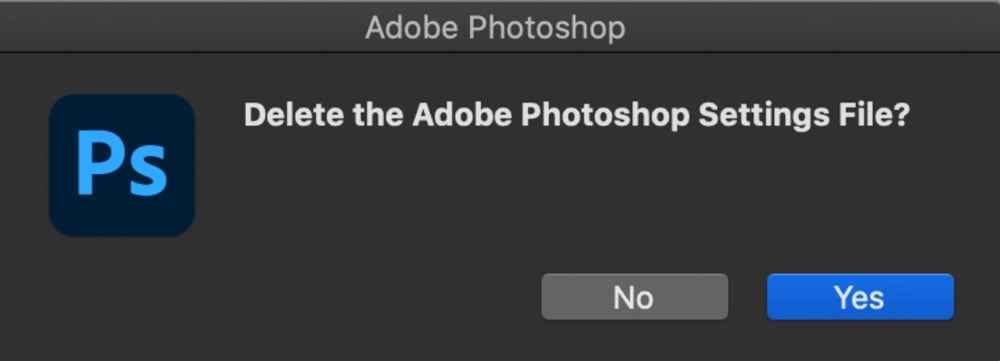
If you’ve ever played older video games, you might be familiar with using special keys to input a cheat code upon launching. This is kind of like that. Hold down either Control + Alt + Shift (Win) or Command + Option + Shift (Mac) while launching Adobe Photoshop.
Once Photoshop opens, you’ll get a message popping up inquiring whether you want to delete your Settings File or not. Click Yes to reset the preferences.
A new folder will form in place of the old one, so you can start re-doing your preferences and be assured that they will save safely.
Option 2: Using The Preferences Window
You can also use the Preferences Window itself to reset your settings. To access your Preferences window, click Edit > Preferences > General (Win) or Photoshop > Preferences > General (Mac).
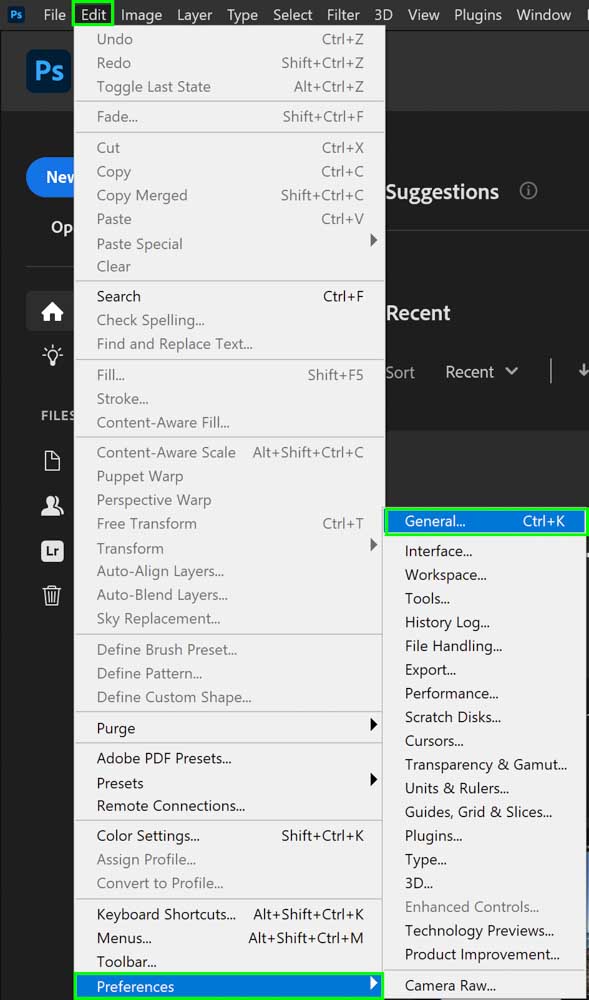
You can also shortcut access this window with Control + K (Win) or Command + K (Mac).
Once the Preferences window appears, click Reset Preferences On Quit, select OK, and then close the program.
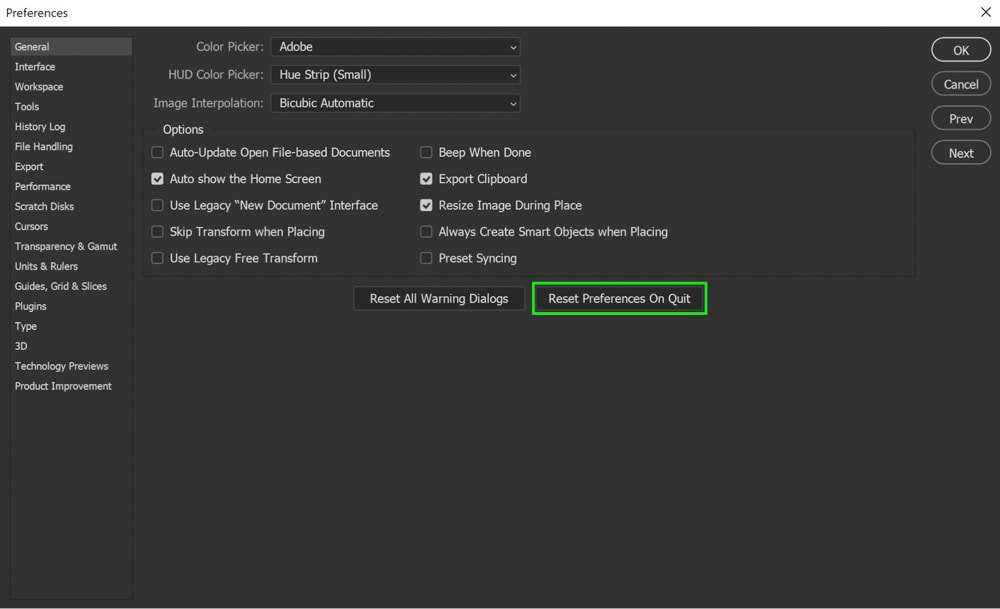
When you open Photoshop once more, your preferences are fully reset.
Option 3: Manually Resetting Your Preferences
Lastly, you can manually reset your preferences by deleting the folder they are saved in. As mentioned earlier, Photoshop Preferences exist as a tangible file folder. You can find the folder housing all of your preferences in the program files on your computer. The most common pathway to finding them are the following:
Windows users (Windows 10 and newer): Users > [user name] > AppData > Roaming > Adobe > Adobe Photoshop [version] > Adobe Photoshop [version] Settings.
Mac users: Users > [user name] > Library > Preferences > Adobe Photoshop [version] Settings.

If your Photoshop Preferences aren’t located in the above paths, you can manually find them. Locate where your Photoshop program files live on your computer and dig into those files. You will find the folder titled Adobe Photoshop [version] Settings there. When searching around, ensure you don’t accidentally delete anything else (as these folders are responsible for allowing the program to run correctly).
To manually delete your preferences, highlight the Adobe Photoshop [version] Settings folder and simply delete it. Click Delete on your keyboard, drag it to the trash can, or drag it out to your Desktop or a different folder. Wherever you put it, just make sure it isn’t where it was.
When you reopen Photoshop, it will create a new version of the settings folder with the default options.
How To Backup Your Photoshop Preferences
Like your photography files, it’s a good idea to have backups of things that are important to you. Photoshop Preferences can be a hassle to re-do if you change computer systems frequently or have previously been a victim of a bad computer crash. Plus, if you use multiple computers for your photography work, ensuring the Preferences are the same on all devices is a huge help.
As mentioned directly above, locate the Photoshop settings folder.
Windows users (Windows 10 and newer): Users > [user name] > AppData > Roaming > Adobe > Adobe Photoshop [version] > Adobe Photoshop [version] Settings.
Mac users: Users > [user name] > Library > Preferences > Adobe Photoshop [version] Settings.
Once you find the folder, simply Copy and Paste this folder into a safe location. I suggest backing the folder up on a cloud-based service such as Google Drive or Dropbox, as well as on a physical hard drive. You can never have too many copies.
With this, you can go ahead and move the Preferences between computers or keep them for safekeeping should a crash occur.
How To Restore Your Photoshop Preferences
You can also restore your Photoshop Preferences should you find a need to do so (typically by accidentally resetting the preferences!). Or, if you find that your program is acting up, part of troubleshooting is restoring the preferences that worked previously.
First, ensure you have access to the backed-up Photoshop Preferences you plan on using, whether in cloud storage or a hard drive. Have that preference folder at the ready.
Next, locate your Adobe Photoshop [version] Settings folder once more in the program files, just like if you were to back them up.
Now, you’re going to move that folder from where it is located. You can move it to your desktop or delete it if you wish to, but the point is that you need to get it out of the program files.
Once you’ve moved the Photoshop Settings folder, select the desired backed-up version of the Photoshop Settings folder (that you should have at the ready) and place it in the same place where the original folder was.
Note: Make sure the files go exactly where the previous ones were; otherwise, Photoshop will create a new settings folder with the program’s default settings.
With so many methods of handling Photoshop Preferences at the ready, you can be assured that your customizations are safe and sound.


